Table of Contents
Advertisement
Available languages
Available languages
Quick Links
Version: 2023.05
All the rights to this manual are reserved, especially reproduction, publication and translation rights. No portion of this manual may
be reproduced by no means (photocopy, microfilm or other methods) without previous written authorization from ECLERIS. Neither
can it be reproduced, multiplied or published through any electronic data processing form.
The information contained in this manual may be modified or broaden without previous notification, without it representing any
responsibility to ECLERIS.
USER MANUAL
MICROSTAR SERIE C-200
INFORMATION ABOUT THIS MANUAL
Year: 2023
ECLERIS USA
11801 NW 100th Rd
Suite 17
Medley, FL 33178, U.S.A.
Phone: +1 786 483 7490
COLPOSCOPE
Language: English
CMC Medical Devices & Drugs
S.L.
C/ Horacio Lengo Nº18, CP29006,
Málaga, Spain
Ph. +34951214054
Email:
info@cmcmedicaldevices.com
Advertisement
Chapters
Table of Contents

Related Manuals for Ecleris MICROSTAR C-200 Series


Summary of Contents for Ecleris MICROSTAR C-200 Series
- Page 1 All the rights to this manual are reserved, especially reproduction, publication and translation rights. No portion of this manual may be reproduced by no means (photocopy, microfilm or other methods) without previous written authorization from ECLERIS. Neither can it be reproduced, multiplied or published through any electronic data processing form.
-
Page 2: Table Of Contents
USER MANUAL / MANUAL DE USUARIO – MICROSTAR TABLE OF CONTENT SYMBOLS ..........................4 SAFETY INFORMATION ......................5 WARNINGS .......................... 5 DESCRIPTION......................... 6 INTENDED USE ........................6 INTENDED USER ........................ 6 DESCRIPTION AND COMPONENTS .................. 7 3.3.1 FLOOR STAND COLPOSCOPE (C-200F) ..............7 3.3.2 WALL MOUNT COLPOSCOPE (C-200W) .............. - Page 3 USER MANUAL / MANUAL DE USUARIO – MICROSTAR FOREARM MOVEMENT ....................27 PANTOGRAPHIC ARM MOVEMENT ................. 27 ROTATION OF THE OPTICAL HEAD ................28 OPTICAL HEAD ROTATION AXIS ..................29 OPTICAL HEAD TILT ......................29 COLPOSCOPE TRANSPORTATION ................. 30 MAINTENANCE ........................30 CLEANING .........................
-
Page 4: Symbols
USER MANUAL / MANUAL DE USUARIO – MICROSTAR 1. SYMBOLS Warning CE Mark Caution This side up Read the related documentation Fuse Alternate current Video output AC input Protective earth (Ground) AC output Equipotential bonding Manufacturer identification Freeze image function (Name, Address) Serial number Video camera... -
Page 5: Safety Information
2.1 WARNINGS It is important to read this manual carefully before using the Microstar Colposcope. ECLERIS will not be held responsible for damage that can occur to the device due to not following the instructions or not observing the following criteria: ... -
Page 6: Description
Microstar Colposcope and the other equipment to minimize these effects. Do not open the equipment. Maintenance and repairs must be done by ECLERIS or an authorized company. ECLERIS will not be responsible for the consequences of repairs or maintenance carried out by unauthorized personnel. -
Page 7: Description And Components
USER MANUAL / MANUAL DE USUARIO – MICROSTAR 3.3 DESCRIPTION AND COMPONENTS This user manual describes the recommended procedures in order to install and use the Ecleris Microstar C-200 Colposcope. The user manual contains all the information about care and properly handling of the colposcope. -
Page 8: Wall Mount Colposcope (C-200W)
USER MANUAL / MANUAL DE USUARIO – MICROSTAR 3.3.2 WALL MOUNT COLPOSCOPE (C-200W) 1. Wall-mount support 6. Progressive brake 2. Progressive brake 7. Optical head/arm attach 3. Forearm 8. Optical head 4. Arm 9. HD beam splitter 5. Lock brake 10. -
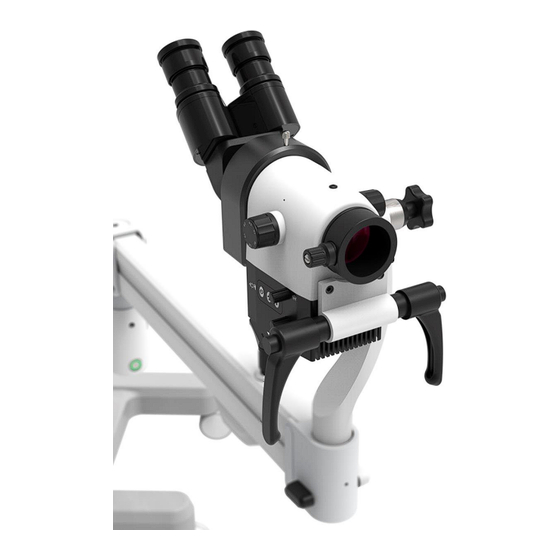
Page 9: Optical Head
USER MANUAL / MANUAL DE USUARIO – MICROSTAR 3. Progressive brake 9. Arm 4. Forearm 10. Binocular 5. Progressive brake 11. HD beam splitter 6. Lock brake 12. Optical head 3.3.4 OPTICAL HEAD Components: 1. Magnification changer 5. Light intensity (Decrease) 2. -
Page 10: Column Installation
USER MANUAL / MANUAL DE USUARIO – MICROSTAR A wrench should be used to tighten the wheel bolts solidly to the base of the colposcope. The bricks should be now put back in place, as well as the plastic cover. 4.1.1.2 COLUMN INSTALLATION Put the column in the central axis of the base as indicated in the following figure:... - Page 11 USER MANUAL / MANUAL DE USUARIO – MICROSTAR Tighten the set screw with an Allen wrench. The column has to be mounted in the right position, making sure the edge mounted to the base is the inferior end of the column, as indicated in the following figure: Column Top Column Bottom Page 11 of 74...
-
Page 12: Forearm-Column Installation
USER MANUAL / MANUAL DE USUARIO – MICROSTAR 4.1.1.3 FOREARM-COLUMN INSTALLATION Place the forearm on top of the column, and then tighten the screw in order to solidly attach the forearm to the column. 4.1.2 WALL-STAND (C-200W) Before installing the Wall-support, determine the appropriate height for its fixing and the correct leveling. - Page 13 Check that the leveling is correct before drilling the wall. 6) The wall-mount should remain firmly. ECLERIS is not responsible for any physical or equipment damage that may occur due to the incorrect fixation of the wall-mount. 7) Loosen the Allen screws from the forearm-attach-piece of the wall-mount using the supplied 3/16’’...
-
Page 14: Gynecological Chair-Stand (C-200T)
USER MANUAL / MANUAL DE USUARIO – MICROSTAR 8) Place the microscope forearm as is shown in the picture. You must achieve a perfect fit to the support. Tighten the support screw up to the wall-mount with the supplied 3/16’’ Allen key. Finally check the microscope is properly installed by rotating the forearm around the support, on both directions, until the limit point. - Page 15 2) Tighten the bracket screw with the 3/16” Allen key. Check its correct fixation, the stand must provide a stable and firm grip. ECLERIS is not responsible for any physical or equipment damage that may occur due to the incorrect fixation of the gyn chair -stand.
-
Page 16: Optical Head To Arm Connection
USER MANUAL / MANUAL DE USUARIO – MICROSTAR 4) Follow the steps in section 4.2 for optical head, binocular and eyepiece installation 4.2 OPTICAL HEAD TO ARM CONNECTION The optical head is mounted to the arm as shown in the picture below. Place the fine washer (A) on the colposcope arm. - Page 17 USER MANUAL / MANUAL DE USUARIO – MICROSTAR Optical head Fine washer (A) Progressive brake (G) From the bottom of the arm, place the thick washer (B) and then the clamping screw (C). (See following picture) Thick washer (B) Clamping screw (C) Adjust the camping crew (C) completely.
- Page 18 USER MANUAL / MANUAL DE USUARIO – MICROSTAR Adjust the tensor screw (D) on the center of the clamping screw to the maximum using a corre- sponding Allen key (See following picture). Tensor screw (D) Now place the embellishing screw (E) and adjust completely as the following picture. Page 18 of 74 INMANUUML021 USER MANUALM.
-
Page 19: Binocular-Splitter Installation
USER MANUAL / MANUAL DE USUARIO – MICROSTAR Embellishing screw (E) Finally, adjust the security screw (F). Security screw (F) It is important to adjust the optical head to the arm exactly according to the instructios on this section, in order to stabelly install the device and prevent damage. 4.3 BINOCULAR-SPLITTER INSTALLATION Either a binocular and a splitter, or just a binocular can be mounted on the upper side of the head. - Page 20 USER MANUAL / MANUAL DE USUARIO – MICROSTAR If the colposcope has a splitter, mount it first on the optical head, and then mount the binocular on top. In both cases the adjustment screw must be released to engage the parts, and then tightened.
-
Page 21: Video Cables Installation
USER MANUAL / MANUAL DE USUARIO – MICROSTAR 4.4 VIDEO CABLES INSTALLATION The splitter and the optical head with integrated light have specific power and video connectors for normal operation. Once the splitter is mounted to the head, proceed to install the video and power cables. -
Page 22: Operation - Functions
USER MANUAL / MANUAL DE USUARIO – MICROSTAR 5. OPERATION - FUNCTIONS 5.1 COLPOSCOPE OPERATION This section describes the equipment functioning procedure. The device shall only be operated by trained personnel. 1) Connect the power supply cable to the colposcope and then to the mains. 2) Press the power switch on the forearm to turn the unit on (the green indicator light will turn on). -
Page 23: Connections
USER MANUAL / MANUAL DE USUARIO – MICROSTAR 5.2 CONNECTIONS A display monitor can be connected to the HDMI output located inside the Microstar Colposcope forearm. The forearm cover must be removed to access the connectors. 5.2.1 FOREARM 1. 100 VA auxiliary power output (monitor connection) -
Page 24: Light Source
USER MANUAL / MANUAL DE USUARIO – MICROSTAR 5.3 LIGHT SOURCE The Ecleris Microstar C-200 Colposcope has a light module integrated to the colposcope’s head. From this module you can turn the light on or off, vary its intensity, select different diaphragm levels to reduce the illuminated field and select different light filters. -
Page 25: Magnification Variation
USER MANUAL / MANUAL DE USUARIO – MICROSTAR 5.6 MAGNIFICATION VARIATION The magnification changer has six positions: 4/6/10/16/25x. The 10x position is repeated in the selector. The mark on the head (red dot adjacent to the magnification selector) will indicate the selected magnification. -
Page 26: Wall-Stand (C-200W)
USER MANUAL / MANUAL DE USUARIO – MICROSTAR 6.2 WALL-STAND (C-200W) The wall colposcope (C-200W) is mounted on a bracket attached to the wall through fixing screws. The microscope has joints and movements to set the optimum work position. 6.3 GYNECOLOGICAL CHAIR – STAND (C-200T) The gynecology chair colposcope (C-200T) is attached to the gynecology chair by an adjustable bracket that keeps it stable Page 26 of 74... -
Page 27: Forearm Movement
USER MANUAL / MANUAL DE USUARIO – MICROSTAR The colposcope has joints and movements to set the optimal working position. 6.4 FOREARM MOVEMENT The forearm can rotate 320° related to the column axis, and it has stops to avoid the accumulation of turns and winding of the cables. -
Page 28: Rotation Of The Optical Head
USER MANUAL / MANUAL DE USUARIO – MICROSTAR 6.6 ROTATION OF THE OPTICAL HEAD The colposcope has an elbow that positions the head at a fixed angle in relation to the arm. Movement can be totally blocked using the adjustment control command. If this command is completely loosened, the head can freely rotate on its axis. -
Page 29: Optical Head Rotation Axis
USER MANUAL / MANUAL DE USUARIO – MICROSTAR 6.7 OPTICAL HEAD ROTATION AXIS For a better alignment of the optical axis in relation with the target, the head can be rotated on the fork. The rotational range is 0-360 degrees. The movement can be adjusted or completely locked using the control knob. -
Page 30: Colposcope Transportation
USER MANUAL / MANUAL DE USUARIO – MICROSTAR 6.9 COLPOSCOPE TRANSPORTATION The Ecleris Microstar C-200 Colposcope has been designed to be moved over short distances within a doctor’s office or room. If it is necessary to move the colposcope over larger distances, special attention should be paid to the following cautions: ... -
Page 31: Cleaning
Spare parts: to avoid loss of time, and an inoperative colposcope, it is recommended to have spare fuses (See Technical specifications). Any maintenance or service required must be done by an authorized local distributor or the nearest ECLERIS office. 7.1 CLEANING Before cleaning the colposcope, disconnect the power supply cable from the mains. - Page 32 USER MANUAL / MANUAL DE USUARIO – MICROSTAR Always disconnect the power cord from the electrical network while changing the fuses. 1) Disconnect the power cord from the electrical network 2) Remove the forearm access cover to reach the fuse housing. 3) Under de power cord connector there is a small rectangular plastic holder where the fuses are located.
-
Page 33: Technical Specifications
USER MANUAL / MANUAL DE USUARIO – MICROSTAR 8. TECHNICAL SPECIFICATIONS MICROSTAR C-200 COLPOSCOPE OPTICAL SYSTEM Composed of apochromatic lenses with a fungus-resistant coating BINOCULAR TUBES 45º inclined / straight / 180° inclinable OBJECTIVE LENS f: 300 (200/250/400 optional). MAGNIFICATIONS Apochromatic five steps magnification changer through a click-stop revolving mechanism FINE FOCUS... - Page 34 USER MANUAL / MANUAL DE USUARIO – MICROSTAR NOT SUITABLE FOR USE IN AN OXYGEN RICH ENVIROMENT PANTOGRAPHIC ARM TYPE Neumatic Balance System ROTATION MOVEMENTS Proximal and distal rolling bearings system CONEXIONES DC Plug 12Vcc (4 Acc) (connection to HD Splitter and Head) HDMI (connection to HD Splitter) USB 5V-2,4ª...
-
Page 35: Troubleshooting
If the problem cannot be solved, please contact your local distributor or the closet ECLERIS office and request technical service. TECHNICAL SERVICE The Ecleris Microstar C-200 Colposcope must be repaired and/or maintained exclusively by authorized ECLERIS Technical services. -
Page 36: Warranty
Problem´s description 4) Send the Colposcope for repair or replacement. The ECLERIS Microstar C-200 Colposcope shall be sent in its original Packaging so that it is not damaged during transportation. ECLERIS shall not be liable for damages that may occur during transportation, caused by deficient packaging. - Page 37 La información contenida en este manual puede ser modificada o ampliada sin notificación previa, sin que ello represente responsabilidad alguna para ECLERIS. ECLERIS USA CMC Medical Devices &...
-
Page 38: Tabla De Contenido
USER MANUAL / MANUAL DE USUARIO – MICROSTAR TABLA DE CONTENIDO TABLA DE CONTENIDO ....................... 38 SIMBOLOGIA ........................40 INFORMACION DE SEGURIDAD ..................40 ADVERTENCIAS ........................ 41 DESCRIPCION ........................42 USO PREVISTO ......................... 42 USUARIO PREVISTO ......................42 DESCRIPCION Y COMPONENTES ................... 42 3.3.1 COLPOSCOPIO CON ESTATIVO DE PIE (C-200F) ............ - Page 39 USER MANUAL / MANUAL DE USUARIO – MICROSTAR ESTATIVO DE CAMILLA (C-200T) ..................63 MOVIMIENTO DEL ANTEBRAZO ..................64 MOVIMIENTO DEL BRAZO PARALELOGRAMO .............. 64 MOVIMIENTO ROTACIONAL DEL CABEZAL..............65 MOVIMIENTO DE GIRO DEL CABEZAL OPTICO ............. 66 MOVIMIENTO DE INCLINACION DEL CABEZAL OPTICO ..........67 TRANSPORTE DEL COLPOSCOPIO ................
-
Page 40: Simbologia
USER MANUAL / MANUAL DE USUARIO – MICROSTAR 1. SIMBOLOGIA Advertencia Marcado CE Precaución Arriba Es obligatorio consultar los Fusible documentos acompañantes Tensión alterna Salida de Video Entrada AC Puesta a Tierra de Protección Salida AC Tierra de Equipotencialidad Identificación del fabricante Congelar Imagen (Nombre, Dirección) Número de serie... -
Page 41: Advertencias
Lea cuidadosamente todo el manual antes de utilizar el dispositivo. Ante cualquier duda sobre el contenido de este manual, la utilización o seguridad del dispositivo, solicitamos comunicarse con su distribuidor local o con la oficina de ECLERIS más cercana. 2.1 ADVERTENCIAS Es importante leer cuidadosamente este manual antes de utilizar el Colposcopio Microstar. -
Page 42: Descripcion
No abra el equipo. El mantenimiento y las reparaciones deben ser realizados por ECLERIS o una empresa autorizada por ésta. ECLERIS no se responsabiliza por las consecuencias de reparaciones o mantenimientos efectuados por personas no autorizadas. -
Page 43: Colposcopio Con Estativo De Pie (C-200F)
USER MANUAL / MANUAL DE USUARIO – MICROSTAR Divisor HD (divisor de haz de luz con video cámara full HD integrada) Cable especial que contiene 1 ficha HDMI macho para conectar al sistema de video, y 2 fichas de alimentación DC-PLUG para alimentar el sistema de video y la luz integrada. El equipo puede ser instalado en una base móvil, montaje con estativo de pared o montado en un estativo de mesa ginecológica. -
Page 44: Colposcopio Con Estativo De Pared (C-200W)
USER MANUAL / MANUAL DE USUARIO – MICROSTAR 3.3.2 COLPOSCOPIO CON ESTATIVO DE PARED (C-200W) 1. Soporte para pared 6. Freno progresivo 2. Freno progresivo 7. Acople brazo / cabezal 3. Antebrazo 8. Cabezal óptico 4. Brazo pantográfico 9. Divisor de imagen HD 5. -
Page 45: Cabezal Optico
USER MANUAL / MANUAL DE USUARIO – MICROSTAR 1. Fijación soporte/camilla 7. Freno progresivo 2. Acople antebrazo 8. Acople brazo/ cabezal 3. Freno progresivo 9. Brazo pantografico 4. Antebrazo 10. Binocular 5. Freno progresivo 11. Divisor de imagen HD 6. Freno de bloque 12. -
Page 46: Instalacion Y Puesta En Marcha
1. Selector de nivel Magnificador 5. Decrementar Intensidad de luz 2. Ajuste microenfoque 6. Incrementar Intensidad de luz 3. Selector de filtro 7. Encendido/Apagado de Luz 4. Diafragma 4. INSTALACION Y PUESTA EN MARCHA 4.1 INSTALACION DE ESTATIVO 4.1.1 ESTATIVO DE PISO (C-200F) 4.1.1.1 INSTALACION DE BASE MOVIBLE Para ensamblar la base del colposcopio se deben colocar 4 ruedas y 4 contrapesos. -
Page 47: Instalacion De La Columna
USER MANUAL / MANUAL DE USUARIO – MICROSTAR 4.1.1.2 INSTALACION DE LA COLUMNA Para instalar la columna se debe colocar la misma sobre el eje central de la base como indica la siguiente figura: Página 47 de 74 INMANUUML021 USER MANUALM. USO C-200 V.2023.05 ENGESP US... -
Page 48: Instalacion Del Antebrazo A La Columna
USER MANUAL / MANUAL DE USUARIO – MICROSTAR Ajustar el tornillo de fijación con una llave Allen. La columna tiene que ser montada en la posición correcta, asegúrese que se monta la columna a la base por la parte inferior, como se indica en la siguiente figura: Columna Parte Superior Columna Parte Inferior 4.1.1.3... -
Page 49: Estativo De Pared (C-200W)
USER MANUAL / MANUAL DE USUARIO – MICROSTAR 4.1.2 ESTATIVO DE PARED (C-200W) Antes de proceder a la instalación del estativo de pared, debe determinar la altura adecuada para su fijación y la correcta nivelación. El estativo de pared deberá colocarse únicamente en paredes de alta resistencia. No se lo debe instalar en paredes de ladrillo hueco o de espesores menores a 15 cm, placas de yeso, tabiques de madera o cualquier otro material de baja resistencia. - Page 50 Antes de perforar la pared verifique que la nivelación sea correcta 6) El estativo de pared debe permanecer firme. ECLERIS no es responsable por los daños físicos y/o materiales que pudieran ocurrir debido a la incorrecta fijación del estativo a la pared.
-
Page 51: Estativo De Camilla (C-200T)
USER MANUAL / MANUAL DE USUARIO – MICROSTAR 9) En el conector superior del soporte de pared conecte uno de los cables de alimentación des- de la fuente de iluminación. Para lograr una mejor visualización de las conexiones eléctricas, se muestra al estativo de pared sin el antebrazo. -
Page 52: Instalacion De Cabezal Optico A Brazo
USER MANUAL / MANUAL DE USUARIO – MICROSTAR ECLERIS no es responsable por los daños físicos y/o materiales que pudieran ocurrir debido a la incorrecta fijación del estativo a la pared. 3) Ubique el antebrazo del colposcopio como se muestra en la figura. Debe obtenerse un calce perfecto con el soporte. - Page 53 USER MANUAL / MANUAL DE USUARIO – MICROSTAR Coloque la arandela fina (A) sobre el brazo del colposcopio. Desajuste el freno progresivo (G) colocándolo al mínimo nivel. Coloque el cabezal en el bazo. Cabeza Arandela fina (A) Freno Progresivo (G) Página 53 de 74 INMANUUML021 USER MANUALM.
- Page 54 USER MANUAL / MANUAL DE USUARIO – MICROSTAR Por la parte inferior del brazo coloque la arandela gruesa (B) y seguido a esta el tornillo de su- jeción (C). Arandela gruesa (B) Tornillo sujeción (C) Ajuste el tornillo de sujeción (C) completamente. Cuando este al máximo, desajuste el mismo media vuelta.
- Page 55 USER MANUAL / MANUAL DE USUARIO – MICROSTAR Tornillo tensor (D) Coloque el tornillo embellecedor (E) y ajústelo completamente (Ver imagen a continuación) Tornillo embellecedor (E) Finalmente ajustara el tornillo de seguridad (F), también hasta su máximo. Página 55 de 74 INMANUUML021 USER MANUALM.
-
Page 56: Instalacion Del Binocular-Sistema De Video
USER MANUAL / MANUAL DE USUARIO – MICROSTAR Tornillo seguridad (F) Es importante que ajuste el cabezal al brazo exactamente según estas instrucciones para que el equipo permanezca estable y con movilidad adecuada y evitar daños. 4.3 INSTALACION DEL BINOCULAR-SISTEMA DE VIDEO En la parte superior del cabezal se puede instalar un binocular, o bien incluir un divisor HD además del binocular. -
Page 57: Instalacion Cables De Video
USER MANUAL / MANUAL DE USUARIO – MICROSTAR Si quiere utilizar el colposcopio utilizando un sistema de video, móntelo sobre el cabezal y luego el binocular sobre este último. En ambos casos el tornillo de ajuste debe ser liberado para encastrar las partes y luego ajustado. - Page 58 USER MANUAL / MANUAL DE USUARIO – MICROSTAR El paquete de cables contiene 1 ficha HDMI macho para conectar al sistema de video, y 2 fichas de alimentación DC-PLUG para alimentar el sistema de video y la luz integrada. Uno de los cables de alimentación es levemente más largo, este cable debe ser conectado al sistema de luz.
-
Page 59: Operación - Funciones
USER MANUAL / MANUAL DE USUARIO – MICROSTAR 5. OPERACIÓN – FUNCIONES 5.1 OPERACIÓN DEL COLPOSCOPIO En esta sección se detalla el funcionamiento del equipo. Este equipo debe ser operado sólo por personal entrenado 1) Conecte el cable de alimentación al colposcopio y luego a la red eléctrica. 2) Encienda la unidad presionando el interruptor de encendido que se encuentra en el antebrazo (se encenderá... -
Page 60: Antebrazo
5.3 FUENTE DE ILUMINACION El Colposcopio Ecleris Microstar C-200 dispone de un módulo de luz integrada al cabezal óptico del mismo. Desde este módulo se puede apagar o encender la luz, variar la intensidad de la misma,seleccioinar el nivel de apertura del diafragma según el campo que desea iluminar y seleccionar diferentes filtros de luz. -
Page 61: Ajuste De La Distancia Interpupilar
55 y 75 mm. 5.5 AJUSTE DE LA CORRECCION DIOPTRICA El Colposcopio Ecleris Microstar C-200 posee una corrección dióptrica independiente para ambos oculares. El ajuste se realiza girando los oculares hacia el signo (+) o el signo (-). -
Page 62: Variación De La Magnificacion
USER MANUAL / MANUAL DE USUARIO – MICROSTAR 5.6 VARIACIÓN DE LA MAGNIFICACION El selector de magnificación posee 6 posiciones: 4/6/10/16/25x. La posición 10x se repite en el selector. La marca en el cuerpo del cabezal, punto rojo adyacente al selector de magnificación, indica la magnificación seleccionada. -
Page 63: Estativo De Pared (C-200W)
USER MANUAL / MANUAL DE USUARIO – MICROSTAR 6.2 ESTATIVO DE PARED (C-200W) El colposcopio de pared (C-200W) se monta en un soporte fijado a la pared mediante tornillos de fijación. El microscopio dispone de articulaciones y movimientos para fijar la posición óptima de trabajo. 6.3 ESTATIVO DE CAMILLA (C-200T) El colposcopio del sillón de ginecología (C-200T) se sujeta al sillón de ginecología mediante un soporte ajustable que lo mantiene estable... -
Page 64: Movimiento Del Antebrazo
USER MANUAL / MANUAL DE USUARIO – MICROSTAR El colposcopio dispone de articulaciones y movimientos para fijar la posición óptima de trabajo. 6.4 MOVIMIENTO DEL ANTEBRAZO El antebrazo puede rotar 320º respecto al eje de la columna, y dispone de topes para evitar acumular giros y enroscar los cables. -
Page 65: Movimiento Rotacional Del Cabezal
USER MANUAL / MANUAL DE USUARIO – MICROSTAR 6.6 MOVIMIENTO ROTACIONAL DEL CABEZAL El colposcopio posee una horquilla que posiciona el cabezal optico a un ángulo fijo en relación al brazo. Se puede regular o completamente anular el movimiento utilizando su comando de control. -
Page 66: Movimiento De Giro Del Cabezal Optico
USER MANUAL / MANUAL DE USUARIO – MICROSTAR 6.7 MOVIMIENTO DE GIRO DEL CABEZAL OPTICO El cabezal puede girar sobre el eje de la horquilla, permitiendo un mejor posicionamiento de la dirección del centro óptico, en relación al objetivo observado. El rango de movimiento permitido es de 0-360º. -
Page 67: Movimiento De Inclinacion Del Cabezal Optico
6.9 TRANSPORTE DEL COLPOSCOPIO El Colposcopio Ecleris Microstar C-200 ha sido diseñado para ser trasladado cortas distancias dentro del recinto médico. Si es necesario transportarlo grandes distancias, debe prestarse especial atención a las siguientes precauciones: ... -
Page 68: Mantenimiento
USER MANUAL / MANUAL DE USUARIO – MICROSTAR 7. MANTENIMIENTO Para conservar el funcionamiento óptimo del Colposcopio Ecleris Microstar C-200 se recomienda realizar una revisión anual del equipo. Este procedimiento deberá incluir: Limpieza. Revisión de conexiones eléctricas. ... -
Page 69: Conexiones Eléctricas
USER MANUAL / MANUAL DE USUARIO – MICROSTAR 7.2 CONEXIONES ELÉCTRICAS Se debe controlar el envejecimiento y estado de los componentes. Verifique que no existan: Cables en mal estado, rotos o cortados. Mala conexión del cable con el enchufe. ... -
Page 70: Especificaciones Técnicas
USER MANUAL / MANUAL DE USUARIO – MICROSTAR 4) Retire el fusible dañado y reemplácelo por el fusible de repuesto que se encuentra en el mismo zócalo. Utilice fusibles de idénticas características eléctricas y de seguridad que el fusible original, según se indica en el rotulado del equipo. 5) Introduzca el zócalo hasta escuchar un “click”. - Page 71 USER MANUAL / MANUAL DE USUARIO – MICROSTAR CAMPO ILUMINADO Campo Iluminado / Nivel de Diafragma Distancia Lente Focal Focal [mm] [mm] [mm] [mm] [mm] [mm] [mm] [mm] [mm] SUMINISTRO ELÉCTRICO 100-240 VAC, 50 / 60 Hz FUSIBLES 2 x T2AL250V PROTECCIÓN CONTRA CHOQUE Clase I ELECTRICO...
-
Page 72: Solución De Problemas
USER MANUAL / MANUAL DE USUARIO – MICROSTAR MODELO C-200W – ESTATIVO DE PARED Forma de H 18,5” x 19,7”(470x500mm) BASE Brazo estándar: 35.8’’ (910mm) (máx) RANGO HORIZONTAL MASA 44.5 libras (20.2 Kg) MODELO C-200T – ESTATIVO DE CAMILLA Fijación camilla 2,24’’ x 5,12’’ (57x130mm) BASE Brazo estándar: 35.8’’... -
Page 73: Servicio Técnico
Si no puede solucionar el inconveniente, contacte a su distribuidor local u oficina de ECLERIS más cercana y solicite servicio técnico SERVICIO TÉCNICO El Colposcopio Ecleris Microstar C-200 debe ser reparado y/o mantenido exclusivamente en instalaciones autorizadas por ECLERIS. - Page 74 USER MANUAL / MANUAL DE USUARIO – MICROSTAR Las reparaciones hechas por personas no autorizadas por ECLERIS anularán esta garantía. La garantía antes mencionada es válida únicamente para el comprador original. Las siguientes partes están excluidas de la garantía: ...
Need help?
Do you have a question about the MICROSTAR C-200 Series and is the answer not in the manual?
Questions and answers