Table of Contents
Advertisement
Quick Links
COLPOSCOPE - FLOOR STAND-TELESCOPIC COLUMN MODEL
Version: 2019.04.01
All the rights to this manual are reserved, especially reproduction, publication and translation rights. No portion of this manual may be
reproduced by no means (photocopy, microfilm or other methods) without previous written authorization from ECLERIS. Neither can it
be reproduced, multiplied or published through any electronic data processing form.
The information contained in this manual may be modified or broaden without previous notification, without it representing any
responsibility to ECLERIS.
EUSA GLOBAL Llc.
11801 NW 100th Rd
Suite 17
Medley, FL 33178, U.S.A.
Phone: +1 786 483 7490
USER MANUAL
MICROSTAR SERIE C-100A5E
ABOUT THIS MANUAL
Year: 2019
Language: English
CMC Medical Devices & Drugs S.L.
C/
Horacio
Lengo
Nº18,
Málaga, Spain
Ph. +34951214054
Email: info@cmcmedicaldevices.com
CP29006,
Advertisement
Table of Contents

Related Manuals for Ecleris MICROSTAR C-100A5E


Summary of Contents for Ecleris MICROSTAR C-100A5E
- Page 1 All the rights to this manual are reserved, especially reproduction, publication and translation rights. No portion of this manual may be reproduced by no means (photocopy, microfilm or other methods) without previous written authorization from ECLERIS. Neither can it be reproduced, multiplied or published through any electronic data processing form.
-
Page 2: Table Of Contents
USER MANUAL – COLPOSCOPE C100A5E TABLE OF CONTENT SYMBOLS ..........................4 SECURITY WARNINGS ......................4 WARNINGS .......................... 4 DESCRIPTION......................... 5 INTENDED USE ........................5 INTENDED USER ........................ 5 DESCRIPTION AND COMPONENTS .................. 5 FLOOR STAND - TELESCOPIC COLUMN MODEL – C-100A5E ......... 6 3.3.1 3.3.2 COMPLETE HEAD ...................... - Page 3 USER MANUAL – COLPOSCOPE C100A5E WARRANTY ........................20 Page 3 of 20 INMANUUIN163 Rev.2019.04.01 / ENG...
-
Page 4: Symbols
The Ecleris Microstar C-100A5E Colposcope is an electrical device that provides very high light intensity. Its use is recommended exclusively for trained personnel. ECLERIS will not assume any liability for damages that may occur if the device is used without following the instructions and/or ignoring the following advice: ... -
Page 5: Description
Do not open the device. The diagnostics, service and repairment must be performed by ECLERIS, or a company authorized by ECLERIS. ECLERIS will not be liable for the damage caused by repairment, or service performed by unauthorized personnel. ... -
Page 6: Floor Stand - Telescopic Column Model - C-100A5E
USER MANUAL – COLPOSCOPE C100A5E The Ecleris Microstar C-100A5E Colposcope includes the following necessary components. Please identify and check them before you proceed with the installation: 3.3.1 FLOOR STAND - TELESCOPIC COLUMN MODEL – C-100A5E Components: 1 Base with wheels ... -
Page 7: Complete Head
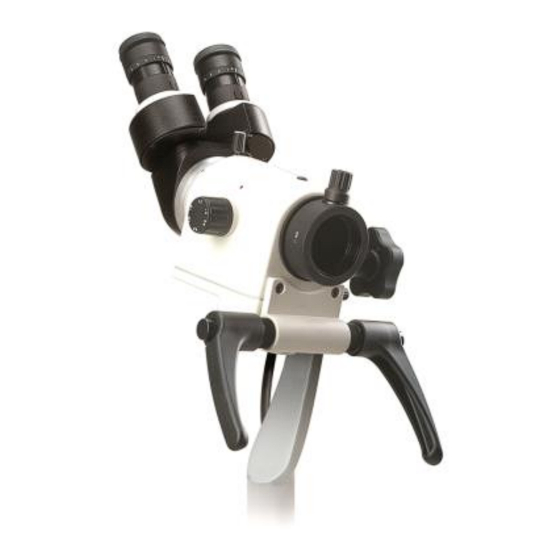
USER MANUAL – COLPOSCOPE C100A5E 10. Elbow (90º piece) 12. Column 11. LED light souce 13. Base 3.3.2 COMPLETE HEAD 1. Magnification selector 7. Eyepiece rubber 2. Micro focus adjustment 8. Eyepiece 3. Objective lens 9. Binocular body 4. Green filter 10. -
Page 8: Rear Panel
Digital capturing and documentation system – Ecleris ENDODIGI. 4. INSTALLATION AND SET UP Experienced personnel are not required for the installation of the Ecleris Microstar C-100A5E Colposcope. To avoid accidents while handling heavy parts of the equipment, two people should... -
Page 9: Floor Stand - Telescopic Column Model - C-100A5E
USER MANUAL – COLPOSCOPE C100A5E Once the installation is over, please continue with the procedures detailed in the Revision section. 4.1 FLOOR STAND - TELESCOPIC COLUMN MODEL – C-100A5E 1) Place the colposcope's base in a vertical position. 2) Insert the column into the base and hold it by mean of the provided 10mm Allen screw. Place the washer between the screw and the base as shown in the picture below 3) Stand the base on the floor and insert the 90°... - Page 10 USER MANUAL – COLPOSCOPE C100A5E 6) Place the binocular in the matching binocular support, verifying that the marks are aligned. Adjust the binocular screw to achieve the best possible seat. 7) Attach the eyepieces to the binocular. Unfold the rubber protectors surrounding the eyepieces.
-
Page 11: Focal Lens Mounting
USER MANUAL – COLPOSCOPE C100A5E If you detect any abnormality before you start operating the Ecleris Microstar C-100A5E Colposcope, please contact the technical department of your local distributor or nearest ECLERIS office prior to using the colposcope on patients. 4.2 FOCAL LENS MOUNTING Screw the lens to the head, tightening until the micro focus adjustment reaches the desired position. - Page 12 USER MANUAL – COLPOSCOPE C100A5E 4) The same way, place the binocular on top of the beam splitter. 5) Connect the video cable to the video output on the light source. 6) Connect the other end of the video cable to the monitor’s video input (Video IN). 7) Turn on the light source and monitor.
-
Page 13: Image Orientation
3) Adjust the 3 Allen screws of the Beam splitter to fix the camera position. 4.4 REVISION Once installation is over and before starting-up the Ecleris Microstar C-100A5E Colposcope, please go through the following check list: ... -
Page 14: Interpupillary Distance Adjustment
You must move these backwards and forwards until the distance between them matches your interpupillary distance. 5.2 DIOPTRIC CORRECTION ADJUSTMENT The Ecleris Microstar C-100A5E Colposcope has independent dioptric correction for both eyepieces. The adjustment is made by turning the eyepieces towards the + sign or towards the – sign. -
Page 15: Manipulation & Movements
USER MANUAL – COLPOSCOPE C100A5E 6. MANIPULATION & MOVEMENTS The Ecleris Microstar C-100A5E Colposcope has been designed to obtain very stable movements and proper positioning of the head for better operation. 6.1 HEAD ROTATION AXIS For a better alignment of the optical axis in relation with the target the head can be rotated on the forked pole. -
Page 16: Cleaning
Do no sterilize or immerse the device or its accessories. The cleaning, disinfection and sterilization of accessories not provided by ECLERIS must be performed following the instructions provided by their manufacturer. It is recommended to clean the exterior surface of the device every 15 days. -
Page 17: Fuse Replacement
4) Place the fuse lid back, pushing it until a “click” is heard. 5) Connect the power supply cable to the light source and to the electrical network. 8. TECHNICAL SPECIFICATIONS MICROSTAR C-100A5E COLPOSCOPE Composed of apochromatic lenses with a OPTICAL SYSTEM fungus-resistant coating 45°... -
Page 18: Troubleshooting
USER MANUAL – COLPOSCOPE C100A5E output Ø 70 mm / 2.75” (for f: 200 mm) Ø 90 mm / 3.54” (for f: 250 mm) ILLUMINATED FIELD Ø 107 mm / 4.2” (for f: 300 mm) Ø 145 mm / 5.7” (for f: 400 mm) POWE SUPPLY 100-240 VAC, 50 / 60 Hz FUSES... -
Page 19: Technical Service
Technical Service. If the problem cannot be solved, please contact your local distributor or the closest ECLERIS office and request technical service. TECHNICAL SERVICE The Ecleris Microstar C-100A5E Colposcope should be repaired and/or maintained exclusively by ECLERIS trained and qualified personnel in authorized installations and only the parts of the device that ECLERIS state as repairable must be repaired. - Page 20 Product’s serial number. Problem’s description. The Ecleris Microstar C-100A5E Colposcope shall be sent in its original packaging so that it is not damaged during transportation. ECLERIS shall not be liable for damages that may occur during transportation, caused by deficient packaging.
Need help?
Do you have a question about the MICROSTAR C-100A5E and is the answer not in the manual?
Questions and answers