Table of Contents
Advertisement
Quick Links
Version: 14.02.2019
All the rights to this manual are reserved, especially reproduction, publication and translation rights. No portion of this manual may be
reproduced by no means (photocopy, microfilm or other methods) without previous written authorization from ECLERIS. Neither can it
be reproduced, multiplied or published through any electronic data processing form.
The information contained in this manual may be modified or broaden without previous notification, without it representing any
responsibility to ECLERIS.
USER MANUAL
HYDRODERMABRASION
Year: 2019
ECLERIS S.R.L.
FRANCISCO N. LAPRIDA 4955. VILLA MARTELLI
(B1603ABK) BUENOS AIRES. ARGENTINA
Tel/Fax: +54 11 48383200
Web: www.ecleris.com
E-Mail:
info@ecleris.com
MINIVAC +
ABOUT THIS MANUAL
Language: English
Advertisement
Table of Contents

Subscribe to Our Youtube Channel
Related Manuals for Ecleris MINIVAC+


Summary of Contents for Ecleris MINIVAC+
- Page 1 All the rights to this manual are reserved, especially reproduction, publication and translation rights. No portion of this manual may be reproduced by no means (photocopy, microfilm or other methods) without previous written authorization from ECLERIS. Neither can it be reproduced, multiplied or published through any electronic data processing form.
-
Page 2: Table Of Contents
USER MANUAL – MINIVAC+ CONTENT SYMBOLS ..........................3 SECURITY WARNINGS ......................3 2.1. WARNINGS ..........................3 2.2. CONTRAINDICACIONES ......................4 DESCRIPTION......................... 5 INTRODUCTION AND OPERATION PRINCIPLE ..............5 EXPECTED USE ........................5 EXPECTED USER ....................... 6 COMPONENTS ........................6 3.4.1. MAIN UNIT FRONT PANEL ....................7 3.4.2. -
Page 3: Symbols
Button start cleaning cycle 2. SECURITY INFORMATION 2.1. WARNINGS Read this manual carefully before using the equipment. ECLERIS does not assume responsibility for damages that may occur if the equipment is not used according to the instructions and observing the criteria mentioned below: •... -
Page 4: Contraindicaciones
Poor care or maintenance of the equipment. Repair or handling by unauthorized personnel..there will be personal or material damages to third parties, ECLERIS, the manufacturer and seller of these equipment, do not assume any responsibility for these damages. -
Page 5: Description
It is suggested not to apply pressure on the applicator to prevent its formation, especially on the face. This manual describes the recommended procedures for installing and using Ecleris Minivac +. It contains all the pertinent information about the care and proper handling of the equipment during its use. -
Page 6: Expected User
USER MANUAL – MINIVAC+ 3.3 EXPECTED USER The equipment should only be used by personnel who are informed of the warnings stated in this manual. It can be operated by aesthetic professionals such as dermatologists, beauticians, cosmetologists and / or their assistants properly controlled and previously trained. Anyone who dominates the technique of microdermabrasion. -
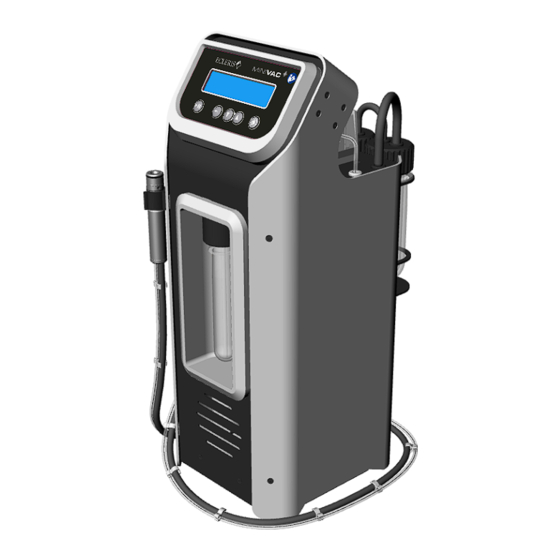
Page 7: Main Unit Front Panel
USER MANUAL – MINIVAC+ POWER CORD FOOTSWITCH 3.4.1. MAIN UNIT FRONT PANEL 3.4.2. MAIN UNIT REAR PANEL Page 7 of 18 INMANUUIN155 Rev.2019.02.14 / ENG... -
Page 8: Installation And Start Up
USER MANUAL – MINIVAC+ CONSTITUENT PARTS OF THE VACUUM TRAP 1. Button On / Stop Vacuum circuit. 2. Button for menu selection. 3. Menu selection button DOWN. 4. Menu selection button UP. 5. Button ON cleaning cycle. 4. INSTALLATION AND START UP The connection and revision of the equipment must be carried out by technical personnel with knowledge of the electrical installation from where the equipment will be connected. - Page 9 USER MANUAL – MINIVAC+ 4. Place the product to be infused into the product receptacle, verify that the suction nozzle reaches the bottom of the container; and screw it on the front panel. Product to infused 5. Turn on the equipment using the switch on the rear panel. The device will show the following startup sequence on the display.
-
Page 10: Operation - Functions
USER MANUAL – MINIVAC+ 7. With the button the vacuum circuit is switched on and stopped, independently. 8. Remember that when the equipment is turned on, only the suction circuit is activated. To activate the infusion circuit, use the pedal. When pressing the pedal once, the infusion circuit is turned on, pressing again stops the infusion circuit. - Page 11 USER MANUAL – MINIVAC+ Do not use hot water. 1. To begin the cleaning cycle, the vacuum circuit and the infusion circuit must be stopped, and the applicator must have a diamond tip. 2. Place the applicator in a vertical position, embedded in the receptacle for the applicator. 3.
-
Page 12: Diamond Tip Change
USER MANUAL – MINIVAC+ Before beginning a cleaning cycle, verify that the vacuum trap on the rear panel is free in order to place the cleaning waste. 5.2. DIAMOND TIP CHANGE The equipment has several tips with different levels of abrasion, determined by the type of diamond that it contains in the tip. -
Page 13: Language
USER MANUAL – MINIVAC+ 5.3. LANGUAGE To select the menu language, press and hold the button while turning on the equipment, wait for the system to load and release the button. By pressing the button you can define the language of the menu. To finish press the button and the equipment will be ready to be used in the selected language. -
Page 14: Fuse Changes
USER MANUAL – MINIVAC+ Stand-by hours Verifier number Treatment hours Qty. Cleaning cycles 4. To continue in normal operating mode, press the button again. 6.2 FUSE CHANGES To avoid loss of time due to unavailability, it is recommended to have spare fuses. 1. -
Page 15: Technical Specifications
USER MANUAL – MINIVAC+ 4. Verify that the clamps (B) that hold the hose in position press it firmly, but do not strangle the internal lumen, so that the product can pass through the inside of the hose without restrictions (C). 5. -
Page 16: Troubleshooting
USER MANUAL – MINIVAC+ 7. TROUBLESHOOTING The following chart indicates the most frequent problems and their quick solutions. Please, in case of any inconvenience, consult this chart. PROBLEM PROBABLE CAUSE ACTION It is not connected to the Connect the power cable to mains the mains The power cord is broken or... -
Page 17: Technical Service
The device consumes too much product. If you cannot solve the problem, please contact your local distributor or nearest ECLERIS office and ask for technical service. 8. TECHNICAL SERVICE The equipment must be repaired and / or maintained exclusively in places authorized by ECLERIS. -
Page 18: Warranty
9. WARRANTY ECLERIS declares that the EQUIPMENT has passed its Quality Control and did not show any manufacturing defect, therefore, it guarantees its proper functioning under suitable conditions of use according to the indications presented in this manual. The warranty period is for a period of one (1) year from the date of the purchase invoice.
Need help?
Do you have a question about the MINIVAC+ and is the answer not in the manual?
Questions and answers