Table of Contents
Advertisement
Available languages
Available languages
Quick Links
Version: 2023.03
All the rights to this manual are reserved, especially reproduction, publication and translation rights. No portion of this manual may be
reproduced by no means (photocopy, microfilm or other methods) without previous written authorization from ECLERIS. Neither can it
be reproduced, multiplied or published through any electronic data processing form.
The information contained in this manual may be modified or broaden without previous notification, without it representing any
responsibility to ECLERIS.
EUSA GLOBAL Llc.
11801 NW 100th Rd
Suite 17
Medley, FL 33178, U.S.A.
Phone: +1 786 483 7490
USER MANUAL
MICROSTAR SERIE C100
COLPOSCOPE
ABOUT THIS MANUAL
Year: 2023
Language: English
CMC Medical Devices & Drugs S.L.
C/ Horacio Lengo Nº18, CP29006, Málaga,
Spain
Ph. +34951214054
Email: info@cmcmedicaldevices.com
Advertisement
Chapters
Table of Contents

Related Manuals for Ecleris MICROSTAR C100 Series


Summary of Contents for Ecleris MICROSTAR C100 Series
- Page 1 All the rights to this manual are reserved, especially reproduction, publication and translation rights. No portion of this manual may be reproduced by no means (photocopy, microfilm or other methods) without previous written authorization from ECLERIS. Neither can it be reproduced, multiplied or published through any electronic data processing form.
-
Page 2: Table Of Contents
USER MANUAL – COLPOSCOPE C100 TABLE OF CONTENT SYMBOLS ..........................4 SAFETY INFORMATION ......................4 WARNINGS .......................... 4 DESCRIPTION......................... 5 INTENDED USE ........................5 INTENDED USER ........................ 5 DESCRIPTION AND COMPONENTS .................. 5 FLOOR STAND – PARALLEOLOGRAM ARM MODEL – C-100F ......... 6 3.3.1 WALL-MOUNTED PARALLELOGRAM ARM MODEL –... - Page 3 USER MANUAL – COLPOSCOPE C100 MAINTENANCE ........................22 CLEANING ......................... 22 7.1.1 CLEANING THE EXTERNAL SURFACES ..............22 7.1.2 CLEANING OF OBJECTIVE LENS AND EYEPIECES ..........22 ELECTRICAL CONNECTIONS ..................22 FUSE CHANGE ........................23 FIBER OPTIC CABLE CHANGE ..................23 TECHNICAL SPECIFICATIONS ....................
-
Page 4: Symbols
The Ecleris Microstar C-100 Colposcope is an electrical device that provides very high light intensity. Its use is recommended exclusively for trained personnel. ECLERIS will not assume any liability for damages that may occur if the device is used without following the instructions and/or ignoring the following advice: ... -
Page 5: Description
Do not open the device. The diagnostics, service and repairment must be performed by ECLERIS, or a company authorized by ECLERIS. ECLERIS will not be liable for the damage caused by repairment, or service performed by unauthorized personnel. ... -
Page 6: Floor Stand - Paralleologram Arm Model - C-100F
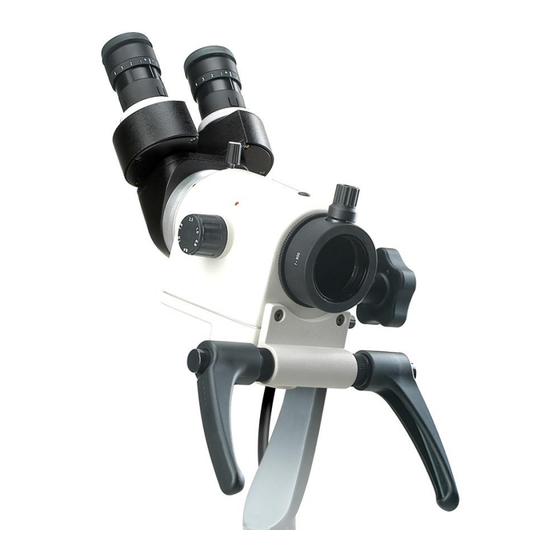
USER MANUAL – COLPOSCOPE C100 The Ecleris Microstar C-100 Colposcope includes the following necessary components. Please identify and check them before you proceed with the installation: 3.3.1 FLOOR STAND – PARALLEOLOGRAM ARM MODEL – C-100F Components: 4 Wheels with brakes ... -
Page 7: Wall-Mounted Parallelogram Arm Model - C-100W
USER MANUAL – COLPOSCOPE C100 3.3.2 WALL-MOUNTED PARALLELOGRAM ARM MODEL – C-100W Components: 1 Wall mount 4 Wall anchors with 4 bolts 1 Complete pantograph arm 1 Light source 1 Head with 1 objective lens ... -
Page 8: Gyn Chair Mount Colposcope Model - C-100T
USER MANUAL – COLPOSCOPE C100 3.3.3 GYN CHAIR MOUNT COLPOSCOPE MODEL – C-100T Components: 1 Gyn Chair support 1 Complete pantograph arm 1 Light source 1 Head with 1 objective lens 1 Binocular 2 Eyepieces ... -
Page 9: Light Source
USER MANUAL – COLPOSCOPE C100A5E 3.3.4 LIGHT SOURCE 3.3.4.1 LED100G2/1 1. ON/OFF Button. 2. Light Intensity Control (Dimmer). 3. Universal Fiber optic cable connector. 4. Opening Handles. Earth connection. Power cord connector with fuse holder. Ventilation grid. Auxiliar Power output connector (maximun load 60 VA). -
Page 10: Led100
2. Light intensity control (Dimmer) 3. Camera connector (video input) 4. Universal fiber optic cable connector 5. Power supply cable connector with fuse holder 6. Ecleris Endodigi connector (image and video capture) and other peripheral devices* 7. S-Video output (SVHS) 8. Composite Video Output (CVBS) 9. -
Page 11: Compatible Accesories
Eyepieces 10X. 4. INSTALLATION AND SET UP Experienced personnel is not required for the installation of the Ecleris Microstar C-100 Colposcope. Additionally to the provided tools, for the installation of the Floor Stand - Parallelogram Arm Model (C-100F) you will need 13 mm and 27 mm wrenches or an adjustable wrench. - Page 12 USER MANUAL – COLPOSCOPE C100 2) Tighten the 27mm bolt to the column as shown in the picture using a socket, fixed or adjustable wrench. 3) Loosen the 3 screws at the column’s receiving end with the 3/16” Allen wrench. Place the colposcope’s arm, as shown in the figure.
- Page 13 USER MANUAL – COLPOSCOPE C100 5) Place the binocular in the matching binocular support, verifying that the marks are aligned. Adjust the binocular screw to achieve the best possible seat. 6) Attach the eyepieces to the binocular. Spread the rubber protectors surrounding the eyepieces.
-
Page 14: Light Source
USER MANUAL – COLPOSCOPE C100 7) Pass the fiber optic cable connector through the parallelogram arm cover and connect it to the head l. 8) If necessary, once the colposcope has been installed, regulate the weight compensation command, located at the proximal end of the parallelogram arm. 4.1.1 LIGHT SOURCE 1) Locate the light source under the forearm, as shown in the picture. -
Page 15: Wall-Mounted Parallelogram Arm Model - C-100W
USER MANUAL – COLPOSCOPE C100 4.2 WALL-MOUNTED PARALLELOGRAM ARM MODEL – C-100W Before you proceed with the installation, you must decide the adequate height for the wall-mount, as well as the correct leveling. The wall-mounted model must be fixed only to high resistance walls. You should not fix the wall-mount to walls made of hollow bricks or walls with less than 15 cm thickness, or plaster panels, wooden walls or other low resistance material. -
Page 16: Gyn Chair Mount - C-100T
USER MANUAL – COLPOSCOPE C100 ECLERIS is not responsible for any physical or equipment damage that may occur due to the incorrect fixation of the wall-mount. 7) Loosen the 3 screws at the wall-mount’s receiving end with the 3/16” Allen wrench. -
Page 17: Focal Lens Mounting
USER MANUAL – COLPOSCOPE C100 4.4 FOCAL LENS MOUNTING Screw the lens to the head, tightening until the micro focus adjustment reaches the desired position. Counterscrew the nut for proper fixation of the lens. 4.5 BEAM SPLITTER AND CAMERA INSTALLATION 1) Remove the binocular if it is already placed. -
Page 18: Image Orientation
USER MANUAL – COLPOSCOPE C100 4) The same way, place the binocular on top of the beam splitter. 5) Remove the fiber optic cable from the colposcope’s arm. 6) Introduce the camera’s cable in the head through the cover of the parallelogram arm. 7) Introduce once again the fiber optic cable through the colposcope’s arm. -
Page 19: Revision
3) Adjust the 3 Allen screws of the Beam splitter to fix the camera position. 4.6 REVISION Once installation is over and before starting-up the Ecleris Microstar C-100 Colposcope, please go through the following check list: ... -
Page 20: Light Source
6. MANIPULATION AND MOVEMENTS The Ecleris Microstar C-100 Colposcope has been designed with ball bearings to obtain very stable movements. Ball bearings allow easy handling and proper positioning of the head for better operation. -
Page 21: Parallelogram Arm Movement
Before loosening this command, verify that the fiber optic cable is not strained. 6.5 SHIPMENT The Ecleris Microstar C-100 Colposcope has been designed to be moved over short distances within a doctor’s office or room. If it is necessary to move the colposcope over larger distances, special attention should be paid to the following recommendations: Place the arm in “closed”... -
Page 22: Maintenance
USER MANUAL – COLPOSCOPE C100 7. MAINTENANCE To maintain optimum operation of the Ecleris Microstar C-100 Colposcope, it is recommended to perform a simple revision of the equipment once a year. This procedure should include: Lubrication. Cleaning. ... -
Page 23: Fuse Change
USER MANUAL – COLPOSCOPE C100 Faulty connection between the cable and the plug. Oxide corrosion in connection pins. 7.3 FUSE CHANGE To avoid wasting time due to unavailability is recommended to have spare fuse. 1. Disconnect the power cord from the power supply and equipment. 2. - Page 24 USER MANUAL – COLPOSCOPE C100 ILLUMINATION LIGHT SOURCE 100 - 240 V, 50 – 60 Hz SUPPLY VOLTAGE Nº OF PHASES 1 (monophase) SHOCK PROTECTION Class I APPLICABLE PART BF type Continuous DEGREE OF PROTECTION AGAINST IPX0 COLOR TEMPERATURE 6000ºK approx. LED SYSTEM SERVICE LIFE 50000 Hours Approx.
-
Page 25: Troubleshooting
Network’s voltage is not compatible with the one Verify voltages required If the problem cannot be solved, please contact your local distributor or the closest ECLERIS office and request technical service. Página 25 de 54 INMANUUML031 USER MANUALM. USO C-100 V.2023.03 ING-ESP US... -
Page 26: Technical Service
Product’s serial number. Problem’s description. The Ecleris Microstar C-100 Colposcope shall be sent in its original packaging so that it is not damaged during transportation. ECLERIS shall not be liable for damages that may occur during transportation, caused by deficient packaging. - Page 27 La información contenida en este manual puede ser modificada o ampliada sin notificación previa, sin que ello represente responsabilidad alguna para ECLERIS. CMC Medical Devices & Drugs S.L.
- Page 28 USER MANUAL – COLPOSCOPE C100 TABLA DE CONTENIDO SIMBOLOGIA ........................30 INFORMACION DE SEGURIDAD ..................30 ADVERTENCIAS ........................ 30 DESCRIPCION ........................31 USO PREVISTO ......................... 31 USUARIO PREVISTO ......................31 DESCRIPCION Y COMPONENTES ................... 32 COLPOSCOPIO CON ESTATIVO DE PIE – C-100F........... 32 3.3.1 COLPOSCOPIO CON ESTATIVO DE PARED –...
- Page 29 USER MANUAL – COLPOSCOPE C100 MOVIMIENTO DE BALANCEO DEL CABEZAL (MOVIMIENTO BASCULANTE) ....48 TRANSPORTE DEL COLPOSCOPIO ................49 MANTENIMIENTO ......................... 49 LIMPIEZA ........................... 49 7.1.1 LIMPIEZA DE SUPERFICIES EXTERIORES .............. 49 7.1.2 LIMPIEZA DE OBJETIVOS Y OCULARES ..............50 CONEXIONES ELÉCTRICAS ....................
-
Page 30: Simbologia
El Colposcopio Ecleris Microstar C-100 es un equipo eléctrico con emisión de luz de gran intensidad. Su uso está aconsejado únicamente para personal entrenado. ECLERIS no asume responsabilidad por daños que puedan ocurrir si el equipo no es utilizado de acuerdo a las instrucciones y observando los criterios que se mencionan a continuación: ... -
Page 31: Descripcion
Reparación o manipulación por personal no autorizado … se produjeran daños personales o materiales a terceros, ECLERIS, el fabricante y vendedor de estos equipos, no asumen responsabilidad alguna por dichos daños. No desechar el aparato, como así tampoco ninguno de sus accesorios junto con los residuos domésticos. -
Page 32: Descripcion Y Componentes
Conserve el embalaje original para su uso posterior. Éstos pueden resultar útiles cuando el equipo debe ser transportado. Los Colposcopios Ecleris MICROSTAR C-100 incluyen los siguientes componentes. Se recomienda identificar y comprobar su existencia antes de proceder a la instalación: 3.3.1 COLPOSCOPIO CON ESTATIVO DE PIE –... -
Page 33: Colposcopio Con Estativo De Pared - C-100W
1. Oculares 8. Ruedas con freno 2. Binocular 9. Horquilla del cabezal 3. Cabezal 10. Freno del brazo paralelogramo 4. Comando de regulación de giro del 11. Comando de compensación de cabezal peso 5. Cable de fibra óptica 12. Antebrazo 6. -
Page 34: Colposcopio Con Estativo Para Sillon Ginecologico - C-100T
USER MANUAL – COLPOSCOPE C100 1. Freno del brazo paralelogramo 7. Binocular 2. Comando de compensación de 8. Horquilla del cabezal peso 9. Cabezal 3. Brazo paralelogramo 10. Comando de regulación de giro del 4. Cable de fibra óptica cabezal 5. -
Page 35: Cabezal Completo
1. Freno del brazo paralelogramo 7. Binocular 2. Comando de compensación de 8. Horquilla del cabezal peso 9. Cabezal 3. Brazo paralelogramo 10. Comando de regulación de giro del 4. Cable de fibra óptica cabezal 5. Fuente de iluminación 11. Antebrazo 6. -
Page 36: Fuente De Luz
MANUAL DE USUARIO – COLPOSCOPIO C100A5E 3.3.5 FUENTE DE LUZ 3.3.5.1 LED100G2/1 1. Llave de encendido 2. Control ajuste intensidad (Dimmer) 3. Conector de cable de fibra óptica 4. Ases de apertura 1. Borne tierra equipotencial. 2. Conector de cable de alimentación con porta fusible. -
Page 37: Led100
3. Sistema rotativo tipo torreta de adaptadores múltiples 4. Conector de cámara (entrada de video) 5. Conector cable alimentación con porta fusibles 6. Conexión a Ecleris Endodigi (Captura de imágenes y videos) y otros equipos periféricos* 7. Salida de S-Video (SVHS) 8. Salida Video Compuesto (CVBS) 9. -
Page 38: Accesorios Compatibles
No se requiere personal especializado o con experiencia para la instalación del Colposcopio Ecleris Microstar C-100. Además de las herramientas provistas, para la instalación del Colposcopio con Estativo de Pie serán necesarias: 1 llave de 13mm, una llave de 27mm o una llave ajustable y en el caso del Colposcopio con Estativo de Pared (C-100W), un taladro eléctrico, una broca widea de 12mm y una llave tubo de 1/2’’. - Page 39 MANUAL DE USUARIO – COLPOSCOPIO C100A5E 2) Presente la columna y enrosque el tornillo en la misma. Utilice una llave de 27mm para ajustar el tornillo a la columna. 3) Desajuste los 3 tornillos en el extremo receptor de la columna con una llave Allen de 3/16”. Coloque el brazo paralelogramo como se muestra en la figura.
- Page 40 MANUAL DE USUARIO – COLPOSCOPIO C100A5E 5) Coloque el binocular en el soporte, verificando que las marcas coincidan. Ajuste el tornillo del binocular para obtener la mejor fijación posible. 6) Coloque los oculares en el binocular. Despliegue la goma que rodea a los oculares. Nota: Si el usuario utiliza anteojos deje la goma plegada.
-
Page 41: Fuente De Luz
MANUAL DE USUARIO – COLPOSCOPIO C100A5E 7) Pase el conector del cable de fibra óptica a través de la funda del brazo paralelogramo y conéctelo al cabezal. 8) En caso de ser necesario, una vez que el colposcopio ha sido instalado, regule el comando de compensación de peso ubicado en el extremo proximal del brazo paralelogramo. -
Page 42: Estativo De Pared - C-100W
Allen de 4mm. Nota: El procedimiento de montaje de la fuente de luz es el mismo tanto para todas las fuentes de luz ECLERIS. 4.2 ESTATIVO DE PARED – C-100W Antes de proceder a la instalación del estativo de pared, debe determinar la altura adecuada para su fijación. -
Page 43: Estativo Para Sillon Ginecologico - C-100T
6) El estativo de pared debe permanecer firme. Para verificarlo se debe probar su resistencia poniendo un peso 8 veces más pesado que el colposcopio. ECLERIS no es responsable por los daños físicos y/o materiales que pudieran ocurrir debido a la incorrecta fijación del estativo a la pared. -
Page 44: Montaje De La Lente Focal
MANUAL DE USUARIO – COLPOSCOPIO C100A5E 4.4 MONTAJE DE LA LENTE FOCAL Enrosque la lente al cabezal dejando el comando micro focal en la posición deseada. Ajuste la arandela a contra rosca para lograr la correcta sujeción de la lente. 4.5 INSTALACION DEL DIVISOR DE IMAGEN Y LA CAMARA 1) Si el binocular ya se encuentra instalado, retírelo desajustando el tornillo de soporte. - Page 45 MANUAL DE USUARIO – COLPOSCOPIO C100A5E 3) Monte el divisor de imagen con la cámara de video en el cabezal, verificando la coincidencia de la muesca presente en cada una de las partes. Ajuste manualmente el tornillo de seguridad del cabezal de manera de lograr la mayor firmeza posible en el montaje. 4) De manera similar monte el binocular, situándolo por encima del divisor de imágenes.
-
Page 46: Orientacion De La Imagen
2) Rote la cámara hasta obtener la orientación deseada para la imagen en el monitor. 3) Ajuste nuevamente los tornillos para fijar la cámara en esa posición. 4.6 REVISION Una vez finalizada la instalación y antes de poner en marcha el Colposcopio Ecleris Microstar C- 100, se recomienda realizar los siguientes controles: ... -
Page 47: Operación - Funciones
5) Apague el colposcopio cuando no es utilizado 5.1 FUENTE DE LUZ El Colposcopio Ecleris Microstar C-100 tiene un módulo de iluminación integrado Everlux basado en tecnología LED. El punto focal del sistema óptico alcanza muy altas temperaturas, por lo tanto el extremo del cable de fibra óptica se calienta. -
Page 48: Filtro De Color
6. MOVIMIENTOS Y TRANSPORTE El Colposcopio Ecleris Microstar C-100 ha sido diseñado para obtener movimientos de gran estabilidad mediante crapodinas. Éstas permiten una fácil manipulación y el correcto posicionamiento del cabezal para una mejor observación. -
Page 49: Transporte Del Colposcopio
No esterilizar ni sumergir el equipo ni sus accesorios La limpieza, desinfección y esterilización de los accesorios no provistos por ECLERIS debe ser realizada según las instrucciones detalladas por sus respectivos fabricantes. 7.1.1 LIMPIEZA DE SUPERFICIES EXTERIORES Limpie la superficie externa del equipo utilizando algodón o un paño humedecido con detergente... -
Page 50: Limpieza De Objetivos Y Oculares
MANUAL DE USUARIO – COLPOSCOPIO C100A5E Realice la limpieza teniendo mucho cuidado en no introducir agua o humedad al equipo. No utilice productos inflamables, especialmente alcohol, mientras la fuente de iluminación no esté fría. Si utilizó productos inflamables no encienda dicha fuente hasta después de una (1) hora de realizada la limpieza ya que podría producirse una mezcla explosiva. -
Page 51: Especificaciones Técnicas
MANUAL DE USUARIO – COLPOSCOPIO C100A5E 6) Conecte el cable de alimentación al colposcopio y luego a la red eléctrica. 7) Coloque la llave de encendido en “On”. 8. ESPECIFICACIONES TÉCNICAS COLPOSCOPIO MICROSTAR C-100 Compuesto por lentes apocromáticas con SISTEMA OPTICO capa protectora anti-hongos TUBOS BINOCULARES Inclinado 45º... - Page 52 MANUAL DE USUARIO – COLPOSCOPIO C100A5E LED100 Sistema rotativo tipo torreta de adaptadores CONECTOR DE FIBRA OPTICA múltiples CONSUMO 110VA FUSIBLE 2 x T3AL250V LED 111 Adaptador cables fibra óptica CONECTOR DE FIBRA OPTICA individual e intercambiable CONSUMO 110 VA FUSIBLE 2x T3AL250V BRAZO PANTOGRAFICO...
-
Page 53: Solución De Problemas
SERVICIO TÉCNICO Los Colposcopios Ecleris Microstar C-100 deben ser reparados y/o mantenidos exclusivamente por personal técnico calificado por ECLERIS del usuario y sólo deberán ser reparadas aquellas partes del equipo que son designadas por ECLERIS como reparables. Ecleris, a requerimiento, ha de proveer los esquemas de circuitos, las listas de partes componentes, las descripciones, las instrucciones para el calibrado u otra información que sea... -
Page 54: Garantia
GARANTIA ECLERIS declara que el Colposcopio Ecleris Microstar C-100 ha pasado su Control de Calidad y no evidenció ningún defecto de manufactura, por lo tanto garantiza su funcionamiento apropiado bajo condiciones de uso adecuadas de acuerdo a las indicaciones presentadas en este manual.
Need help?
Do you have a question about the MICROSTAR C100 Series and is the answer not in the manual?
Questions and answers