Table of Contents
Advertisement
Quick Links
Version: 2020.04.01
All the rights to this manual are reserved, especially reproduction, publication and translation rights. No portion of this manual may be
reproduced by no means (photocopy, microfilm or other methods) without previous written authorization from ECLERIS. Neither can it
be reproduced, multiplied or published through any electronic data processing form.
The information contained in this manual may be modified or broaden without previous notification, without it representing any
responsibility to ECLERIS.
ECLERIS USA.
11801 NW 100th Rd
Suite 17
Medley, FL 33178, U.S.A.
Phone: +1 786 483 7490
USER MANUAL
PROCAM SD
CCD CAMERA AND CONSOLE
ABOUT THIS MANUAL
Year: 2020
Language: English
CMC Medical Devices & Drugs S.L.
C/
Horacio
Lengo
Nº18,
Málaga, Spain
Ph. +34951214054
Email: info@cmcmedicaldevices.com
CP29006,
Advertisement
Table of Contents

Subscribe to Our Youtube Channel
Related Manuals for Ecleris PROCAM SD


Summary of Contents for Ecleris PROCAM SD
- Page 1 All the rights to this manual are reserved, especially reproduction, publication and translation rights. No portion of this manual may be reproduced by no means (photocopy, microfilm or other methods) without previous written authorization from ECLERIS. Neither can it be reproduced, multiplied or published through any electronic data processing form.
-
Page 2: Table Of Contents
INTENDED USER ........................ 5 COMPONENTS ........................6 3.4.1. CONSOLE FRONT PANEL ....................6 3.4.2. CONSOLE REAR PANEL ....................6 3.4.3. PROCAM SD BASIC CAMERA ..................8 3.4.4. PROCAM SD FULL CAMERA ................... 8 INSTALLATION AND SET UP ....................8 4.1. -
Page 3: Symbols
2.1 WARNINGS It is important to read this manual carefully before using the device. ECLERIS will not be held responsible for damage that can occur to the equipment due to not following the instructions or not observing the following criteria: ... - Page 4 PROCAM SD and the other equipment to minimize these effects. Do not open the equipment. Maintenance and repairs must be done by ECLERIS or an authorized company. ECLERIS will not be responsible for the consequences of repairs or maintenance carried out by non-authorized personnel.
-
Page 5: Description
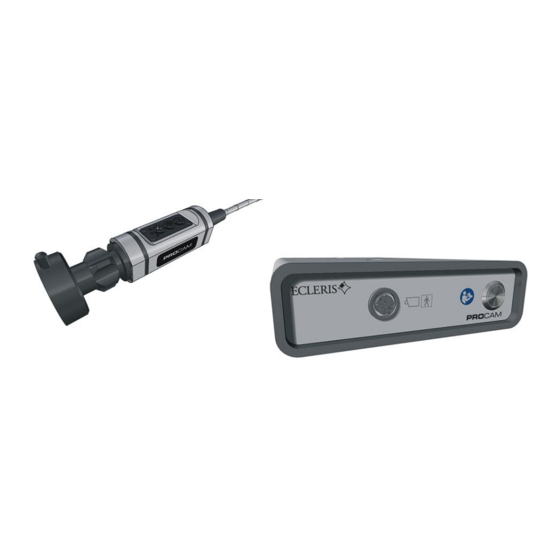
The device is intended to be used by a physician, paramedic or health care professional. 3.3 DESCRIPTION & FUNCTIONING PROCAM SD video camera is a system that combines one camera head and a power and video processing console. The camera head has a powerful 1/3"CCD color sensor and integrated controls, making the unit easy to operate. -
Page 6: Components
USER MANUAL – PROCAM SD 3.4 COMPONENTS The system is composed by: Main unit (console) Video camera Main power cable Video cable with BNC connector 3.4.1. CONSOLE FRONT PANEL 1. ON/OFF button. 2. PROCAM SD Connector 3.4.2. - Page 7 1. Power connector. 2. Equal-potential Ground connection. 3. S-Video output 4. Composite Video Output (CVBS) Ecleris Endodigi connector (image and video capture) and other peripheral devices* * Standard output (normally-open) to remotely operate other image capture devices such as Video Printers.
-
Page 8: Procam Sd Basic Camera
4. INSTALLATION AND SET UP 4.1. INSTALLATION Connection and revision of this equipment must be done by technical personnel with electrical installation knowledge. The PROCAM SD includes the following components. Check and identify them before proceeding with the installation. Console ... -
Page 9: Coupling To Ecleris Everlux Light Source
Allen key. With this Allen key, unscrew the two screws at the bottom of the PROCAM SD console as shown in the picture. By doing so, two heads of screws will emerge from the top of the PROCAM SD console. These screws shall be anchored to the bottom side of the ECLERIS Everlux light source. - Page 10 Once the coupling is finished, the combined set ECLERIS Everlux light source and PROCAM SD console is ready to be used by itself or it can be attached to an ECLERIS microscope forearm or to an ECLERIS colposcope forearm through the ECLERIS Everlux light source (after removing the handle on top of the Everlux unit).
-
Page 11: Revision
ECLERIS has specially designed an interlock male-female cable of 24 centimeters. With this cable, the PROCAM SD console can be supplied by the ECLERIS Everlux light source directly. This cable is an optional accessory and it has to be requested by the user. -
Page 12: Operation & Features
Only medical, paramedical or health personnel should use this equipment. 1) Press the power button in front of the PROCAM SD console. The LEDs of the PROCAM SD camera will blink for few seconds and then they will turn off. It indicates that the PROCAM SD camera head is being powered. -
Page 13: Anti-Moire Function
USER MANUAL – PROCAM SD If the object to be observed is centered in the monitor screen, as when thin endoscopes are being used (<10mm), and where the edge of the image displayed is black, select the Window function by pressing the corresponding button. -
Page 14: Maintenance
USER MANUAL – PROCAM SD 6. MAINTENANCE The following procedures are recommended to preserve PROCAM SD in optimum working conditions: Before the maintenance of the PROCAM SD, disconnect the power cable from the electric power supply. Periodic cleaning of all external components. -
Page 15: Technical Specifications
USER MANUAL – PROCAM SD Only use fuses as shown at the rear side of the PROCAM SD console and certified by IEC60127. 4) Screw again the knobs. 5) Connect the power cord. 7. TECHNICAL SPECIFICATIONS 100 – 240V POWER SUPPLY Nº... -
Page 16: Troubleshooting
The following table indicates the most common problems and their solutions. Please consult this table if you have any inconvenience. As PROCAM SD console is always used in combination with a video monitor and a videocamera, faults will be analyzed considering the whole system. -
Page 17: Technical Service
PROCAMSD should be repaired and/or maintained exclusively by ECLERIS trained and qualified personnel in authorized installations and only the parts stated as repairable by ECLERIS can be repaired. ECLERIS will provide, under request, circuits, list of components, calibration instructions or any other information necessary in order to assist the ECLERIS authorized technical personnel. -
Page 18: Warranty
The guarantee is for the term of one (1) year starting on the purchase date. ECLERIS shall not be responsible for damage caused by/to the PROCAM SD and its power supply for inadequate use, neglect, incorrect cleaning or storage. Any repairs carried out by anyone other than ECLERIS authorized personal will annul this warranty.
Need help?
Do you have a question about the PROCAM SD and is the answer not in the manual?
Questions and answers