Advertisement
Quick Links
INSTALLATION INSTRUCTIONS FOR THE CADDY ADVANCED
& CADDY ADVANCED CR FURNACE BLOWER BOX
Imprimé au Canada
PA08581/PA08582
This manual is available for free download on the manufacturer's web site. It is a
copyrighted document. Re-sale is strictly prohibited. The manufacturer may update
this manual from time to time and cannot be responsible for problems, injuries, or
damages arising out of the use of information contained in any manual obtained
from unauthorized sources.
Eco-energy at the hearth
of your home
CADDY
250, de Copenhague,
St-Augustin-de-Desmaures
(Quebec)
CANADA G3A 2H3
46369F
2024-03-14
Advertisement

Subscribe to Our Youtube Channel
Related Manuals for PSG Caddy PA08581


Summary of Contents for PSG Caddy PA08581
- Page 1 INSTALLATION INSTRUCTIONS FOR THE CADDY ADVANCED & CADDY ADVANCED CR FURNACE BLOWER BOX PA08581/PA08582 This manual is available for free download on the manufacturer’s web site. It is a copyrighted document. Re-sale is strictly prohibited. The manufacturer may update this manual from time to time and cannot be responsible for problems, injuries, or damages arising out of the use of information contained in any manual obtained from unauthorized sources.
- Page 2 If you are installing the duct support on top of the fan housing, you will need to install the top air return plenum kit PA08506 for the Caddy Advanced or the PA08588 for the Caddy Advanced CR (both not included). For installation instructions of the other components of the furnace (temperature sensor, servomotor, electronic boards) as well as electrical diagrams for the wood-electric or wood-oil combination furnace refer to the Caddy Advanced furnace user’s manual.
- Page 3 BLOWER HOUSING INSTALLATION 1.1 Removal of the furnace serial add-on adapter. Unscrew screws (B) and set aside. • Dispose of part (A) • CADDY ADVANCED CADDY ADVANCED CR...
- Page 4 • Take 3 screws (B), set aside in the previous step, and reinstall them as shown the image below.
- Page 5 1.2 Removal of control board housing cover • Remove screws (C) securing the circuit board cover (E) and the furnace cover (D) as shown. Keep all parts pertaining to this step.
- Page 6 1.3 Remove the sheet metal wiring and mounting bracket. CAUTION: This step is only necessary for installation with the Caddy Advanced. • Remove highlighted parts (!) and (!!)
- Page 7 1.4 Remove the panels from the blower housing. Unscrew and remove screws (H) from parts (G) and (F) and set aside. •...
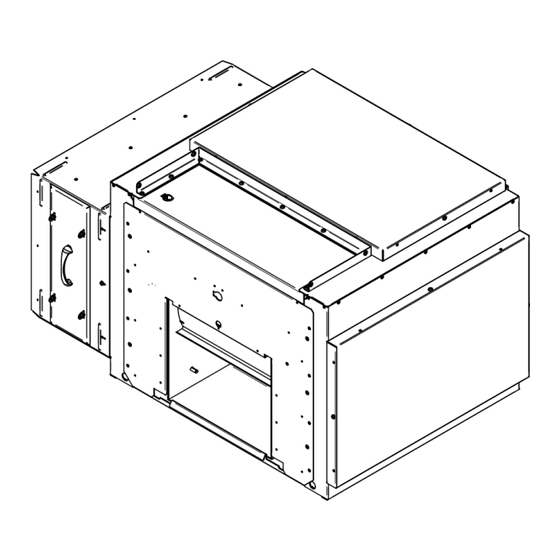
- Page 8 1.5 Blower housing installation Install levelling bolts (J). • Place blower housing (I) into position. Place the metal lip over the edge of the furnace. See • Detail Using screws (H) included in the instruction manual kit, secure the blower housing to the •...
- Page 9 1.6 How to attach the blower unit Using screws (B) set aside in step 1, finish securing the blower housing. • Take the blower wire and pass it through the wire holder (J) included in the installation kit • manual.
- Page 10 BLOWER WIRING 2.1 CADDY ADVANCED Blower Wiring 2.1.1 Wiring for PSC motor – PA08581 Insert the blower wire into grommet (K). • Pull on excess wire and secure with cable ties (Ty-Rap) (L) supplied in the instructions kit. •...
- Page 11 2.1.2 Blower wiring for ECM motor - PA08582 Remove part (N) to install grommet (K). •...
- Page 12 2.1.3 Blower wiring for ECM motor - PA08582 (CONTINUED) • Take the black wire (O) from the manual kit and pass it through the 2 eyelets, the one on the blower housing and the one on the printed circuit board housing. •...
- Page 13 2.1.4 Blower wiring for ECM motor - PA08582 (CONTINUED) Disconnect the black wire from the circuit board and connect the wire coming from the blower to • • Take the unplugged wire from the power cord and connect it to the wire coming from the blower.
- Page 14 2.2 Connections for CADDY ADVANCED CR 2.2.1 Wiring for ECM motor – PA08582 Connect the blower • extension lead and the 1/4" (!) terminal connector found in the installation leaflet bag. DETAIL A Plug the other end of • the extension cable into the control board, the 1/4"...
- Page 15 Schematic diagram illustrating the wiring of the ECM blower motor:...
-
Page 16: Top Installation
INSTALLING THE ASSEMBLED DUCT SUPPORT The duct support can be installed on the TOP, RIGHT or LEFT side of the blower housing. IMPORTANT! If you decide to install the assembled duct support on top of the blower housing, you will need to purchase and install the top air plenum option PA08506 (for CADDY ADVANCED), or PA08588 (for CADDY ADVANCED CR) sold separately. - Page 17 Then install the top air plenum option PA08506 (M) for CADDY ADVANCED or PA08588 (M) for CADDY ADVANCED CR. Assembly instructions for these are included with each set. These options are sold separately. CADDY ADVANCED CADDY ADVANCED CR PA08506 PA08588...
- Page 18 3.2 Right side installation • Fasten the right blower housing side panel (G) to the top of the blower housing using supplied screws (H). Fasten the left blower housing side panel (G) to the left side of the blower housing, using the •...
- Page 19 Left hand side installation • Secure the left blower housing side panel (G) to the top of the blower housing using the screws (H) supplied. • Secure the right-hand blower housing side panel (G) to the right-hand side of the blower housing, using the screws (H) supplied.
- Page 20 ADAPTING FILTER HOLDER TO ALLOW 1" FILTERS WARNING: Using 1" filters instead of 2" filters may result in the furnace not operating optimally. 2" filters are recommended. • Take one, 1" filter adapter (J) and fasten with metal screws as shown. •...
- Page 21 WIRING DIAGRAM FOR REGULAR MOTOR...
- Page 22 6 ECM MOTOR WIRING DIAGRAM...
- Page 23 7 BLOWER HOUSING DIMENSIONS...
Need help?
Do you have a question about the Caddy PA08581 and is the answer not in the manual?
Questions and answers