Advertisement
Quick Links
SSV WORKS, 201 N. Rice Ave Unit A, Oxnard, CA 93030
www.SSVworks.com | Phone: 818-991-1778 | Fax: 866-293-6751
WARRANTY INFORMATION:
All SSV Works enclosures are covered by a limited lifetime warranty against defects in material or
workmanship. All SSV Works Electronics are covered by a limited 1 year warranty against defects
in material or workmanship. All SSV Works Speakers are covered by a limited lifetime warranty
against defects in material or workmanship. All Kicker Speakers are covered by a limited 1
year warranty against defects in material or workmanship. Labor for replacement of defective
components is not covered. Contact SSV Works for further warranty information.
TOOLS NEEDED FOR INSTALLATION
- T30 & T40 Torx Driver
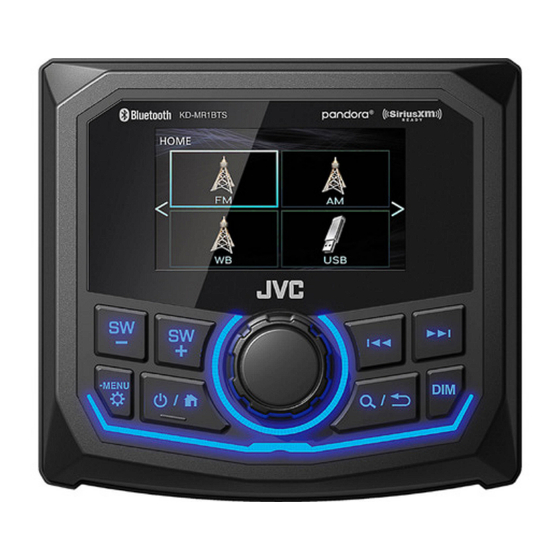
PARTS LIST IMAGES
1. RZ3-DMR1 Base Plate with Blank
Rocker Switches
5. Low Level Harness x1
(B-H2375)
- 10mm and 3/8in Socket & Rachet or Wrench
2. JVC MR1 Headunit
6. MR1 Power Harness x1
(B-H2367)
RZR XP1000 & 2015+ RZR900
!
- #1 & #2 Phillips Screwdriver
3. M3 Screws x4
7. JVC MR1 Trim Ring
RZ3-R1
JVC MR1 Upgrade Kit
Please read and understand these
instructions completely before
installation to avoid possible injury, or
damage to the accessory or vehicle.
- Panel removal tool
4. Mounting Brackets
1
Advertisement

Related Manuals for SSV Works RZ3-R1


Summary of Contents for SSV Works RZ3-R1
- Page 1 WARRANTY INFORMATION: Please read and understand these All SSV Works enclosures are covered by a limited lifetime warranty against defects in material or instructions completely before workmanship. All SSV Works Electronics are covered by a limited 1 year warranty against defects installation to avoid possible injury, or in material or workmanship.
- Page 2 PANELS AND DASH DISASSEMBLY A. Remove all seats by releasing the handle behind each seat, B. Disconect the negative battery cable from the battery. push forward slightly while lifting up. C. Remove hood by turning locking pins and lifting up. D.
- Page 3 PANELS AND DASH DISASSEMBLY F. Remove the factory dash pocket by first extracting the 10mm bolt on the dash frame (F1). Then pull out the dash pocket with bracket attached (F2) - NOTE this bracket will no longer be used for any part of this installation. Extract (2) screws securing the sub dash (F3). Detach and remove the dash. G.
-
Page 4: Warranty Information
All SSV Works enclosures are covered by a limited lifetime warranty against defects in instructions completely before material or workmanship. All SSV Works Electronics are covered by a limited 1 year warranty installation to avoid possible injury, or against defects in material or workmanship. All Kicker Speakers are covered by a limited 1 damage to the accessory or vehicle. - Page 5 The installation of the dash kit panel is complete. Refer to the JVC Once the MR1 is powered on, verify the following presets in the manual for further details. General Settings: Pre-out = Subwoofer Int. Amplifier = On © 2020 SSV Works, Oxnard, CA 93030 RZ3-R1 Rev. A 3-31-20...
Need help?
Do you have a question about the RZ3-R1 and is the answer not in the manual?
Questions and answers