Advertisement
Quick Links
SSV WORKS, 201 N. Rice Ave Unit A, Oxnard, CA 93030
www.SSVworks.com | Phone: 818-991-1778 | Fax: 866-293-6751
WARRANTY INFORMATION:
All SSV Works enclosures are covered by a limited lifetime warranty against defects in
material or workmanship. All SSV Works Electronics are covered by a limited 1 year warranty
against defects in material or workmanship. All SSV Works Speakers are covered by a
limited 1 year warranty against defects in material or workmanship. Labor for replacement of
defective components is not covered. Contact SSV Works for further warranty information.
TOOLS FOR INSTALLATION
PARTS LIST IMAGES
1. WP3-RG34O4 Stereo
4. M10x1.5x35mm Bolt,
Washer and Nut (4)
A. Fasten the driver and passenger brackets to the driver and passenger
side of the unit with (4) M6 screws & washers using a T30 Torx per side.
Passenger side shown.
Always disconnect the battery when installing electronic devices.
- Panel removal tool
- Ratchet
- #2 & #3 Phillips Screwdriver
5. M6 x 1.0 Screws
6. Fuse Holder & Ring Terminal
and Washer (1)
- Cut-off Wheel
- 7mm, 10mm, 15mm & 17mm Deep Socket & Wrenches
- Wire Cutters & Crimpers
2. Mounting Brackets
7. BH1752 - Bus Bar Harness
A
B. If the ranger is equipped with a roof, it must be removed prior to
installing the overhead stereo. The stereo is compatible with both
POLARIS Factory plastic and metal roofs. The factory plastic roof
requires minor modification. Follow steps C-K for plastic roof
modification. Skip to step L if equiped with metal roof or without a roof.
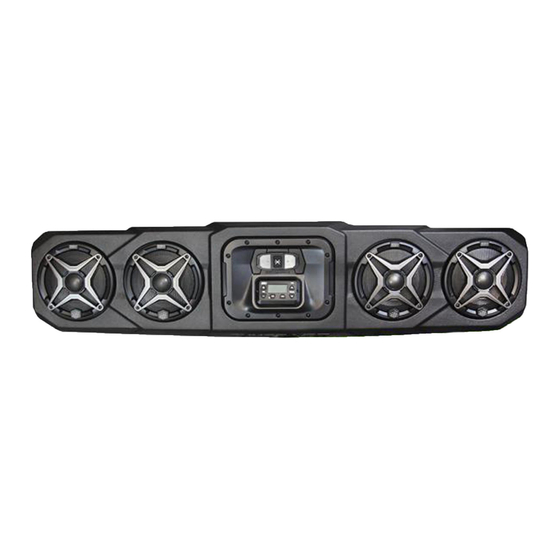
WP3-RG34O4
Polaris Ranger XP900 & XP1000
Overhead 4-Speaker Stereo System
Please read and understand these
!
instructions completely before
installation to avoid possible injury, or
damage to the accessory or vehicle.
- T27. T30, T40 Torx
3. Support Bracket & Hardware (for factory plastic roof)
8. 10" Zip Ties (5)
B
Advertisement

Related Manuals for SSV Works WP3-RG34O4


Summary of Contents for SSV Works WP3-RG34O4
- Page 1 All SSV Works enclosures are covered by a limited lifetime warranty against defects in instructions completely before material or workmanship. All SSV Works Electronics are covered by a limited 1 year warranty installation to avoid possible injury, or against defects in material or workmanship. All SSV Works Speakers are covered by a damage to the accessory or vehicle.
- Page 2 D. To remove the front lock tabs we recommend using a cut off wheel E. Your cuts should resemble the image above. or grinder. Cut off the tabs at the bend. They do not need to be cut flush to the roof WP3-RG34O4...
- Page 3 J. Once the Roof support bracket is secured to the visor tab and roof, pull down K. Re-fasten all hardware to secure the roof to the vehicle. the rear of the roof to engage the rear locking tabs. WP3-RG34O4...
- Page 4 M10 washers and locknuts. Evenly torque the locknuts with a 17mm socket. NOTE: (N2) When lifting the WP3-RG34O4 into position, if the mounting brackets do not align over the ROP visor hardware, the base brackets position need to be adjusted. Lower the unit, use a T30 torx driver to loosen the base bracket fasteners.
- Page 5 P. Route the power/ground and Sub output into the dash cavity (P1). Once in the dash cavity, pull the power/ground and sub output across the dash cavity along the factory harnesses and out through the firewall grommet (P2). The overhead wiring will then be in the exterior hood compartment (P3). Q.
- Page 6 (1) for key-on power or post (3) for constant power. Connect the BLACK ground wire to post (2). U. This concludes the installation process. Reassemble all factory panels. WP3-RG34O4 © 2020 SSV Works, Oxnard, CA 93030 WP3-RG34O4 Rev. B 6-26-20...
Need help?
Do you have a question about the WP3-RG34O4 and is the answer not in the manual?
Questions and answers