
Related Manuals for saunalife Cube-Series


Summary of Contents for saunalife Cube-Series
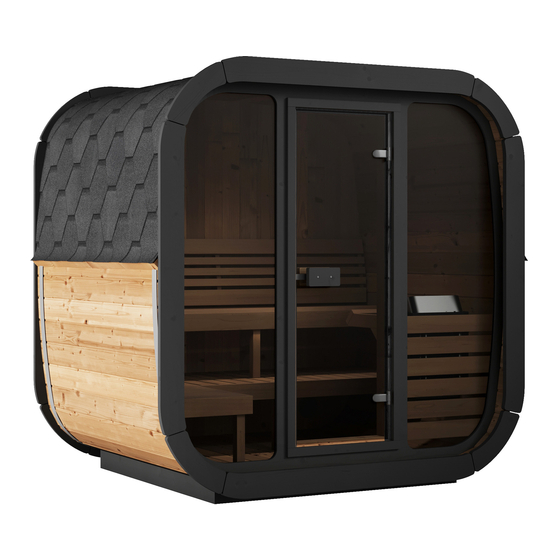
- Page 1 Cube-Series CL4G Outdoor Sauna 50D" x 81W" x 83H" Note: Please read manual before construction Rev: 1.0_6/2024...
- Page 2 Cube-Series CL4G Outdoor Sauna 50D" x 81W" x 83H" 23.23" 80.71 " 77.17" 75.98" 49.80" 17.72" 8.27" Rev: 1.0-6/2024...
-
Page 3: Tools Needed
Tools needed Measuring tape Marker pen Circular saw Water level Hammer Screwdriver Extra hands Drill Cresent wrench Utility knife Rubber mallet Ratchet strap... - Page 4 CL4G Outdoor Sauna 50D" x 81W" x 83H" Details list 1/5 DET 1 Article. K-SM100/1050 DET 2 Article. K-SM100/1300 DET 3 Article. T-STL117/1250XLM01 DET W kmpl Article. MU-TRAPP DET 3 Article. T-STL117/1250-01 DET 3/H Article. T-STL117/1250-01X DET Sb Article. IC-TE-20-PR-12/15V DET Sa Article.
- Page 5 CL4G Outdoor Sauna 50D" x 81W" x 83H" Details list 2/5 DET V Article. KI-VIN-25/40/40-ZN DET U1 Article. K-TL94/1940 DET Y1 Article. T-IC-PTS-20/28-V DET Y2 Article. T-IC-PTS-20/28-P DET U2 Article. K-TL94/1850 DET 6 Article. T-STL117/1250XL-01 DET 6c/d/e/f 1" ³/₈" Article. ³/₄"...
- Page 6 CL4G Outdoor Sauna 50D" x 81W" x 83H" Details list 3/5 DET F Article. MU-VENT-100-ZN DET 10a Article. K-HP44/510XP DET 10c Article. K-HP44/170 DET 10 Article. TL-LAMOD-1930-KA01 DET 10b Article. K-HP44/652 DET 12 Article. TL-LAMOD-1250-01 DET 12a Article. K-HP44/250XP-XP DET 14 Article.
- Page 7 CL4G Outdoor Sauna 50D" x 81W" x 83H" Details list 4/5 DET 21c Article. K-HP44/1690 DET 21d Article. K-HP44/680 DET 21a Article. K-HL44/1660 DET 21b Article. K-HL44/650 DET 16 24.88" 23.74" 3° 8° 24.61" 23.11" 5° Article. 9° 22.16" 24.21" TL-PIMOD-632-01 6°...
- Page 8 CL4G Outdoor Sauna 50D" x 81W" x 83H" Details list 5/5 DET 25a Article. MU-OL-IC-20-1 DET 25b Article. MU-OL-IC-20-2 Article. Article. KI-KERL-12-RV4 KI-USA-ICO-226 L=~9.85" Bit PH2 Torx bits T10 T15 T20 T25 ~250 x230...
- Page 9 CL4G Outdoor Sauna 50D" x 81W" x 83H" Exterior...
- Page 10 CL4G Outdoor Sauna 50D" x 81W" x 83H" Diagonal measurements should be equal! 6x M 3x DET 2 inch=inch Top view. 2x DET 1 6x M inch=inch 2x DET W 3.94" Top view. 3x M 3.94" Side view. DET 3 3.94"...
- Page 11 CL4G Outdoor Sauna 50D" x 81W" x 83H" Use rubber mallet! 20x M 3.94" Side view. 3.94" Use rubber mallet! Side view. Fix screws over the one board, diagonally in every board. Fix DET 3/H with Top view. three screws. Top view.
- Page 12 CL4G Outdoor Sauna 50D" x 81W" x 83H" Front glass-wall assembly Inside Attention! Place backside up! Outside Marking to bottom 4x DET V Outside will have an extra notch around the edge. Top view min.1" 16x J Top view min.1" min.0.79"...
- Page 13 CL4G Outdoor Sauna 50D" x 81W" x 83H" Wooden back wall assembly 2x H Pre-drill holes 5/32" before screws. DET U2 4x I...
- Page 14 CL4G Outdoor Sauna 50D" x 81W" x 83H" DET U1 inside Use waterlevel inch=inch Make sure the marking on the Sauna wall is centered in the notch. midpoint 2x H...
- Page 15 CL4G Outdoor Sauna 50D" x 81W" x 83H" Use waterlevel 4x H DET 3 Fix temporarily to support walls. DET U2 inside Make sure the marking on the wall is centered in the notch. 2x H...
- Page 16 CL4G Outdoor Sauna 50D" x 81W" x 83H" Remove DET 3 from their temporary positions and use during the next step. ~1/4" Use rubber mallet! DET 3 Important! Leave space. IMPORTANT! Be sure to leave a 1/4” gap when tightening screws to leave room for adjustment when the outer bands (A2) are installed.
- Page 17 CL4G Outdoor Sauna 50D" x 81W" x 83H" DET 6/6c DET 3 DET 3 If needed, trim the flat edge of the board to create the desired width. Join boards together (as shown in diagram III) that will bridge the width of the "A" gap. It is recommended that the combined boards are approximately 1/4"...
- Page 18 CL4G Outdoor Sauna 50D" x 81W" x 83H" Place ratchet strap near the ends of the boards. Pay attention to measurement. Then remove screws. Remove screws. min.2.36" Side view. Don´t fix nuts very Don´t fix nuts very tightly yet! DET A2 DET A2 tightly yet! 1xDET A2...
- Page 19 CL4G Outdoor Sauna 50D" x 81W" x 83H" Place ratchet strap near the ends of the boards. Pay attention to measurement. Then remove screws. Remove screws. min.2.36" Side view. Now fix all nuts tightly and DET A2 DET A2 Now fix all nuts tightly! remove ratchet strap! 1xDET A2 DET A1...
- Page 20 CL4G Outdoor Sauna 50D" x 81W" x 83H" Remove all temporary braces Upper vent 1xDET G 6x K Lower vent 3xDET F 6x K Interior...
- Page 21 CL4G Outdoor Sauna 50D" x 81W" x 83H" Use waterlevel for installation! 2x DET 10a 1x DET 10c 6x H Pre-drill holes 5/32" Pre-drill holes 5/32" End view. End view.
- Page 22 CL4G Outdoor Sauna 50D" x 81W" x 83H" Pre-drill holes 5/32" End view. 1x DET 10 Use pre-drilled hole 8x H 2x H 10.87" 1x DET 10b Use pre-drilled hole Sauna midpoint Pre-drill holes 5/32" Pre-drill holes 5/32" 1x DET 14 1x DET 12 3x H 3x M...
- Page 23 CL4G Outdoor Sauna 50D" x 81W" x 83H" Attention! Place door 2x M from inside out. 1x DET 21 Attention! The door must open outwards. If you need the door handle to be on the opposite side, 2x DET 21c rotate door 180 2x DET 21d degrees.
- Page 24 CL4G Outdoor Sauna 50D" x 81W" x 83H" Please be careful!!! Do not hit the glass with the screw. Leave ~0.2". gap from board 1x DET 16 Fasten the screws end coming into contact with at a slight angle. barrel staves! ~0.2"...
- Page 25 CL4G Outdoor Sauna 50D" x 81W" x 83H" ~39.4" 2x DET 22 3x H 3x H...
- Page 26 CL4G Outdoor Sauna 50D" x 81W" x 83H" Underlay felt installation manual. Attention! Refer to underlay installation manual provided in package. Cut off Remove Proceed same way bottom film first. ~2" as shown in diagram I Cut and ~2" over the edge. remove top film over the edge.
- Page 27 CL4G Outdoor Sauna 50D" x 81W" x 83H" DET N Attention! Refer to shingle installation manual provided in package. End view. End view. End view. Cut and use rest of it ~0.35" ~0.35" on the opposite side. Attention! Refer to shingle installation Shingles overlap manual provided in package.
- Page 28 CL4G Outdoor Sauna 50D" x 81W" x 83H" 4xDET 25a 4xDET 25b 4xDET 25a 4xDET 25b 28x H 28x H...
Need help?
Do you have a question about the Cube-Series and is the answer not in the manual?
Questions and answers