Table of Contents
Advertisement
Quick Links
Advertisement
Table of Contents

Related Manuals for Rice Lake ISHIDA UNI-10


Summary of Contents for Rice Lake ISHIDA UNI-10
- Page 1 UNI-10 3rd Edition User Manual December 14, 2023 PN 222152 Rev A...
- Page 2 All information contained within this publication is, to the best of our knowledge, complete and accurate at the time of publication. Rice Lake Weighing Systems reserves the right to make changes to the technology, features, specifications and design of the equipment without notice.
- Page 3 NOTICES This machine is manufactured for use according to proper procedures by a qualified person and only for the purposes described in this manual. The following conventions are used to indicate and classify precautions depending on the level of danger, or seriousness of potential injury. Always heed the information provided in this manual.
- Page 4 PRECAUTIONS FOR SAFE USE PRECAUTIONS FOR SAFE USE It is strongly advised that the following safety measures must be observed to ensure the safe operation of the machine. IMPORTANT Read this manual and the manual enclosed in CD thoroughly, and do not perform installation, operation, maintenance, or inspection unless you fully understand all of the contents.
- Page 5 PRECAUTIONS FOR SAFE USE ● Prepare a dedicated power source and always use a power supply with rated voltage. Never connect the machine power input with an AC power supply exceeding the rated voltage. To avoid any potential electrical shock, ensure that the protective ground wire is connected to the main grounding provision.
- Page 6 PRECAUTIONS FOR SAFE USE ● Do not hold the connector cover when carrying the machine. Dropping the machine may result in injury or cause the machine to break down. ● Do not hold the operation panel or weigh platter when carrying the machine. Doing so may cause the operation panel or the platter to break down.
- Page 7 PRECAUTIONS FOR SAFE USE ● Risk of explosion if battery is replaced by an incorrect type. Make sure to dispose of used batteries according to the instructions. UNI-10 User’s Manual...
- Page 8 PRECAUTIONS FOR SAFE USE PRECAUTION REGARDING FCC RULE IN USA Note: This equipment has been tested and found to comply with the limits for a Class A digital device, pursuant to part 15 of the FCC Rules. These limits are designed to provide reasonable protection against harmful interference when the equipment is operated in a commercial environment.
- Page 9 PRECAUTIONS FOR SAFE USE PRECAUTIONS FOR MACHINE INSTALLATION Do not install the machine in the following types of places: ● ● ● Places subject to high Places subject to excessive Places subject to a lot of dust or temperatures or high humidity vibration or unstable foundations dirt ●...
- Page 10 PRECAUTION SYMBOLS PRECAUTION SYMBOLS This machine is manufactured for use according to proper procedures by a qualified person and only for the purposes described in this manual. The following conventions are used to indicate and classify precautions depending on the level of danger, or seriousness of potential injury. Always heed the information provided in this manual.
-
Page 11: Table Of Contents
TABLE OF CONTENTS TABLE OF CONTENTS CHAPTER 1 BEFORE USE ......................... 1-1 SPECIFICATIONS ........................1-1 PART NAMES ..........................1-3 LEVEL ADJUSTMENT ......................... 1-4 LABEL / RECEIPT ROLL LOADING .................... 1-5 REMOVING & REPLACING OF WEIGHING PLATTER ..............1-7 1.5.1 REMOVING THE WEIGHING PLATTER ................1-7 1.5.2 REPLACING THE WEIGHING PLATTER ................ - Page 12 TABLE OF CONTENTS 2.3.20 VOIDING THROUGH WEIGHING PRODUCTS .............. 2-27 2.3.21 SUBTRACTING TOTALS THROUGH MANUAL ENTRY ..........2-29 2.3.22 SUBTRACTING TOTALS THROUGH WEIGHING PRODUCTS ........2-31 2.3.23 ADDING TOTALS THROUGH MANUAL ENTRY ............2-33 2.3.24 ADDING TOTALS THROUGH WEIGHING PRODUCTS ..........2-35 CHAPTER 3 TOTAL MODE ........................
- Page 13 TABLE OF CONTENTS 4.21 CHECK LABEL DATA ..........................4-60 4.22 STAMP PRICE DATA..........................4-61 4.23 NUTRITION TEXT DATA ..........................4-62 4.24 NUTRITION DATA ............................4-64 CHAPTER 5 SETUP MODE ........................5-1 SETUP MODE ENTRY / EXIT ..................... 5-1 MACHINE NUMBER / NETWORK NUMBER ................5-2 SALES MODE ..........................
-
Page 14: Chapter 1 Before Use
Chapter 1: BEFORE USE BEFORE USE SPECIFICATIONS DESCRIPTIONS 12.1 inch 10.1 inch UNIT ITEM UNI-10 B UNI-10 P UNI-10 H UNI-10 B UNI-10 P UNI-10 H Weighing Weighing 30 lb specification: 0 to 15 lb / 0.005 lb, 15 to 30 lb / 0.010 lb capacity unit (15 kg specification: 0 to 6 kg / 2 g, 6 to 15 kg / 5 g) - Page 15 Chapter 1: BEFORE USE UNI-10 B Type 12.1 inch UNI-10 B Type 10.1 inch UNI-10 H Type Front UNI-10 H Type Rear Uni-10 User’s Manual...
-
Page 16: Part Names
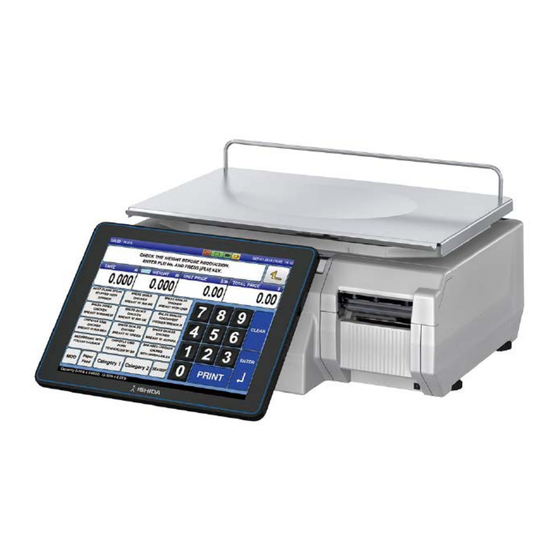
Chapter 1: BEFORE USE PART NAMES DESCRIPTIONS Uni-10 User’s Manual... -
Page 17: Level Adjustment
Chapter 1: BEFORE USE LEVEL ADJUSTMENT Install the machine horizontally to use. Be sure to turn off the power switch before placing the machine on a stable platform, and adjust the machine inclination by turning the four level adjustment legs so that the bubble is located at the center of the level gauge. Accurate measurements cannot be performed if it is not installed horizontally. -
Page 18: Label / Receipt Roll Loading
Chapter 1: BEFORE USE LABEL / RECEIPT ROLL LOADING Raise the Thermal Head Cover, and pull the Cassette to draw out of the main body. Load a new label roll around the Roll Holder and raise the Roll Stopper to fix the roll position. Confirm that the label roll can turn gently with the space from 0.5 to... - Page 19 Chapter 1: BEFORE USE Fix the paper end with the backing paper stopper, and gently turn the Winding Bobbin counterclockwise until the label becomes tight. Slide the label/receipt guide to help smooth paper feeding according to the paper width. Push the Cassette straight into the main body to return to its original position, and lower the Thermal Head Cover.
-
Page 20: Removing The Weighing Platter
Chapter 1: BEFORE USE LABEL / RECEIPT ROLL LOADING 1.5.1 REMOVING THE WEIGHING PLATTER When removing the weighing platter from the main body, lift the front side to pull out the two pins from the two rubber platter holders and remove the platter by pulling it to disengage the two hooks at the rear side of the platter. -
Page 21: Cleaning Of The Machine
Chapter 1: BEFORE USE CLEANING OF THE MACHINE 1.6.1 CLEANING OF THE THEREMAL HEAD Pull out the cassette from the main body. Before pulling out the cassette unit, ensure that nothing is placed on the weighing platter. Use a cotton-tipped swab to clean off the thermal head. Uni-10 User’s Manual... -
Page 22: Cleaning Of The Label Sensor
Chapter 1: BEFORE USE 1.6.2 CLEANING OF THE LABEL SENSOR Pull out the cassette from the main body. Before pulling out the cassette unit, ensure that nothing is placed on the weighing platter. Use a dry cloth to clean off the emitter and receiver of the label sensor. Uni-10 User’s Manual... -
Page 23: Cleaning Of The Print Roller And Prism
Chapter 1: BEFORE USE 1.6.3 CLEANING OF THE PRINT ROLLER AND PRISM Pull out the cassette from the main body. Before pulling out the cassette unit, ensure that nothing is placed on the weighing platter. Use a dry cloth to clean off the print roller and prism. Uni-10 User’s Manual 1-10... -
Page 24: Precautions When Using Cleaning Fluids
Chapter 1: BEFORE USE 1.6.4 PRECAUTIONS WHEN USING CLEANING FLUIDS Use a soft cloth and a neutral detergent to clean the machine. Do not use thinner, benzene, etc. Doing so may damage the original safety functions. For some parts, use cleaning fluid (isopropyl alcohol). ... -
Page 25: Starting Procedures
Chapter 1: BEFORE USE STARTING PROCEDURES 1.7.1 TURNING ON THE POWER The “Clock Check” screen is displayed. Push down the Power Switch to turn on the Check that displayed date and time agree power. with the current date and time, and press the [ENTER] button on the screen to proceed to the next step. -
Page 26: Zero Adjustment
Chapter 1: BEFORE USE 1.7.2 ZERO ADJUSTMENT The “ZERO” indicator lights up and the If the “ZERO” indicator does not appear in the weight value becomes zero. “WEIGHT” field on the initial screen, press the [ZERO] key. 1.7.3 GETTING BACK TO THE INITIAL SCREEN To get back to the initial screen from a Menu The initial screen is displayed. -
Page 27: Chapter 2 Operation Mode
Chapter 2: OPERATION MODE OPERATION MODE OPERATION MODE ENTRY / EXIT Ensure that the initial screen is displayed. Then, press the Return button to display the “Menu” screen. Note: The contents of the initial screen may differ depending on the settings on your machine. The “Menu”... -
Page 28: Screen Examples For Product Categories
Chapter 2: OPERATION MODE SCREEN EXAMPLES FOR PRODUCT CATEGORIES Weighing Products Weighing Fixed Price Products UNI-10 User’s Manual... - Page 29 Chapter 2: OPERATION MODE Non-weighing Fixed Price Products Non-weighing Fixed Weight/Unit Price Products UNI-10 User’s Manual...
-
Page 30: Sales Operations
Chapter 2: OPERATION MODE SALES OPERATIONS 2.3.1 ISSUING LABELS FOR WEIGHING PRODUCTS Press the “SALES” icon on the operation The initial screen is displayed. Note: The contents of the initial screen may differ menu selection screen. depending on the settings on your machine. Enter a PLU number and press the [PLU] key Press a preset product department key to display the associated screen. - Page 31 Chapter 2: OPERATION MODE Put the product on the weighing platter. The designated weighing PLU screen is displayed. EXAMPLE A product to which its unit price and tare weight were set beforehand. The product is weighed and its total price is calculated.
-
Page 32: Issuing Labels For Weighing Fixed Price Products
Chapter 2: OPERATION MODE 2.3.2 ISSUING LABELS FOR WEIGHING FIXED PRICE PRODUCTS Press the “SALES” icon on the operation The initial screen is displayed. Note: The contents of the initial screen may differ menu selection screen. depending on the settings on your machine. Enter a PLU number and press the [PLU] key Press a preset product department key to display the associated screen. - Page 33 Chapter 2: OPERATION MODE The designated weighing PLU screen is Put the product on the weighing platter. displayed. EXAMPLE A product to which its tare weight and price were set beforehand. The product is weighed, but its price stays the same. Press the [PRINT] key to issue a label when “MANUAL”...
-
Page 34: Issuing Labels For Fixed Price Products
Chapter 2: OPERATION MODE 2.3.3 ISSUING LABELS FOR FIXED PRICE PRODUCTS Press the “SALES” icon on the operation The initial screen is displayed. Note: The contents of the initial screen may differ menu selection screen. depending on the settings on your machine. Enter a PLU number and press the [PLU] key Press a preset product department key to display the associated screen. - Page 35 Chapter 2: OPERATION MODE Press the [PRINT] key to issue labels when The designated non-weighing PLU screen is “MANUAL” is set in the “Print Mode” field. displayed. Note: Labels are automatically issued when “AUTO” is set in the “Print Mode” field. Non-traceable products Traceable products Note: To stop printing, press the [PRINT] key again.
-
Page 36: Issuing Labels For Fixed Weight/Unit Price Products
Chapter 2: OPERATION MODE 2.3.4 ISSUING LABELS FOR FIXED WEIGHT/UNIT PRICE PRODUCTS Press the “SALES” icon on the operation The initial screen is displayed. menu selection screen. Note: The contents of the initial screen may differ depending on the settings on your machine. Press a preset product department key to Enter a PLU number and press the [PLU] key display the associated screen. - Page 37 Chapter 2: OPERATION MODE Enter the fixed weight and press the “FIXED The designated non-weighing PLU screen is WEIGHT” field. displayed. EXAMPLEFixed weight “159 g” Non-traceable products Traceable products Note: To stop printing, press the [PRINT] key again. UNI-10 User’s Manual 2-11...
-
Page 38: Issuing Labels Requiring Operator Registration
Chapter 2: OPERATION MODE 2.3.5 ISSUING LABELS REQUIRING OPERATOR REGISTRATION Press the “SALES” icon on the operation The initial screen is displayed. Note: The contents of the initial screen may differ menu selection screen. depending on the settings on your machine. Enter a PLU number and press the [PLU] key Press a preset product department key to display the associated screen. - Page 39 Chapter 2: OPERATION MODE Put the product on the weighing platter. The designated PLU screen is displayed. EXAMPLE A product to which its unit price and tare weight were set beforehand. The product is weighed and its total price is calculated.
-
Page 40: Entering Or Overwriting Tare Weights
Chapter 2: OPERATION MODE 2.3.6 ENTERING OR OVERWRITING TARE WEIGHTS Enter a numerical value and press the Ensure that the designated PLU screen is [T] (Tare) key. displayed. Tare weight “50 g” EXAMPLE 2.3.7 CHANGING UNIT PRICES Enter the unit price and press the “UNIT Ensure that the designated PLU screen is PRICE”... -
Page 41: Changing Fixed Prices
Chapter 2: OPERATION MODE 2.3.8 CHANGING FIXED PRICES Enter the price, and press the “FIXED Ensure that the designated PLU screen is PRICE” field. displayed. “$1.56” EXAMPLE Fixed Price Products 2.3.9 DISCOUNTING UNIT PRICES BY AMOUNT Ensure that the designated PLU screen is Enter the amount to be discounted, and press the “-$ (U/P)”... -
Page 42: Discounting Unit Prices By Percentage
Chapter 2: OPERATION MODE 2.3.10 DISCOUNTING UNIT PRICES BY PERCENTAGE Ensure that the designated PLU screen is Enter the discount percentage, and press the “-% (U/P)” field. displayed. Discount percentage “10%”. EXAMPLE 2.3.11 DISCOUNTING TOTAL PRICES BY AMOUNT Ensure that the designated PLU screen is Enter a discount amount using the numeric keys, and press the “-$”... -
Page 43: Discounting Total Prices By Percentage
Chapter 2: OPERATION MODE 2.3.12 DISCOUNTING TOTAL PRICES BY PERCENTAGE Ensure that the designated PLU screen is Enter the discount percentage, and press the “-%” field. displayed. Discount percentage “10%”. EXAMPLE 2.3.13 CHANGING QUANTITIES Ensure that the designated price PLU screen Enter the quantity and press the [X] key. -
Page 44: Specifying The Number Of Labels
Chapter 2: OPERATION MODE 2.3.14 SPECIFYING THE NUMBER OF LABELS Ensure that the designated PLU screen is Enter the number of labels to be printed and displayed, and confirm that “AUTO” is press the [PRINT] key to print labels. . selected in the “Print Mode”... -
Page 45: Self-Service Operations For Weighing Products
Chapter 2: OPERATION MODE 2.3.15 SELF-SERVICE OPERATIONS FOR WEIGHING PRODUCTS Select a product by pressing the Ensure that the initial screen for self-service corresponding field on the screen. operations is displayed. “Red Grape” (weighing product) EXAMPLE The designated product image is displayed. Put the product on the weighing platter. -
Page 46: Self-Service Operations For Fixed Price Products
Chapter 2: OPERATION MODE 2.3.16 SELF-SERVICE OPERATIONS FOR FIXED PRICE PRODUCTS Ensure that the initial screen for self-service Select a product by pressing the corresponding field on the screen. operations is displayed. “APPLE ROYAL” EXAMPLE The designated product image is displayed. Enter the quantity and press the [MULTI] key. -
Page 47: Accumulations Through Manual Entry
Chapter 2: OPERATION MODE 2.3.17 ACCUMULATIONS THROUGH MANUAL ENTRY The “Input Numerical Accumulation” screen Ensure that the operation menu selection is displayed. screen is displayed. Then, press the “ACC (Accumulation)” icon. The “Input Numerical Accumulation” screen Press the input field at the right-bottom of the screen to display the keypad. - Page 48 Chapter 2: OPERATION MODE The accumulation procedure has been completed. 12.1 / 10.1 inch Display 12.1 inch 10.1 inch Enter Enter UNI-10 User’s Manual 2-22...
-
Page 49: Accumulations Through Weighing Products
Chapter 2: OPERATION MODE 2.3.18 ACCUMULATIONS THROUGH WEIGHING PRODUCTS Ensure that the operation menu selection The “Input Numerical Accumulation” screen screen is displayed. is displayed. Then, press the “ACC (Accumulation)” icon. Press the “WGT. ACC” tab to display the Press the input field at the right-bottom of the screen to display the keypad. - Page 50 Chapter 2: OPERATION MODE The confirmation screen is displayed. Remove the product from the weighing platter. Press [EXEC] to continue, or [STOP] to go The accumulation procedure has been back. completed. UNI-10 User’s Manual 2-24...
-
Page 51: Voiding Registrations Through Manual Entry
Chapter 2: OPERATION MODE 2.3.19 VOIDING REGISTRATIONS THROUGH MANUAL ENTRY Ensure that the operation menu selection The “Input Numerical Accumulation” screen screen is displayed. is displayed. Then, press the “ACC (Accumulation)” icon. Press the “NUM. VOID” tab to display the Press the input field at the right-bottom of the screen to display the keypad. - Page 52 Chapter 2: OPERATION MODE The confirmation screen is displayed. The void procedure has been completed. Press [EXEC] to continue, or [STOP] to go back. UNI-10 User’s Manual 2-26...
-
Page 53: Voiding Through Weighing Products
Chapter 2: OPERATION MODE 2.3.20 VOIDING THROUGH WEIGHING PRODUCTS Press the “ACC (Accumulator)” icon. The “Input Number Accumulation” screen is displayed. To display the “Weighing Void” screen, press Press the input field at the right-bottom of the screen to display the keypad. the “WGT. - Page 54 Chapter 2: OPERATION MODE The confirmation screen is displayed. Remove the product from the weighing platter. Press [EXEC] to continue, or [STOP] to go The void procedure has been completed. back. UNI-10 User’s Manual 2-28...
-
Page 55: Subtracting Totals Through Manual Entry
Chapter 2: OPERATION MODE 2.3.21 SUBTRACTING TOTALS THROUGH MANUAL ENTRY Press the “TOTAL ADJUST” icon. The “Total Adjust (Input Number Subtraction)” screen is displayed. The Total Adjust (Input Number Subtraction) Press the input field at the right-bottom of the screen for the selected product is displayed. screen to display the keypad. - Page 56 Chapter 2: OPERATION MODE The subtraction procedure has been completed. UNI-10 User’s Manual 2-30...
-
Page 57: Subtracting Totals Through Weighing Products
Chapter 2: OPERATION MODE 2.3.22 SUBTRACTING TOTALS THROUGH WEIGHING PRODUCTS Press the “TOTAL ADJUST” icon. The “Total Adjust (Input Number Subtraction)” screen is displayed. To display the “Total Adjust (Weighing Press the input field at the right-bottom of the Subtraction)” screen, press the “WGT. SUB” screen to display the keypad. - Page 58 Chapter 2: OPERATION MODE The confirmation screen is displayed. Remove the product from the weighing platter to complete the subtraction procedure. Press [EXEC] to continue, or [STOP] to go back. UNI-10 User’s Manual 2-32...
-
Page 59: Adding Totals Through Manual Entry
Chapter 2: OPERATION MODE 2.3.23 ADDING TOTALS THROUGH MANUAL ENTRY Press the “TOTAL ADJUST” icon. The “Total Adjust (Input Number Subtraction)” screen is displayed. To display the “Total Adjust (Input Number Press the input field at the right-bottom of the screen to display the keypad. - Page 60 Chapter 2: OPERATION MODE The confirmation screen is displayed. The addition procedure has been completed. Press [EXEC] to continue, or [STOP] to go back. UNI-10 User’s Manual 2-34...
-
Page 61: Adding Totals Through Weighing Products
Chapter 2: OPERATION MODE 2.3.24 ADDING TOTALS THROUGH WEIGHING PRODUCTS Press the “TOTAL ADJUST” icon. The “Total Adjust (Input Number Subtraction)” screen is displayed. To display the “Total Adjust (Weighing Add)” Press the input field at the right-bottom of the screen to display the keypad. - Page 62 Chapter 2: OPERATION MODE The confirmation screen is displayed. Remove the product from the weighing platter to complete the addition procedure. Press [EXEC] to continue, or [STOP] to go back. UNI-10 User’s Manual 2-36...
-
Page 63: Chapter 3 Total Mode
Chapter 3: TOTAL MODE TOTAL MODE TOTAL MODE ENTRY / EXIT Make sure that the initial screen is displayed. Press the [TOTAL] button. Then, press the Return button on the screen to display the “Menu” screen. Note: The contents of the initial screen may differ depending on the settings on your machine. -
Page 64: Daily Totals
Chapter 3: TOTAL MODE DAILY TOTALS The total menu selection screen is The “Production Daily Total (Total)” screen displayed. is displayed. To display the “Production Daily Total To display the “Production Daily Total (Department)” screen, press the “DEPT.” (Hourly)” screen, press the “HOUR” tab. ... - Page 65 Chapter 3: TOTAL MODE To display the “Production Daily Total (PLU)” To display the “Production Daily Total screen, press the “PLU” tab. (Group)” screen, press the “GROUP” tab. Press the input field at the right-bottom of the screen to display the keypad. Then, enter a desired PLU number and press the [PLU] key on the keypad.
- Page 66 Chapter 3: TOTAL MODE Select the target reports by pressing a Select the listing order by pressing a desired desired button. button. The total analysis is performed for all products. DEPT. The total analysis is performed for all departments. GROUP The total analysis is performed for all groups.
-
Page 67: Weekly Totals
Chapter 3: TOTAL MODE WEEKLY TOTALS Press the “PROD. WEEKLY” icon. The Weekly Total (Week) screen is displayed. To display the “Production Weekly Total” total for the day-of-the week, press a desired day-of-the week tab. To turn pages, press the [ ] or [ ... -
Page 68: Cumulative Totals
Chapter 3: TOTAL MODE CUMULATIVE TOTALS Press the “PROD. CUM. TOTAL” icon. The “Cumulative Total (Total) screen is displayed. To display total for groups, press the To display total for departments, press the “GROUP” tab. “DEPT.” tab. To display analysis totals, press the “TYPE” To display total for operators, press the “OPER.”... - Page 69 Chapter 3: TOTAL MODE Z PRICE The total analysis is performed in ascending price order. Z WEIGHT The total analysis is performed in ascending weight order. Z PCS The total analysis is performed in ascending quantity order. Select the target reports and listing order by pressing desired buttons, and press the [ANALYSIS] button.
-
Page 70: Traceability Totals
Chapter 3: TOTAL MODE TRACEABILITY TOTALS Press the “TRACE. TOTAL” icon. For more information, refer to the Service Manual for UNI-10. UNI-10 User’s Manual... -
Page 71: Preset Reports
Chapter 3: TOTAL MODE PRESET REPORTS Press the “PRESET REPORT” icon. The “Preset Report” screen is displayed. Select a desired report type by pressing the corresponding fields. Press the [PRINT] button to issue the selected reports. UNI-10 User’s Manual... -
Page 72: Total Clear
Chapter 3: TOTAL MODE TOTAL CLEAR Press the “TOTAL CLEAR” icon. The “Total Clear” screen is displayed. Select desired reports to be cleared by The confirmation screen is displayed. pressing the corresponding fields. Press [EXEC] to continue, or [STOP] to go Then, press the [DELETE] button. -
Page 73: Chapter 4 Program Mode
Chapter 4: PROGRAM MODE PROGRAM MODE PROGRAM MODE ENTRY / EXIT The “Menu” screen is displayed. Ensure that the initial screen is displayed, and press the Return button on the screen. Then, press the [PROGRAM] button. Note: The contents of the initial screen may differ depending on the settings on your machine. -
Page 74: Plu Data
Chapter 4: PROGRAM MODE PLU DATA Press the “PLU” icon on the menu selection The “PLU” screen is displayed. screen. To turn pages, press [ ] or [ The “PLU Detail (Sales)” screen is displayed. Select a desired PLU by pressing the To edit the PLU name, press the name field. - Page 75 Chapter 4: PROGRAM MODE ] or [ ] to select a desired sales mode. Press [ 0: Weight (for selling weighing products) 1: Fix price (for selling fixed price products) 2: Weight fix price (for selling weighing fixed price products) SALES MODE 3: Fix unit price (for selling fixed unit price products) 4: Weight (100 g) (when the setting of the unit price per 100 g is needed in...
- Page 76 Chapter 4: PROGRAM MODE Press the “UNIT TYPE” field to display the “Fix Price Symbol” screen. Then, press a desired field for selection. UNIT TYPE Enter the packed quantity and press this field. Enter the tare percentage and press this field. TARE Enter the lower weight limit and press this field.
- Page 77 Chapter 4: PROGRAM MODE ITEM DESCRIPTIONS ] or [ ] to select whether or not to use the point flag. Press [ POINT FLAG 0: OFF 1: ON ] or [ ] to select a desired point type. Press [ POINT TYPE 0: Weight 1: Fixed weight...
- Page 78 Chapter 4: PROGRAM MODE The selected image has been registered. The “Image” screen is displayed. Press [NO PRINT] or [PRINT] in the “Safe Handling Image” field to select whether or Press a desired image for selection. not to print the image. The Display Image screen is displayed.
- Page 79 Chapter 4: PROGRAM MODE The selected image has been registered. Press [NO PRINT] or [PRINT] in the “Safe Handling Image” field to select whether or not to print the image. Press the “PRINT” tab to display the PLU / Detail (Print) screen. ITEM DESCRIPTIONS 1st LABEL FORMAT...
- Page 80 Chapter 4: PROGRAM MODE Press the “DATE” tab to display the PLU / Detail (Date) screen. ITEM DESCRIPTIONS Press [YES] or [NO] in this field to select whether or not to print the packed PACK DATE PRINT date. ] or [ ] to select a desired pack time printing method.
- Page 81 Chapter 4: PROGRAM MODE Press the “CODE” tab to select the PLU / Detail (Code) screen. DESCRIPTIONS ITEM ITEM CODE Enter an item code and press this field. REG CODE Enter the register code and press this field. This field is available only when “1: PLU File” is selected in “POS REFERENCE”.
- Page 82 Chapter 4: PROGRAM MODE Press this field to display the Barcode Format screen, and press a desired barcode format for selection. POS FORMAT (WGT) Press [YES] or [NO] in this field to select whether or not to enable a TRACE ENABLE traceability function.
-
Page 83: Campaign Data
Chapter 4: PROGRAM MODE CAMPAIGN DATA The “Campaign” screen is displayed. Press the “CAMPAIGN” icon on the menu To create the first data, press the [NEW] selection screen. button. To call up desired data, press the Input field To change existing data, press a desired field for selection and then the [DETAIL] button. - Page 84 Chapter 4: PROGRAM MODE The designated “Campaign / Detail (Data)” The PLU screen is displayed. screen is displayed. Press a desired item field for selection. Press the “MD MODE” field. The Campaign / Mode List screen is displayed. Press a desired field for selection. Percent discount “-%”...
-
Page 85: Operator Data
Chapter 4: PROGRAM MODE OPERATOR DATA The “Operator” screen is displayed. Press the “OPERATORS” icon on the menu To call up desired data, press the Input field selection screen. at the bottom right of the screen to display the keypad. Then, enter a numerical value and press the [PLU] key on the keypad. - Page 86 Chapter 4: PROGRAM MODE To set a password, press the Input field at the To finish the editing, press the Return button. bottom right of the screen to display the keypad. Enter the 4-digit numerical value and press the [SET] key on the keypad, and then press the “PASSWORD”...
-
Page 87: Preset Key Registration
Chapter 4: PROGRAM MODE PRESET KEY REGISTRATION 4.5.1 SETTING PRESET GROUPS AND PAGES The Preset Key screen is displayed. Press the “PRESET KEY” icon on the menu Press a desired field for selection, and press selection screen. the [DETAIL] button. The edit screen is displayed. -
Page 88: Setting Preset Keys
Chapter 4: PROGRAM MODE 4.5.2 SETTING PRESET KEYS The “Preset Key” screen is displayed. Press the “PRESET KEY” icon on the menu Press a desired field for selection, and press selection screen. the [DETAIL] button. Select the group and the page where you Available preset keys are listed on the screen. - Page 89 Chapter 4: PROGRAM MODE Press a desired function for selection. EXAMPLE Selecting the PLU function The PLU screen is displayed. The selected preset key has been assigned. Press a desired field for selection. EXAMPLE PLU No.3 UNI-10 User’s Manual 4-17...
-
Page 90: Changing Preset Key Sizes And Positions
Chapter 4: PROGRAM MODE 4.5.3 CHANGING PRESET KEY SIZES AND POSITIONS The “Preset Key” screen is displayed. Press the “PRESET KEY” icon on the menu Press a desired field for selection, and press selection screen. the [DETAIL] button. The size and position editing screen is Select the group and the page that the preset displayed. -
Page 91: Editing Preset Keys
Chapter 4: PROGRAM MODE 4.5.4 EDITING PRESET KEYS The “Preset Key” screen is displayed. Press the “PRESET KEY” icon on the menu Press a desired field for selection, and press selection screen. the [DETAIL] button. Select the group and the page that the preset The editing screen is displayed. - Page 92 Chapter 4: PROGRAM MODE To change the font size, press the “TITLE The font size has been changed. FONT” or ”FONT” field, enter a numerical value, and press the [SET] button on the keypad. The “Preset Key / Name Edit” screen is To change the preset key title, press the “TEXT EDIT”...
- Page 93 Chapter 4: PROGRAM MODE The Preset Key / Image screen is displayed. To assign a desired image to the preset key, Press a desired image for selection. press the “IMAGE No.” field. Note: To use images stored in the USB memory, press [STORAGE] key.
- Page 94 Chapter 4: PROGRAM MODE Press a desired color for selection. The selected color has been applied to the background of the key. To change the font color, press the “UPPER Press a desired color for selection. TEXT” or “LOWER TEXT” field. The selected color has been applied to the To change the preset key operation, press the “FUNC No.”...
- Page 95 Chapter 4: PROGRAM MODE Available functions are listed on the screen. To change the PLU number called up by the preset key, press the “DATA” field. for selection Press a desired function The PLU screen is displayed. Upon completion of all settings, press the Return button.
-
Page 96: Deleting Preset Keys
Chapter 4: PROGRAM MODE 4.5.5 DELETING PRESET KEYS The “Preset Key” screen is displayed. Press the “PRESET KEY” icon on the menu Press a desired field for selection, and press selection screen. the [DETAIL] button. Select the group and the page that the preset The selected key has been deleted. -
Page 97: Advertisement Messages
Chapter 4: PROGRAM MODE ADVERTISEMENT MESSAGES The “Advertisement Message” screen is Press the “AD MSG.” icon on the menu displayed. selection screen. To create the first data, press the [NEW] button. To call up desired data, press the Input field To change existing data, press a desired field for selection and then the [DETAIL] button. - Page 98 Chapter 4: PROGRAM MODE The “Advertisement Message / Detail / Edit” To exit the edit mode, press the Return button. screen is displayed. Edit a desired message according to the procedure described in Appendix “Text Editing”. The confirmation screen is displayed. To confirm changes, press [SAVE].
- Page 99 Chapter 4: PROGRAM MODE The “Advertisement Message / Detail (Text)” screen is displayed. ITEM DESCRIPTIONS ] or [ ] to select a desired text display type. Press [ 0: None TEXT DISPLAY TYPE 1: Slide 2: Flash ] or [ ] to select a desired display type.
- Page 100 Chapter 4: PROGRAM MODE Press the “IMAGE” tab to display the Press a desired field to display the Image “Advertisement Message / Detail (Image)” screen. screen. The “Advertisement Message / Image” The selected image has been assigned in the designated field. screen is displayed.
-
Page 101: Schedule Data
Chapter 4: PROGRAM MODE SCHEDULE DATA Press the “SCHEDULER” icon on the menu To call up a desired data number, press the Input field at the bottom right of the screen to selection screen. display the keypad. Then, enter a desired numerical value and press the [PLU] key on the keypad. - Page 102 Chapter 4: PROGRAM MODE To enter the start time, press the “START To enter the end date, press the “END DATE” field, enter a numerical value, and press the TIME” field, enter a numerical value, and [SET] key on the keypad. press the [SET] key on the keypad.
-
Page 103: Store Data
Chapter 4: PROGRAM MODE STORE DATA The “Store” screen is displayed. Press the “STORE” icon on the menu To call up desired data, press the Input field selection screen. at the bottom right of the screen to display the keypad. Then, enter a numerical value and press the [PLU] key on the keypad. - Page 104 Chapter 4: PROGRAM MODE The “Store / Name Edit” screen is displayed The “Store / Detail” screen is displayed. for the selected store number. Press the name field. Edit text according to the procedure described in Appendix “Text Editing”. Press the Return button to finish the editing. The confirmation screen is displayed.
- Page 105 Chapter 4: PROGRAM MODE The “Store / Edit Address” screen is Press the Return button to finish the editing. displayed. Edit text according to the procedure described in Appendix “Text Editing”. The store address has been registered. The confirmation screen is displayed. To confirm changes, press [SAVE].
-
Page 106: Department Name Data
Chapter 4: PROGRAM MODE DEPARTMENT NAME DATA The “Department” screen is displayed. Press the “DEPARTMENT” icon on the To create the first data, press the [NEW] menu selection screen. button. To change existing data, press a desired field To call up desired data, press the Input field for selection and press the [DETAIL] button. - Page 107 Chapter 4: PROGRAM MODE The confirmation screen is displayed. Press the Return button to finish the editing. To confirm changes, press [SAVE]. To undo changes, press [CANCEL]. The edited data has been registered. UNI-10 User’s Manual 4-35...
-
Page 108: Group Name Data
Chapter 4: PROGRAM MODE 4.10 GROUP NAME DATA Press the “GROUP” icon on the menu The “Group” screen is displayed. To create the first data, press the [NEW] selection screen. button. To change existing data, press a desired field To call up desired data, press the Input field for selection and then the [DETAIL] button. - Page 109 Chapter 4: PROGRAM MODE Press the Return button to finalize the edited The confirmation screen appears. Press [EXEC] to continue, or [STOP] to go text. back. The edited data has been registered. UNI-10 User’s Manual 4-37...
-
Page 110: Cooking Instruction Data
Chapter 4: PROGRAM MODE 4.11 COOKING INSTRUCTION DATA The “Cooking Time” screen is displayed. Press the “COOKING TIME” icon on the To create the first data, press the [NEW] menu selection screen. button. To change existing data, press a desired field To call up desired data, press the Input field for selection and then the [DETAIL] button. - Page 111 Chapter 4: PROGRAM MODE Press the Return button to finish the editing. The confirmation screen is displayed. To confirm changes, press [SAVE]. To undo changes, press [CANCEL]. The edited data has been registered. Press the Input field at the bottom right of the screen to display the keypad.
-
Page 112: Extra Message Data
Chapter 4: PROGRAM MODE 4.12 EXTRA MESSAGE DATA Press the “EXTRA MSG.” icon on the menu The “Extra Message” screen is displayed. To create the first data, press the [NEW] selection screen. button. To change existing data, press a desired field To call up a desired data number, press the for selection and then the [DETAIL] button. - Page 113 Chapter 4: PROGRAM MODE Press the Return button to finish the editing. The confirmation screen is displayed. To confirm changes, press [SAVE]. To undo changes, press [CANCEL]. The edited data has been registered. UNI-10 User’s Manual 4-41...
-
Page 114: Coupon Message Data
Chapter 4: PROGRAM MODE 4.13 COUPON MESSAGE DATA The “Coupon Message” screen is displayed. Press the “COUPON MSG.” icon on the To create the first data, press the [NEW] menu selection screen. button. To change existing data, press a desired field To call up desired data, press the Input field for selection and then the [DETAIL] button. - Page 115 Chapter 4: PROGRAM MODE Press the Return button to finish the editing. The confirmation screen is displayed. To confirm changes, press [SAVE]. To undo changes, press [CANCEL]. The edited data has been registered. UNI-10 User’s Manual 4-43...
-
Page 116: Pop Message Data
Chapter 4: PROGRAM MODE 4.14 POP MESSAGE DATA Press the “POP MSG.” icon on the menu The “POP Message” screen is displayed. selection screen. To create the first data, press the [NEW] button. To call up desired data, press the Input field To change existing data, press a desired field for selection and then the [DETAIL] button. - Page 117 Chapter 4: PROGRAM MODE Press the Return button to finish the editing. The confirmation screen is displayed. To confirm changes, press [SAVE]. To undo changes, press [CANCEL]. The edited data has been registered. UNI-10 User’s Manual 4-45...
-
Page 118: Scheme Table Data
Chapter 4: PROGRAM MODE 4.15 SCHEME TABLE DATA Press the “SCHEME TABLE” icon on the The “Scheme Table” screen is displayed. To create the first data, press the [NEW] menu selection screen. button. To call up desired data, press the Input field To change existing data, press a desired field for selection and then the [DETAIL] button. - Page 119 Chapter 4: PROGRAM MODE The “Scheme Table / Edit screen” is Press the Return button to finish the editing. displayed. Edit text according to the procedure described in Appendix “Text Editing”. The confirmation screen is displayed. The edited data has been registered. To confirm changes, press [SAVE].
- Page 120 Chapter 4: PROGRAM MODE ITEM DESCRIPTIONS Press this field to select whether or not to use this lot number. RETAIN LOT No. 0: No 1: Yes PASSPORT FORMAT No. Enter a numerical value and press this field. ICON No. Enter a numerical value and press this field. LIFE OFFSET Enter a numerical value and press this field.
- Page 121 Chapter 4: PROGRAM MODE The edited data has been registered. Upon completion of the table data registration, press the Return button. UNI-10 User’s Manual 4-49...
-
Page 122: Gen Table Data
Chapter 4: PROGRAM MODE 4.16 GEN TABLE DATA Press the “GEN TABLE” icon on the menu The “GEN Table” screen is displayed. selection screen. Press a desired field for selection. Enter a numerical value, press the applicable To change the text, press the [EDIT] button. field, and press the [SET] key. - Page 123 Chapter 4: PROGRAM MODE The confirmation screen is displayed. The edited data has been registered. To confirm changes, press [SAVE]. To undo changes, press [CANCEL]. UNI-10 User’s Manual 4-51...
-
Page 124: Lookup Table Data
Chapter 4: PROGRAM MODE 4.17 LOOKUP TABLE DATA Press the “LOOKUP TABLE” icon on the The “Lookup Table” screen is displayed. To create the first table, press the [NEW] menu selection screen. button. To change existing data, press a desired field To call up desired data, press the Input field for selection and then the [DETAIL] button. - Page 125 Chapter 4: PROGRAM MODE Press the Return button to finish the editing. The confirmation screen is displayed. To confirm changes, press [SAVE]. To undo changes, press [CANCEL]. To create the first data, press the [NEW] The edited text has been registered. button.
- Page 126 Chapter 4: PROGRAM MODE The Lookup Data / Text Edit screen is Press the Return button to finish the editing. displayed. Edit text according to the procedure described in Appendix “Text Editing”. The edited data has been registered. The confirmation screen is displayed. To confirm changes, press [SAVE].
-
Page 127: Mince Traceability Data
Chapter 4: PROGRAM MODE 4.18 MINCE TRACEABILITY DATA Press the "MINCE TRACE.” icon on the The “Mince Traceability” screen is displayed. Press a desired field for selection. menu selection screen. Press the Return button to complete the The keypad is displayed. procedure. -
Page 128: Fixed Price Symbols
Chapter 4: PROGRAM MODE 4.19 FIXED PRICE SYMBOLS Press the "FIX PRICE SYMBOL” icon on the The “Fix Price Symbol” screen is displayed. menu selection screen. Press the Input field at the bottom right of the Enter a desired table number and press the screen to display the keypad. - Page 129 Chapter 4: PROGRAM MODE The edited text has been registered. The confirmation screen is displayed. To confirm changes, press [SAVE]. To undo changes, press [CANCEL]. UNI-10 User’s Manual 4-57...
-
Page 130: Free Message Data
Chapter 4: PROGRAM MODE 4.20 FREE MESSAGE DATA The “Free Message” screen is displayed. Press the "FREE MSG.” icon on the menu To create the first message, press the [NEW] selection screen. button. To change existing data, press a desired field To call up desired data, press the Input field for selection and then the [DETAIL] button. - Page 131 Chapter 4: PROGRAM MODE The confirmation screen is displayed. Press the Return button to finish the editing. To confirm changes, press [SAVE]. To undo changes, press [CANCEL]. The edited data has been registered. UNI-10 User’s Manual 4-59...
-
Page 132: Check Label Data
Chapter 4: PROGRAM MODE 4.21 CHECK LABEL DATA Press the "CHECK LABEL” icon on the The “Check Label” screen is displayed. menu selection screen. Press a desired field. Enter the start number and the end number Press the [STRAT] button to print a label. via the keypad, and press the [SET] key. -
Page 133: Stamp Price Data
Chapter 4: PROGRAM MODE 4.22 STAMP PRICE DATA Press the "STAMP PRICE” icon on the menu The “Stamp Price” screen is displayed. Press a desired field for selection. selection screen. Enter the stamp price and the reference price via the keypad, and press the [SET] key. -
Page 134: Nutrition Text Data
Chapter 4: PROGRAM MODE 4.23 NUTRITION TEXT DATA The “Nutrition Text” screen is displayed. Press the "NUTRITION TEXT” icon on the To create the first text, press the [NEW] menu selection screen. button. To call up desired data, press the Input field To change existing data, press a desired field for selection and then the [DETAIL] button. - Page 135 Chapter 4: PROGRAM MODE The “Nutrition Text / Edit” screen is Press the Return button to finish the editing. displayed. Edit text according to the procedure described in Appendix “Text Editing”. The edited data has been registered. The confirmation screen is displayed. To confirm changes, press [SAVE].
-
Page 136: Nutrition Data
Chapter 4: PROGRAM MODE 4.24 NUTRITION DATA Press the "NUTRITION” icon on the The “Nutrition” screen is displayed. To create the first text, press the [NEW] menu selection screen. button. To call up desired data, press the Input field To change existing data, press a desired field at the bottom right of the screen to display for selection and then the [DETAIL] button. - Page 137 Chapter 4: PROGRAM MODE The “Nutrition / Edit” screen is Press the Return button to finish the editing. displayed. Edit text according to the procedure described in Appendix “Text Editing”. The edited data has been registered. The confirmation screen is displayed. To confirm changes, press [SAVE].
-
Page 138: Chapter 5 Setup Mode
Chapter 5: SETUP MODE SETUP MODE SETUP MODE ENTRY / EXIT The “Menu” screen is displayed. Ensure that the initial screen is displayed. Then, press the [SETUP] button. Then, press the Return button on the screen to display the “Menu” screen. Note: The contents of the initial screen may differ depending on the settings on your machine. -
Page 139: Machine Number / Network Number
Chapter 5: SETUP MODE MACHINE NUMBER / NETWORK NUMBER Press the “MACHINE No.” icon on the menu The “Machine No. (Basic)” screen is displayed. selection screen. Press a desired field for selection. Enter a numerical value via the keypad and press the [SET] key. - Page 140 Chapter 5: SETUP MODE The confirmation screen is displayed. Press [EXEC] to continue, or [STOP] to go back. UNI-10 User’s Manual...
-
Page 141: Sales Mode
Chapter 5: SETUP MODE SALES MODE The “Sales Mode” screen is displayed. Press the “SALES MODE” icon on the menu Then, select a desired sales mode by selection screen. pressing the corresponding button. “With Operator” EXAMPLE Press the Return button to complete the procedure. -
Page 142: Password
Chapter 5: SETUP MODE PASSWORD Press the “PASSWORD” icon on the menu The “Password (Operate)” screen is displayed. selection screen. Press the “PROGRAM” tab to display the Press the “TOTAL” tab to display the “Password (Program)" screen. “Password (Total)” screen. ... - Page 143 Chapter 5: SETUP MODE Press the “SETUP” tab to display the “Password (Setup)” screen. To turn pages, press [ ] or [ Press the “ADJUST” tab to display the “Password (Adjust)" screen. UNI-10 User’s Manual...
- Page 144 Chapter 5: SETUP MODE Press the “PASSWORD” field to display the Select a desired mode by pressing the corresponding tab, and press any selection keypad. Enter a 6-digit password and press [SET] key buttons to set whether or not to prompt the on the keypad.
-
Page 145: Key Lock
Chapter 5: SETUP MODE KEY LOCK Press the “KEY LOCK” icon on the menu The “Key Lock (Display Key)” screen is displayed. selection screen. Press the “FUNCTION KEY” tab to display the “Key Lock (Function Key)” screen. To turn pages, press [ ] or [ ... - Page 146 Chapter 5: SETUP MODE UNI-10 User’s Manual...
- Page 147 Chapter 5: SETUP MODE Press the “PASSWORD” field to display the Select a desired key category by pressing the keypad. corresponding tab, and press any selection Then, enter a 6-digit password and press the buttons to lock or unlock lock the key. [SET] key on the keypad.
-
Page 148: Data Storage
Chapter 5: SETUP MODE DATA STORAGE Press the “DATA STORAGE” icon on the The “Data Staorage (Total Add)” screen is displayed. menu selection screen. To turn pages, press [ ] or [ Press any selection buttons to set whether or not to apply the total addition function for each menu. -
Page 149: Preset Report
Chapter 5: SETUP MODE PRESET REPORT Press the “PRESET REPORT” icon on the The “Preset Report (Daily)” screen is displayed. menu selection screen. To turn pages, press [ ] or [ Press the “WEEKLY” tab to display the “Preset Report (Weekly)”... - Page 150 Chapter 5: SETUP MODE Press the “CUMULATIVE” tab to display the “Preset Report (Cumulative)” screen. To turn pages, press [ ] or [ Select a desired report type by pressing the Press the Return button to complete the procedure.
-
Page 151: Plu Overwrite
Chapter 5: SETUP MODE PLU OVERWRITE Press the “PLU OVERWRITE” icon on the The “PLU Overwrite” screen is displayed. menu selection screen. To turn pages, press [ ] or [ Note: Display items may vary depending on the country setting. - Page 152 Chapter 5: SETUP MODE Press the Return button to complete the procedure. UNI-10 User’s Manual 5-15...
-
Page 153: Plu Initial Data
Chapter 5: SETUP MODE PLU INITIAL DATA Press the “PLU INITIAL DATA” icon on the The “PLU Initial Data (Sale 1)” screen is displayed. menu selection screen. ] or [ ] to select a desired sales mode. Press [ 0: Weight (for selling weighing products) SALES MODE 1: Fix price (for selling fixed price products) 2: Weight fix price (for selling weighing fixed price products) - Page 154 Chapter 5: SETUP MODE ] or [ ] to select a desired markdown mode. Press [ 0: Normal price 1: Special price 2: Amount discount for total price MARKDOWN MODE 3: Percent discount for total price 4: Special unit price 5: Amount discount for unit price 6: Percent discount for unit price M/D AMOUNT...
- Page 155 Chapter 5: SETUP MODE Press the “SALE 2” tab to display the “PLU Initial Data (Sale 2)” screen. DESCRIPTIONS ITEM ] or [ ] to select whether or not to use the point flag. Press [ POINT FLAG 0: OFF 1: ON ] or [ ] to select a desired point type.
- Page 156 Chapter 5: SETUP MODE The “Extra Message” screen is displayed. The selected message has been registered. Press a desired field for selection. Press the “IMAGE” tab to display the “PLU Press a desired field for selection. Initial Data (Image)” screen. UNI-10 User’s Manual 5-19...
- Page 157 Chapter 5: SETUP MODE The “Image” screen is displayed. The selected image has been registered. Press [NO PRINT] or [PRINT] in the “Safe Press a desired image for selection. Handling Image” field to select whether or not to print the image. Press the Display Image field.
- Page 158 Chapter 5: SETUP MODE Press the “PRINT” tab to display the “PLU Initial Data (Print)” screen. ITEM DESCRIPTIONS 1st LABEL FORMAT Enter a desired format number and press this field. No. (M) 2nd LABEL Enter a desired format number and press this field. FORMAT No.
- Page 159 Chapter 5: SETUP MODE Press the “DATE” tab to display the “PLU Initial Data (Date)” screen. ITEM DESCRIPTIONS Press [YES] or [NO] in this field to select whether or not to print the packed PACK DATE PRINT date. ] or [ ] to select a desired pack time printing method.
- Page 160 Chapter 5: SETUP MODE Press the “CODE” tab to display the “PLU Initial Data (Code)” screen. ITEM DESCRIPTIONS ITEM CODE Enter an item code and press this field. REG CODE Enter the register code and press this field. This field is available only when “1: PLU File” is selected in “POS REFERENCE”.
- Page 161 Chapter 5: SETUP MODE Press this field to display the “Barcode Format” screen, and press a desired barcode format for selection. POS FORMAT (WGT) Press [YES] or [NO] in this field to select whether or not to enable a TRACE ENABLE traceability function.
-
Page 162: Plu Update
Chapter 5: SETUP MODE 5.10 PLU UPDATE Press the “PLU UPDATE” icon on the menu The “PLU Update” screen is displayed. To turn pages, press [] or [ ]. selection screen. Note: Display items may vary depending on the country setting. - Page 163 Chapter 5: SETUP MODE Enter the start and end numbers and press these fileds respectively to specify the target PLUs. UNI-10 User’s Manual 5-26...
- Page 164 Chapter 5: SETUP MODE Press desired items for selection. Note 1: To clear the selection, press the selected field again. Note 2: To clear all selections at one time, press the [BATCH DELETE] button. Press the [EXEC] button to update the The confirmation screen is displayed.
-
Page 165: Receipt Setting
Chapter 5: SETUP MODE 5.11 RECEIPT SETTING The “Receipt Setting (Title)” screen is Press the “RECEIPT SETTING” icon on the displayed. menu selection screen. To edit the header and footer titles, press the corresponding field. The text edit screen is displayed. To finish the editing, press the Return button on the screen. - Page 166 Chapter 5: SETUP MODE Press a desired image for selection. The “Header Image” screen is displayed. The selected logo image has been registered. UNI-10 User’s Manual 5-29...
-
Page 167: Tax Registration
Chapter 5: SETUP MODE 5.12 TAX REGISTRATION Press the “TAX” icon on the menu selection screen. The “Tax” screen is displayed. ITEM DESCRIPTIONS TAX TYPE Press a desired tax type for selection. Exclusive tax Inclusive tax Tax exemption TAX RATE Enter a numerical value and press the applicable field. -
Page 168: Chapter 6 Adjustment Mode
Chapter 6: ADJUSTMENT MODE ADJUSTMENT MODE ADJUSTMENT MODE ENTRY / EXIT The “Menu” screen is displayed. Ensure that the initial screen is displayed. Then, press the [ADJUST] button. Then, press the Return button on the screen to display the “Menu” screen. Note: The content of the initial screen may differ depending on the settings on your machine. -
Page 169: Date / Time
Chapter 6: ADJUSTMENT MODE DATE / TIME Press the “DATE TIME” icon on the menu The “Date / Time” screen is displayed. selection screen. To change the date, press the “DATE” field and enter a new date data. Then, press the [SET] key. EXAMPLE May 23, 2022 Enter... - Page 170 Chapter 6: ADJUSTMENT MODE Enter To register new date and time, press the The confirmation screen is displayed. Press [EXEC] to continue, or [STOP] to go [SET] button. back. UNI-10 User’s Manual...
-
Page 171: Touch Screen
Chapter 6: ADJUSTMENT MODE TOUCH SCREEN Press the “TOUCH SCREEN” icon on the The “Touch Screen” screen is displayed. menu selection screen. Press [+] on the button at the upper left of the Press [+] on the button at the upper right screen with a round-pointed device. -
Page 172: Display Check
Chapter 6: ADJUSTMENT MODE 12.1 / 10.1 inch Display 12.1 inch 10.1 inch DISPLAY CHECK The “Display Check (Vertical)” screen is Press the “DISPLAY CHECK” icon on the displayed. menu selection screen. Press [-] or [+] to adjust the vertical brightness for operator and customer displays. -
Page 173: Sound
Chapter 6: ADJUSTMENT MODE 12.1 / 10.1 inch Display 12.1 inch 10.1 inch SOUND Press the “DISPLAY CHECK” icon on the The “Sound” screen is displayed. To set sound levels, press “ON” in the menu selection screen. “Sound” field and press [ < ] or [ > ]. UNI-10 User’s Manual... - Page 174 Appendix: TEXT EDITING TEXT EDITING EDIT SCREENS Upper-case mode Used to finalize the editing Displays the called number Displays the number of Press this field to select a desired font size input characters Press this field to select a desired font style Displays the number of remaining characters Lower-case mode...
- Page 175 Appendix: TEXT EDITING EDIT KEYS Used to switch between Used to specify a normal lower-case and upper-case character style. character modes. Used to specify a bold character Used to begin a new line. font style. Used to delete a line text at the Used to specify a reverse place where the cursor is placed.
-
Page 176: Appendix Text Editing
Appendix: TEXT EDITING Used to display the following key screen. UNI-10 User’s Manual... -
Page 177: Input Examples
Appendix: TEXT EDITING INPUT EXAMPLES A.3.1 TEXT EDITING Enter desired characters using alpha-numeric keys. Upper-case characters Lower-case characters To begin a new line, press the [New Line] key. Enter desired characters. The confirmation screen is displayed. To register the editing, press the Return To confirm changes, press [SAVE]. -
Page 178: Font Style Selection
Appendix: TEXT EDITING A.3.2 FONT STYLE SELECTION Press the following keys to select a desired font style. Note: The selected font style is displayed in the “STYLE” display field. Enter desired characters using alpha-numeric keys. The confirmation screen is displayed. Press the Return key to register the editing. -
Page 179: Line Data Deletion
Appendix: TEXT EDITING A.3.3 LINE DATA DELETION Press the [Line Delete] key to delete the line The line data has been deleted. Press the Return button to register the data. deletion. The confirmation screen is displayed. To confirm changes, press [SAVE]. To undo changes, press [CANCEL UNI-10 User’s Manual... -
Page 180: Data Erase
Appendix: TEXT EDITING A.3.4 DATA ERASE Press the [ERASE] button to delete the full The confirmation screen is displayed. Press [EXEC] to continue, or [STOP] to go text currently being called. back. The full text has been erased. UNI-10 User’s Manual... -
Page 181: Data Copy
Appendix: TEXT EDITING A.3.5 DATA COPY To call up a desired string of characters, Then, enter a numerical value and press the [SET] key on the keypad. press the INPUT field at the bottom right of the screen to display the keypad. Enter Press the [COPY] key while the number is The confirmation screen is displayed. - Page 182 © Rice Lake Weighing Systems Content subject to change without notice. 230 W. Coleman St. • Rice Lake, WI 54868 • USA USA: 800-472-6703 • International: +1-715-234-9171 December 14, 2023 PN 222152 Rev A www.ricelake.com...
Need help?
Do you have a question about the ISHIDA UNI-10 and is the answer not in the manual?
Questions and answers