Table of Contents
Advertisement
Advertisement
Table of Contents

Related Manuals for Rice Lake ISHIDA Uni-3


Summary of Contents for Rice Lake ISHIDA Uni-3
- Page 1 Ishida Uni-3 Price Computing Scale With Printer Operation Manual PN 166737 Rev A...
-
Page 3: Table Of Contents
Course descriptions and dates can be viewed at www.ricelake.com/training or obtained by calling 715-234-9171 and asking for the training department. © Rice Lake Weighing Systems. All rights reserved. Printed in the United States of America. Specifications subject to change without notice. - Page 4 6.3 Specifications ..............39 Rice Lake Limited Warranty ........................40 Rice Lake continually offers web-based video training on a growing selection of product-related topics at no cost. Visit www.ricelake.com/webinars...
-
Page 5: Introduction
Failure to follow the instructions or heed the warnings could result in injury or death. Rice Lake Weighing Systems is not liable for any damage, loss or injury that results from incorrect operation, insufficient caution, unauthorized modifications to the scale, or failure to follow the instructions contained in this manual. -
Page 6: Overview
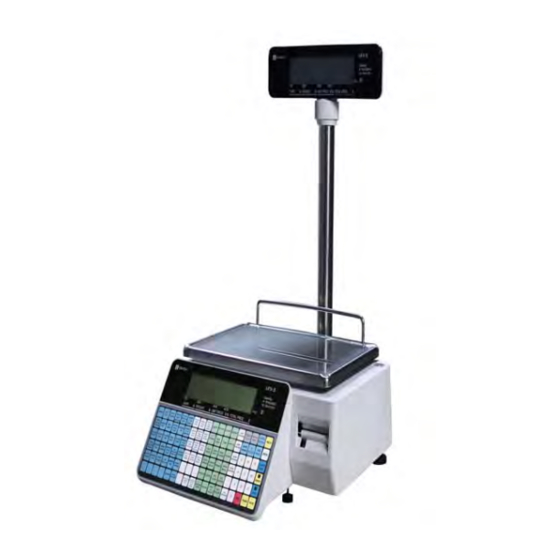
Overview Level gauge Weighing Platter Printer Power Switch Cash Keyboard Drawer Level adjustment leg Figure 1-1. Uni-3 Part Names (Bench Type Pictured) Figure 1-2. Operation Panel Used to delete an entered numerical value. Used to call Menu Select display. Used to call a registered product data. Used to move left. -
Page 7: Menu Navigation
Menu Navigation Enter the Mode number and press the key to enter any mode. To exit the mode, press the key. Mode Mode Use the arrow keys to select a parameter within the menu. Press the key to enter the parameter. Down Enter Use the... -
Page 8: Setup
Setup Setup Mode Enter and press the key to enter the Setup mode menu. To exit the Setup mode, press the key. 6000 Mode Mode Setup Mode Main Menu Screen < SETUP > < > The Setup Mode for this device includes the following parameters: 1. -
Page 9: B02-Sales Mode
2.1.2 B02-Sales Mode SALES MODE Allows user to set the sales mode of the scale. Parameter Display Description Choices B02-01 SLS MD Select sales mode. 1: NO OPERATOR Sales Mode Use modes 1 and 2 for typical Issue labels using the Print key. supermarket installations. -
Page 10: B05-Data Storage
2.1.4 B05-Data Storage DATA STORAGE Allows user to determine what type of totals to store for user reference. Parameter Display Description Choices B05-01 B05-01-01 Daily Total Select if the Daily Total accumulator is enabled. 1: NON ADD Total Add 2: ADD B05-01-02 Weekly Total Select if the Weekly Total accumulator is enabled. - Page 11 Parameter Display Display Explanation Choices B06-01 B06-01-25 GROUP Z-3 Product Daily Total Weight (Z) (GROUP) 1: NO PRINT Preset Report 2: PRINT B06-01-26 GROUP Z-4 Product Daily Total Pieces (Z) (GROUP) (Daily) B06-01-27 P D T ACC1 Daily Total (ACC1) B06-01-28 P D T ACC2 Daily Total (ACC2) B06-01-29 P D T ACC3...
-
Page 12: B07-Plu Overwrite
2.1.6 B07-PLU Overwrite OVERWRITE Specify how temporary changes made by the operator are processed. A selection of “Yes” will overwrite the original setting in the PLU. Parameter Display Description Choices B07-01 Unit Price/Fixed Price Select if a price change is saved. 1: YES PLU Overwrite 2: NO... -
Page 13: B08-Plu Initial Data
2.1.7 B08-PLU Initial Data INITIAL DATA Specify the default values for any new PLU. When a new PLU is programmed the initial data automatically populates the fields. This speeds up PLU programming by setting the customer’s standard values. The initial data values can be changed as needed during PLU programming. - Page 14 Parameter Display Description Choices B08-04 B08-04-01 — B08-04-03 0 - 999 Image Image 1-3 B08-04-05 SH. Image 0 - 999 B08-04-06 SH. Image Print Enter the mode number. Press Enter to select whether or 1: NO PRINT not to print the Safe Handling Image. 2: PRINT B08-05 B08-05-01 First Label Format...
- Page 15 Parameter Display Description Choices B08-07 B08-07-06 Barcode Type Enter the desired bar code type number. Press Enter. 0: REFER Code 1: EAN/UPC 13 2: EAN/UPC 8 3: 10 DIGITS 13 4: 5 DIGITS 8 5: GS1 6: GS1 ST 7: GS1 STO 8: GS1 LIMITED 9: GS1 EXPANDED 10: ITF...
-
Page 16: B10-Receipt Setting
2.1.8 B10-Receipt Setting RECEIPT SETTING Specify the receipt setting when the Uni-3 is configured for CR mode. Parameter Display Description Choices B10-01 B10-01-01 Header Text Enter header text to print on receipt. Title B10-01-04 Footer Logo Specify logo image number for footer. 0 - 999 (11) Table 2-9. -
Page 17: Adjustment Mode
Display Description Choices B29-08 TAX8 Rate Tax Rate 0-99.99% B29-09 TAX9 Type Tax Type 1: EXCLUDED 2: INCLUDED 3: EXEMPT B29-09 TAX9 Rate Tax Rate 0-99.99% Table 2-10. B29 Tax Parameters (Continued) Adjustment Mode Enter and press to enter the Adjustment mode menu. To exit the Adjustment mode, press 4000 Mode Mode... -
Page 18: C01-Date Time
2.2.1 C01-Date Time DATE TIME Adjusts date and time of the Uni-3’s internal clock. Display Description Choices C01-01 Date Adjustment To adjust the date, enter the date in the format MMDDYYYY MMDDYYYY (Month+Day+Year). Press Enter to store data. C01-02 Time Adjustment To adjust the time, enter the time in the format HHMMSS HHMMSS (Hour:Minute:Second). -
Page 19: Program Mode
Program Mode Enter and press the key to enter the main menu in the program mode. To exit the program mode, press 9000 Mode key. Mode Program Mode Main Menu Screen < PROGRAM > < > The Program Mode for this device includes the following parameters: 1. -
Page 20: P01-Plu Data
P01-PLU Data 1. From the program mode main menu screen, press the down arrow once to scroll to P01 PLU. 2. Press to display Enter PLU P01-00 *PLU (No. +PLU) 3. Enter the PLU number. 4. Press 5. Press to confirm a new item. Enter 6. - Page 21 Parameter Display Description Choices P01-03 P01-03-01 Nutrition Enter the desired Nutrition Facts number. Press Enter to select. Message P01-03-02 —P01-03-04 Enter the desired Extra Message number. Press Enter to select. Xtra MSG 1-3 P01-03-05 Coupon MSG Enter the desired Coupon Message number. Press Enter to select.
- Page 22 Parameter Display Description Choices P01-07 P01-07-01 Item Code Enter an item code. Press Enter. Code 8 DIGITS P01-07-02 Register code Enter the register code. Press Enter. P01-07-03 POS Flag This field is available only when 1 PLU File is selected in POS Reference P01-07-05.
-
Page 23: P02-Campaign
Parameter Display Description Choices P01-07 P01-07-08 Trace Enable 1: YES Code 2: NO P01-07-10 Department Enter desired department number. Press Enter. Number P01-07-11 Group Number Enter desired group number. Press Enter. P01-08 P01-08-01 Link PLU Number -- Link Table 3-1. P01 PLU Data (Continued) P02-Campaign CAMPAIGN Parameter... -
Page 24: P04-Preset Key Registration
P04-Preset Key Registration PRESET Display Description Choices P04-01 P FLG Press desired key to register. Enter the function number and press PLU to set the function. If the function includes PLU data, enter the data number; otherwise, enter 0. Press the desired key again. - Page 25 Key Flag No. Preset Key Description Free12 Free Message 12 Free13 Free Message 13 Free14 Free Message 14 Free15 Free Message 15 Receipt Copy Reissue of receipt -% (U/P) -% (U/P) Cassette Display of cassette number SH Flag Safe Handling on/off Fix UPR Change to fixed unit price item Auto Print Mode...
-
Page 26: P05-Ad Message
Key Flag No. Preset Key Description Target PRI Key to set the target price Target Cancel Key to set the target cancel Fixed WGT Key to set the fixed weight Cassette Switching Switching cassette number Table 3-5. Preset Key List (Continued) P05-Ad Message MSG. -
Page 27: P08-Group
Display Description Choices 13001-0000 Set Up New Data If a non-registered item has been requested, the confirmation screen is displayed. Press Enter to set up new data, or Clear to go back. InP 0001-0000 The Text Edit screen is displayed for the selected department number. Edit text according to the procedure described in Section 6.2 on page 79. -
Page 28: P11-P13 Extra Message Data 1-3
Display Description Choices P10-08 Total Fat Percent Enter the total fat percent. P10-09 Saturated Fat Enter the saturated fat value (g) P10-10 Saturated Fat Percent Enter the saturated fat percent. P10-11 Cholesterol Enter the cholesterol value (mg). P10-12 Cholesterol Percent Enter the cholesterol percent. -
Page 29: P14-Coupon Message
3.12 P14-Coupon Message COUPON MSG. Display Description Choices P14-00 Coupon MSG Enter the Coupon Message number and press PLU to display desired coupon message data. 13001-0000 Set Up New Data If a non-registered item has been requested, the confirmation screen is displayed. Press Enter to set up new data, or Clear to go back. -
Page 30: P21-Fix Price Symbol
3.15 P21-Fix Price Symbol PRICE SYMBOL Display Description Choices P21-00 F/P Symbol Enter the Fix Price Symbol number and press PLU to display desired fixed price data. 13001-0000 Set Up If a non-registered item has been requested, the confirmation screen is displayed. Press New Data Enter to set up new data, or Clear to go back. -
Page 31: Operation
Operation Basic Operating Procedures 4.1.1 Power On 1. Turn the power switch to 2. The screen is displayed. Check that the Clock Check displayed date and time are correct, press on the Enter PLEASE CONFIRM TIME (ENT) keypad to proceed to the next step. To adjust the date or time, use the Date/Time menu in Adjustment Mode, see Section 2.2.1 on page 14. -
Page 32: Issuing Receipts By The Same Operator
Issuing Labels Requiring Operator Registration 1. The designated PLU screen is displayed. STEAK 2. Place the product on the weighing platter. 3. The product is weighed and its price is calculated. 4. Press an button to issue a label. Operator Must have Operator buttons programmed prior to operation. -
Page 33: Issuing Receipts By Different Operators
4.2.3 Issuing Receipts by Different Operators Must have Operator buttons programmed prior to operation. See Section 3.3 on page 19. 1. From the initial screen, enter a PLU number and press ITEM Example: To access PLU 1, press followed by 2. -
Page 34: Entering Or Overwriting Tare Weights
4.2.5 Entering or Overwriting Tare Weights STEAK 1. Ensure that the designated PLU screen is displayed. 2. Enter a numerical value and press Tare STEAK Example: Tare weight of .050 lb 4.2.6 Changing Unit Prices STEAK 1. Ensure that the designated PLU screen is displayed. 2. -
Page 35: Specifying The Number Of Labels
4.2.10 Specifying the Number of Labels 1. Ensure that the designated PLU screen is displayed. SALMON FILLET 2. Enter the number of labels to be printed and press Print Example: Print three labels. SALMON FILLET To interrupt or restart the issue of labels, press Print. Total Mode ITEM 1. -
Page 36: F07-Cumulative Totals
4.3.3 F07-Cumulative Totals PROD. CUM. TOTAL Parameter Display Description F07-01 Total Press Print to print the data. Product Cumulative Totals F07-02 Department F07-03 Group F07-04 Operator Table 4-3. F07 Cumulative Totals Parameters 4.3.4 F09-Preset Report PRESET REPORT Parameter Display Description F09-01 Preset Report Preset Report F09-02 Daily... -
Page 37: Maintenance
Maintenance Level Adjustment CAUTION Ensure the machine is powered off before moving or adjusting the level of the scale. 1. Place the machine on a stable platform. 2. Adjust the inclination of the machine by turning the four level adjustment legs until the spirit bubble is located in the center of the level gauge. -
Page 38: Label/Receipt Roll Loading
Label/Receipt Roll Loading CAUTION Ensure the weighing platter is empty prior to starting this procedure. 1. Open the cover on the right side of the main body. Roll Thermal Head Figure 5-2. Open the Right Cover 2. Set a new roll around the roll holder. Roll Stopper Roll Holder Label Roll... -
Page 39: Removing And Replacing The Weighing Platter
5. Thread the paper as shown in Figure 5-5 Figure 5-5. Thread Paper 6. For labels, fix the paper end with the backing paper stopper. 7. Gently turn the winding bobbin clockwise until the label becomes tight. 8. For both labels and receipts, push down the lever to lock the thermal head. Figure 5-6. -
Page 40: Cleaning The Machine
Cleaning the Machine 1. Lift up on lever on thermal head to unlock. Figure 5-8. Unlock the Thermal Head 2. Use a cotton-tipped swab to clean off the thermal head. Figure 5-9. Clean Thermal Head Uni-3 Operation Manual... -
Page 41: Appendix
Error Codes Error Error Title Description Initialization Failed Contact Rice Lake Weighing Systems technical support or the local scale dealer. Battery is Fault Verify battery switch is on or replace battery. Clock Setting is Not Completed Yet Set up clock in Adjustment mode, Date/Time (See Section 2.2.1 on page 14). -
Page 42: Text Editing
715-002 Thermal Head Is Worn Out For Printer 1 Change thermal head. 1601 Span Adjustment For Scale Is Not Completed Contact Rice Lake Weighing Systems technical support or the local scale dealer. Table 6-1. Error Codes (Continued) Text Editing Used to finalize editing a text. -
Page 43: Specifications
Specifications Unit Item Description Weighing Unit Weighing Capacity 30 lb specification: 0 to 15 lb/.02 lb, 15-30 lb/.05 lb Weighing Accuracy 1/3000 Operation Panel Unit Display Method L1: 23-digit 16 segment LCD L2: 192 x 16 dot matrix/23-digit 7 segment LCD Customer Display Unit Display Method L1: 23-digit 16 segment LCD... -
Page 44: Rice Lake Limited Warranty
Rice Lake Limited Warranty Rice Lake Weighing Systems (RLWS) warrants that all RLWS equipment and systems properly installed by a Distributor or Original Equipment Manufacturer (OEM) will operate per written specifications as confirmed by the Distributor/OEM and accepted by RLWS. All systems and components are warranted against defects in materials and workmanship for one (1) year from the date of shipment from RLWS, unless otherwise stated in the product catalog or manual. - Page 46 Specifications subject to change without notice. Rice Lake Weighing Systems is an ISO 9001 registered company. 230 W. Coleman St. • Rice Lake, WI 54868 • USA U.S. 800-472-6703 • Canada/Mexico 800-321-6703 • International 715-234-9171 • Europe +31 (0)26 472 1319 www.ricelake.com www.ricelake.mx www.ricelake.eu www.ricelake.co.in...
Need help?
Do you have a question about the ISHIDA Uni-3 and is the answer not in the manual?
Questions and answers