Table of Contents
Advertisement
Quick Links
Advertisement
Table of Contents

Related Manuals for MeiTrack TA255


Summary of Contents for MeiTrack TA255
- Page 1 TA255 Tracker Step-by-step Instruction TA255 Tracker Step-by-step Instruction...
-
Page 2: Table Of Contents
1.5 Installing a SIM Card and a Battery ....................... - 5 - 1.6 Turning on the Tracker ..........................- 6 - 2 Configuring Device Parameters by Meitrack Manager ....................- 7 - 2.1 Installing the USB Driver ..........................- 8 - 2.2 Installing Meitrack Manager ......................... -
Page 3: First Use
TA255 Tracker Step-by-step Instruction 1 First Use 1.1 Overview This document is intended for customers who use the TA255 tracker for the first time, helping them configure and operate the device and learn about the basic functions of the device. 1.2 Product Specifications... -
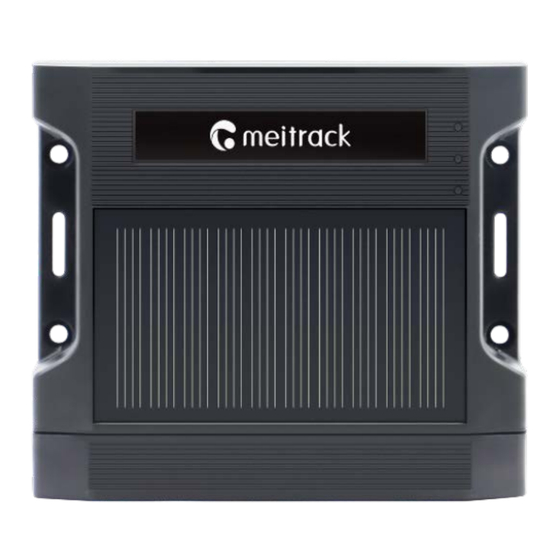
Page 4: Product Appearance
Brown cable RS232-RX Pink cable Black cable 1.3 Product Appearance Product appearance: Red: Charging LED indicator Blue: GPS LED indicator Green: GSM LED indicator Solar panel Infrared sensor switch Copyright © Meitrack Group 2021. All rights reserved. - 4 -... -
Page 5: Main Device And Accessories
Four magnets. Screws are provided. 1.5 Installing a SIM Card and a Battery Installing a SIM card and a battery into the tracker Installing batteries into a battery box Copyright © Meitrack Group 2021. All rights reserved. - 5 -... -
Page 6: Turning On The Tracker
You can use any of the following methods to turn on the tracker: 1. Press and hold down the power key for 3 seconds. Then the LED indicators blink, which means that the tracker is turned on. Copyright © Meitrack Group 2021. All rights reserved. - 6 -... -
Page 7: Configuring Device Parameters By Meitrack Manager
2 Configuring Device Parameters by Meitrack Manager The following table describes how to connect the tracker to your computer by using a USB cable. Method 1: USB port of the tracker Copyright © Meitrack Group 2021. All rights reserved. - 7 -... -
Page 8: Installing The Usb Driver
Meitrack. 2.1 Installing the USB Driver Before you use Meitrack Manager, install the USB driver and Meitrack Manager first. (If the operating system of your computer is Windows 10, the USB driver maybe already exists.) Right-click My Computer, select Manage, and view Device Manager. If Prolific USB-to-Serial Comm Port (COM3) is displayed as follows, the data communication is successful. -
Page 9: Running Meitrack Manager
On the page that is displayed, click Finish. The software installation is finished. 2.3 Running Meitrack Manager Start Meitrack Manager on your computer. Then Device disconnected, auto connect device... is displayed in the lower left corner of the window. Turn on the device, and connect it to the computer by using the USB cable. -
Page 10: Configuring Gprs Parameters
TA255 Tracker Step-by-step Instruction If Get device setting succeed! is displayed in the lower left corner of the window, Meitrack Manager is run successfully. 2.4 Configuring GPRS Parameters Click Tracking. Then the Tracking page is displayed. In this section, use a device in China as an example. Customers can configure device parameters as required. -
Page 11: Using The Ms03 Tracking Platform
Visit https://MS03.trackingmate.com/, enter the user name and password, and log in to the MS03 platform. On the main interface, choose Management. On the page that is displayed, select Account & Tracker from Use Normal. Copyright © Meitrack Group 2021. All rights reserved. - 11 -... - Page 12 On the Add new tracker window that is displayed, set related parameters and click Submit. Note: You need to enter the device transfer password after the expiry date is set. Copyright © Meitrack Group 2021. All rights reserved. - 12 -...
-
Page 13: Sending Commands In Batches
On the Management window that is displayed, select Sending command from Use Normal. On the Sending command window that is displayed, select multiple trackers on the left pane and a command on the right pane, and click Send command. Copyright © Meitrack Group 2021. All rights reserved. - 13 -... -
Page 14: Querying Reports
On the Event report window that is displayed, click the menu arrow on the left. Then the tracker list is displayed. Select a tracker to be queried, set the query time, and click the search icon. Copyright © Meitrack Group 2021. All rights reserved. - 14 -... -
Page 15: Device Installation Alert And Device Detaching Alerts
The tracker can be used to track assets. You can install magnets on the tracker and then attach the tracker to a place with iron materials, such as containers. The sensor located at the bottom of the device can detect whether the device is detached. Copyright © Meitrack Group 2021. All rights reserved. - 15 -... - Page 16 TA255 Tracker Step-by-step Instruction As shown in the following figure, you can view device detaching alerts and installation alerts. Copyright © Meitrack Group 2021. All rights reserved. - 16 -...
Need help?
Do you have a question about the TA255 and is the answer not in the manual?
Questions and answers