Advertisement
Advertisement
Table of Contents

Related Manuals for Kogan KAVACCPT05A


Summary of Contents for Kogan KAVACCPT05A
- Page 1 CARPET AND UPHOLSTERY SPOT CLEANER KAVACCPT05A...
-
Page 2: Table Of Contents
Safety & Warnings Overview Assembly Operation Cleaning & Care Troubleshooting Specifications... -
Page 3: Safety & Warnings
• Do not use to pick up hot coals, cigarette butts or hot items or use on area with harmful fluids including pesticides, hair dyes or bleach • If the power cord or plug is damaged, cease use immediately and contact help.Kogan.com for support. - Page 4 • The appliance should not be adjusted or repaired by anyone except properly qualified service personnel authorised to do so by Kogan.com. Doing so may cause fire, injury or damage to the appliance. • To avoid fire or injury do not immerse the cleaner in water.
-
Page 5: Overview
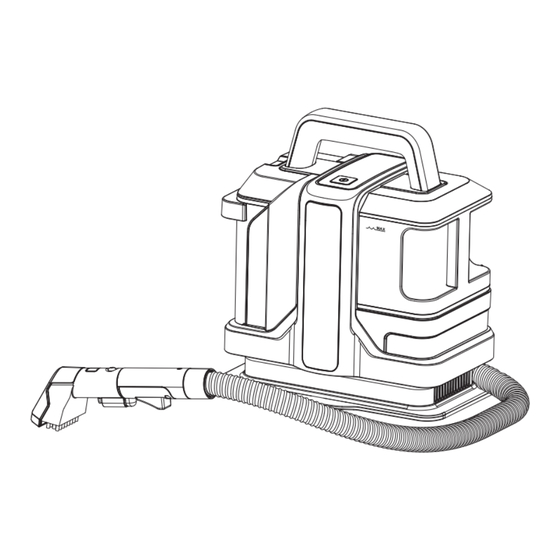
OVERVIEW Carry handle Dirty water tank release button Power button Dirty water tank Large wash tool Power cord Clean water tank Power cord storage hook Release button Hose Hose Handle Small wash tool Tool retaining hook Foam filter... -
Page 6: Assembly
ASSEMBLY Step 1: Insert the wash tool retaining hook into the location below the clean water tank and secure it tightly using the screw provided. Step 2: Remove the clean water tank. Note: pull the clean water tank at an angle of 30 degrees top to bottom. - Page 7 Step 4: Relocate the clean water tank. Note: lock the bottom part to the machine, then push the clean water tank into place at the top. Step 5: Attach the wash tool to the hose handle. Step 6: Wrap the hose around the base and insert the wash tool and hose handle into the wash tool retaining hook.
- Page 8 Adding Cleaning Solution Add spot cleaning solution to the clean water when cleaning stubborn stains. Mix the water and detergent directly in the clean water tank following the detergent guidelines ensuring the max line is not exceeded. Note: Detergents and cleaning solutions are not included with this appliance.
-
Page 9: Operation
OPERATION Step 1: Select the desired wash tool suitable for the flooring/surface and attach it to the hose handle. Step 2: • Unwrap the power cord and connect it to an electrical outlet. • Turn the cleaner on using the power button. Step 3: Press the water release button to spray water (and detergent if added) onto the surface. - Page 10 Step 4: Use the brush to agitate stubborn stains. Step 5: For spills always pick up the excess liquid before using water or solution. Step 6: Suction inlet Release the button to stop spraying. Tilt the wash tool forward so the brushes are not in contact with the surface, to ensure the suction inlet collects the dirty water on the backward stroke.
- Page 11 Step 7: Power off after cleaning. Wrap the hose around the base and lock in the hook. Note: Clean the dirty water tank after every use to avoid unpleasant smells. Suction inlet Note: Over or under tilting the hand tool may result in poor water pick up.
-
Page 12: Cleaning & Care
CLEANING & CARE • To prolong the life of your carpet cleaner and prevent blockages or problems occurring ensure you this appliance is cleaned regularly. • Always carry out cleaning when the product has been switched off for a short period of time. - Page 13 Step 3: Pour water out of the tank. Step 4: Re-install the empty clean water, press the water- spray button to remove any excess water from the tank. Step 5: • Remove the wash tool brush and rinse under the tap. •...
- Page 14 Step 6: Remove the dirty water tank from the main cleaner. Step 7: Empty the dirty water tank after every use or when the water level reaches the max fill line. The float inside will prevent suction if the tank is full. Step 8: Remove the tank lid, remove the water fill guide Float...
- Page 15 Step 9: Clean all parts with warm water only. Do not use detergents or other chemicals. Step 10: Thoroughly wash and dry the inside of the tank and refit the float and water fill guide and replace the tank lid. Step 11: •...
- Page 16 Step 12: Reinstall the dirty water tank.
-
Page 17: Troubleshooting
The appliance will (13amp required) • Fuse needs replacing not turn on. • Contact help.Kogan.com • The cord is damaged. for support. • Remove the wash tool and • Water inlet tube is check for blockages. - Page 18 • Fully clean the tanks and refill with warm water only, pump the water through the machine using the hose • Incorrect detergent has Foaming or soapy cleaning tool to remove been used. residue inside the excess foam / residue. •...
-
Page 19: Specifications
SPECIFICATIONS Voltage 220-240V Frequency 50/60Hz Rated power 750W Max vacuity ≥15 kPa Clean water tank capacity 1080ml Dirty water tank capacity 800ml IP rating IPX4... - Page 20 Need more information? We hope that this user guide has given you the assistance needed for a simple set-up. For the most up-to-date guide for your product, as well as any additional assistance you may require, head online to help.kogan.com...
Need help?
Do you have a question about the KAVACCPT05A and is the answer not in the manual?
Questions and answers