Advertisement
Quick Links
Advertisement

Related Manuals for Kogan X9


Summary of Contents for Kogan X9
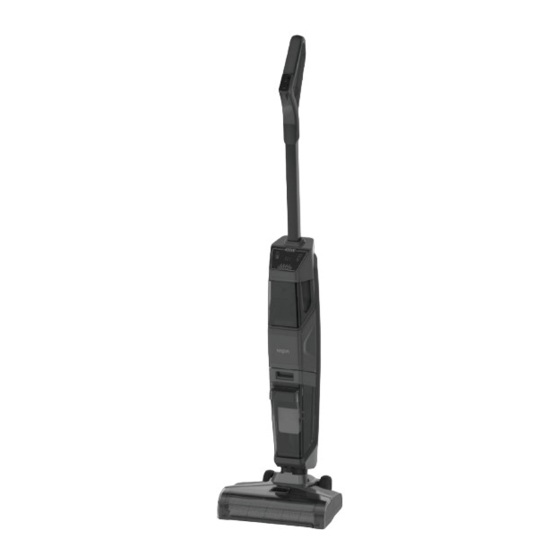
- Page 1 X9 WET & DRY FLOOR VACUUM CLEANER (KAVACSTWDX9)
-
Page 2: Table Of Contents
Safety & Warnings Components list Overview Getting started Operation Cleaning & Care Troubleshooting Specifications... -
Page 3: Safety & Warnings
• Do not use with damaged cable or plug. • If the supply cord is damaged, it must be replaced by Kogan.com, its service agent or qualified person to avoid a hazard. • Please dispose of the battery safely. - Page 4 • Use only the type and amount of liquids specified as instruction. • Liquid must not be directed towards equipment containing electrical components. • Do not pull or carry by cable, use cable as a handle, close door on cable or pull cable around sharp edges or corners.
- Page 5 • Please use the cleaning solution specified by manufacturer and use it in the specified proportion. Cleaning fluids that are not approved by manufacturer may cause damage and injury to users, the environment and parts inside the fuselage. • Prevent accidental start. Make sure the switch is in the off position before lifting or handling the unit.
-
Page 6: Components List
COMPONENTS LIST Vacuum handle Vacuum body Charging base Cleaning tool Multi-surface Replacement User guide rolling brush filter... -
Page 7: Overview
OVERVIEW Speed button (High / Low) Power button Water spray button Self-cleaning / Voice button Dirty water tank Filter cover Filter LED display panel Clean Float water tank Rolling brush cover Rolling brush... - Page 8 Underneath: Wheels Base Auxiliary wheels Charging dock: Charging base Charging contact pins Power adapter Drying plate...
-
Page 9: Getting Started
GETTING STARTED Upon removing from the packaging, your vacuum cleaner will be in two separate parts. To assemble the vacuum, insert the handle into body as directed by the arrow until a “CLICK” sound is heard. Vacuum handle click Vacuum body Charging vacuum Connect the charging dock AC adapter plug to wall socket and turn on. - Page 10 Lifting An ergonomically correct lift design has been applied on back of vacuum, we recommend you lift or move the vacuum via this point rather than holding by the handle. Arrow to lift up Lift from here Display panel introduction Display panel indicates status for the following: Brush jam/clean reminder Brush drying...
- Page 11 Fill clean water tank Remove clean water tank from vacuum, fill with warm tap water to the “MAX” line, and then add 2 to 3 caps of a floor cleaner liquid (not supplied). Seal with rubber cap, then place the water tank back into vacuum. Click DO NOT USE BOILING WATER –...
-
Page 12: Operation
OPERATION Hold the base with your foot and press the handle downwards. Recline the body of vacuum backward to start the roller brush spinning. - Page 13 To select deep cleaning mode, press the Speed control button (next to Power button) To press Water Spray trigger and release, the water from the clean water tank will wet the roller brush. After cleaning, ensure the vacuum is stood upright. To stop roller brush spinning, push the handle forward until a “CLICK”...
-
Page 14: Cleaning & Care
CLEANING & CARE Emptying dirty water tank & cleaning the filter The float is what prevents your dirty tank from overflowing. When your dirty tank is full, the float will shut off your suction motor creating a high-pitched sound indicating it is time to empty your dirty water tank. - Page 15 Do not use sharp/hard force to scratch the inner surface. 4. Pour dirty water and 5. Clean here to avoid air 6. Remove the filter from the debris out. Rinse the blockages. dirty water tank top by inside of the dirty pulling it up.
- Page 16 Click 10. If the inside area 11. Leave parts out to dry 12. Once parts are dry, place where the dirty water naturally in a well vacuum filter back into tank sits is dirty, wipe ventilated location. dirty water tank top. it clean with a rag or Avoid direct exposure towel.
- Page 17 Maintenance: Cleaning roller brush Note: Ensure the vacuum has been turned off before removing the roller brush cover. 1. Grasp cover at the front and pull upward 2. Pull roller brush via lifting the nose of to remove. roller brush. 3.
- Page 18 Click 5. Insert the end of roller into one side of 6. Align the cover to the edges of the the base and then to fix the pin of roller base and then to lock the cover into into the hole on the other side of the place until a CLICK sound is heard.
-
Page 19: Troubleshooting
TROUBLESHOOTING Vacuum is not operating: Ensure battery is sufficiently charged. Ensure the vacuum is standing upright. Check the roller brush is locked in place. Self-cleaning is not completing: If self-clean is failing, it could be low power. Charge the vacuum for at least five minutes before running the self-clean mode. - Page 20 Need more information? We hope that this user guide has given you the assistance needed for a simple set-up. For the most up-to-date guide for your product, as well as any additional assistance you may require, head online to help.kogan.com...
Need help?
Do you have a question about the X9 and is the answer not in the manual?
Questions and answers