
Related Manuals for Holman 406NH


Summary of Contents for Holman 406NH
- Page 1 Installation Guide 406NH Holman Rancho Cordova, CA 95742 800-343-7486 InstallationSupport@Holman.com 20230309R1 DATE: ________________...
-
Page 2: Table Of Contents
1/4” Drill Bit Drill Before You Begin Read all instructions prior to assembling or installing any Holman product. Be sure to have large partition (40651, 40652, 40653, or 40655) assembled and ready to install. Always locate your installation locations prior to performing any work. -
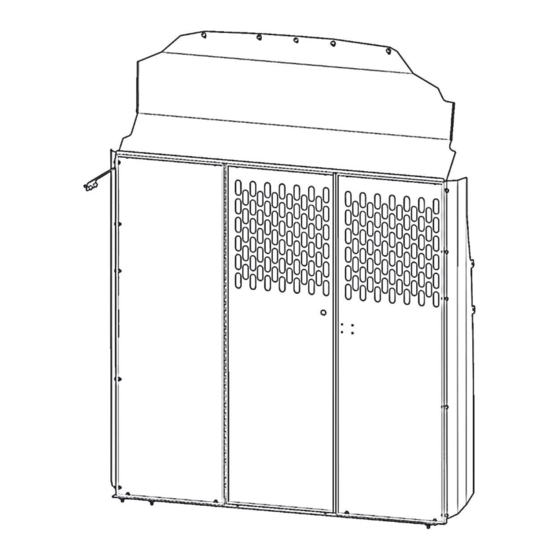
Page 3: Parts List
Instructions – 406NH Parts List For Technical Support Call: 800-343-7486, Monday-Friday, 7AM - 4 PM (PST) Page 2... -
Page 4: Hardware
Instructions – 406NH Hardware For Technical Support Call: 800-343-7486, Monday-Friday, 7AM - 4 PM (PST) Page 3... -
Page 5: Step 1 - Bolt Floor Plate
Instructions – 406NH Step 1 – Bolt Floor Plate Locate threaded embosses in floor of van. NOTE: If a mat is installed in van, use a hole saw to expose threaded embosses. Place floor plate into van in orientation shown. -
Page 6: Step 2 - Bolt Side Wings
Instructions – 406NH Step 2 – Bolt Side Wings Place wings in orientation shown next to the partition. Bolt together using a 1/4" x 5/8” flanged hex head screw and a 1/4" flanged lock nut. On the passenger side wing, leave the 2nd and 3rd holes from the top open. -
Page 7: Step 4 - Mount Partition
Instructions – 406NH Step 4 – Mount Partition From underneath, insert carriage bolts through the floor plate in the orientation shown. Place assembled partition into van on top of floor plate installed in Step 1. Line the holes in the bottom of the partition with the slots in the floor plate. -
Page 8: Step 5 - Mount Wings To Van
Instructions – 406NH Step 5 – Mount Wings to Van A. Passenger Side Mount passenger side wing to the embossed holes on the “B” pillar where the handle was removed in Step 3. Use hardware from Step 3 to bolt passenger side wing to van. -
Page 9: Step 6 - Mount Top Wing To Van
Instructions – 406NH Step 6 – Mount Top Wing to Van Place top wing on top of partition in the orientation shown. Using six 1/4" x 5/8” flanged hex head screws and six flanged lock nuts, bolt the top wing to the top of the partition. - Page 10 Instructions – 406NH SQUARE AND ALIGN PARTITION. TIGHTEN ALL HARDWARE FROM ALL PREVIOUS STEPS. YOUR INSTALLATION IS NOW COMPLETE. For Technical Support Call: 800-343-7486, Monday-Friday, 7AM - 4 PM (PST) Page 9...
Need help?
Do you have a question about the 406NH and is the answer not in the manual?
Questions and answers