
Related Manuals for Bose ControlSpace ESP-00 II


Summary of Contents for Bose ControlSpace ESP-00 II
- Page 1 ® ControlSpace ESP-00 II Engineered Sound Processor, CC-16 and CC-64 Controllers (US and non-US units) ©2014 Bose Corporation Service Manual Reference Number 370610-SM Rev. 00...
-
Page 2: Table Of Contents
Packaging Part List, ControlSpace CC-64 Controller ..............12 Figure 3. CC-64 Controller Packing View ..................12 Main Part List, ControlSpace ESP-00 II Chassis (see Figure 4) .......... 13-14 Figure 4. ControlSpace ESP-00 II Chassis Exploded View ............. 14 Main Part List, ControlSpace CC-16 Controller ................15 Figure 5. -
Page 3: Safety Information
THE PURPOSE OF SERVICING THE IDENTIFIED BOSE PRODUCT BY AN AUTHORIZED BOSE SERVICE CENTER AND SHALL NOT BE REPRODUCED OR USED FOR ANY OTHER PURPOSE. WARRANTY The Bose ControlSpace ESP-00 II System and CC-16 / CC-64 Controllers are covered by a limited 5-year transferable warranty. -
Page 4: Product Description
For information on how to install and use the ControlSpace Designer software, the ControlSpace Designer Software Guide can be downloaded as a PDF from pro.Bose.com or can be found inside the ControlSpace Designer software help system. Online Resources pro.Bose.com - Main resource for product information, downloads, tech data sheets. - Page 5 At time of print, the following expansion cards are available. For further information on these cards, and to view new cards that are available, please visit pro.Bose.com where an online interactive configurator tool provides technical details, assistance in populating expansion cards, and additional information about user controls.
- Page 6 • Universal mounting bracket • UL and CE listed CC-64 Control Center The Bose ControlSpace CC-64 control center is an elegant, programmable, networked controller that provides users with a simple and logical interface to their ControlSpace system. Because the controller is...
- Page 7 PRODUCT DESCRIPTION CC-64 Control Center (continued) The CC-64 is a 10Base-T Ethernet device. Up to sixteen CC-64s can be used per ControlSpace ® system. Features • 2-line by 40-character backlit LCD • Sixteen Gain/Selector controls (four banks of four) - Four rotary encoders for changing the gain level or selecting scenes/sources - Each encoder includes a 15-segment LED array for indicating the control’s current level or state - The encoders feature push buttons for muting gain controls or making selections...
-
Page 8: Specifications
Designer ™ software Network Control Ethernet (RJ-45), 10Base-T Communication Ports RS-232 (DB9M, DTE), Bose CC-16 (5.08 mm Euroblock 3-pin) Expansion Slots 8 analog/digital audio, 2 GPIO (1 occupied) Audio Channel Capacity 64 (bi-directional, digital and/or analog) Carton Contents ESP-00 II processor... -
Page 9: Electrostatic Discharge Sensitive (Esds) Device Handling
ELECTROSTATIC DISCHARGE SENSITIVE (ESDS) DEVICE HANDLING This unit contains ESDS devices. We recommend the following precautions when repairing, replacing or transporting ESDS devices: • Perform work at an electrically grounded work station. • Wear wrist straps that connect to the station or heel straps that connect to conductive floor mats. -
Page 10: Packaging Part List, Controlspace
PACKAGING PART LIST ControlSpace ® ESP-00 II Chassis ® Item Description Vendor Part Bose Part Qty. Note Number Number Number CARTON BSET5141-01161 370969-0010 CARTON SHEET, L430X160MM BSET5111-01021 370904-0010 EPE FOAM BSET5741-01021 312474 POLY BAG, BSET5542100112 W217XL320X0.05MM TERMINAL BLOCK, P5.08MM, 3... -
Page 11: Packaging Part List, Controlspace Cc-16 Controller
PACKAGING PART LIST ControlSpace ® CC-16 Controller Item Description Qty. Part Number Note Number Foam, White EPE CC-16 Controller 041761 Anti-static bag, 150 x 180 x 0.03MM Paper Tray Installation Manual, English Language 285042 White box Screw, #6-32x0.7", Phillips, ZINC (US/Japan) Bag, Poly, 40 x 60MM Screw, M4.0x18, Phillips, ZINC (Europe) Power Supply, 15VDC, 5W, 100-240VAC Input... -
Page 12: Packaging Part List, Controlspace Cc-64 Controller
PACKAGING PART LIST ControlSpace ® CC-64 Controller Item Description Qty. Part Number Note Number Install Guide, CC-64 285041 EPE Foam, 330X180X15MM Bag, PE, Anti-Static, 330X180X0.03MM CC-64 Controller 041760 Screw, US, MSF, #6-32X0.7, MS, ZN-WH Bag, Poly, 40X60MM Tray, Foam, EPE, 330x180x45MM Terminal Block, 2P, P5.08, 2ESDV-02P Bag, Poly, 100X60MM White Box, W9B... -
Page 13: Main Part List, Controlspace Esp-00 Ii Chassis (See Figure 4)
MAIN PART LIST ControlSpace ® ESP-00 II Chassis (see Figure 4) ® Item Description Vendor Part Number Bose Part Qty. Note Number Number FRONT PANEL, ALUMINUM BSET8571-01162 369714-0010 LIGHT PIPE BSET70G1-01162 369716-0010 LIGHT GUIDE, SLEEVE BSET7211-01162 369717-0110 FRONT PANEL, STEEL... - Page 14 MAIN PART LIST ControlSpace ® ESP-88C/ESP-00 Chassis (continued) Figure 4. ControlSpace ESP-00 II Chassis Exploded View...
-
Page 15: Main Part List, Controlspace Cc-16 Controller
MAIN PART LIST ® ControlSpace CC-16 Controller Item Description Qty. Part Number Note Number Front plate, PC, GE, LEXAN, 241R, White 275432 Overlay, PC sheet, w/adhesive, 0.18mm 277488 Insert, plate, PC, GE, LEXAN, 241R, White 275434 LCD PCB Assembly 275817-002 Mounting Frame, PC, GE, LEXAN, 241R, White 275433 Main PCB Assembly... -
Page 16: Main Part List, Controlspace Cc-64 Controller
MAIN PART LIST ControlSpace ® CC-64 Controller Item Description Part Number Note Number Metal EMC Shield, Case, SECC-T1, T=0.50MM 275816 Front Panel 275814 Knob 278523-002 Nylon Washer, OD=6.1MM, ID=2.95MM, T=2MM Keyboard Overlay, Plastic, W/S, Adhesive 277485 LCM Module, STN, Blue, 12 Clock, 323977-001S YMC402-11AAABUCL LED PCB Assembly... -
Page 17: Electrical Part Lists
ELECTRICAL PART LIST ESP-00 II Motherboard PCB Assembly (Rev. B) Resistors Reference Description Vendor Part Number Vendor Name Note Designator R100 RK73H1JTD10KF R101 RK73H1JTD1KF R102 0 Ohm RK73Z1JTD 0RJ R103 0 Ohm RK73Z1JTD 0RJ R104 0 Ohm RK73Z1JTD 0RJ R105 0 Ohm RK73Z1JTD 0RJ R106... - Page 18 ELECTRICAL PART LIST ESP-00 II Motherboard PCB Assembly (Rev. B) Resistors (continued) Reference Description Vendor Part Number Vendor Name Note Designator R304 33 Ohm RK73H1JTD33RF R305 33 Ohm RK73H1JTD33RF R306 33 Ohm RK73H1JTD33RF R307 33 Ohm RK73H1JTD33RF R308 33 Ohm RK73H1JTD33RF R309 33 Ohm...
- Page 19 ELECTRICAL PART LIST ESP-00 II Motherboard PCB Assembly (Rev. B) Resistors (continued) Reference Description Vendor Part Number Vendor Name Note Designator R360 33 Ohm RK73H1JTD33RF R361 33 Ohm RK73H1JTD33RF R362 33 Ohm RK73H1JTD33RF R363 33 Ohm RK73H1JTD33RF R364 33 Ohm RK73H1JTD33RF R365 33 Ohm...
- Page 20 ELECTRICAL PART LIST ESP-00 II Motherboard PCB Assembly (Rev. B) Capacitors Reference Description Vendor Part Number Vendor Name Note Designator C101 0.1uF GRM188F11E104ZA01D MURATA C102 0.1uF GRM188F11E104ZA01D MURATA C103 0.1uF GRM188F11E104ZA01D MURATA C104 0.1uF GRM188F11E104ZA01D MURATA C105 0.1uF GRM188F11E104ZA01D MURATA C106 0.1uF GRM188F11E104ZA01D...
- Page 21 ELECTRICAL PART LIST ESP-00 II Motherboard PCB Assembly (Rev. B) Capacitors (continued) Reference Description Vendor Part Number Vendor Name Note Designator C147 12pF GRM1882C1H120JA01D MURATA C148 12pF GRM1882C1H120JA01D MURATA C149 12pF GRM1882C1H120JA01D MURATA C150 47pF GRM1882C1H470JZ01D MURATA C151 47pF GRM1882C1H470JZ01D MURATA C152 47pF...
- Page 22 ELECTRICAL PART LIST ESP-00 II Motherboard PCB Assembly (Rev. B) Capacitors (continued) Reference Description Vendor Part Number Vendor Name Note Designator C304 47pF GRM1882C1H470JZ01D MURATA C305 47pF GRM1882C1H470JZ01D MURATA C306 47pF GRM1882C1H470JZ01D MURATA C307 47pF GRM1882C1H470JZ01D MURATA C308 47pF GRM1882C1H470JZ01D MURATA C309 47pF...
- Page 23 ELECTRICAL PART LIST ESP-00 II Motherboard PCB Assembly (Rev. B) Capacitors (continued) Reference Description Vendor Part Number Vendor Name Note Designator C356 47pF GRM1882C1H470JZ01D MURATA C358 47pF GRM1882C1H470JZ01D MURATA C359 47pF GRM1882C1H470JZ01D MURATA C360 47pF GRM1882C1H470JZ01D MURATA C361 47pF GRM1882C1H470JZ01D MURATA C362 47pF...
- Page 24 ELECTRICAL PART LIST ESP-00 II Motherboard PCB Assembly (Rev. B) Diodes Reference Description Vendor Part Number Vendor Name Note Designator D201 OPEN NOT USED NOT USED D202 1SR154-400 1SR154-400 RHOM D207 1SR154-400 1SR154-400 RHOM D208 1SR154-400 1SR154-400 RHOM Transistors Reference Description Vendor Part Number Vendor Name...
- Page 25 ELECTRICAL PART LIST 4x4 Series II PCB Assembly (optional on ESP-00 II) Resistors Reference Description Vendor Part Number Vendor Name Note Designator R100 100k RK73H1JTD100kF R101 100 Ohm RK73H1JTD100RF R102 100 Ohm RK73H1JTD100RF R103 100k RK73H1JTD100kF R104 OPEN NOT USED NOT USED R105 6.8k...
- Page 26 ELECTRICAL PART LIST 4x4 Series II PCB Assembly (optional on ESP-00 II) Resistors (continued) Reference Description Vendor Part Number Vendor Name Note Designator R147 RK73H1JTD12KF R148 6.8k RK73H1JTD6.8KF R149 RK73H1JTD12KF R150 RK73H1JTD12KF R151 6.8k RK73H1JTD6.8KF R152 6.8k RK73H1JTD6.8KF R153 RK73H1JTD12KF R156 RK73H1JTD12KF R157...
- Page 27 ELECTRICAL PART LIST 4x4 Series II PCB Assembly (optional on ESP-00 II) Resistors (continued) Reference Description Vendor Part Number Vendor Name Note Designator R218 OPEN NOT USED NOT USED R219 OPEN NOT USED NOT USED R220 1.3k RK73H1JTD1.3KF R221 OPEN NOT USED NOT USED R222...
- Page 28 ELECTRICAL PART LIST 4x4 Series II PCB Assembly (optional on ESP-00 II) Resistors (continued) Reference Description Vendor Part Number Vendor Name Note Designator R267 RK73H1JTD39KF R268 RK73H1JTD39KF R269 4.7k RK73H1JTD4.7KF R270 1.8k RK73H1JTD1.8KF R271 1.2k RK73H1JTD1.2KF R272 4.7k RK73H1JTD4.7KF R273 4.7k RK73H1JTD4.7KF R274...
- Page 29 ELECTRICAL PART LIST 4x4 Series II PCB Assembly (optional on ESP-00 II) Resistors (continued) Reference Description Vendor Part Number Vendor Name Note Designator R336 RK73H1JTD10KF R337 1.8k RK73H1JTD1.8KF R338 RK73H1JTD10KF R339 2.2k RK73H1JTD2.2KF R340 1.8k RK73H1JTD1.8KF R341 1.5k RK73H1JTD1.5KF R342 1.5k RK73H1JTD1.5KF R343...
- Page 30 ELECTRICAL PART LIST 4x4 Series II PCB Assembly (optional on ESP-00 II) Resistors (continued) Reference Description Vendor Part Number Vendor Name Note Designator R382 2.2k RK73H1JTD2.2KF R403 RK73H1JTD10KF R404 4.7k RK73H1JTD4.7KF R405 OPEN NOT USED NOT USED R406 OPEN NOT USED NOT USED R407 OPEN...
- Page 31 ELECTRICAL PART LIST 4x4 Series II PCB Assembly (optional on ESP-00 II) Resistors (continued) Reference Description Vendor Part Number Vendor Name Note Designator R448 6.8k RK73H1JTD6.8KF R449 RK73H1JTD10KF R450 6.8k RK73H1JTD6.8KF R451 6.8k RK73H1JTD6.8KF R452 RK73H1JTD10KF R453 6.8k RK73H1JTD6.8KF R454 RK73H1JTD10KF R455 RK73H1JTD10KF...
- Page 32 ELECTRICAL PART LIST 4x4 Series II PCB Assembly (optional on ESP-00 II) Resistors (continued) Reference Description Vendor Part Number Vendor Name Note Designator R512 5.1 Ohm RK73H1JTD5.1RF R513 OPEN NOT USED NOT USED R514 OPEN NOT USED NOT USED R515 5.1 Ohm RK73H1JTD5.1RF R516...
- Page 33 ELECTRICAL PART LIST 4x4 Series II PCB Assembly (optional on ESP-00 II) Resistors (continued) Reference Description Vendor Part Number Vendor Name Note Designator R615 0 Ohm RK73Z1JTD 0RJ R616 0 Ohm RK73Z1JTD 0RJ R617 0 Ohm RK73Z1JTD 0RJ R618 0 Ohm RK73Z1JTD 0RJ R619 0 Ohm...
- Page 34 ELECTRICAL PART LIST 4x4 Series II PCB Assembly (optional on ESP-00 II) Resistors (continued) Reference Description Vendor Part Number Vendor Name Note Designator R722 330 Ohm RK73H1JTD330RF R723 330 Ohm RK73H1JTD330RF R724 330 Ohm RK73H1JTD330RF R725 330 Ohm RK73H1JTD330RF R726 330 Ohm RK73H1JTD330RF R727...
- Page 35 ELECTRICAL PART LIST 4x4 Series II PCB Assembly (optional on ESP-00 II) Capacitors Reference Description Vendor Part Number Vendor Name Note Designator C100 0.1uF GRM188F11E104ZA01D MURATA C101 10uF, 16V MVK16VC10MD55 NICHIKEMI C102 0.1uF GRM188F11E104ZA01D MURATA C103 0.1uF GRM188F11E104ZA01D MURATA C104 10uF, 16V MVK16VC10MD55 NICHIKEMI...
- Page 36 ELECTRICAL PART LIST 4x4 Series II PCB Assembly (optional on ESP-00 II) Capacitors (continued) Reference Description Vendor Part Number Vendor Name Note Designator C146 100pF GRM39CH101JZ01D MURATA C147 100pF GRM39CH101JZ01D MURATA C148 100pF GRM39CH101JZ01D MURATA C149 10uF, 16V, BP RVB16V100M-R ELNA C200 0.1uF...
- Page 37 ELECTRICAL PART LIST 4x4 Series II PCB Assembly (optional on ESP-00 II) Capacitors (continued) Reference Description Vendor Part Number Vendor Name Note Designator C242 47pF GRM39CH470JZ01D MURATA C243 47pF GRM39CH470JZ01D MURATA C244 47pF GRM39CH470JZ01D MURATA C245 10uF, 16V, BP RVB16V100M-R ELNA C246 100pF...
- Page 38 ELECTRICAL PART LIST 4x4 Series II PCB Assembly (optional on ESP-00 II) Capacitors (continued) Reference Description Vendor Part Number Vendor Name Note Designator C338 22pF GRM39CH220J50PB MURATA C339 22pF GRM39CH220J50PB MURATA C340 22pF GRM39CH220J50PB MURATA C341 22pF GRM39CH220J50PB MURATA C342 22pF GRM39CH220J50PB MURATA...
- Page 39 ELECTRICAL PART LIST 4x4 Series II PCB Assembly (optional on ESP-00 II) Capacitors (continued) Reference Description Vendor Part Number Vendor Name Note Designator C428 2700pF GRM188B11H272KA01D MURATA C429 1500pF P-GRM39B152K-50 MURATA C430 4700pF GRM188B11H472KA01D MURATA C431 4700pF GRM188B11H472KA01D MURATA C432 47uF, 16V MVK16VC47MF55 NICHIKEMI...
- Page 40 ELECTRICAL PART LIST 4x4 Series II PCB Assembly (optional on ESP-00 II) Capacitors (continued) Reference Description Vendor Part Number Vendor Name Note Designator C518 0.1uF GRM188F11E104ZA01D MURATA C519 47uF, 16V MVK16VC47MF55 NICHIKEMI C520 0.1uF GRM188F11E104ZA01D MURATA C521 10uF, 16V MVK16VC10MD55 NICHIKEMI C522 0.1uF...
- Page 41 ELECTRICAL PART LIST 4x4 Series II PCB Assembly (optional on ESP-00 II) Capacitors (continued) Reference Description Vendor Part Number Vendor Name Note Designator C612 0.1uF GRM188F11E104ZA01D MURATA C613 0.1uF GRM188F11E104ZA01D MURATA C614 0.1uF GRM188F11E104ZA01D MURATA C615 0.1uF GRM188F11E104ZA01D MURATA C616 0.1uF GRM188F11E104ZA01D MURATA...
- Page 42 ELECTRICAL PART LIST 4x4 Series II PCB Assembly (optional on ESP-00 II) Diodes Reference Description Vendor Part Number Vendor Name Note Designator D500 1SS396 1SS396 TOSHIBA D501 1SS396 1SS396 TOSHIBA D502 1SS396 1SS396 TOSHIBA D503 1SS396 1SS396 TOSHIBA D504 1SS396 1SS396 TOSHIBA D505...
-
Page 43: 4X4 Series Ii Pcb Assembly (Optional On Esp-00 Ii)
ELECTRICAL PART LIST 4x4 Series II PCB Assembly (optional on ESP-00 II) Transistors (continued) Reference Description Vendor Part Number Vendor Name Note Designator Q402 DTC114EKA DTC114EKA RHOM Q403 2SC3326 2SC3326 TOSHIBA Q404 2SC3326 2SC3326 TOSHIBA Q405 2SC3326 2SC3326 TOSHIBA Q406 2SC3326 2SC3326 TOSHIBA... - Page 44 ELECTRICAL PART LIST 4x4 Series II PCB Assembly (optional on ESP-00 II) Miscellaneous Reference Description Vendor Part Number Vendor Name Note Designator CN600 B9B-XH B9B-XH NICHIATSU CN601 2EHDRC-03P(GRN) 2EHDRC-03P(GRN) DINKL CN602 2EHDRC-03P(GRN) 2EHDRC-03P(GRN) DINKL CN603 2EHDRC-03P(GRN) 2EHDRC-03P(GRN) DINKL CN604 2EHDRC-03P(GRN) 2EHDRC-03P(GRN) DINKL CN700...
-
Page 45: Digital Signal Processor (Dsp) Pcb Assembly
ELECTRICAL PART LIST Digital Signal Processor (DSP) PCB Assembly Resistors Reference Description Vendor Vendor Part Number Note Designator R100 33 OHM, 0603, 1/10W, 1% Yageo RC0603FR-0733R R101 1K, 0603, 1/10W, 1% Yageo RC0603FR-071K R102 1K, 0603, 1/10W, 1% Yageo RC0603FR-071K R103 10K, 0603, 1/10W, 1% Yageo... - Page 46 ELECTRICAL PART LIST Digital Signal Processor (DSP) PCB Assembly Resistors (continued) Reference Description Vendor Vendor Part Number Note Designator R409 10K, 0603, 1/10W, 1% Yageo RC0603FR-0710K R410 220K, 0603, 1/10W, 1% Yageo RC0603FR-07220K R450 4.7K, 0603, 1/10W, 1% Yageo RC0603FR-074K7 R451 4.7K, 0603, 1/10W, 1% Yageo...
- Page 47 ELECTRICAL PART LIST Digital Signal Processor (DSP) PCB Assembly Resistor Arrays (continued) Reference Description Vendor Vendor Part Number Note Designator RA109 33 OHM, ARRAY, 8 PIN, 5% Yageo YC164-JR-0733R RA110 33 OHM, ARRAY, 8 PIN, 5% Yageo YC164-JR-0733R RA111 33 OHM, ARRAY, 8 PIN, 5% Yageo YC164-JR-0733R RA200...
- Page 48 ELECTRICAL PART LIST Digital Signal Processor (DSP) PCB Assembly Resistor Arrays (continued) Reference Description Vendor Vendor Part Number Note Designator RA401 10K, ARRAY, 10 PIN, 8R, 5% Yageo YC158TJR-0710K RA450 10K, ARRAY, 10 PIN, 8R, 5% Yageo YC158TJR-0710K RA530 10K, ARRAY, 10 PIN, 8R, 5% Yageo YC158TJR-0710K RA531...
- Page 49 ELECTRICAL PART LIST Digital Signal Processor (DSP) PCB Assembly Capacitors (continued) Reference Description Vendor Vendor Part Number Note Designator C139 10uF, ELEC, 16V, 40C, 20% NICHICON UZT1C100MCR1GB C140 0.1uF, 0603, Y5V, 50V, 20% Samsung CL10F104ZBNC C141 0.1uF, 0603, Y5V, 50V, 20% Samsung CL10F104ZBNC C142...
- Page 50 ELECTRICAL PART LIST Digital Signal Processor (DSP) PCB Assembly Capacitors (continued) Reference Description Vendor Vendor Part Number Note Designator C211 0.1uF, 0603, Y5V, 50V, 20% Samsung CL10F104ZBNC C212 0.1uF, 0603, Y5V, 50V, 20% Samsung CL10F104ZBNC C213 0.1uF, 0603, Y5V, 50V, 20% Samsung CL10F104ZBNC C214...
- Page 51 ELECTRICAL PART LIST Digital Signal Processor (DSP) PCB Assembly Capacitors (continued) Reference Description Vendor Vendor Part Number Note Designator C323 0.1uF, 0603, Y5V, 50V, 20% Samsung CL10F104ZBNC C324 0.1uF, 0603, Y5V, 50V, 20% Samsung CL10F104ZBNC C325 0.1uF, 0603, Y5V, 50V, 20% Samsung CL10F104ZBNC C326...
- Page 52 ELECTRICAL PART LIST Digital Signal Processor (DSP) PCB Assembly Capacitors (continued) Reference Description Vendor Vendor Part Number Note Designator C456 0.047uF, 0603, X7R, 50V, 10% Samsung CL10B471KBNC C457 0.1uF, 0603, Y5V, 50V, 20% Samsung CL10F104ZBNC C458 0.1uF, 0603, Y5V, 50V, 20% Samsung CL10F104ZBNC C459...
- Page 53 ELECTRICAL PART LIST Digital Signal Processor (DSP) PCB Assembly Capacitors (continued) Reference Description Vendor Vendor Part Number Note Designator C507 47pF, 0603, 50V, NPO, 55C, 5% Samsung CL10C470JBNC C531 47pF, 0603, 50V, NPO, 55C, 5% Samsung CL10C470JBNC C532 47pF, 0603, 50V, NPO, 55C, 5% Samsung CL10C470JBNC C533...
- Page 54 ELECTRICAL PART LIST Digital Signal Processor (DSP) PCB Assembly Transistors Reference Description Vendor Vendor Part Number Note Designator Q450 PNP, 50V, 100Ma, SOT-23 KRA102S Q451 PNP, 50V, 100Ma, SOT-23 KRA102S Q452 PNP, 50V, 100Ma, SOT-23 KRA102S Q453 PNP, 50V, 100Ma, SOT-23 KRA102S Q454 PNP, 50V, 100Ma, SOT-23...
-
Page 55: General Input/Output (Gio) Pcb Assembly
ELECTRICAL PART LIST General Input/Output (GIO) PCB Assembly Resistors Reference Description Vendor Vendor Part Note Designator Number R100 100 OHM, 0603, 1/10W, 1% Yageo RC0603FR-07100R R101 100 OHM, 0603, 1/10W, 1% Yageo RC0603FR-07100R R102 100 OHM, 0603, 1/10W, 1% Yageo RC0603FR-07100R R103 100 OHM, 0603, 1/10W, 1%... - Page 56 ELECTRICAL PART LIST General Input/Output (GIO) PCB Assembly Capacitors Reference Description Vendor Vendor Part Note Designator Number C100 10uF, 16V, 40C, 20% NICHICON UZT1C100MCR1GB C101 0.01uF, 0603, X7R, 50V, 55C, 10% Samsung CL10B103KBNC C102 0.01uF, 0603, X7R, 50V, 55C, 10% Samsung CL10B103KBNC C103...
- Page 57 ELECTRICAL PART LIST General Input/Output (GIO) PCB Assembly Inductors Reference Description Vendor Vendor Part Note Designator Number L100 EMI FILTER, SMD 300mA, 20% Murata NFM21CC223R1H3D L101 EMI FILTER, SMD 300mA, 20% Murata NFM21CC223R1H3D L102 EMI FILTER, SMD 300mA, 20% Murata NFM21CC223R1H3D L103 EMI FILTER, SMD 300mA, 20%...
- Page 58 ELECTRICAL PART LIST General Input/Output (GIO) PCB Assembly Integrated Circuits Reference Description Vendor Vendor Part Note Designator Number M100 VOLTAGE DETECTOR, TSOP-5 ONSEMI NCP303LSN30T1 M100 VOLTAGE DETECTOR, SOT-23-5 SEIKO S-80930CNMC-G80- M101 REGULATOR, 3.3V, 1A, TO-252 UPC2933T M102 FLASH, MCU, 32K, LQFP64 RENASES HD64F3664FP M451...
-
Page 59: Output Pcb Assembly
ELECTRICAL PART LIST Output PCB Assembly Inductors Reference Description Vendor Vendor Part Number Note Designator Name L900 NFM39R12C223 MURATA NFM39R12C223 L901 NFM39R12C223 MURATA NFM39R12C223 L902 NFM39R12C223 MURATA NFM39R12C223 L903 NFM39R12C223 MURATA NFM39R12C223 L904 NFM39R12C223 MURATA NFM39R12C223 L905 NFM39R12C223 MURATA NFM39R12C223 L906 NFM39R12C223 MURATA... -
Page 60: Control Center
ELECTRICAL PART LIST CC-64 Control Center Resistors Reference Description Vendor Vendor Part Note Designator Name Number RA100 NETWORK, 10K, 10 PIN/8R, 5% Yageo YC158TJR-0710K RA400 NETWORK, 10K, 10 PIN/8R, 5% Yageo YC158TJR-0710K YC158TJR-0710K RA401 NETWORK, 10K, 10 PIN/8R, 5% Yageo RA500 NETWORK, 10K, 10 PIN/8R, 5% Yageo... - Page 61 ELECTRICAL PART LIST CC-64 Control Center Capacitors (continued) Reference Description Vendor Vendor Part Designator Name Number C105 0.1uF, 0603, Y5V, 50V, 85C, 20% Samsung CL10F104ZBNC C106 0.1uF, 0603, Y5V, 50V, 85C, 20% Samsung CL10F104ZBNC CL10F104ZBNC C107 0.1uF, 0603, Y5V, 50V, 85C, 20% Samsung C108 0.1uF, 0603, Y5V, 50V, 85C, 20%...
- Page 62 ELECTRICAL PART LIST CC-64 Control Center Diodes Reference Description Vendor Vendor Part Designator Name Number D100 SWITCHING, KDS181, SOT-23 KDS181 D101 SWITCHING, KDS181, SOT-23 KDS181 KDS181 D102 SWITCHING, KDS181, SOT-23 D200 LED, YELLOW, SMD, 0805 Everlight 17-21 UYC/S530- A2/TR8 17-21 UYOC/S530- D201 LED, AMBER, SMD, 0805 Everlight...
- Page 63 ELECTRICAL PART LIST CC-64 Control Center Diodes (continued) Reference Description Vendor Vendor Part Designator Name Number D339 LED, GREEN, SMD, 0805 Everlight 17-21 VGC/TR8 D340 LED, GREEN, SMD, 0805 Everlight 17-21 VGC/TR8 17-21 VGC/TR8 D341 LED, GREEN, SMD, 0805 Everlight D342 LED, GREEN, SMD, 0805 Everlight...
- Page 64 ELECTRICAL PART LIST CC-64 Control Center Integrated Circuits Reference Description Vendor Vendor Part Number Designator Name M100 QUAD 2-INPUT AND, TSSOP14 ON Semi MC74VHC08DT K6R1016C1D-TC10 M101 CMOS, SRAM, TSOP44 Samsung HD64F3069RF25 M102 MCU, FLASH, UNPROG, FP-100B Hitachi M200 HEX INVERTER, TSSOP14 ON Semi MC74VHC04DT M201...
-
Page 65: Zone Controller
ELECTRICAL PART LIST CC-16 Zone Controller Resistors Reference Description Vendor Name Vendor Part Note Designator Number 715 OHM, 0603, 1/10W, 1% Yageo Corporation RC0603FR-07715R 240 OHM, 0603, 1/10W, 1% Yageo Corporation RC0603FR-07240R 100K, 0603, 1/10W, 5% Yageo Corporation RC0603JR-07100K 10K, 0603, 1/10W, 5% Yageo Corporation RC0603JR-0710K 10K, 0603, 1/10W, 5%... - Page 66 ELECTRICAL PART LIST CC-16 Zone Controller Integrated Circuits Reference Description Vendor Name Vendor Part Note Designator Number REG, 1.5A, TO-263 NS National Semi LM317S XCVR, SO-8, MAXIM Maxim Integrated MAX485ECSA EEPROM, 16Kx8, MSOP-8 Microchip Tech Inc 24LC128-I/MS MCU, SSOP28, 10MHz Microchip Tech Inc PIC16F873A-I/SS Miscellaneous...
-
Page 67: Disassembly Procedures
DISASSEMBLY PROCEDURES ® ControlSpace ESP-00 II Chassis 4. GPIO Board Removal Refer to Figure 4 for the following proce- 4.1 Perform procedure 1. dures 4.2 Unplug the wire harness at CN102. 1. Top Cover Removal Lift out the GPIO card. 1.1 Remove the eight screws (2, 3) that 4.3 Remove the two screws (3) that secure secure the top cover (1). -
Page 68: Controlspace Cc-16 Control Center
DISASSEMBLY PROCEDURES 6.4 Lift out the Mic/Line PCB assembly. ControlSpace ® CC-16 Control Center Unplug the wiring harness for the Line Output PCB. Refer to Figure 5 for the following proce- Re-assembly Note: When re-installing the dures. Mic/Line PCB assembly, ensure that the LEDs located on the front of the LED PCB 1. - Page 69 DISASSEMBLY PROCEDURES ControlSpace ® CC-64 Control Center 4. LED PCB Removal Refer to Figure 6 for the following proce- 4.1 Perform procedure 3. dures. 4.2 Remove the five screws (11) that secure 1. Front Panel Removal the LED PCB (7) to the front panel (9). 1.1 Grasp the edge of the front panel (2) and 4.3 Slide the PCB off of the posts and lift it pull it away from the rest of the unit.
-
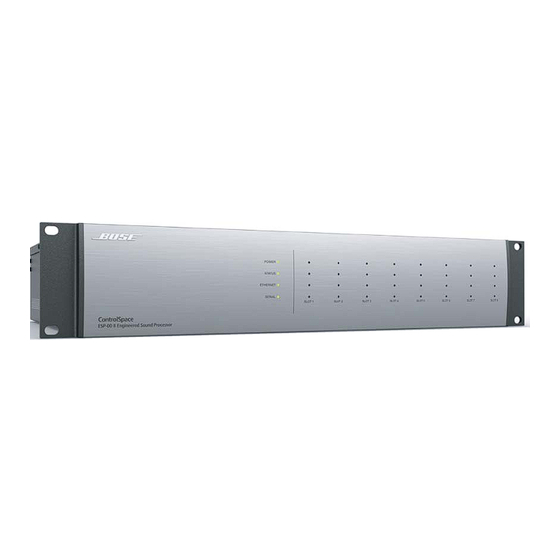
Page 70: Esp-00 Ii Indicators And Features
2. Card slot panels: Removable panels, houses up to eight expansion cards. 3. CC-16 connector: Allows Bose CC-16 zone controller connections. 4. GPIO slot 1: Pre-loaded GPIO card which provides eight general purpose control inputs and eight general-purpose control outputs. - Page 71 ESP-00 II Indicators and Features (cont.) Front Panel LED Indicators General Purpose Inputs/Outputs POWER - Power on or fault-state indication The ESP-00 II includes one GPIO card in • Green: Power on, normal operation slot 1 providing eight control inputs and eight •...
-
Page 72: Test Procedures
192.168.0.99. The subnet mask will remain 255.255.255.0 and leave DNS settings window blank. Click OK. 2. If not installed on the PC, install the Bose ControlSpace Designer software. Once the software is installed, click on the icon to start the program. - Page 73 TEST PROCEDURES If there is no CC-16 or CC64 controller This setup is a straight-through connection connected, connect it now. You will also need for this test. Click the connect icon. the power supply for the controller. Click on the Properties view When the connection is completed, the background color will change.
- Page 74 TEST PROCEDURES Audio Processor ESP-00 II Standard Version Chassis Test Description ® This procedure will cover the ControlSpace ESP-00 II chassis. This same test can also be used for the ESP-88, 88C and ESP-00 chassis. This procedure will provide a step-by-step process to performing a product hardware validation test on analog audio quality at varying power levels, digital audio quality, and throughput.
- Page 75 This test process utilizes a .csp configuration file within ControlSpace Designer. To re-create ® this file, refer to Addendum A. You can also download this configuration file from the Bose Service web page on the ESP-00 II product page. 2.1 Double click on the ControlSpace Designer.exe Icon located on the desktop (may be in the...
- Page 76 TEST PROCEDURES 2.2 Select File -> Open ->. In the Project Files Folder, Select the Configuration file for the Model Type ESP-00 II DUT. ex: ESP-00 II DUT Test Config Basic.csp. See Figures D & E. 2.3 Push the Config file to the DUT by selecting 'Online’...
- Page 77 TEST PROCEDURES 3.1 Double click on the ATS.exe icon located on the Desktop (may be in the taskbar on some PCs). This will launch the Audio Precision ATS-2 program window. 3.2 Select Panels -> Analog Generator. This will display the Audio Generator panel and all of the associated functions.
- Page 78 TEST PROCEDURES Note: The Generator fields that will be altered dynamically throughout the test are as follows: -- Generator Frequency -- Generator Amplitude 3.10 Note the Analyzer dialog box in Figure M. There will be several adjustments to the values in this panel throughout the test and close attention must be paid to the process steps.
- Page 79 TEST PROCEDURES 4.4 On the 'Analyzer' Panel, set the 'BW' to '22Hz' and '20kHz LP'. Set the 'Fltr' to 'A-Weighting'. 4.5 Allow a few seconds for equipment settling time and read and record the value in the 'Function' window. See Figure P. The recorded value should be <-84 dBu (between -84 dBu and -200dBu).
- Page 80 TEST PROCEDURES 4.16 Move the XLR Phoenix I/O connectors to the next sequential I/O ports. 4.17 Reset the 'Generator' and 'Analyzer' to the start up settings. 4.18 Repeat steps 4.0 to 4.17 until all I/O ports have been tested. See Addendum C - Analog Port Mapping.
-
Page 81: Hi-Pot Test
TEST PROCEDURES 5.5 Power Cycle the DUT and watch the Terminal Emulator for the 'Ready' prompt. 5.6 On the PC Keyboard, Type '+++' (without the quotes). Do not hit Enter. Observe that the terminal window now indicates that the unit is in 'Debug Mode'. 5.7 Type '?' (without the quotes) and observe the response from the DUT. -
Page 82: Ground Bond Test
TEST PROCEDURES 6.2 With the tester set to the above parameters, perform the test. If the unit fails, remove the top cover and repair the problem. Once the unit is repaired, repeat the Hi-Pot and the ground bond test to ensure the unit is safe to return to the customer. 7. -
Page 83: Addendum A - Csd Configuration Setup
ADDENDUM A - CSD Configuration Setup 8.0 CSD Project File Configuration Setup 8.1 Open ControlSpace ® Designer 4.0 or Later 8.2 Expand the Signal Processors and Control Centers drop-down menus by clicking the + sign next to the name. 8.3 Create the New design file including one ESP-00 II and one CC-16. - Page 84 ADDENDUM A - CSD Configuration Setup 8.5 Add a 4x4 Mic/Line Card as shown in Figure A4. Right Click the ESP-00 II and Close Properties Right-click and select ‘Properties’ Select Properties. Select the 'Slot 7' Drop- At the Audio Cards Slot 7 drop-down, select ‘4x4 Mic/Line’ Down Menu and Select '4X4 Mic/Line'.
-
Page 85: Addendum B - Process Summary
ADDENDUM B - Process Summary 9.0 Process Summary ® 9.1 Launch the ControlSpace Designer application and open the appropriate .csp file for the DUT. Push the Project file to the DUT. See 'ControlSpace Designer Settings' for details. 9.2 Launch the AP ATS-2 Application. See 'Audio Precision ATS-2 Settings' for details. 9.3 Insure that the cabling and loopback is in starting position. - Page 86 Figure 7. Astec LPT83 Switch Mode Power Supply...
-
Page 87: Astec Power Supply +5Vdc Voltage Adjustment Procedure
DC Power Supply +5V Adjustment Procedures Astec Power Supply +5VDC Voltage Adjustment Procedure CAUTION: Dangerous voltages are present when the chassis is powered up and the top cover is off. Use care when performing the below procedure. Note: This procedure is to be performed when replacing the Astec power supply used in the ESP-00 II chassis. -
Page 88: Troubleshooting
TROUBLESHOOTING Symptom Possible Solution No Power Turn power on, plug in power cord. Power is on, but no Verify that there is an input signal from the source. The audio input sound indicator should be green (or yellow). ... -
Page 89: Service Manual Revision History
SERVICE MANUAL REVISION HISTORY Date Revision Description of Change Change Driven Pages Level Affected 8/14 Document released at revision 00. Service manual release ... - Page 90 SPECIFICATIONS AND FEATURES SUBJECT TO CHANGE WITHOUT NOTICE Bose Corporation The Mountain Framingham Massachusetts USA 01701 P/N: 370610-SM Rev. 00 8/2014 (P) http://serviceops.bose.com...
Need help?
Do you have a question about the ControlSpace ESP-00 II and is the answer not in the manual?
Questions and answers