
Subscribe to Our Youtube Channel
Related Manuals for UWE AXM-II


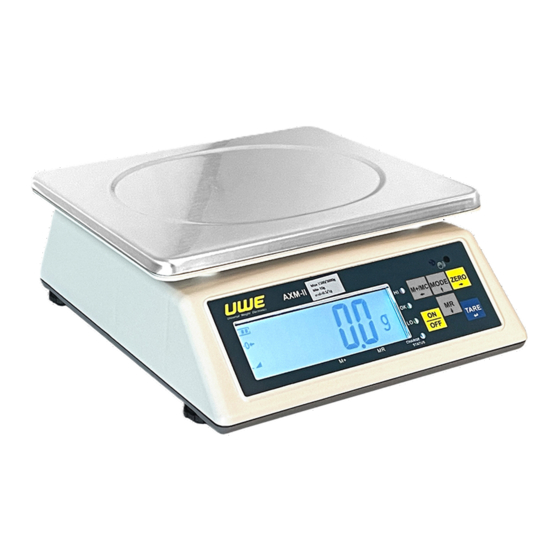
Summary of Contents for UWE AXM-II
- Page 1 AXM-II OPERATION MANUAL PLEASE READ THIS MANUAL VERY CAREFULLY BEFORE OPERATING UNIVERSAL WEIGHT ELECTRONICS | UWE-EUROPE.COM...
-
Page 2: Table Of Contents
Internal Setting Function Function Definitions and Parameter Settings Maintenance and Care Guidelines Information Before First Use Thank you for purchasing a UWE product, please read this manual carefully before starting to use it. The product packaging should contain the following items:... -
Page 3: Information Before First Use
Please avoid using it in bad environments. Product Specifications The AXM-II Digital Weighing Scale has OIML approval (( n≤3000,6000, 3000 x2(Dual- Interval). It offers high precision 30,000 (60,000) divisions, with other division numbers that can also be set. We also accept customized models with higher precision. (Max... -
Page 4: Keyboard Layout And Description
The table below provides specific model specifications: Non-OIML Readability Platter Size Model Capacity Readability (+/- 2d error) (mm) Setup Dual AXM-II 1.5/3 kg 0.5/1 g 0.1 g 280 x 330 interval Dual AXM-II 3/6 kg 1/2 g 0.2 g 280 x 330... -
Page 5: Keyboard
Symbol/Indicator Description ZERO Indicates that the current measurement state is at the 'true zero point'. Indicates that the current display value is the net weight value (for example, the container weight has been deducted). No dedicated symbol, when the result is in an unstable state, it is indicated by (Stable) flashing the measurement unit symbol. -
Page 6: Instructions
This versatile key allows you to switch the weight unit from metric to Imperial (when this unit is enabled) or between different units when you're in the standby screen. MODE⇧ A long press activates and sets the check weighing mode, allowing you to set upper and lower limits. -
Page 7: Tare Setting
Tare Setting To Change Tare Setting: 1. Access the internal setting F9 to change Tare options, or during weighing mode, long-press [TARE] to enter the menu and switch between Tare options. 2. Use the [⇧] key to change options. 3. Confirm your selection by pressing [TARE] key. Tare Mode Description Press [TARE] after placing a load to reset the display to zero... -
Page 8: Disabling The Auto Tare Function
Disabling the Auto Tare Function Step Action Step 1 Long press the [TARE] key to access the tare mode menu Step 2 Select the [tr.oFF] option Step 3 Press [TARE] to turn off all auto tare functions Accumulation Function (M+) Before you begin, remember the Accumulation Function can only be activated when the F11/ACC is ON. -
Page 9: Counting Mode
Press the [M+/MC] button to erase that specific entry. The total number of entries will decrease by one. To exit Memory Recall Mode, press the [Tare] button. Counting Mode Use the counting mode to determine the number of pieces placed on the scale based on the weight of a sample batch. - Page 10 ● If the unit weight of the items is too light (less than 0.5d per unit), the PCS unit symbol will also flash as a warning. Check Weighing Function Activation/Deactivation Step Display Notes Hold MODE (⇧) until display shows "CHK?". To activate, press TARE (↵).
-
Page 11: Percentage Weighing
bb-no No beep for any result. bb-Go Beeps when the result is within range. bb-H.L Beeps when the result is out of range. bb-Hi Beeps when the result is above the upper limit. bb-Lo Beeps when the result is below the lower limit. Important Notes ●... -
Page 12: Rs-232 Connection (D-Sub 9 Pin Female Connector)
RS-232 Connection (D-sub 9 pin female connector) Pin Connection (Computer Side): Configuration... -
Page 13: Internal Setting Function
Internal Setting Function The table below lists the internal functions available, some of which are only authorized for technical personnel. Do not attempt to disassemble any certified scales or any sealed structures Display Function Setting Access (Note 1) Password or Legal F0 * Zero tracking parameter setting (0.25/0.5/1.0/2.0d) restrictions... - Page 14 Hold function setting: OFF/ Lock.H(auto)/ Lock.d Password or Legal (1~9d)/Lock.W(±0.1 ~±20.0%(display value)) restrictions UART2: Communication protocol setting of serial Open (uncontrolled) communication interface UART2: Peripheral equipment menu and output mode/data format selection for serial communication Open (uncontrolled) interface. Password setting (default value=0 or 00000 ; no (Password control), password) Note 2...
-
Page 15: Function Definitions And Parameter Settings
Purpose: Mainly used for certified scales, this feature locks specific functions tied directly to weighing, such as F3 (specification setting), as well as F19 to F21 and the calibration function. Role: The LOCK PIN operates with the highest level of authority, managing the options linked to weighing performance. - Page 16 are not saved, the device will retain the previous settings. F0. Auto Zero Tracking (AZT): Default setting is at 0.5d. Definition: A device that automatically maintains the zero indication within specified limits. Settings: Choose from [ F0 ] [ 0.25d / 0.5d / 0.75d / 1d / 2d ]. If the environment temperature changes significantly or the weighing cycle is long, leading to a non-zero state, you can opt for a larger parameter value.
- Page 17 F7 Setting the Transmission Mode Action Options Description Enter Transmission Press [TARE] when F7 is This opens the menu for Mode displayed. communication protocols. Choose Different types of communication protocols. Use [▲]/[▼] to select Communication OFF / RS232 / RS485 Protocol and [TARE] to confirm.
- Page 18 ● Auto.: Automatic transmission occurs once, but only after the weight is stable. Zero values are excluded. This mode is applicable only for weights between 10d and Max. ● Manu.: Press the [Accumulate M+] key to send weighing data once. ●...
- Page 19 ST, NT,- 100.01kg US, GS, 1000.01kg Format Set to Ser2.x: When the display stabilizes, the indicator will automatically send a single weighing result. Press the [MC] button to clear the memory and print the total value. WEIGHT (kg) UT Remarks Indicator automatically sends single data when 100.02 H stable...
- Page 20 Settings Functionality tr.oFF Auto taring is disabled. As soon as the scale has a steady reading, the initial weight is automatically tr.on tared. tr.Cnt Performs automatic taring after the display stabilizes (unlimited times). After stabilization, the first piece is automatically tared. Subsequent taring is tr.PACK only performed if the CHECK-OK condition is met.
- Page 21 the displayed value. When this HOLD mode is active, the display will blink to indicate its status. Note: The display hold function is not supported when the type is set to "Legal". Conditions for Default & Mode Description Lock/Unlock Range Applications/Remarks Disables the HOLD function...
- Page 22 F16: Password setting Important: Don't forget your password! If forgotten, you'll lose access to certain functionalities, including F3 and F17. By default, no password (set as '0') means no restrictions. However, once a new password is set, a forgotten password can only be reset by professional servicing.
- Page 23 the changes by pressing the [▲] key. Note: After setting the password, the F3 weighing This is a caution note. Please specification setting remember your new password to /calibration function and the avoid loss of access to F3 and F17 F17 time setting will be functions locked (controlled)
- Page 24 F32. Stable Condition Selection This setting defines what's considered a stable weight reading. It affects the operations of the ZERO, TARE, M+, Print keys and the transmission function of the output interface. ● ST.= 1d to 5d: Defines stability. Weight changes within this range are considered stable.
-
Page 25: Maintenance And Care Guidelines
under special circumstances, the sensor can be deactivated. The infrared sensor settings are available for customization: [Ir.Off] no function, [Ir. tArE] tare, [Ir.MOdE] function/unit conversion, [Ir. ZErO] zeroing, [Ir. Pr] printing/accumulation, [Ir. MR] display. F100. Factory Reset Restore all settings to their original factory values. Useful for starting fresh or after updating the firmware to ensure smooth performance.
Need help?
Do you have a question about the AXM-II and is the answer not in the manual?
Questions and answers