Advertisement
Advertisement

Subscribe to Our Youtube Channel
Related Manuals for UWE APM


Summary of Contents for UWE APM
-
Page 2: Table Of Contents
CONTENTS 1. INSTALLATION 2. SPECIFICATIONS 3. KEYBOARD LAYOUT AND DESCRIPTION 4. INITIAL SETUP 5. INSTRUCTION FOR USE 6. TROUBLE SHOOTING 7. DAILY CARE AND MAINTENANCE APPENDIX: ERROR CODES... -
Page 3: Installation
INSTALLATION Because of metrological legislation, installation/some metrological parameter settings are limited to be done by authorized personnel only. Do not attempt to change any of the built-in parameters. Contact your dealer for installation and technical assistance. CAUTION: This unit is legal for trade only when it is sealed (and/or stamped) and bearing a serial number. -
Page 4: Specifications
2. SPECIFICATIONS Model No. APM INDICATOR Max. USER DEFINED 6000 1/3 Max. – e (NOTE 1) Tare Range ±20% Max. (NOTE 1) Power-on Zero Range ±2% Max. (NOTE 1) Zero Range 20e (NOTE 1) Min. Load Max. measuring range 9.0mV 0.8 V... -
Page 5: Keyboard Layout And Description
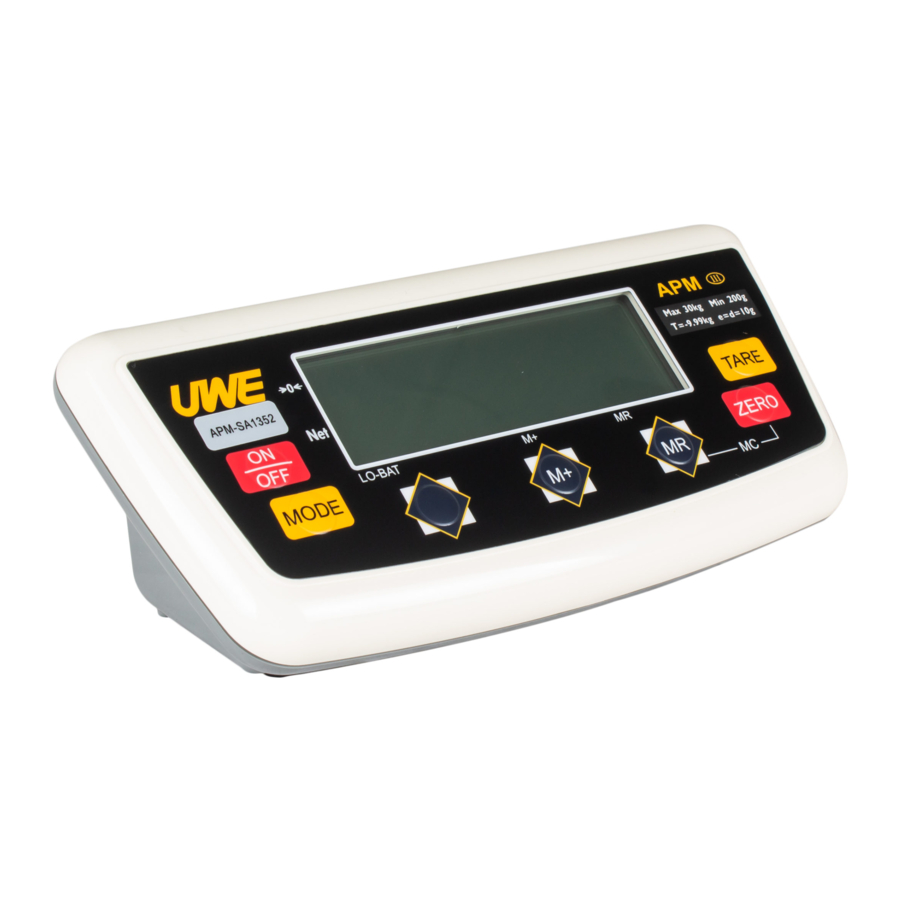
3. KEYBOARD LAYOUT AND DESCRIPTION 1. ON/OFF KEY Press this key to turn indicator on or off. 2. MODE KEY Press this key to shift among different weight units and/or turn backlight on/off. 3. TARE KEY Press this key to tare off the weight of a container. 4. - Page 6 7. MC KEY Press MR and ZERO simultaneously to clear weight from memory. 8. LO BAT INDICATOR This indicator appears when input voltage is below the lowest input limit. Check the power supplied to the indicator. 9. ZERO INDICATOR This indicator appears to indicate zero weight status. 10.
-
Page 7: Initial Setup
4. INITIAL SETUP 4.1 PLACING THE SCALE In order to obtain an accurate weighing result, the complete weighing instrument (hereinafter referred as the scale) must be placed on a strong and level surface. 4.2 INTERNAL SETTING 4.2.1 Select Weight Unit This indicator is equipped with metric and avoirdupois weight units. - Page 8 h. After TARE is pressed, the indicator will go to F4 (AUTO POWER OFF setting). Refer to 4.2.2 for AUTO POWER OFF setting or press ZERO to quit. NOTE To comply with the law of certain countries and certain approval requirements, the avoirdupois weight units may be disabled.
-
Page 9: Instruction For Use
5. INSTRUCTION FOR USE 5.1 BEFORE WEIGHING Make sure that: Connect the load cell signal and power to the indicator properly. Place the scale on a level and strong surface. The indicator is turned on. The ZERO INDICATOR is on. If not, press ZERO to set display to zero. - Page 10 The weight unit used before power off would be employed when the indicator is turned on again. 5.4 TURN BACKLIGHT (OPTIONAL) ON/OFF Press MODE to shift among various weight units with or without backlight. Even though the backlight function is employed, backlight will be automatically turned off when a stable weight remained for 25 seconds or a zero weight is detected and remains stable for 10 seconds...
- Page 11 a. Remove all loads away from platter b. Make sure that the ZERO INDICATOR is on. c. Place the container on the platter. d. Press TARE. After TARE is pressed, the TARE INDICATOR would appear. Refer to 5.2 for weighing procedures. Weight displayed under is the net weight of the subject matter.
- Page 12 d. Indicator returns to normal display status after 2 seconds. e. Repeat a to c for subsequent transactions. 5.8.2 Memory Recall Press MR to recall total accumulated weight from memory. After MR is pressed, indicator displays P. ? (? Means the number of transactions accumulated), then a flashing value.
- Page 13 LO BATTERY This indicator appears when input voltage is below the lowest input limit. 5.9.1 In case a Rechargeable is Used The indicator will be power off in about 5 to 10 minutes. Recharge the battery now. 5.9.2 In case a Power Adaptor is Used Check power supply to indicator immediately.
-
Page 14: Trouble Shooting
6. TROUBLE SHOOTING Syndrome Indicator cannot be turned on Check: Is the indicator powered properly? Action: Check power supply to indicator. Syndrome Indicator turned off automatically Check Is Auto Power Off Function employed? Action Refer to 4.2.2 to disable Auto Power Off Function. - Page 15 ----- Syndrome Indicator displays Check Is the load cell signal cables connected to the indicator properly? Action Recheck signal cable connections. Check Is load cell working properly? Action Check load cell input/output. Syndrome Weighing result is not accurate Check Is the scale placed in a level condition? Action Obtain a level condition.
-
Page 16: Daily Care And Maintenance
7. DAILY CARE AND MAINTENANCE Clean the indicator with a soft and damp cloth. If necessary, apply a mild detergent. Do not use any harsh, abrasive material, acetone, volatile solvent, thinner or alcohol for cleaning. Verify the accuracy of indicator periodically. Re-calibrate the indicator if necessary. -
Page 17: Appendix: Error Codes
APPENDIX: ERROR CODES P_OFF Low battery status is detected during power on. Indicator will shut off after this message appeared. Error Error during calibration. Case 1: The 1 calibration weight entered is less than 1/3 of rated capacity Case 2: calibration weight entered...
Need help?
Do you have a question about the APM and is the answer not in the manual?
Questions and answers