Advertisement
Advertisement
Table of Contents

Subscribe to Our Youtube Channel
Related Manuals for UWE VFM


Summary of Contents for UWE VFM
-
Page 2: Table Of Contents
CONTENTS 1. INSTALLATION 2. SPECIFICATIONS 3. KEYBOARD LAYOUT AND DESCRIPTION 4. INITIAL SETUP 5. INSTRUCTION FOR USE 6. PRINTER AND RS232C INTERFACE 7. TROUBLE SHOOTING 8. DAILY CARE AND MAINTENANCE APPENDIX: APPEARANCE... -
Page 3: Installation
1. INSTALLATION Because of metrological legislation, installation/some metrological parameter settings are limited to be done by authorized personnel only. Do not attempt to change any of the built-in parameters. Contact your dealer for installation and technical assistance. CAUTION: This unit is legal for trade only when it is sealed (and/or stamped) and bearing a serial number. -
Page 4: Specifications
2. SPECIFICATIONS Model No. VBM/VFM/VFS/VTM/VPS (6-WIRE TYPE) ABM/AFM/AFS/ATM/APS (4-WIRE TYPE) INDICATOR Max. USER DEFINED 10000 (NOTE 1) 1/3 Max. – e (NOTE 2) Tare Range SELECTABLE (NOTE 3) Power-on Zero Range Zero Range ±2% Max. 20e (NOTE 4) Min. Load Max. - Page 5 NOTE 2: When under OIML mode, for Multi range or interval, change e to e . When under non-OIML mode, the default setting is full tare range. NOTE 3: The power-on zero (initial zero) range can be selected with ±2%, ±5%, ±10%, ±15%, ±20%, ±30%, ±40% at F3 function followed CAP1.? setting.
-
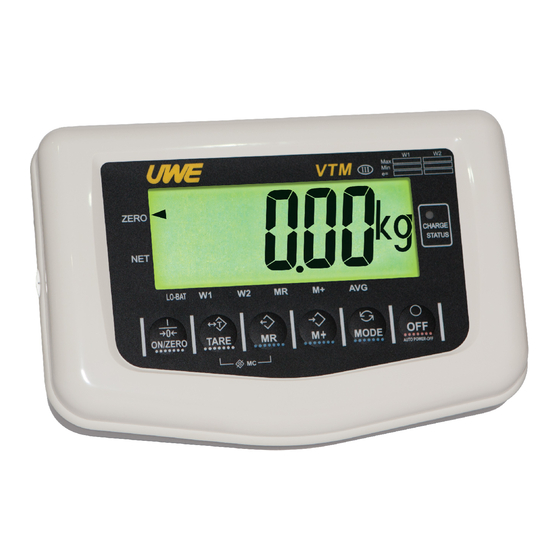
Page 6: Keyboard Layout And Description
3. KEYBOARD LAYOUT AND DESCRIPTION (MODEL SHOWN: VTM) 1. OFF KEY Press this key to turn indicator off. 2. MODE KEY Press this key to shift among different weight units and/or turn backlight on/off. 3. M+ KEY Press this key to accumulate current weight to memory. - Page 7 4. MR KEY Press this key to recall the total accumulated weight from memory. 5. TARE KEY Press this key to tare off the weight of a container. 6. ON/ZERO KEY Press this key to turn indicator on and/or set weight displayed to zero.
- Page 8 Green color: Charging completed 11. AVERAGE INDICATOR This indicator flashes to indicate the digital motion filtering function is being employed when choosing Filt.7 at F6 internal function. 12. M+ INDICATOR This indicator appears to indicate memory contains of stored data. 13.
- Page 9 16. LO-BAT INDICATOR This indicator appears when input voltage is below the lowest input limit. Check the power supplied to the indicator.
-
Page 10: Initial Setup
4. INITIAL SETUP 4.1 PLACING THE SCALE In order to obtain an accurate weighing result, the complete weighing instrument (hereinafter referred as the scale) must be placed on a strong and level surface. 4.2 INTERNAL SETTING 4.2.1 Display Segment Check User can enter this function to check and see if the display and backlight (if purchased) are functioning properly. - Page 11 for 4 minutes. Follow the below steps to enable/disable Auto Power Off Function. Scale is off Press and hold TARE, then press ON/ZERO Scale displays F1 Press TARE three times to F4 Press MODE to shift between 0_OFF or 4_OFF -To enable Auto Power Off Function, press TARE when 4_OFF appears -To disable Auto Power Off Function, press TARE when...
- Page 12 g. Press MODE again to enter transmission protocol setup h. Press M+ to select protocol of P=N81 or P=E71 i. When the preferred transmission protocol shows on display, press TARE to confirm and proceed to the next selection or ON/ZERO to restart the scale NOTE: The default data output format of the scale is Baud Rate = 9600...
- Page 13 when display shows Filt.1~Filt.7. Select Filt.7 will get strongest filter effect. To disable Animal Weighing Function, press TARE when display shows Filt.0 f. After TARE is pressed, indicator display F7 g. Press MODE to enter next set up or ON/ZERO to restart the scale 4.2.5 Select Serial Output Mode There are four selectable transmission modes to choose...
- Page 14 shows Auto For manual sending, press TARE when display shows P_Out Disable Serial output, press TARE when display shows OFF f. After TARE is pressed, indicator display F8 g. Press MODE to enter next set up or ON/ZERO to restart the scale 4.2.6.
- Page 15 For connecting to UTP printer, press TARE when display shows utP (When choosing utP, the setting of F7 will change to OFF) f. After printout format is selected, will enter sub-menu for auto-printing or not. Press MODE to shift between Auto or Nauto(non-auto) For auto printout when weight is stabilized , press TARE when display shows Auto For manual printout when pressing M+ , press TARE...
- Page 16 Scale displays F1 Press TARE eight times Scale displays F9 Press MODE to select between Tr_on or TroFF -To enable Auto Tare Function, press TARE when Tr_on appears -To disable Auto Tare Function, press TARE when TroFF appears After TARE is pressed, scale display F10 Press MODE to enter next set up or ON/ZERO to restart the scale 4.2.8 Select Original Calibrated Zero Function...
- Page 17 TARE when AC_on appears -To disable Original Calibrated Zero Function, press TARE when AC_oF appears After TARE is pressed, scale display F11 Press MODE to enter next set up or ON/ZERO to restart the scale NOTE: 1. For OIML approval, this function would be prohibited. 2.
- Page 18 -To enable Accumulation Function when pressing M+, press TARE when Ad._on appears -To disable Accumulation Function when pressing M+, press TARE when Ad._oF appears After TARE is pressed, scale display F13 Press MODE to enter next set up or ON/ZERO to restart the scale 4.2.10 Select Number of Printout Copy (This function is UTP printer related)
- Page 19 Function This scale is equipped with total print enabled/disabled when performing memory-clear function. When total print is disabled, press MR & TARE will only perform memory-clear function, it won’t print out data of total. Scale is off Press and hold TARE, then press ON/ZERO Scale displays F1 Press TARE twelve times Scale displays F14...
- Page 20 Scale is off Press and hold TARE, then press ON/ZERO Scale displays F1 Press TARE thirteen times Scale displays F15 Press MODE to enter data and time setting Make sure that the UTP printer is connected to scale and it is in online status. Key Function ...
-
Page 21: Instruction For Use
5. INSTRUCTION FOR USE 5.1 BEFORE WEIGHING Make sure that: Connect the load cell signal and power to the indicator properly Place the scale on a level and strong surface The scale is turned on The ZERO INDICATOR is on. If not, press ON/ZERO to set display to zero 5.2 WEIGHING a. - Page 22 NOTE: To comply with the law of certain countries and certain approval requirements, the avoirdupois weight units may be disabled. Contact your dealer for more information. 5.4 TURN BACKLIGHT (OPTIONAL) ON/OFF Follow the below steps to turn on and off backlight (if purchased).
- Page 23 Refer to SPECIFICATIONS for maximum zero range. NOTE: -When scale is set at OIML and application is legal for trade. User only needs to press ON/ZERO once when setting the value to zero. The re-zero function will take place when reading is stabled -When scale is set at Normal and application is not legal for trade.
- Page 24 to SPECIFICATIONS for maximum tare range. NOTE: - When scale is set at OIML and application is legal for trade. User only needs to press TARE once when tare off a weight. The tare function will take place when reading is stabled - When scale is set at Normal and application is not legal for trade.
- Page 25 transaction to memory c. Indicator displays “P. X” and M+ INDICATOR appears to indicate that memory contains of stored data NOTE: “P. X” means the total number of transactions accumulated to memory. d. Indicator returns to normal display status after 2 seconds e.
- Page 26 When the total accumulated weight is being displayed, MR INDICATOR appears to indicator that the value being displayed is the total accumulated weight. Indicator will return to normal display status after 3 seconds. 5.8.3 Memory Clear All transactions stored in memory by pressing MR and TARE at the same time.
-
Page 27: Printer And Rs232C Interface
6. PRINTER AND RS232C INTERFACE The VBM/VFM/VFS/VTM series are capable to install printer interface, and RS232 interface upon purchase. 6.1 Connect the Scale with a Computer Follow the below steps to connect the scale with a computer. a. Turn scale off b. - Page 28 *: Input 1 if the input port of computer is COM 1, or input 2 for COM 2 ...etc. LINE INPUT #1, A$ PRINT A$ GOTO 20 b. Save the above program file. Below is the data output format for RS-232 interface. Please refer to the notes for more information.
- Page 29 6.2 Connect the Scale with a Printer(Parallel Port) a. Turn scale off b. Turn printer off c. Connect the printer output of scale to printer with an appropriate data cable(D-SUB 25) d. Turn scale on e. Turn printer on(in online status) Below is the data output format for printer interface.
-
Page 30: Trouble Shooting
7. TROUBLE SHOOTING Syndrome Indicator cannot be turned on Check: Is the indicator powered properly? Action: Check power supply to indicator. Syndrome Indicator turned off automatically Check Is Auto Power Off Function employed? Action Refer to 4.2.2 to disable Auto Power Off Function. - Page 31 ----- Syndrome Indicator displays Check Is the load cell signal cables connected to the indicator properly? Action Recheck signal cable connections. Check Is load cell working properly? Action Check load cell input/output. Syndrome Display shows 00000 after counting down Check Is the load applied to platter excess the acceptable power-on zero range? Action...
-
Page 32: Daily Care And Maintenance
8. DAILY CARE AND MAINTENANCE Clean the indicator with a soft and damp cloth. If necessary, apply a mild detergent. Do not use any harsh, abrasive material, acetone, volatile solvent, thinner or alcohol for cleaning. Verify the accuracy of indicator periodically. Re-calibrate the indicator if necessary. -
Page 33: Appendix: Appearance
APPENDIX: APPEARANCE MODEL SHOWN: VBM MODEL SHOWN: VFM MODEL SHOWN: VFS... - Page 34 MODEL SHOWN: VTM MODEL SHOWN: VPS MODEL SHOWN: ABM...
- Page 35 MODEL SHOWN: AFM MODEL SHOWN: AFS MODEL SHOWN: ATM...
- Page 36 MODEL SHOWN: APS...
- Page 37 L'instrument de pesage à fonctionnement non automatique Hersteller: Universal Weight Enterprise Manufacturer: Co., Ltd. Fabricant Typ/Modell: VBM/VFM/VFS/VTM/VPS Type/Model: ABM/AFM/AFS/ATM/APS Type/modèle: Nr. der EG-Bauartzulassung (gegebenen falls): No of the EC type-approval certificate (where applicable): Nº du certificat d'approbation CE de type (le cas écheant): entspricht dem in der Bescheinigung über die Bauartzulassung beschriebenen...
Need help?
Do you have a question about the VFM and is the answer not in the manual?
Questions and answers