Table of Contents
Advertisement
Quick Links
Enter Serial No. here._____________________________________
In the event of an enquiry please quote this serial number.
www.monoequip.com
OVEN
40 x 60 trays
for
(INCLUDING CASSETTE LOADING)
OPERATION AND MAINTENANCE
FILE 138
Failure to adhere to the operation, cleaning and maintenance instructions detailed in this manual could affect the warranty of this oven.
1
Bx oven Nonwash Eco 60 x 40 RevA20 8-1-20
Advertisement
Table of Contents

Related Manuals for Mono FG174


Summary of Contents for Mono FG174
- Page 1 Enter Serial No. here._____________________________________ In the event of an enquiry please quote this serial number. www.monoequip.com OVEN 40 x 60 trays (INCLUDING CASSETTE LOADING) OPERATION AND MAINTENANCE FILE 138 Failure to adhere to the operation, cleaning and maintenance instructions detailed in this manual could affect the warranty of this oven. Bx oven Nonwash Eco 60 x 40 RevA20 8-1-20...
- Page 2 Bx oven Nonwash Eco 60 x 40 RevA20 8-1-20...
- Page 3 ATTENTION IF OVEN FAILS TO HEAT UP, WHEN FIRST CONNECTED TO A POWER SUPPLY OR DURING USE AT ANYTIME. PRESS RESET BUTTON LOCATED THROUGH THE REAR BACK PANEL. (DO NOT REMOVE BACK PANEL) RESET BUTTON SAFETY SYMBOLS The following safety symbols are used throughout this product documentation. Before using your new equipment, read the instruction manual carefully and pay special attention to information marked with the following symbols.
- Page 4 ELECTRICAL SAFETY AND ADVICE REGARDING SUPPLEMENTARY ELECTRICAL PROTECTION: Commercial bakeries, kitchens and foodservice areas are environments where electrical appliances may be located close to liquids or operate in and around damp conditions or where restricted movement for installation and service is evident. The installation and periodic inspection of the appliance should only be undertaken by a qualified, skilled and competent electrician, and connected to the correct supply suitable for the load as stipulated by the appliance data label.
-
Page 5: Table Of Contents
8-7.0 Settings (Including passwords) 8-8.0 Using USB port 8-9.0 Diagnostics PART 9.0 Maintenance PART 10.0 Steam System Maintenance PART 11.0 Light Bulb Replacement PART 12.0 SPARES INFORMATION MONO EQUIPMENT Contact Information Bx oven Nonwash Eco 60 x 40 RevA20 8-1-20... -
Page 6: Introduction
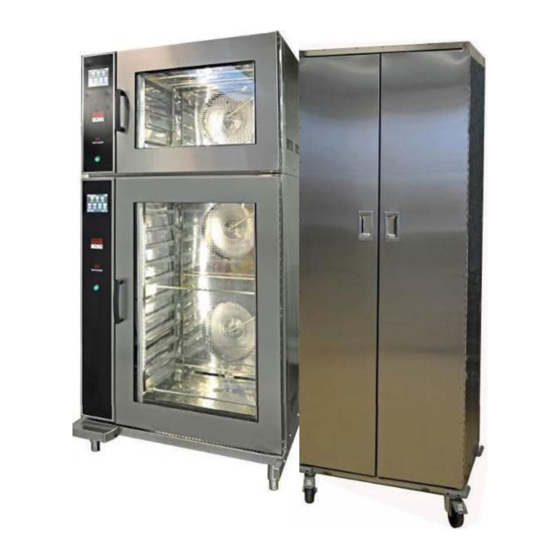
1.0 INTRODUCTION • A combination of clean industrial design and the latest technology, the MONO BX is designed specifically to take the baking Industry’s standard 40cm x 60cm trays with the option of a quick and easy “Tray Loading Cassette system”... -
Page 7: Specifications
2.0 SPECIFICATIONS 10 tray 4 tray stacked HEIGHT 1240 2000 HEIGHT OF OVEN ON BASE 1360 WIDTH 1000 1000 DEPTH – DOOR CLOSED DEPTH – DOOR OPEN 1620 1620 TRAY SIZE 600mm x 400mm POWER (uk versions) 4/5 TRAY OVENS - 415 volts. 3 PHASE, + NEUTRAL + EARTH, 50HZ 11amps per phase, total power 7.5kW (element = 7kW 240v stainless steel) 10 TRAY OVENS - 415 volts. -
Page 8: Safety
The following points should be observed and followed at all times. The oven is designed for baking of bread, confectionery and savoury products only. DO NOT use it for any other items without first consulting with MONO. All repairs and maintenance of electrical units must be carried out by authorised electricians;... -
Page 9: Installation
A 50mm gap is recommended at the sides and rear of this oven and 250mm above. Chimneys and evacuation ducts fitted above mono ovens should be insulated to stop condensate flowing back into the oven. - Page 10 subject to excessive humidity or ambient working temperature above 40 C (115 will not be covered by the component manufacturers guarantee or the MONO product warranty. NOTE • Room should be allowed for the door to open fully to allow easy loading and unloading of product without people coming in contact with hot surfaces.
-
Page 11: Isolation
ISOLATION ELECTRICITY SUPPLY To stop the oven in an emergency. Switch off electricity supply at the wall isolator WATER SUPPLY The water supply should be shut off at the nearest shut-off point Bx oven Nonwash Eco 60 x 40 RevA20 8-1-20... -
Page 12: Cleaning Instructions
6.0 CLEANING INSTRUCTIONS NOTE: BEFORE CLEANING, ISOLATE OVEN FROM MAINS SUPPLY AND ALLOW TO COOL. DAILY • Sweep any debris (after it has been allowed to cool) onto removable oven trays and remove for cleaning. • Brush down and wipe oven front, back and sides. •... -
Page 13: Ideal Operating Conditions
A 50mm gap is required at the sides and rear of this oven and 250mm above. • Chimneys and evacuation ducts fitted above mono ovens should be insulated to stop condensate flowing back into the oven. - Page 14 OPERATION LOADING THE OVEN CASSETTE SYSTEM Slide full trays onto runners in the cassette holding rack at positions required. TOP OVEN CASSETTE 4 TRAYS LOWER OVEN CASSETTE 10 TRAYS When the oven is up to temperature and ready to bake, open the door(s) and push loaded rack up to oven using the central locator on the bottom front edge to give the correct positioning.
-
Page 15: Unloading The Oven
UNLOADING THE OVEN When the bake is over, stop the oven and open the door required, the rack can now be placed back into position. Hold the rack in place and using the push-pull tool provided hooked onto the bar on the cassette;... - Page 16 TOUCH SCREEN OPERATING INSTRUCTIONS Bx oven Nonwash Eco 60 x 40 RevA20 8-1-20...
- Page 17 BASIC OPERATION ALL OPERATIONS ARE ACTIVATED BY TOUCHING AREAS ON THE SCREEN, WHICH WILL PASS YOU ON TO THE NEXT INFORMATION PANEL. DO NOT USE EXCESSIVE FORCE. (THE PRESSURE REQUIRED TO OPERATE THE PANEL CAN BE ALTERED IN THE SETTINGS SECTION) TOUCH THE SCREEN ON THE AREA YOU REQUIRE TO...
- Page 18 8 -1.0 BAKING USING FAVOURITES MENU TOUCH TO OPEN THE FAVOURITES SELECT SCREEN OPTION SCREEN TOUCH THE NAME OF THE PRODUCT REQUIRED SELECT SCREEN TOUCH THE “FULL LOAD” OR “HALF LOAD” AS REQUIRED LOAD SCREEN TO RETURN TO THE PREVIOUS SCREEN TOUCH THE “BACK”...
- Page 19 IF THE OVEN IS NOT UP TO TEMPERATURE IT WILL SHOW THE HEATING SCREEN. WAIT FOR THE OVEN TO REACH TEMPERATURE IF THE OVEN IS TOO HOT FOR THE TEMPERATURE CHOSEN, THE SCREEN WILL TELL YOU TO OPEN THE DOOR TO AID COOLING. View HEATING SCREEN READY SCREEN...
- Page 20 BAKE OVER SCREEN AT THE END OF THE BAKE TIME A SOUNDER WILL BE HEARD AND “BAKE OVER” WILL FLASH. TOUCH “STOP” AND OPEN THE View DOOR TO REMOVE THE PRODUCT. TO KEEP THE OVEN BAKING FOR EXTRA MINUTES THE “+ 10 MIN” BUTTON CAN BE TOUCHED.
- Page 21 8 - 2.0 BAKING USING MANUAL MENU PRESS TO OPEN MANUAL BAKE SCREEN OPTION SCREEN SET BAKE TIME AND TEMPERATURE MANUAL BAKE SCREEN SET BAKE TEMPERATURE SET BAKE TIME TOUCH TEMPERATURE ON THE SCREEN TOUCH TIME ON THE SCREEN TO TO ACTIVATE THE KEYBOARD SCREEN.
- Page 22 USE STEAM TIME AND DAMPER IF REQUIRED STEAM DAMPER TOUCH TO OPEN THE DAMPER. (SYMBOL GOES GREEN) TOUCH AND HOLD FOR THE TIME (SECONDS) STEAM IS REQUIRED. TOUCH TO CLOSE THE DAMPER. (THIS CAN BE USED BEFORE (SYMBOL GOES RED) OR DURING THE BAKE) MANUAL BAKE SCREEN 2 CANCEL...
- Page 23 SAVE MANUAL PROGRAM, IF REQUIRED MANUAL BAKE SCREEN 3 SAVE SETTINGS IF NO TIME WAS ENTERED AT THE START OF THE BAKE, WHEN STOP IS TOUCHED “SAVE” WILL APPEAR AT THE BOTTOM OF THE SCREEN. “SAVE”CAN BE TOUCHED AND AN OPTION SCREEN WILL APPEAR.
- Page 24 8 - 3.0 BAKING USING PROGRAMMES MENU NOTE : THIS COVERS TWO VERSIONS OF FIRMWARE. THE OVEN CAN BE SET TO SHOW EITHER 1. PICTORIAL CHOICES OF PRODUCT CATERGORIES 2. A NUMERICAL VERSION THAT SHOWS RANGES OF PROGRAM NUMBERS. TOUCH TO OPEN “CATEGORY”...
- Page 25 IF THE OVEN IS NOT UP TO TEMPERATURE IT WILL SHOW THE HEATING SCREEN. WAIT FOR THE OVEN TO REACH TEMPERATURE IF THE OVEN IS TOO HOT FOR THE TEMPERATURE CHOSEN, THE SCREEN WILL TELL YOU TO OPEN THE DOOR TO AID COOLING. View HEATING SCREEN READY SCREEN...
- Page 26 BAKE OVER SCREEN AT THE END OF THE BAKE TIME A SOUNDER WILL BE HEARD AND View “BAKE OVER” WILL FLASH. TOUCH “STOP” AND OPEN THE DOOR TO REMOVE THE PRODUCT. TO KEEP THE OVEN BAKING FOR EXTRA MINUTES THE “+ 10 MIN” BUTTON CAN BE TOUCHED.
- Page 27 8 - 4.0 BAKING USING MULTI-BAKE MENU Multi-bake allows the setting of up to four bake timers so that up to four different products can be baked in the same load. (Products must all use the same temperature). TOUCH TO OPEN “MULTI-BAKE”...
- Page 28 MULTI-BAKE SETUP SCREEN SHOWING FOUR TIMERS SET TOUCH THE START BUTTON WHEN REQUIRED AND THE TIMER WILL COUNT DOWN. TOUCH TO STOP TIMER MULTI-BAKE SETUP SCREEN WITH FOUR TIMERS RUNNING AT THE END OF A SET TIME A BUZZER SOUNDS. TOUCH RED BAR TO STOP Bx oven Nonwash Eco 60 x 40 RevA20 8-1-20...
-
Page 29: Creating A Program
" 8 - 5.0 CREATING A PROGRAM TOUCH TO OPEN “CATEGORY” SCREEN OPTION SCREEN TOUCH THE TYPE OF PRODUCT WANTED AND THE “SELECT” SCREEN OPENS CATEGORY SCREEN TOUCH THE DOWN ARROW UNTIL A BLANK PROGRAM IS REACHED. TOUCH “I” BUTTON NEXT TO THE BLANK PROGRAM TO OPEN NEXT SCREEN... - Page 30 INFORMATION SCREEN TOUCH OPTION TO GO TO PASS CODE SCREEN PASS CODE SCREEN ENTER “SUPERVISOR” PASS CODE AND THEN TOUCH OK. (DEFAULT CODE = 123456) Bx oven Nonwash Eco 60 x 40 RevA20 8-1-20...
- Page 31 CHANGE PRODUCT OPTION SCREEN TOUCH “CHANGE PRODUCT” LOAD TYPE VALUE CHANGE SCREEN BAKE PHASE (IF REQUIRED) INCREASE OR USE KEYS DECREASE ENTER AMOUNT REQUIRED AND PRESS DONE POWER LEVEL TOUCH EACH ITEM AND CHANGE THE VALUE BY USING THE UP AND DOWN KEYS OR BY USING THE KEY PAD.
- Page 32 CHANGE TRAY LAYOUT OPTION SCREEN TOUCH “CHANGE TRAY LAYOUT” TOUCH TO ADJUST TOUCH TO ADJUST NUMBER OF PRODUCTS NUMBER OF PRODUCTS ACROSS THE TRAY DOWN THE TRAY INCREASE VALUE DECREASE VALUE WHEN SATISFIED WITH THE TRAY LAYOUT TOUCH “SAVE” TO RETURN TO THE “OPTIONS”...
- Page 33 SAVE OPTION SCREEN TOUCH “SAVE AS” KEYBOARD SCREEN TYPE IN THE NEW NAME AND TOUCH “SAVE” Bx oven Nonwash Eco 60 x 40 RevA20 8-1-20...
- Page 34 ADD A PRODUCT TO THE FAVOURITES LIST TOUCH THE TYPE OF PRODUCT WANTED AND THE “SELECT” SCREEN OPENS CATEGORY SCREEN TOUCH THE “i” (INFORMATION) BUTTON NEXT TO THE PRODUCT YOU WANT AS A FAVOURITE. THIS OPENS THE OPTION SCREEN SELECT SCREEN TOUCH “ADD TO FAVOURITES”...
-
Page 35: 7-Day Timer
8 - 6.0 SETTING 7–DAY TIMER TOUCH TO OPEN “7-DAY TIMER” SCREEN OPTION SCREEN CHOOSE DAY SET “ON” TIME INCREASE VALUE SET “OFF” TIME DECREASE VALUE TIMER SETUP SCREEN NOTE Up to four on/off times can be set for each day. Touch “clear”... -
Page 36: Settings (Including Passwords)
8 - 7.0 SETTINGS OPTION SCREEN TOUCH TO OPEN THE “SETTINGS” SCREEN PASS CODE SCREEN ENTER “SUPERVISOR” CODE AND THEN TOUCH “OK”. (DEFAULT CODE = 123456) SETTINGS SCREEN CHOOSE THE SETTING TO ALTER Bx oven Nonwash Eco 60 x 40 RevA20 8-1-20... - Page 37 TIME AND DATE INCREASE DECREASE TOUCH THE SCREEN TO HIGHLIGHT THE ITEM TO CHANGE USE THE INCREASE / DECREASE BUTTONS TO ALTER THE SETTINGS TIME AND DATE SCREEN WHEN ALL INFORMATION IS CORRECT, TOUCH “SAVE”. THIS WILL RETURN TO THE SETTINGS SCREEN SETTINGS SCREEN Bx oven Nonwash Eco 60 x 40 RevA20 8-1-20...
- Page 38 OVEN SETTINGS (GENERAL) SELECT START SCREEN. TOUCH “BACK” TO CONFIRM SETTINGS SCREEN TOUCH “GENERAL SETTINGS” AND THE FOLLOWING SCREEN WILL APPEAR. SCROLL DOWN TO MOVE THROUGH ALL CHOICES AND ADJUST EACH ONE AS REQUIRED, USING THE ARROW KEYS. Bx oven Nonwash Eco 60 x 40 RevA20 8-1-20...
- Page 39 OVEN SETTINGS EXPLAINED - GENERAL LEVEL SCREEN BRIGHTNESS – Adjusts the brightness of the viewing screen for user comfort. TOUCHSCREEN SENSITIVITY – Adjusts the pressure required to operate the touch screen. (5 settings) TEMPERATURE UNIT OF MEASURE – Centigrade (Celsius) or Fahrenheit BAKE EXTENSION (mins) –...
- Page 40 OVEN SETTINGS (HIGH LEVEL) TOUCH “HIGH LEVEL SETTINGS” AND SETTINGS SCREEN THE FOLLOWING SCREEN WILL APPEAR. ENTER “HIGH LEVEL” PASS CODE AND THEN TOUCH “OK”. THE FOLLOWING SCREEN WILL APPEAR. CHANGE SUPERVISOR PASSWORD HERE CHANGE HIGH LEVEL PASSWORD HERE RESTORES ALL SCREENS BACK TO ORIGINAL DEFAULT SETTINGS (NOT PASSCODES)
- Page 41 OVEN SETTINGS EXPLAINED - HIGH LEVEL OVEN TYPE – Set this to the type of oven that the screen is installed on. MAX. BAKE TEMPERATURE – Can be set up to 300C , (depending on the oven type) TEMPERATURE OFFSET – Can be used to adjust the display to the actual temperature in the oven.
- Page 42 DEFAULT PASSCODES SUPERVISOR (LOW LEVEL) -- 123456 HIGH LEVEL -- 654321 MASTER -- 314159 (This is fixed) SUGGESTION To stop unauthorised changes to the oven setup, it is suggested that this page is removed from this manual and kept in a safe place for future reference. If tampering could be a problem It is also a good idea to change the passcodes at regular intervals.
- Page 43 8 - 8.0 USING THE USB PORT Ensure the Start screen is showing START SCREEN Insert the USB memory stick into the socket on the side of the oven panel. (Rubber plug may have to be removed first). NOTE The USB stick will only fit in one way. Do not force into the socket.
- Page 44 Choose action you would like to do. Select the file required. When confirmation of “file loaded ok” shows, remove usb stick Bx oven Nonwash Eco 60 x 40 RevA20 8-1-20...
- Page 45 The oven will find the "Mono" folder automatically when the stick is plugged into the oven. Any stick can be used (does not have to be blank) but the Mono folder must be in the root folder. The most used folders are explained below: SKINS These control the way the screen looks in different modes.
-
Page 46: Diagnostics
8 - 9.0 DIAGNOSTICS SETTINGS SCREEN TOUCH “DIAGNOSTICS” AND THE FOLLOWING SCREEN WILL APPEAR. DIAGNOSTICS SCREEN INPUTS HIGHLIGHT WHEN A SIGNAL IS Received. e.g. DOOR OPEN TOUCH THE REQUIRED OUTPUT AND A SIGNAL IS SENT TO THAT ITEM. THE OUTPUT BEING CHECKED IS HIGHLIGHTED WHEN ACTIVE. TO STOP THE OUTPUT, TOUCH AGAIN. -
Page 47: Maintenance
12.0 STEAM SYSTEM MAINTENANCE 11.0 BULB REPLACEMENT In the event of a light failure, please contact Mono service department as there are no customer replaceable parts Bx oven Nonwash Eco 60 x 40 RevA20 8-1-20... - Page 48 This can be found on the silver information plate of the machine and on the front cover of this manual. MACHINE SERIAL NUMBER spares@monoequip.com email: +44(0)1792 564039 Mono Spares TEL. Bx oven Nonwash Eco 60 x 40 RevA20 8-1-20...
- Page 49 DESIGNED AND MANUFACTURED IN WALES BY: MONO EQUIPMENT Queensway Swansea West Industrial Estate Swansea. SA5 4EB UK Web site: www.monoequip.com Tel. +44(0)1792 561234 Fax. 01792 561016 OVEN DISPOSAL ❑ CARE SHOULD BE TAKEN WHEN THE MACHINE COMES TO THE END OF ITS WORKING LIFE. ALL PARTS SHOULD BE DISPOSED OF IN THE APPROPRIATE PLACE, EITHER BY RECYCLING OR OTHER MEANS OF DISPOSAL THAT COMPLIES WITH LOCAL REGULATIONS.
Need help?
Do you have a question about the FG174 and is the answer not in the manual?
Questions and answers