Table of Contents
Advertisement
Quick Links
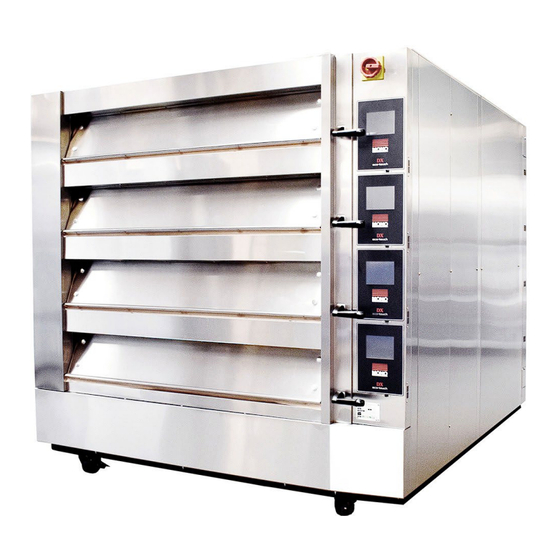
Fan Assisted Deck Oven
Installation and Operation
EN
© 2024, MONO Equipment Limited
MonoEquip.com
Product Version
Fan assisted baking
Double-depth fixed decks
3-tray wide x 2-tray deep
ECO touch control
UK specifications
Oven Serial Number
Oven Code
FG246T-B483L
FG246T-B483R
FILE-150 | Rev. A24 (November 2024)
Advertisement
Table of Contents

Related Manuals for Mono FG246T-B483L


Summary of Contents for Mono FG246T-B483L
- Page 1 Fan assisted baking Double-depth fixed decks 3-tray wide x 2-tray deep ECO touch control UK specifications Oven Serial Number Oven Code FG246T-B483L FG246T-B483R © 2024, MONO Equipment Limited FILE-150 | Rev. A24 (November 2024)
-
Page 2: Thank You
Before using your new oven for the very first time, please read and familiarise yourself with the contents of this User Manual and keep it handy for future reference. If you have any queries regarding your oven, please contact MONO Equipment Limited directly: +44 (0)1792 561234 ... -
Page 3: Safety Symbols
Indicates a potential hazard with a medium risk which, if not avoided, could result in death or serious physical injury. CAUTION Indicates a hazard with a low risk which, if not avoided, could result in minor or moderate physical injury. Rev. A24 (November 2024) MONO... -
Page 4: Electrical Safety Notice
Residual Current Device (RCD). Always fit a wall-mountable isolator switch to isolate the oven from the electrical supply completely. The isolator must be visible, labelled as an emergency shut-down device, and easily accessible. MONO Rev. A24 (November 2024) -
Page 5: Water Leak Safety Notice
Place an out-of-service notice on the oven. Contact your oven supplier or MONO Equipment Limited for technical assistance. Ovens must be maintained and serviced at appropriate intervals to ensure the oven operates at optimum levels. Rev. A24 (November 2024) -
Page 6: General Notices
It is the owners’ responsibility to ensure adequate ventilation is provided. Any component malfunctioning during the guarantee period found to have been subjected to excessive humidity or ambient working temperatures is not covered by the component manufacturer’s or MONO Equipment’s product warranty. –... -
Page 7: Declaration Of Conformity Certificate
Fan Assisted Double Depth Deck Oven | Installation and Operation Manual Title Pages Declaration of Conformity Certificate Rev. A24 (November 2024) MONO... -
Page 8: Table Of Contents
Water Leak Safety Notice ..............iv General Notices ..................v Declaration of Conformity Certificate ..........vi Chapter: 1 Introduction The MONO Fan Assisted Deck Oven ....... 1 Chapter: 2 Safety General safety ............... 3 Oven safety ................3 Chapter: 3 Installation Safety messages .............. - Page 9 Contact information for customer services ....44 Further information ............44 Environmental disposal ............ 44 Chapter: 9 Maintenance Safety messages ..............45 General maintenance ............45 Preventative maintenance ..........45 Every 3 months ..................45 Rev. A24 (November 2024) MONO viii...
- Page 10 Fan Assisted Double Depth Deck Oven | Installation and Operation Manual Every 12 months ..................46 Chapter: 10 Spares Appendix: A Passcodes ................52 Appendix: B Dimensional Drawings ............54 Appendix: C Specifications ................ 58 Appendix: D Electrical Information ............61 MONO Rev. A24 (November 2024)
- Page 11 Fan Assisted Double Depth Deck Oven | Installation and Operation Manual Contents Rev. A24 (November 2024) MONO...
-
Page 12: Chapter: 1 Introduction
1.1. The MONO Fan Assisted Deck Oven MONO’s industry-leading fan-assisted, double-depth bakery deck oven is an easy-to-use, practical, and good-looking oven with an excellent heat recovery rate and an even bake across a wide range of bread and confectionery products. - Page 13 C. Door handle for opening and closing a baking chamber D. Main isolator switch (normally in the ON position) E. Steel bumpers F. Power cable entry (M50 cable gland with lock nut supplied) G. Single water inlet H. Damper I. Double-peel holder Rev. A24 (November 2024) MONO...
-
Page 14: Chapter: 2 Safety
If the oven is damaged, malfunctioning, or missing parts: Stop using it. Do not attempt any repairs to the oven. – Contact MONO Equipment Limited for technical assistance. – Never operate the oven with any covers or panels removed. ... - Page 15 Always check the electrical requirements on the machine's information plate before connecting the power for the first time. Contact MONO Equipment if the electrical information is not correct for your site. Always ensure your hands are dry before touching any electrical ...
-
Page 16: Chapter: 3 Installation
Always check the electrical requirements on the machine's information plate before connecting the power for the first time. Contact MONO Equipment if the electrical information is not correct for your site. Always ensure your hands are dry before touching any electrical ... -
Page 17: Electrical Supply Connections
– MONO does not supply or fit a mains power cable for the deck oven. An M50 cable gland with a lock nut is provided loosely with the oven for an electrician to fit a customer-supplied power cable to the oven and connect it to the supply at the premises. -
Page 18: Water Supply Connections
A water conditioning unit is advised for ‘hard water’ areas. Figure 3.2: Water supply connection on the oven's roof A. Water inlet valve (½-inch connection point) on the oven's roof MONO Rev. A24 (November 2024) -
Page 19: Water System Setup Procedure
Water regulator set-up (located on rear of the oven) A. Drain valve C. Regulator B. Adjusting screw to set the regulator D. Water treatment filter NOTE Depending on the water supply area, the water treatment filter should be changed during yearly maintenance. Rev. A24 (November 2024) MONO... -
Page 20: Chapter: 4 Isolation
WARNING Always disconnect the oven from the consumer power supply if working on the electrical box and panel. Some components stay electrically energised even after the main isolator is in the 0 (OFF) position. Rev. A24 (November 2024) MONO... -
Page 21: Chapter: 5 Operation
Fan Assisted Double Depth Deck Oven | Installation and Operation Manual Chapter 5 Operation 5.1. Touchscreen operations Each deck has an independent colour touchscreen for operating the oven. Rev. A24 (November 2024) MONO... -
Page 22: Main Menu Functions
A. Favourites (see Section 5.3) B. Manual bake (see Section 5.4) Section 5.5) C. Programmes (see D. 7-Day timer (Section 5.8) E. Settings (Section 5.9 Section 5.11) 5.14) F. Standby mode (Section G. Sleep mode (Section 5.13) Rev. A24 (November 2024) MONO... -
Page 23: Baking Using The "Favourites" Menu
Use the up-arrow and down-arrow buttons to see other product pages. – Touch the Full Load or Half Load icon (C). This screen only appears if a half load is saved in the program. – Rev. A24 (November 2024) MONO... - Page 24 Touch the Start button (E). NOTE To minimise heat loss from the oven, do not leave the oven door open for longer than needed. The oven will automatically recover from the heat lost when the door is closed. Rev. A24 (November 2024) MONO...
- Page 25 Observe the baking progress bar and actual time remaining (G). Touch the View button (H) during a bake to show the settings for that particular bake. Touch the Cancel button (I) to go back to the previous screen. (It does not cancel the bake). Rev. A24 (November 2024) MONO...
- Page 26 + 2 mins button (J). When ready to stop the bake: Touch the Stop button (K). Open the door. Take care to avoid burns. – Carefully remove the trays of product. Rev. A24 (November 2024) MONO...
-
Page 27: Baking Using The "Manual Bake" Menu
Touch the Manual Bake icon (A). Set the top and bottom heat. Touch a Heat % button (B or C) to activate the keyboard screen. Use the keypad to input the required percentage of heat. Touch OK. Rev. A24 (November 2024) MONO... - Page 28 Manual damper function: Touch the Damper icon (G) to open the damper. The icon changes colour to green. – Touch the Damper icon again to close the damper. The icon changes colour to red. – Rev. A24 (November 2024) MONO...
- Page 29 – Carefully load the oven with the prepared trays of product. Close the door. Touch Start to begin the bake. Touch Stop when the end-of-bake buzzer sounds or the required baking time has elapsed. Rev. A24 (November 2024) MONO...
- Page 30 Touch Save on the Manual Bake screen. Touch Add To Favourites or Save As... on the Choose Option screen. Use the keyboard to type the program name. Touch Save on the keyboard screen. Rev. A24 (November 2024) MONO...
-
Page 31: Bake Using The "Programmes" Menu
Touch the Programmes icon (A). Touch a category (B) or programme number range (C), as appropriate for your set-up. Touch the name (D) or number (E) of the required product. Rev. A24 (November 2024) MONO... - Page 32 Touch the Start button (H). NOTE To minimise heat loss from the oven, do not leave the oven door open for longer than needed. The oven will automatically recover from the heat lost when the door is closed. Rev. A24 (November 2024) MONO...
- Page 33 To minimise heat loss from the oven, do not leave the oven door open for longer than needed. The oven will automatically recover from the heat lost when the door is closed. Rev. A24 (November 2024) MONO...
-
Page 34: Create A Product Bake Program
Touch a category (B) or programme number range (C), as appropriate for your set-up. Touch the down arrow ˅ until the first blank program space is seen. Touch the i button next to the blank program space. Rev. A24 (November 2024) MONO... - Page 35 However, for security reasons, the passcodes section may have been removed. Configure the product bake settings. Touch the Change Product button (E). Touch Full Load to switch to the Half Load settings (if required). Rev. A24 (November 2024) MONO...
- Page 36 Use the arrow buttons or keypad to change the number of products across the tray. Touch the D (Depth) value. Use the arrow buttons or keypad to change the number of products down the tray. Touch Save to confirm the tray layout. Rev. A24 (November 2024) MONO...
- Page 37 Fan Assisted Double Depth Deck Oven | Installation and Operation Manual Chapter 5 Save the program for future use. Touch the Save As... button. Type in a name for the new program. Touch Save to save the new program. Rev. A24 (November 2024) MONO...
-
Page 38: Add A Product Bake Program To "Favourites" Menu
On the Select Product screen, touch the i (information) button next to the product you want as a favourite. On the Choose Option screen, touch Add to favourites. The product bake program now appears on the favourites list. See Baking using the “Favourites” menu on page 13 for instructions to select this favourite. Rev. A24 (November 2024) MONO... -
Page 39: Setting The 7-Day Timer
Set the minutes using the arrow keys or keypad. Set the off time (D) using the same method. Touch Save to immediately activate the timer. NOTE The settings can be cleared for a selected day by touching Clear. Rev. A24 (November 2024) MONO... -
Page 40: Configurable Oven Settings (Supervisor Level)
Touch the General Settings (G) Use the page-down and page-up arrows (H) to move through all the oven settings. Touch an oven setting. Adjust the oven setting value using the increase or decrease arrows (I). Rev. A24 (November 2024) MONO... - Page 41 Fan Assisted Double Depth Deck Oven | Installation and Operation Manual Chapter 5 Rev. A24 (November 2024) MONO...
-
Page 42: Explanation Of The General Oven Settings
* [Blank] (not used) (Settings at 6 fn cannot be changed). Door open alarm Turns the alarm on or off for when the door is opened during a bake program. Settings are On and Off. Rev. A24 (November 2024) MONO... -
Page 43: Configurable Oven Settings (High Level)
Adjust the oven setting value using the increase or decrease arrows (D). NOTE Use the Set Supervisor Passcode or Set High Level Passcode buttons if wanting to change the passcodes. The Restore Factory Defaults button restores all screens (except passcodes) to the original default settings. Rev. A24 (November 2024) MONO... -
Page 44: Explanation Of The High-Level Oven Settings
Set how the temperature increases for the top heating elements. Bottom gain (°C) Set how the temperature increases for the bottom heating elements. Mono constant Factory set. Do not change the value unless instructed to do so. (Factory) Steam trough temp. -
Page 45: Sleep Mode Function
This process enables the oven to return to full baking heat as quickly as possible, preventing the oven from standing idle and consuming the power required for baking temperatures. Figure 5.2: Putting the oven into Sleep mode Figure 5.3: Exiting Sleep mode Rev. A24 (November 2024) MONO... -
Page 46: Standby Mode And Auto Shutdown Functions
Touch the screen to turn the oven on. Figure 5.4: Putting the oven into Standby mode Figure 5.5: Exiting Standby mode Rev. A24 (November 2024) MONO... -
Page 47: Using The Usb Port
A rubber plug may have to be removed from the socket first. – The USB memory stick only fits in one way. Do not force it into the socket. – Wait for the USB symbol to finish moving. Rev. A24 (November 2024) MONO... - Page 48 Remove the USB stick or touch Cancel to choose other items to update or change. Choose the action you would like to do (e.g. Load Products). Select the file required (e.g. MALEVOX). Remove the USB stick when confirmation of “file loaded OK” is seen. Rev. A24 (November 2024) MONO...
-
Page 49: Notes On Using Usb Sticks
Fan Assisted Double Depth Deck Oven | Installation and Operation Manual Chapter 5 Notes on using USB sticks For a USB stick (pen drive) to function correctly on a Mono oven with a port, it must have the following folder structure as a root folder. Mono... -
Page 50: Diagnostics
Inputs (B) are highlighted when a signal is received, e.g. a door is open. Touch the required output (C) and a signal is sent to that item. The output being checked is highlighted when active. To stop the output, touch it again. – Rev. A24 (November 2024) MONO... -
Page 51: Chapter: 6 Cleaning
Clean any burnt-on debris by scrubbing it with a stiff brush and, if necessary, a damp cloth. Use a nylon brush to scrub the wheels with a mild detergent and hot water. Using too much water eventually rusts the metalwork. – Rev. A24 (November 2024) MONO... -
Page 52: Troubleshooting Bakes
marginal when the deck is full of products. If the elements continue to heat after reaching the set temperature, call MONO Equipment for technical assistance. (Please allow up to 15 °C (59 °F) difference before diagnosing a fault condition). -
Page 53: Chapter: 8 Service
Chapter 8 Service If a fault arises, please do not hesitate to contact MONO Equipment’s Service and Spares department. Be prepared to provide the Serial Number from the machine’s information plate or the front page of this User Manual in all communications. -
Page 54: Chapter: 9 Maintenance
You must immediately report any damage or defect arising with the appliance. Unsafe equipment is dangerous. Do not use the appliance. Isolate the electrical supply and contact MONO Equipment Limited or your appointed service agent. 9.2. General maintenance The following general maintenance is recommended: Check for any visible damage or signs of tampering. -
Page 55: Every 12 Months
Arrange for a suitably qualified and experienced person to replace damaged baking tiles. – General functioning of the oven: Confirm the general functioning of the oven is as expected, e.g. the control panel is not 'freezing' – and the oven is not underbaking or overbaking product. Rev. A24 (November 2024) MONO... - Page 56 Image B873-95-007 Oven thermocouple B872-22-009 Heater MCB B888-30-014 Overheat thermostat B872-22-061 Cooling fan MCB B801-08-021 Control circuit power supply B801-93-004 Top heat contactor B801-93-004 Bottom heat contactor B867-83-009 Water solenoid B749-83-003 Damper solenoid (L/H oven) Rev. A24 (November 2024) MONO...
- Page 57 Quantity Image B749-83-004 Damper solenoid (R/H oven) B869-75-032 Cooling fan B851-07-002 Mains isolator switch 158-25-80000 Eco-touch screen and PCB assembly B854-04-004 Heating element, 0.6 kW B854-04-092 Heating element, 0.75 kW B854-04-093 Heating element, 1 kW Rev. A24 (November 2024) MONO...
- Page 58 Chapter 10 Fan Assisted Double Depth Deck Oven | Installation and Operation Manual Figure 10.1: M246-02-00385 Fan Assembly Rev. A24 (November 2024) MONO...
- Page 59 M6 shake-proof washer A900-03-379 M6x20 hexagonal bolt A900-01-305 M6 caged nut B811-49-002 Snap bush 246-02-00357 Fan box A900-01-301 Pop rivet 4.8 dia x 11.25 LG A900-05-168 M5 plain washer A900-04-072 Binx M5 nut, steel plated Rev. A24 (November 2024) MONO...
- Page 60 245-03-22539 Hinge assembly (right-hand door) 45-03-22550 Left-hand hingle plate, hinge block and screws 245-03-00400 Side seal A900-05-174 Shakeproof washer, M8 257-03-00018 Door retainer A900-03-430 Hex bolt, M8x16 A900-05-268 M12 Washer, form A, A2 stainless steel Rev. A24 (November 2024) MONO...
-
Page 61: Default Passcodes
To stop unauthorised changes to the oven setup, it is suggested that this page is redacted or removed from this manual and kept in a safe place for future reference. If tampering could be a problem, it is also a good idea to change the passcodes at regular intervals. Rev. A24 (November 2024) MONO... - Page 62 Appendix A Fan Assisted Double Depth Deck Oven | Installation and Operation Manual Rev. A24 (November 2024) MONO...
-
Page 63: Dimensional Drawings
Internal deck height 188 mm (7½ inches) Internal useable area 2.26 m (24⅓ ft Bottom deck loading height 533 mm (21 inches) Top deck loading height 1590 mm (62½ inches) Figure B.1: Overall dimensions of the oven Rev. A24 (November 2024) MONO... - Page 64 Fan Assisted Double Depth Deck Oven | Installation and Operation Manual Figure B.2: Oven with four decks and without a canopy fitted 3 trays wide x 2 trays deep nominally per deck. Dimensions are in mm (inches). Rev. A24 (November 2024) MONO...
- Page 65 Fan Assisted Double Depth Deck Oven | Installation and Operation Manual Appendix B Figure B.3: Oven with four decks and with a canopy fitted Rev. A24 (November 2024) MONO...
- Page 66 Appendix B Fan Assisted Double Depth Deck Oven | Installation and Operation Manual 3 trays wide x 2 trays deep nominally per deck. Dimensions are in mm (inches). Rev. A24 (November 2024) MONO...
-
Page 67: Electrical Specifications
The supply to this machine must be protected by a 30mA-rated Type A Residual Current Device (RCD) prior to installation and commissioning. Power cable Not supplied or fitted by MONO (M50 cable gland and locking nut provided) Electrical panel Membrane-operated touchscreen Table C.1:... -
Page 68: Mechanical Specifications
18 in. x 30 in. (portrait) 18 in. x 26 in. (portrait) 600 mm x 400 mm (landscape) Optional extras Canopy only Canopy with extractor fan Protective side bumper bars Double peel holder Water softening unit Rev. A24 (November 2024) MONO... -
Page 69: Functional Specifications
Fan speed Programmable for each baking phase Heat Independent top and bottom heat Programmable for each baking phase Steam Integrated steam generating system Pre-steam function Damper Programmable damper function Diagnostics Diagnostic screens for troubleshooting and testing Rev. A24 (November 2024) MONO... -
Page 70: Electrical Information
Audible sounder (option) B867-83-009 Water solenoid B749-83-003 Damper solenoid, right-hand B749-83-004 Damper solenoid, left-hand Element A B854-04-093 Heating element, 1 kW Element B B854-04-004 Heating element, 0.6 kW Element C B854-04-092 Heating element, 0.75 kW Rev. A24 (November 2024) MONO... - Page 71 Fan Assisted Double Depth Deck Oven | Installation and Operation Manual Appendix D Figure D.1: M246E25-04000 Convection deck heating element wiring (3-Tray Wide) Rev. A24 (November 2024) MONO...
- Page 72 Appendix D Fan Assisted Double Depth Deck Oven | Installation and Operation Manual Figure D.2: M246E25-04200 Convection deck heater power circuit wiring Rev. A24 (November 2024) MONO...
- Page 73 Fan Assisted Double Depth Deck Oven | Installation and Operation Manual Appendix D Figure D.3: M246E25-04100 Control circuit / fans power circuit Rev. A24 (November 2024) MONO...
- Page 74 Appendix D Fan Assisted Double Depth Deck Oven | Installation and Operation Manual Figure D.4: M246E25-04300 Convection deck fan motor wiring Rev. A24 (November 2024) MONO...
- Page 76 MONO Equipment is the leading designer and manufacturer of bakery equipment in the United Kingdom. This proud heritage of British craftmanship, combined with a reputation for creating high-quality, innovative products, can be traced back to its origins in 1947. All our bakery equipment is manufactured to the most stringent NQA ISO9001:2015 &...
Need help?
Do you have a question about the FG246T-B483L and is the answer not in the manual?
Questions and answers