Table of Contents
Advertisement
Quick Links
Advertisement
Table of Contents

Related Manuals for Returnstar Interactive Tech IQTouch HA1100 Pro


Summary of Contents for Returnstar Interactive Tech IQTouch HA1100 Pro
- Page 1 IQTouch HA1100 Pro Interactive Flat Panel Display ——User Manual——...
-
Page 2: Table Of Contents
Content Safety Instruction ..............................1 1. Product Overview ............................6 1.1 Appearance Introduction ........................6 1.2 Ports ..............................8 2.Installation ..............................13 2.1 Safety Precautions ..........................13 2.2 Installation Step ..........................14 2.3 Weight Loading ..........................16 2.4 OPS Installation ..........................18 2.5 Installing the Wi-Fi Module ........................20 3.Getting Started ............................22 3.1 Power On ............................ -
Page 3: Safety Instruction
Safety Instruction For your safety, please read the following instruction before you use the device. Serious injury or property damage may be caused by improper operations. Do not try to repair the device by your own. WARNING Disconnect the machine from power supply immediately if any major failures occur. - Page 4 If inspection, adjustment, or maintenance is required, contact the local distributor for help. Use the specified power supply. To prevent the machine from being damaged, do not use any cables other than the one provided with the machine. Use a three-wire socket and ensure that it is properly grounded. ...
- Page 5 Do not put an exposed fire source, such as a lit candle, on the machine. Pull out the power supply during thunderstorms. Do not touch the machine during a lighting storm, you may experience an electric shock. Install or place components that supply high enough voltage to cause personal ...
- Page 6 Do not lay the machine down in a way where the venting surface will be covered. Do not install the machine on carpet or cloth. Do not use a cloth, such as table cloth, to cover the machine ...
- Page 7 Do not expose the battery to overheated environments, such as sunlight or heat sources. Dispose of the used battery based on your local regulations. Additional advice: Use the machine in an environment with comfortable lighting. It is harmful ...
-
Page 8: Product Overview
1. Product Overview 1.1 Appearance Introduction Front View... - Page 9 Rear View Power On/Off Top camera Front Buttons Power Output Plug Remote Control Receiver Power Supply Plug Light Sensor Power Switch Front Ports Rear Ports Speakers Wi-Fi Module Bottom camera OPS Port Microphone...
-
Page 10: Ports
1.2 Ports CAUTION Front USB ports and rear USB 3.0/USB 2.0 ports switch connections based on signal sources. If the current signal source is reading the data from an external product connecting to the port, please switch the signal source after the data reading is complete. Otherwise, the data or product may be damaged. - Page 11 WARNING The rear power output port is supplies 5 V/2 A (maximum) power. Please purchase the power AC adapter for powering external devices. Please do not connect any products which require power than listed. Doing so may cause injury or damage to the panel. Rear Ports...
- Page 12 1.3 Front Buttons Buttons Operations Functions Short press Power on Solid white color : Display is on and working Sleep mode The red and white lights flicker alternately: Display enter Sleep mode. Long press Power off more than Solid red color : Display is in shut down mode ...
- Page 13 1.4 Remote Control Buttons Functions Turn on/off Switch to the OPS computer source Mute or unmute Freeze the Current Screen, press again to Exit Freeze Function Up/Down/Left/Right selection button Confirmation button Press once to return to the previous page Return to homepage Take a Screenshot Decrease the volume Increase the volume...
- Page 14 Type-C(Rear) Switch to Type C Rear source...
-
Page 15: Installation
2.Installation 2.1 Safety Precautions Installation Environment Installation Direction... -
Page 16: Installation Step
2.2 Installation Step Step1: Punching holes in the wall Mark 8 holes location on the wall according to wall mounting bracket A and use the drill bit to drill the 8 holes. Depth of holes should not be less than 90mm (Ref. Picture 1) Step2: Expansion bolt installation Press the wall anchors into 8 holes. - Page 17 Install the wall mounting bracket A with 8pcs screws and gaskets. Please ensure that the wall mounting bracket A is installed horizontally. (Ref. Picture3) Step4: Install the left& right hang bracket B to IQTouch. Use screws fix the hang bracket B at the back of IQTouch. Please check the direction of hang bracket B before installation.
-
Page 18: Weight Loading
Hanging the hang bracket B on the left and right on to the wall mounting bracket A, please ensure two hang brackets B completely hanged onto wall mounting bracket A, then tighten the screws of hang bracket B to prevent it slide. (See Ref. Picture5) 2.3 Weight Loading Net weight of the machine(65",75",86"): 40kg(±2kg), 50kg(±2kg), 61kg(±2kg). - Page 19 Vertical Installation When installing, try to keep the machine vertical. The vertical tilt range allowed for wall-mount installation is ±3 degrees. An excessive tilt angle may cause the screen glass to fall off or the machine to collapse.
-
Page 20: Ops Installation
Ventilation Ensure adequate ventilation and/or an air conditioned environment. We recommend keeping certain distances from the side of the product to the wall or panels. Ventilation requirements are shown in following figure: 2.4 OPS Installation The built-in computer does not support hot plugging. Therefore, you must insert or remove the built-in computer when the display is powered off. - Page 21 Step1 Unscrew the screws by hand to remove OPS shielding cover. Step2 Push OPS into the port at the rear of the machine from right to left. Step3 Secure OPS to the machine by using the screws.
-
Page 22: Installing The Wi-Fi Module
2.5 Installing the Wi-Fi Module Wi-Fi Module does not support hot plugging. Therefore, you must insert or remove the Wi-Fi Module when the display is powered off. Otherwise, the display or Wi-Fi Module may be damaged. Perform the following steps to install the Wi-Fi Module. Step 1: Unscrew the 2 screws on the Wi-Fi Module port and remove the shielding cover. -
Page 24: Getting Started
3.Getting Started 3.1 Power On Step 1: Ensure the power cable is fully seated into the panel and wall outlet before powering on the panel. Please confirm your wall outlet supports a power range of 100V to 240V with frequency at 50 Hz/60 Hz ±... -
Page 25: Power Off
3.2 Power Off Step 1: Press the power button on the front panel or the power button on the remote control to enter sleep mode. Step 2: Long press the power button on the front panel or the power button on the remote control, The Warning dialog box will be displayed as shown in the following figure. - Page 26 the deviation. Calibration is required in the following scenarios: The OPS is used. A computer is connected through the HDMI or Display Port interface. Interface operation on the embedded operating system does not need positioning. External products with Microsoft Windows 7 or higher versions will require positioning. If the positioning is not correct, perform the following operations to calibrate again.
- Page 27 Step 5: Select Touch input from the option and start calibration. Step 6: Use your finger or a pencil to click and hold the center of the flickering cross . Do not release until moves to the next positioning point. Complete the calibration process as instructed. Step 7: After the calibration is complete, the Digitizer Calibration Tool dialog box will be displayed.
- Page 28 To ensure writing accuracy, use the pencil or stylus included with the product for proper positioning. Positioning errors may cause failure of touch functions of the display. In that case, please perform calibration again. Step 8: The Tablet PC Settings dialog box will be displayed again. Tap OK. The calibration will be complete.
-
Page 29: Iq Os
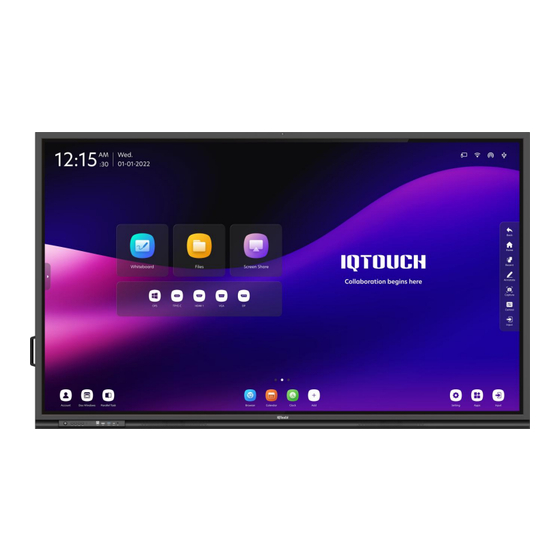
4. IQ OS 4.1 Start Screen When the panel is turned on, the panel will show the Start Screen page, as shown in the following figure. Notes: If Passkey lock function is on, every time you boot up the panel, system will request the passkey. 4.2 Home Touch the screen to enter the Home page. - Page 30 Time and date Sidebar Main APPs Note Input sources Bottom Bar Status Bar Floating Menu Main APPs Icons Functions Tap to enter the whiteboard Tap to enter the files Tap to enter EShare...
- Page 31 Input sources OPS is fixed to display on touch screen. If the OPS has a signal, the OPS icon will light up. Tap the icon to enter the OPS channel. If the touch screen has no OPS, "No Signal" will be displayed. Other input sources include: Type C Rear, HDMI 2, HDMI 1, DisplayPort, HDMI Front, and Type C Front.
- Page 32 Sidebar 【 】 You can tap on the left and right sides to expand the sidebar under any channel. And tap anywhere on the screen to hide it. Icons Functions Tap to back to the previous step or exit from current program. Tap to exit from current program or source to the Home page.
- Page 33 Icons Functions Tap to show all apps that support multi-window Tap to lock screen Tap to enter the settings Tap to enter the [Applications] page Tap to show all input channels Quick application bar. Tap the icon to enter the corresponding APP.
- Page 34 Note Tap the note to edit the title and subtitle Floating Menu Pressing anywhere of the screen with 2 fingers for longer than 2 seconds, the floating toolbar will appear by your fingers. You can move the floating toolbar by press on its center . After 5 seconds without operation of the toolbar, it gradually becomes translucent.
-
Page 35: Recent
Icons Functions Tap to enter managing currently running applications. Tap "×" at the upper right corner to close the application, tap clear all applications. Tap to expand the slidebar to adjust the volume. Tap to expand the slidebar to adjust the brightness. Tap to expand or hide the toolbar. -
Page 36: Applications
Recent screenshots: It shows the screenshots with up to 10 images. Tap 【 】 to delete the screenshot, and tap【 】to delete all screenshots. 4.4 Applications The Home page slides left to show all applications. Tap the icon to run corresponding App. 4.4.1 Application program Name Icon... - Page 37 Name Icon Functions Vote Tap this icon to enter the Vote application Settings Tap this icon to enter the settings application. Eshare Pro Tap this icon to enter the Eshare Pro application Classroom Tap this icon to enter the Classroom Share application Share Signage Tap this icon to enter the Signage application.
- Page 38 Camera Tap the “ ” icon on the Application program to enter “Camera”, you can select camera mode or video mode, when taking a video, audio will automatically be recorded. Swipe right to access the menu for the picture or video taking, you can swipe to view, share or delete your data.
- Page 39 again to end the recorder, you can save your data to internal storage. You can listen to your recorder by tapping the button. Record will be saved automatically in “Meeting Minutes” (File Commander > Meeting Minutes). Record only works in Android system. ...
- Page 40 The recording will be saved in subsequent 45 minutes long sessions. For example: if a recording is 90 minutes long, the record will be separated into two 45 minutes sessions. Record will be saved automatically in “Meeting Minutes” (File Commander > Meeting ...
- Page 41 “Sign In” only works when both the panel and the mobile device are connected to the internet. After the user tap submits from their mobile devices, their input will be shown on the Sign-in list. The meeting host can tap “Complete” to finish the signing process. After the meeting host tap “Complete”, users can use their mobile device to scan the QR code to download the Sign-in List onto their mobile devices.
- Page 42 If the screen stays idle for more than 8 seconds on the signature interface, the bottom toolbar will be automatically hidden. The users can tap the hidden button at the bottom to call out the toolbar again. Vote Tap the “ ”...
- Page 43 “Vote” only works when both the panel and the mobile device are connected to the internet.
- Page 44 User will see the voting topic and options on the mobile device after the QR code is scanned. After making the selection, tap “Submit” to cast vote. In the voting process, the number of voters is displayed in real-time under the QR code. The user can tap the “Result”...
- Page 45 The voting results can be displayed in both the “Pie chart“ or “Bar chart” form. The user can tap Insert into whiteboard to insert the current voting results into the whiteboard. Classroom Share ” icon on the Application program to enter the Classroom Share. Tap enter to bring up Tap the “...
- Page 46 popover on the mobile device (1) Vote Step 1: Tap vote to create a new vote, input vote topic (not required) and input options (2 options minimum). Step 2: Tap Create vote and students can vote on the mobile device. The Will be displayed real-time on the screen.
- Page 47 Step 3: Tap Finish to check the vote result, Bar charts and pie charts are supported for showing voting results. (2) Responder Tap "Responder" on the panel to create a responder, the "Responder" button on the mobile device will be available. Tap the button on the mobile phone, the name of the first successful student will be displayed on the panel.
- Page 48 Tap "Manager" button to view the joined information. (6) Export Tap "Export" button to save the classroom share data to file management. Signage Tap the “ ” icon on the Application program to enter the Signage. In this page, the user can select the desired template style and customize welcome words under “Default”...
- Page 49 After editing the template, the user can tap the “Apply” icon in the lower right corner to save into “Save Files”, or tap the “ ” icon in the lower left corner to perform the following operations: Tap “Restore”: Restore the template to the default mode prior to editing. ...
- Page 50 Visualizer Tap the “ ” icon on the Application program to enter the Visualizer. 1 2 3 4 5 6 7 8 9 10 11 12 13...
- Page 51 Icon Name Icon Function Annotation Tap to enter annotation mode. Whiteboard Tap to enter whiteboard mode. Screen Display Tap to display the visualizer camera. Screen Split Mode (2) Tap to displayed in 2 split screen mode. Screen Split Mode (4) Tap to displayed in 4 split screen mode.
-
Page 52: Whiteborad
Screen Sharing Users can cast screens from multiple devices to the panel using several casting mode (Airplay, Google Cast…). To cast: tap Screen Sharing on the Home Page to enter EShare. Follow the onscreen instructions to cast the screen to the panel (See below). 4.4.2 Whiteborad The whiteboard function is designed to present conference writing to attendees quickly and easily. - Page 53 Whiteboard Mode Tap Whiteboard on the Home page or tap in the floating toolbar to enter the discussion mode, as shown in the following figure. 2 3 4 7 8 9 10 11 12 13 14 15 16 17 18 Icon Name Icon Function Object...
- Page 54 Icon Name Icon Function Move Canvas Tap and move in the page to move canvas and content on it. Tap it and user could choose the camera of visualizer, the recorder Plugins and rulers. Tap to use the pen function, and the icon turns into blue. Tap to set the size or color.
- Page 55 New Page and Settings Create a new page In the discussion mode, tap to create a new page. Up to 20 pages can be created. See the following figure. Page settings Tap and hold for two seconds to set the color and pattern of the new page, as shown in the figure below.
- Page 56 Object Recognition Switch Tap the setting icon, it will pop up a switch and let user to change the object recognition setting, slide to left to open the object recognition function, slide to right to turn it off. Import On the Whiteboard, tap to import data from file management, you can import the pictures/ whiteboard data (PNG)/ screenshots (PNG) from system files or USB storage device.
- Page 57 Insert text On the Whiteboard, tap to insert text, and show the keyboard. (Default is Roboto, 40pt) Text Size: 30-180 (Tap A to change the font size) Insert auto shape On the Whiteboard, tap to insert the auto shape, you also can change the shapes and color. Shapes: Circular, ellipse, square, equilateral triangle, right triangle, star, arrow, line icon status are represented by three colors, gray for not available, white for shape outlines,...
- Page 58 and shape fill when it turns blue. Gray: The icon is unavailable when users insert arrow and line; White: The edge of shapes are colored; Blue: The shape will be filled with colors when you import the shape; ...
- Page 59 Plugins On the whiteboard, tap to choose the plugins, such as visualizer, recorder and rules can be chosen. Pen Type On the Whiteboard, two types of pens are supported: Pen and highlighter. : used to write. Highlighter : used to highlight. Characters covered by comments are still visible. ...
- Page 60 Selected On the Whiteboard, tap and user could choose the data on the page to move/ zoom in/ zoom out/ rotate by two fingers, and the icon turns into blue. to expand the toolbar which can be used to copy, delete or cut the selected content, tap to exit the selection, such as the following figure:...
- Page 61 Eraser On the Whiteboard, tap to clear wrong or unnecessary content. You can erase writing errors using two methods below: Partial eraser: Tap to clear the passing part of eraser. Object eraser: Tap to clear the whole object. ...
- Page 62 Clear All On the Whiteboard page, tap to show the pop-up windows to make users choose if they want to clear contents on the current page, as shown in the following figure. 4.4.2.1 Page Operations You can preview, select, save, export, and delete a created writing page. Page Preview at the lower right corner in the discussion mode.
- Page 63 Page Selection, Export or Deletion On the Navigation page, you can select, export or delete writing pages according to requirements, as shown in the following figure. to select all pages. to save the pages to USB flash device. to export selected pages.
- Page 64 Page Saving On the Navigation page, when no external USB flash memories are connected, USB icons will be gray. When an external USB flash memory is connected, USB icons will turn yellow. Tap the USB icons and the selected whiteboard file can be saved in the folder of "Meeting + year month day hour minute second"...
- Page 65 Page Exporting Step 1: On the Navigation page, tap icon to pop up exporting window. Step 2: you need to select the export format(png, jpg or pdf), tap OK to enter next step.
- Page 66 Step 3: The selected whiteboard page will be exported into QR Code, you can scan the QR code to download the file. Step 4: tapping share to save screenshot to pictures, save with FC or aqua mail.
- Page 67 4.4.2.2 Object Detection This product supports the object detection function and produces different effects according to the diameter and size of the input objects. Fist/palm: identified as an eraser. Fine Pen (3 mm): suggested to be used during writing. ...
- Page 68 Operation method: The system automatically remembers the settings of fine pen and thick pen. Users can use a fine pen or thick pen (finger) to select functions (including color and thickness). After that, the system remembers the attributes of corresponding functions until users change them manually. Fist/palm: keep the eraser function.
-
Page 69: Annotation
4.4.3 Annotation in the floating toolbar to enter the annotation. In the annotation mode it will generate a transparent layer on the screen, and users can add the annotation on it. 3 4 5 6 7 8 9 10 11 12 Icon Name Icon Function Cursor... - Page 70 Icon Name Icon Function Tap it and user could choose the data on the page to move/ Select zoom in/ zoom out/ rotate by two fingers, and the icon turns into blue. Eraser Tap to select the eraser function, when it is selected, the icon turns into blue.
-
Page 71: File Management
On the Home page, tap File Management icon, select "Internal storage > Pictures > Screenshots > image" folder to view or get screenshots. 4.4.4 File Management The product supports connection to USB flash memory. In File Viewer application, you can preview all files in the internal storage of the panel and external storage devices connected via USB ports and move, copy, paste, delete, and search for files. - Page 72 File Preview In the file Commander, you can tap the submenu on the left to preview what files are on internal storage, external storage devices connected via the USB ports, cloud stored files, FTP uploaded files, and local network files, as shown in the following figure. Tap the submenu on the right to preview internal storage, recent files, pictures, screenshots, music, videos, downloads, favorites, PC file transfer, tap the icon to view the files.
- Page 73 Icons function Tap to search the files by files name The system supports two view modes: list and grid. You can on the top right corner to switch to view modes. to display files based on name, type, size, and ...
- Page 74 File Name Under the "Internal storage > Screenshot " folder in the File Commander, remote control screenshots of this meeting are saved. Under the "Internal storage > Pictures > Screenshots" folder in the File Manager, annotation page screenshots and discussion screenshots are saved. Depending on the screenshots mode, picture naming is different.
-
Page 75: System Settings
4.4.5 System Settings Enter the system setting page using one of the following methods: on the Home page. Press on the remote control. In the Quick Setting Menu, tap the icon. ... - Page 76 4.4.5.1 Network Enter the Network submenu to set a LAN, enable Wi-Fi, view network information, and enable the Wake up via LAN function. Status: View IP address, MAC address and work time of the screen. LAN setting: Automatically obtain the LAN IP address or set static IP address according ...
- Page 77 4.4.5.3 Language and Input Method Enter the Language & Input Method submenu to set language and input method. The default input method of the system is Kika Keyboard F, tap keyboard & Input Method to show as the following figure.
- Page 78 Setting a Language Tap Languages at the right side. In the Change language dialog box that is displayed, select a language. 4.4.5.4 Storage Enter the Storage submenu to view space distribution of the internal storage.
- Page 79 4.4.5.5 Applications Enter the Apps submenu to vie w downloaded applications by type, running applications, and all applications. Notes: Apps download by yourself will appear in download apps files, you can uninstall it in all apps files. 4.4.5.6 Whiteboard/Screen capture Enter the Whiteboard/Screen capture submenu to set automatically clearing the whiteboard data cycle.
- Page 80 4.4.5.7 Intelligent Eye Protection Enter the Intelligent eye protection submenu to set Eye care writing, Eye protection and light control and Blue light filter. Eye care writing: Tap to turn on/off the function. The panel will change the brightness of ...
- Page 81 4.4.5.8 Time and Date Enter the Time and Date submenu to set the date and time. Before setting the date and time, users should tap Select time zone to select local time zone. Setting a Date You can automatically obtain the system date or customize a date. To automatically obtain a date, select Automatic date &...
- Page 82 To customize a date and date format, set them in Set date. Setting Time You can automatically obtain the system time or customize time. To automatically obtain time, select Automatic date & time. ...
- Page 83 To customize time and time format, set them in Set time and Use 24-hour format. Time format will be 24-hours mode only when the Use 24-hour format is selected, otherwise time format will be 12 hours mode. 4.4.5.9 Power Enter the Power submenu to set automatic power on/off time, the time for the system to enter the power off mode and the automatic power on/off function of the consumer electronics control (CEC) device.
- Page 84 To set the automatic power on time, select Auto power on, and set the power on time in Power on time, as shown in the following figure. To set the automatic power off time, select Auto power off, and set the power off time in ...
- Page 85 To set the energy saving time, tap Energy saving. In the dialog box displayed, set screen lock time, for example, if you set it as 120s, then the display will go into screen lock mode when the device stays idle for 120 seconds. In addition, you can set device power-off time in screen-lock mode, for example if you set it as 30min, then device will power off automatically if three is no operation on screen-lock mode for 30 min.
- Page 86 After the CEC auto power on function is enabled and the screen is connected with the CEC device via the HDMI port, the screen automatically starts if the CEC device starts and the screen receives a CEC power-on command. After the CEC auto power off function is enabled and the screen is connected with the CEC ...
- Page 87 4.4.5.11 Input/Output Setting Enter the Input/Output Setting submenu to set the favorite source, starting source, new signal source, and image output resolution through the HDMI port. Power signal: Set the signal source entered after power on(Android>Windows>Last Source). C function: Set the commonly used function for C button on the front panel. Default is ...
- Page 88 4.4.5.12 Security Setting Enter the Security Setting submenu to set USB lock, Passkey lock, Setting lock and view credential storage. USB Lock: When you enable the USB lock, under the smart system, only USB disk will be locked, user will not able to read the data from the USB disk, but USB mouse and keyboard could be used.
- Page 89 Note: When you forgot the password, tap Forgot passkey under the Enter passkey page to enter the Reset passkey page, enter the command with the remote control and tap OK again, the original password will be invalid after entering it. Settings lock: When you enable the setting lock, the setting-related icons will be displayed as ...
-
Page 90: Multi-Window
4.4.6 Multi-window The multi-window function can display multiple applications at the same time, and the window of each application can be freely dragged and modified. In the function bar at the bottom of the HOME page, tap 【 】 , and in the expanded secondary window, select the APP that needs multiple windows (only some applications support multiple windows). - Page 91 Tap the icon and the window will be automatically placed in the left half of the screen. Tap the icon and the window will be automatically placed in the right half of the screen. Tap to minimize the window Tap to restore the window to its original size Tap to close the window...
-
Page 92: Quick Setting Menu
5. Quick Setting Menu 5.1 Quick Setting Menu open in the sidebar, tap to enter mode settings, as shown in the following figure. Icon Functions Drag the slider to adjust the volume. Drag the slider to adjust the brightness. Tap the icon to enable or disable the hotspot. Tap the icon to enable or disable the embedded operating system Wi-Fi. - Page 93 Tap the icon to show or hide the toolbar. Tap the icon to enable or disable Palm eraser. Tap the icon to enable or disable Palm Rejection. Tap the icon to return to Home page. Tap the icon to enter the settings page. Tap the icon to access the screenshot.
-
Page 94: Automatically Power Off
Picture Setting Image mode: Tap to set the image mode (Standard > Vivid > Soft > Custom). Only in custom mode, you can drag the slider to adjust the Brightness, Contrast, Hue, Saturation or Sharpness respectively. Color temperature: Tap to set the Color temperature (Standard > Warm > Cool). ... -
Page 95: Serial Port
6. Serial Port RS232 communication cable (please use cross data cables) This Device Computer RXD0 TXD0 TXD0 RXD0 RS232 port of panel Cover Connect RS-232 port to the PC or controlling product. Enable RS-232 serial port connection and complete the following configuration. - Page 96 Power off 7F 08 99 A2 B3 C4 02 FF 01 7F 09 99 A2 B3 C4 02 FF 01 01 01 01 CF Mute/Unmute 7F 08 99 A2 B3 C4 02 FF 01 7F 09 99 A2 B3 C4 02 FF 01 02 01 02 CF Signal source 7F 08 99 A2 B3 C4 02 FF 01...
- Page 97 Menu 7F 08 99 A2 B3 C4 02 FF 01 7F 09 99 A2 B3 C4 02 FF 01 1B 01 1B CF Home page 7F 08 99 A2 B3 C4 02 FF 01 7F 09 99 A2 B3 C4 02 FF 01 1C 01 1C CF Return (exit) 7F 08 99 A2 B3 C4 02 FF 01...
- Page 98 Increase 7F 08 99 A2 B3 C4 02 FF 01 7F 09 99 A2 B3 C4 02 FF 01 47 01 backlight 47 CF brightness Decrease 7F 08 99 A2 B3 C4 02 FF 01 7F 09 99 A2 B3 C4 02 FF 01 48 01 backlight 48 CF brightness...
- Page 99 Switch Safety 7F 09 99 A2 B3 C4 02 FF 0D 7F 09 99 A2 B3 C4 02 FF 0D 01 01 Lock On 01 CF Switch Safety 7F 09 99 A2 B3 C4 02 FF 0D 7F 09 99 A2 B3 C4 02 FF 0D 00 01 Lock Off 00 CF Switch...
- Page 100 7F 09 99 A2 B3 C4 02 FF 01 33 XX Notes: XX indicates current volume value 7F 08 99 A2 B3 C4 02 FF 01 Speaker volume (XX is a hexadecimal value, range: 33 CF 00~64). For example, XX = 20 indicates current volume value is 32 (decimal value), XX = 00 indicates mute state.
- Page 101 7F 09 99 A2 B3 C4 02 FF 01 83 XX Notes: 7F 08 99 A2 B3 C4 02 FF 01 Whiteboard state XX = 01 indicates the whiteboard 83 CF state. XX = 00 indicates non-whiteboard state. 7F 08 99 A2 B3 C4 02 FF 0A 00 AB CD EF GH IJ OP QR ST UV CF Notes: AB: Power supply;...
-
Page 102: Troubleshooting
7. Troubleshooting Symptom Troubleshooting Methods The screen cannot be powered on Check whether the power supply is connected. or the power indicator light is off. Check whether the power supply plug is properly connected. Check whether the power outlet has electricity. Check whether the rocker switch is enabled. - Page 103 The touch function is unavailable Switch between different external signal sources. when the external signal source Ensure that the USB touch cable is connected to channel is being used. the proper port. For details, see section "Ports". Remove and insert the USB touch cable again. There is no sound when the HDMI Remove and insert the HDMI cable again.
- Page 104 The keyboard is not correctly Confirm that the hardware keyboard is enabled. displayed. When you connect a handheld front panel doesn’t support handheld microphone to a port on the front microphone, needs fixed panel, the distance from user to microphone. To make sure of the sound quality, microphone should be no less the distance from user to microphone should be no than 1 meter, otherwise the sound...
Need help?
Do you have a question about the IQTouch HA1100 Pro and is the answer not in the manual?
Questions and answers