Table of Contents
Advertisement
Available languages
Available languages
Advertisement
Chapters
Table of Contents

Related Manuals for Aiper Scuba SE


Summary of Contents for Aiper Scuba SE
- Page 1 ROBOTIC POOL CLEANER User Manual Aiper Scuba SE...
- Page 3 CONTENTS English ------------------------------------ 1-18 Français ---------------------------------- 19-35 Español ------------------------------------ 36-52...
- Page 4 Consult the manufacturer or an experienced radio/TV technician for help. Warning Changes or modifications of this product are not expressly approved by the party responsible for compliance (Aiper), and unauthorized modifications could void the user's authority to operate the equipment. IC Statements This device complies with Industry Canada license‐ICES-003.
- Page 5 Thank you for choosing Aiper. You’ve now joined a family of millions who have already put their trust in Aiper to take care of their pools and are enjoying the convenience of a pristinely clean pool. This user manual will help you maintain your device and ensure it performs at its maximum e ciency for years to come.
-
Page 6: Table Of Contents
English CONTENTS Important Safety Precautions -------------- 4 1. Structure -------------------------------- 5 2. Specifications & Working Conditions ------ 6 3. Using Your Device ------------------------ 7 4. Optional -------------------------------- 8 5. Charging -------------------------------- 11 6. Maintenance ---------------------------- 13 7. Storage ---------------------------------- 16 8. -
Page 7: Important Safety Precautions
Important Safety Precautions Read this manual carefully and use your device in accordance with the instructions. Aiper is not liable for any damages or injuries caused by improper use. Instructions: 1. Do not operate the device when people or animals are in the pool. -
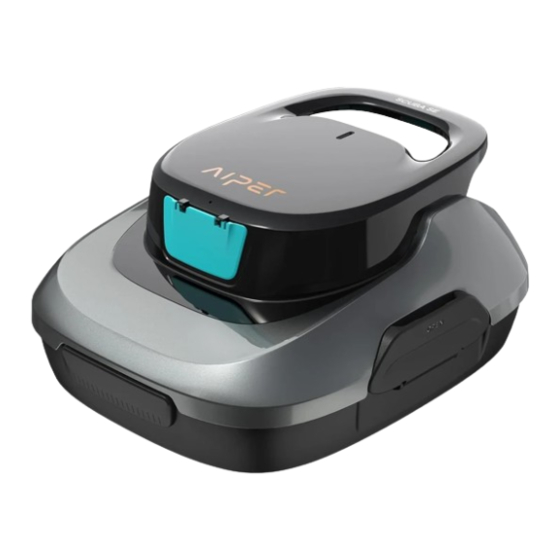
Page 8: Structure
Please read this user manual carefully before using it. 1. Structure Handle Top Shell Filter Tray Chassis Retrieval Hook Charger Brushes... -
Page 9: Specifications & Working Conditions
5. Battery Life: 90 Minutes 6. IP Grade: IPX8 Waterproof 7. Max Water Depth: 1.6-10ft(0.5-3m) 8. Battery Capacity: 2600mAh (28.08Wh) CAUTION: For optimal performance, Aiper recommends using your device in the following water conditions. • Temperature: 50-95°F (10-35°C) • pH Value: 7.0-7.4 •... -
Page 10: Using Your Device
3. Using Your Aiper Pool Cleaner 3.1 First Use a. The device was designed to clean flat floored swimming pools with no slopes up to 860 sq.ft/80m . 860sq.ft / b. Tightly insert the two included brushes into the slots at the bottom of your device. -
Page 11: Optional
c. Power o your device after use. d. Lift from the pool with the bottom of the device facing the wall. 4. Optional 4.1 Fully charge your device before using it for the first time. 4.2 Press the Power Button and place your device in the water after you hear a beep. - Page 12 4.3 If your device has powered o due to low battery against the edge of your pool, the device will beep intermittently for two minutes. 4.4 Lift your device from the pool using the included hook. Telescopic pole not included.
- Page 13 4.5 Open Latches: Open the left and right latches outwards. 4.6 Open the Top Shell: Hold the handle with one hand and remove the Top Shell from your device with your free hand. 4.7 Remove the Filter Screen. Clean the filter and bottom of your device with clean water.
-
Page 14: Charging
4.8 Put the filter back into your device. Return the Top Shell to the device. You will hear a click when Top Shell is securely attached to your device. Close 5. Charging 5.1 Fully charge your device before using it to clean your pool. •... - Page 15 5.2 When charging, ensure your device is right side up to prevent damaging the handle. Do not charge while Handle facing up. upside down. 5.3 When charging the device via the charger, it has the following statuses: Working Status Description Charging The red light indicates charging in progress.
-
Page 16: Maintenance
6. Maintenance a. Always wash the filter tray immediately after use. Dried debris may cause blockage and a ect performance if debris is not washed and removed in a timely manner. Dried Debris Immediately Wash b. Brush Replacement If a brush becomes worn out, follow the steps below. 1. - Page 17 Wheel Replacement If one of your device's wheels breaks, follow the steps below. 1. Remove the shell of your Aiper Scuba SE and find the location of the broken wheel. 2. Using a tool or your finger, push the wheel buckle until it bends slightly,...
- Page 18 3. Insert the new wheel stem by first aligning it with the two small holes of the wheel socket. You should hear a clicking sound when the wheel has locked in place.
-
Page 19: Storage
7. Storage a. The device should be stored in a cool, well-ventilated place away from direct sunlight. b. If you need to store the device for a prolonged period, we recom- mend you charge it every three months between 40%-60% to maintain battery health. -
Page 20: Common Faults
The buzzer beeps Stuck Impeller Alert for 1s intermittently) intermittently. The buzzer beeps Beeps for 5 min (beep Water Damage Alert intermittently. for 5s intermittently) 9. Packing List Name Model QTY(pc) Cleaner Aiper Scuba SE Charger Retrieval Hook User Manual Brushes... -
Page 21: Conventional Warranty
10. Conventional Warranty This product has passed quality control and safety test conducted by our technicians. 1. This product comes with a 12-month warranty that covers your item’s battery and motor from the date of purchase. 2. This warranty is voided if the product has been altered, misused, or has been repaired by unauthorized persons. - Page 22 Merci d'avoir choisi Aiper. Vous avez maintenant rejoint une famille de millions de personnes qui ont déjà fait confiance à Aiper pour prendre soin de leur piscine et qui profitent de la commodité d'une piscine parfaitement propre. Le présent manuel de l'utilisateur vous aidera à entretenir votre nettoy- eur de piscine Aiper et à...
- Page 23 Précautions de sécurité importantes -------- 21 1. Structure -------------------------------- 22 2. Caractéristiques et conditions de fonctionnement -------------------------- 23 3. Utilisation de votre robot de piscine Aiper ---- 24 4. En option -------------------------------- 26 5. Rechargement -------------------------- 28 6. Maintenance ---------------------------- 30 7.
-
Page 24: Précautions De Sécurité Importantes
Si vous pensez qu'il y a une fuite, arrêtez immédiatement d'utilis- er l'appareil. 13. Ne percez pas la coque de votre robot de piscine Aiper, ne la jetez pas et ne l'endommagez pas intentionnellement. 14. Lorsque vous mettez votre appareil dans l'eau, l'avant de la machine doit être orienté... -
Page 25: Structure
1. Structure Poignée Couvercle Filtre Châssis Crochet de récupération Chargeur Brosses... -
Page 26: Caractéristiques Et Conditions De Fonctionnement
7. Profondeur d’eau max. : 0,5 à 3 m (1,6 à 10 pi) 8. Capacité de la batterie : 2600 mAh (28,08 Wh) ATTENTION : Pour des performances optimales, Aiper recommande d’utiliser votre robot dans les conditions suivantes : •... -
Page 27: Utilisation De Votre Robot De Piscine Aiper
3. Utilisation de votre robot de piscine Aiper 3.1 Première utilisation a. Ce robot a été conçu pour nettoyer les piscines à sol plat, qui ne com- portent pas de pentes, et d’une superficie allant jusqu’à 80m /860 pi . -
Page 28: En Option
c. Éteignez votre appareil après utilisation. d. Soulevez et sortez-le de la piscine, la partie inférieure de l’appareil orientée vers le mur.a 4. En option 4.1 Rechargez complètement votre robot avant de l’utiliser pour la première fois. 4.2 Appuyez sur le bouton Marche/Arrêt et placez votre robot dans l’eau une fois que le signal sonore a retenti. - Page 29 4.3 Si votre robot s’éteint près du bord de la piscine en raison d’un faible niveau de batterie, un signal sonore retentira par intermit- tence pendant 2 minutes. 4.4 Soulevez et sortez votre appareil de la piscine en utilisant le crochet inclus.
- Page 30 4.5 Ouvrez les loquets : ouvrez les loquets gauche et droit vers l’extérieur. 4.6 Ouvrez la coque supérieure : maintenez la poignée d’ une main et retirez la coque supérieure de votre robot à l’aide de votre main libre. 4.7 Retirez la crépine. Nettoyez le filtre et le fond de votre robot à l’ eau propre.
-
Page 31: Rechargement
4.8 Replacez le filtre. Remettez la coque supérieure en place sur l’ap- pareil. Vous entendrez un déclic lorsque la coque supérieure sera solidement fixée sur votre robot. Fermer le bouton 5. Rechargement 5.1 Rechargez complètement votre robot avant de l’utiliser pour net- toyer votre piscine. - Page 32 5.2 Lors du rechargement, veillez à ce que votre appareil soit correctement positionné, face supérieure vers le haut, afin de ne pas endommager la poignée. Ne pas charger Poignée vers le haut à l’envers 5.3 État du voyant de charge État de fonctionnement Description Le voyant rouge indique que la charge...
-
Page 33: Maintenance
6. Maintenance a. Lavez toujours le filtre immédiatement après utilisation. Les débris séchés peuvent provoquer des obstructions et nuire aux perfor- mances s’ils ne sont pas rapidement lavés et retirés. Débris séchés Laver immédiatement b. Remplacement des brosses Si une brosse est usée, suivez les étapes ci-dessous. 1. - Page 34 Push 3. Poussez-les ensuite vers le bas pour libérer la brosse. 4. Insérez une nouvelle brosse dans la fente inférieure du robot. (Les brosses de rechange ne sont pas incluses.) c. Remplacement des roues Si l’une des roues de votre robot casse, suivez les étapes ci-dessous. 1.
- Page 35 3. Insérez la tige de la nouvelle roue en l’alignant d’abord avec les deux petits trous du logement de la roue . Vous devez entendre un déclic lorsque la roue est correctement enclenchée.
-
Page 36: Rangement
7. Rangement a. Le robot doit être rangé dans un endroit frais et bien ventilé, à l’abri de la lumière directe du soleil. b. Si vous devez ranger le robot pendant une période prolongée, nous vous recommandons de le recharger tous les trois mois entre 40 % et 60 % pour préserver la durée de vie de la batterie. -
Page 37: Problèmes Courants
1 s par intermittence) Un signal sonore est émis pendant 5 min Alerte infiltration L’alarme retentit par (signal sonore d’eau intermittence. pendant 5 s par intermittence) 9. Contenu de l’emballage N° Nettoyeur Aiper Scuba SE Chargeur Crochet de récupération Manuel d'utilisation Brosses... -
Page 38: Garantie
10. Garantie Ce produit a passé le contrôle de qualité et les tests de sécurité e ectués par nos techniciens. 1. Ce produit est accompagné d'une garantie de 12 mois qui couvre la batterie et le moteur de votre article à partir de la date d'achat. 2. - Page 39 Este manual del usuario le ayudará a mantener su limpiador de piscina Aiper, para que funcione de la forma más eficaz para los años que vienen. Tómese unos minutos para leer todo el manual.
- Page 40 Precauciones de seguridad importantes ---- 38 1. Estructura-------------------------------- 39 2. Especificaciones y condiciones de funcionamiento -------------------------- 40 3. Cómo usar el limpiador de piscinas Aiper ---- 41 4. Opcional -------------------------------- 42 5. En carga -------------------------------- 45 6. Mantenimiento -------------------------- 47 7.
-
Page 41: Precauciones De Seguridad Importantes
Si cree que hay una pérdida, deja de usar la unidad de inmediato. 13. No perfore la carcasa de su limpiador de piscina Aiper, ni lo arroje o dañe de forma intencional. -
Page 42: Estructura
1. Estructura Manija Cubierta Superior Bandeja de Filtro Chasis Retrieval Hook Cargador Cepillos... -
Page 43: Especificaciones Y Condiciones De Funcionamiento
7. Máxima profundidad de agua: 0,5-3 m (1,6-10 pies) 8. Capacidad de la batería: 2600 mAh (28,08 Wh) PRECAUCIÓN: Para un rendimiento óptimo, Aiper recomienda utilizar su producto en agua con las siguientes condiciones. • Temperatura: 10-35 °C (50-95 °F) •... -
Page 44: Cómo Usar El Limpiador De Piscinas Aiper
3. Cómo usar el limpiador de piscinas Aiper 3.1 Primer uso a. El producto está destinado a la limpieza de piscinas de suelo plano y sin desniveles de hasta 80m (860 ft ). 860sq.ft / b. Inserte con firmeza los dos cepillos incluidos en las ranuras de la parte inferior de su producto. -
Page 45: Opcional
c. Apague el producto después de utilizarlo. d. Al subir el producto de la piscina, la parte inferior debe estar orien- tada hacia la pared. 4. Opcional 4.1 Cargue su producto por completo antes de usarlo por primera vez. 4.2 Pulse el botón de encendido. Cuando oiga un "bip", ponga el producto en el agua. - Page 46 4.3 Si el producto se apaga contra el borde de la piscina porque la batería está baja, emitirá un pitido intermitente durante 2 minutos. 4.4 Saque el producto de la piscina utilizando el gancho incluido. La barra telescópica no se incluye.
- Page 47 4.5 Abra los cierres: tire hacia fuera de los cierres situados a la izquier- da y a la derecha. 4.6 Abra la cubierta superior: sujete el mango con una mano y retire la cubierta superior del producto con la otra. 4.7 Retire la rejilla del filtro.
-
Page 48: En Carga
4.8 Vuelva a instalar el filtro en el producto. Ponga de nuevo la cubierta superior del producto. Cuando la cubierta superior esté bien coloca- da, escuchará un clic. Cerrar el botón 5. En carga 5.1 Cargue su producto por completo antes de usarlo para limpiar la piscina. •... - Page 49 5.2 Para evitar daños en el mango, asegúrese de que el producto esté bocarriba cuando vaya a cargarlo. No cargar mango hacia arriba boca abajo 5.3 Estado del indicador LED de carga Estado Descripción En carga La luz roja indica que está cargando. Rojo Cuando el producto esté...
-
Page 50: Mantenimiento
6. Mantenimiento a. Lave siempre el filtro inmediatamente después de usar el produc- to. Los residuos secos podrían producir obstrucciones y, si no se limpian y eliminan puntualmente, afectar al rendimiento. Seque los Residuos Inmediatamente Lave b. Sustitución del cepillo Cuando un cepillo presente signos de desgaste, siga los siguien- tes pasos. - Page 51 Push 3. Empuje hacia abajo las clavijas de sujeción para soltar el cepillo. 4. Inserte un nuevo cepillo en la ranura inferior del limpiador. (Cepillos de recambio no incluidos) c. Sustitución de las ruedas Si una de las ruedas del producto se rompe, siga los siguientes pasos. 1.
- Page 52 3. Para instalar el eje de la nueva rueda, hágalo coincidir con los dos pequeños orificios de la armadura de la rueda. Cuando la rueda esté bien colocada, debería escuchar un clic.
-
Page 53: Almacenamiento
7. Almacenamiento a. El producto debe guardarse en un lugar fresco y bien ventilado, lejos de la luz directa del sol. b. Si va a guardar el producto durante un período de tiempo prolonga- do, le recomendamos cargarlo hasta el 40-60 % cada tres meses para mantener la batería en buen estado. -
Page 54: Errores Comunes
Pitido durante 5 minutos El indicador acústico Alerta de daños emite un sonido (pitidos intermitentes de por agua intermitente. 5 segundos) 9. Lista de contenidos N° Nombre Modelo Cantidad (ud) Limpiador Aiper Scuba SE Cargador Gancho de recuperación Manual del usuario Cepillos... -
Page 55: Garantía
10. Garantía Este producto ha superado el control de calidad y la prueba de seguridad realizada por nuestros técnicos. 1. Este producto viene con una garantía de 12 meses que cubre la batería y el motor, a partir de la fecha de compra. 2. - Page 60 www.aiper.com...
Need help?
Do you have a question about the Scuba SE and is the answer not in the manual?
Questions and answers
how long does it take to charge the scuba SE?
It takes 180 minutes (3 hours) to charge the Aiper Scuba SE.
This answer is automatically generated
I’m charging my aiper se after it sat up all winter. The plug lights up green when I plug it in an outlet before even plugging it into the pool cleaner. It should show red for charging when I plug it in the aiper but it stays green What’s wrong?
@Beth Jordan I am having g the same difficulty. Only used it one summer just bought it last year
My Aiper Scuba SE will not open for me to clean it / remove the debris at all. I charged it all night so it should not be a battery issue.
The Aiper Scuba SE may not open for cleaning or debris removal if the locking pins are not pressed down to release the brush. Ensure you press the locking pins down before attempting to remove parts for cleaning. Also, make sure the device is turned off and completely dry before maintenance.
This answer is automatically generated
Scuber SE will not move in the pool and pick up trash. Indicator on charger shows charged. I bought this last year. Only used last year
Where can I buy a battery replacement
We charge the machine then put in pool and it does one or 2 swipes and comes back to side and stops but not dead. We only had this less than a year.
melyik a pozitiv oldal a tápkábelen a lapos vagy a gömbölyű