
Related Manuals for Mount-It! MI-3771B G10


Summary of Contents for Mount-It! MI-3771B G10
- Page 1 MI-3771B_G10 MI-3771W_G10 Please scan this QR code to visit the product page. TABLET COUNTERTOP STAND...
- Page 2 Mount and Accessories Thank you for choosing Mount-It Mount-It! A (x1) B (x1) C (x1) D (x4) Anti-Theft Tablet Case Standing Base Base Rubber pad Mount-It! E (x1) F (x4) G (x4) H (x1) I (x4) J (x4) K (x1) Base Connector ST6.3x55 Concrete Anchor...
-
Page 3: Attach The Base
Step 1 B. Wood Surface Installation Step 1a-1 Standing Base Option • To secure the stand base to a wood surface use a 3/16” bit and drill holes to a depth of 2.2” and secure the stand base using 2x Lag Screws (#F). Do not over tighten. Note: Ensure the mounting surface is thick enough to accommodate the length of the Lag Screws. - Page 4 Step 1b-1 Low Profile Base Option B. Concrete Surface Installation • Attach the Column (#B) to the Low Profile Base (#K) through the Base Connector (#E) using Bolts (#J) • To secure the stand base to a concrete surface, use a 3/8” Bit and drill holes to a depth of 2.4”. Clear as shown.
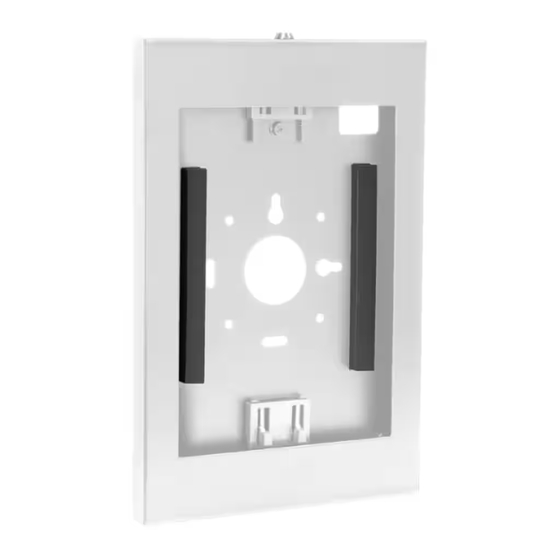
- Page 5 Step 2 Step 3 Open the Tablet Case Step 3a Attach the Tablet Case to the Column • To open the Tablet Case (#A) insert the Key (#H) and turn counterclockwise to unlock(clockwise to lock.) • Attach the back half of the Tablet Case to the end of the column using Bolts (#I) through the 4 bolt holes on the interior of the Case in the orientation shown here.
-
Page 6: Step 6 Viewing Angle Adjustment
Step 4 Step 5 Select the Tablet Adapter Lock the Case • Select the Tablet Adapter (#T1, T2, T3) for your tablet (see the table below for compatibility) and attach • Insert the key into the lock and turn the key clockwise to lock the case it over the tablet inside the case using the 4 Bolts (#Q). -
Page 7: Step 7 Final Adjustments
Step 7 Optional Wall Mount Instructions Final Adjustments A. Concrete/Stone Installation Option – 4 Screws • Using a bubble level to ensure a straight installation, hold the anti-theft case against the wall in the • The tablet case can be rotated 90 degrees to alternate between landscape and portrait orientation and desired location and use a pencil to mark the wall through the 4 bolt holes in the case. - Page 8 B. Wood Stud Installation Option – 2 Screws • Using a bubble level to ensure a straight installation, hold the anti-theft case against the wall in the desired location and use a pencil to mark the wall through the teardrop shaped bolt hole indicated here, and mark the middle of the horizontal slot below.
Need help?
Do you have a question about the MI-3771B G10 and is the answer not in the manual?
Questions and answers