Flashforge Adventurer 5M User Manual
Hide thumbs
Also See for Adventurer 5M:
- User manual ,
- Installation manual (36 pages) ,
- Quick start manual (28 pages)
Table of Contents
Advertisement
EN/CN-A03
User Guide
用户使用手册
Safety Notice
安全提示
1. Please refer to this Guide for initial printer setup.
2. Hot! Avoid touching the heating nozzle in operation.
3. Moving parts in the printer may cause injuries. Do not wear
gloves or other sources of entanglement in operation.
1. 请参照本指南完成打印机的初始准备。
2. 高温危险!打印机喷嘴在工作时会被加热,操作时请避免接触!
3. 可动部件可能会造成卷入挤压和切割伤害。操作机器时请不要
佩戴手套或缠绕物。
Do not power on the printer until installation is completed.
请勿在打印机安装完成之前通电。
Adventurer 5M / 冒险家5M
中文P35
Advertisement
Chapters
Table of Contents

Related Manuals for Flashforge Adventurer 5M


Summary of Contents for Flashforge Adventurer 5M
- Page 1 Adventurer 5M / 冒险家5M EN/CN-A03 User Guide 用户使用手册 中文P35 1. Please refer to this Guide for initial printer setup. 2. Hot! Avoid touching the heating nozzle in operation. 3. Moving parts in the printer may cause injuries. Do not wear gloves or other sources of entanglement in operation.
- Page 2 For more information, you can visit the Flashforge official website. www.flashforge.com - [Support]...
-
Page 3: Table Of Contents
CONTENTS Notice 1. Equipment Introduction 1.1 - Printer Components 1.2 - Printer Parameters 2. Initial Setup 2.1 - Unboxing 2.2 - Packing List 2.3 - Installing the Spool Holder and Filament Guide Tube 2.4 - Installing the Screen 2.5 - Unlocking the Build Plate 2.6 - First Print 3. - Page 4 Exposure to sunlight will accelerate the aging of plastic parts. Make sure to only use the power cord provided by Flashforge. Do not use the equipment during thunderstorms. Please turn off the equipment and unplug it if it is not in use for a long time.
- Page 5 LEGAL STATEMENT Users are not authorized to make any modifications to this User Guide. Flashforge shall not be held responsible for any safety incidents resulting from the disassembly or modification of the equipment by the customer. No one is allowed to modify or translate this Guide without Flashforge's permission.
-
Page 6: Equipment Introduction
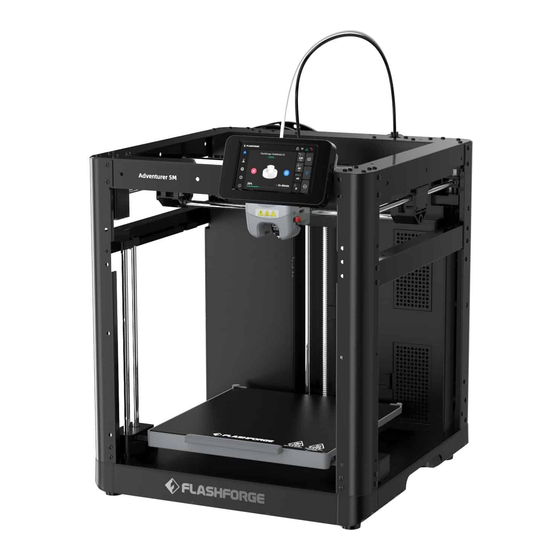
1.Equipment Introduction 1.1 Printer Components 1. Extruder 2. Touch Screen 3. Build Plate 4. USB Port 5. Screw Holes for Spool Holder 6. Filament Detection Sensor 7. Ethernet Input 8. Power Switch 9. Power Socket... -
Page 7: Printer Parameters
1.2 Printer Parameters Machine Name Adventurer 5M Extruder Quantity Printing Precision ±0.1mm [testing based on 100mm cubes] Positioning Accuracy X/Y-axis:0.0125mm, Z-axis:0.0025mm Layer Thickness 0.1-0.4mm Build Volume 220 x 220 x 220mm Nozzle Diameter 0.4mm default [0.6/0.8/0.25mm optional] Printing Speed 10-300mm/s Max Acceleration 20000mm/s²... -
Page 8: Initial Setup
2. Initial Setup 2.1 Unboxing Safety Notice: Do not power on the printer until installation is completed. 2. Remove the upper foam packaging, 1. Open the box. Quick Start Guide and After-sales Service Card. 3. Take out the machine, place it on a level 4. - Page 9 5. Move the chamber foam according to the arrow direction. 6. Remove the foam.
-
Page 10: Packing List
2.2 Packing List Power Cable After-sales 3D Printer Filament Service Card Quick Start Guide Touch Screen Spool Holder Grease (with 2 screws) Glue Diagonal Pliers Unclogging Pin Tool Screwdriver Allen Wrench... -
Page 11: Installing The Spool Holder And Filament Guide Tube
2.3 Installing the Spool Holder and Filament Guide Tube 1. Take out the two screws and spool holder from the accessory box. 2. Install the spool holder at the position shown in the figure with the two screws. (Note: Please tighten them using a 2.0mm Allen wrench.) - Page 12 3. Insert the filament guide tube to the extruder. 4. Insert the other end of the filament guide tube into the filament detection sensor.
-
Page 13: Installing The Screen
2.4 Installing the Screen Before installation, please remove the tape of the screen cable. Tear it off gently to Note avoid damaging the cable. 1. As shown in the picture, insert the screen cable into the screen connector. a. Lift the buckle on the screen's cable socket to the indicated position (Fig. ①), then insert the screen cable into the socket connector. -
Page 14: Unlocking The Build Plate
2. Insert the buckle on the back of the screen into the printer's slot, and push the screen according to the arrow direction to lock it in place. 2.5 Unlocking the Build Plate Note Please ensure the platform has been cleared up! Please use a 2.0mm Allen wrench to remove four screws which lock the build plate (as indicated by the arrow). -
Page 15: First Print
2.6 First Print * The interface layout may change whenever there is an upgrade of firmware. 1. Power on the printer, turn on the power switch, and wait for the screen to respond. Power Switch 2. Following the guide on the screen, select the language. - Page 16 Download Flash Maker by scanning the QR code (see right) or from the app store, register your Flashforge account, and log in. c. Use Flash Maker to scan the QR code on the printer screen to bind the printer to your account.
- Page 17 6.Load filament following the on-screen startup boot: a. Cut off the bent part of the filament end. b. Hang the filament on the spool holder. Pass it through the filament sensor until it's seen from the other end of the filament guide tube. Push it forward to the feed roller, until it can not go further.
- Page 18 C3. Feeding will begin after heating. Successful filament extrusion from the nozzle indicates successful loading. Lastly, confirm the filament guide tube is properly inserted. Note If no filament is extruded, manually insert the filament into the inlet and click [Back] to retry. Feel for filament movement until it is extruded.
-
Page 19: Software Introduction & Installation
QR Code NOTE: 1. By default, the device name is set to "Adventurer 5M", and its location is set to "Group A" upon factory settings. You can modify the name and location on the printer's information interface as needed. - Page 20 Orca-Flashforge is a slicing software developed based on OrcaSlicer, with custom features tailored for the Adventurer 5M series. Download Instructions: 1. Download the latest slicing software from: https://www.flashforge.com/download-center. 2. Find the Orca-Flashforge's installation package on the USB flash drive and install the version that matches your system.
- Page 21 3. Account Login/Register: 4. Create or open a project for slicing. You can Log in to Orca-Flashforge using your select the machine type, material, and Flashforge account. If you don't have...
- Page 22 1. Download the latest slicing software from: https://github.com/SoftFever/OrcaSlicer/releases. 2. Download from the official Flashforge Download Center (https://www.flashforge.com/ download-center). Note: Please download slicing software version 1.8.0 or later. Tip: For details and tutorials on software usage, please refer to Flashforge WiKi. (https://wiki.flashforge.com/en/home).
-
Page 23: Printing
4. Printing 4.1 Filament Loading and Changing 4.1.1 Filament Loading Click [ ] to enter the filament loading interface and follow on-screen instructions to complete filament loading. 4.1.2 Filament Changing 1. Click [ ] - [ ], and follow on-screen instructions to complete filament changing. - Page 24 2. Pull out the filament guide tube as shown, and cut the filament. 3. Pull out the cut filament, and insert the new filament into the filament guide tube. If the material type is changed, click [PLA] to select the corresponding material type.
- Page 25 4. Click [Start], wait for the extruder to heat up and filament feeding will begin. When you see the previous filament is extruded, insert the new filament and observe its flow and the extrusion. If the new filament smoothly comes out of the nozzle, the filament change is successful. If not, hold the filament by hand, insert it into the inlet, and click [Again] to retry.
-
Page 26: Network Connection
4.2 Network Connection Click [ ] - [ ] to enter the network connection interface. 4.2.1 Wireless Network Connection Turn on the Wi-Fi switch, and tap to connect to the corresponding wireless network. Once connected successfully, the network will be marked, and an [ ] icon will appear at the top right corner of the screen. -
Page 27: Printing Methods
4.3.2 Printing via Wi-Fi transfer After successfully connecting the printer to the network, open Orca-Flashforge. After finishing slicing, click [Print plate] in the menu, and select the connected Adventurer 5M to send the print job. 3DBenchy Note The printer and the computer must be connected to the same network. -
Page 28: Printing Via Cloud
WAN Mode: Please log in/register your Flashforge account before connecting the printer. Click [+] on the device page to open the search list and select the desired machine. b. LAN Only Mode: Enable [LAN Only] via [Network Mode]. In the slicing software, click [+] on the device page to find the corresponding printer. - Page 29 After logging in, click the icon at the top right corner, click [Settings], and click [PIN Code] in the menu to find the PIN code. After connecting the Adventurer 5M to the network, simply turn on the Polar Cloud switch and enter your account and PIN code.
-
Page 30: Model Removal After Printing
4.4 Model Removal After Printing When printing is completed, the nozzle and build plate may still be at a high Note temperature. It is recommended to allow them to cool down before removing the model. After printing is completed, directly take out the flexible steel plate and bend the platform to remove the model. -
Page 31: Other Function Settings
When to perform vibration compensation: When there is noticeable ghosting and ringing on 3D prints; After adjusting the tension of the synchronous belt; When the printer has been unused for a long time and is now being restarted. Instructions: ] to enter the leveling and calibration interface. Choose [Leveling] or [Vibration Click [ ] - [ test], click [Start], and the printer will automatically perform the corresponding operation. -
Page 32: Maintenance
6. Maintenance 6.1 Suggestions on Platform Plate Usage 1. Powder coated PEI plate requires glue and is suitable for printing PLA/PETG/PLA-CF/PETG-CF/ ABS/ASA. TPU printing does not require glue. This plate comes with the printer. 2. PEI film plate is suitable for printing PLA/TPU without glue. For PETG, it's recommended to use glue. - Page 33 7. Q&A Q1. How to unclog the nozzle? Method 1: Click [Load] and heat the nozzle to the printing temperature of the used filament. After heating, remove the filament guide tube, and check if the filament is bent or filament tip is not smooth.
- Page 34 Whether it is installed in place is judged as follows: 1. Ensure the nozzle is pressed to the bottom firmly during installation. 2. Check if it is properly installed: a. Check the red buckle positions on the left and right. √...
- Page 35 Q4. What to do if the extruder moves but doesn't extrude filament at the beginning of printing after clicking the model for printing? 1. Observe the filament guide tube to check if filament has entered the nozzle. If not, please click [Load] until filament comes out.
-
Page 36: Help And Support
Many questions are answered at Flashforge's English official website - www.flashforge.com. The Flashforge after-sales service team can be reached by phone from 8:00 AM to 5:00 PM, from Monday to Saturday. In case you contact us during off-duty time, your inquiry will be answered the next working day immediately. - Page 37 更多产品相关资料您可以登陆闪铸官网查看。 www.sz3dp.com - [技术支持]...
- Page 38 目录 注意事项 第一章 设备简介 1.1 - 部件介绍 1.2 - 设备参数 第二章 设备开箱操作 2.1 - 开 箱 2.2 - 装箱清单 2.3 - 安装耗材支架和导丝管 2.4 - 安装屏幕 2.5 - 解锁平台 2.6 - 首次打印 第三章 软件简介及安装 第四章 打 印 4.1 - 装载及更换打印耗材 4.1.1 - 安装打印耗材 4.1.2 - 更换打印耗材...
-
Page 39: 注意事项 第一章 设备简介
注意事项 安全提示:请确保认真阅读以下安全提示 注意: 每台3D打印机在出厂前都经过打印测试,若设备喷头存在耗材残留或打印平台有轻微划 痕,都属正常现象,不影响使用。 工作环境安全 请确保设备的工作台面干净整洁。 请确保设备工作时远离可燃性气体、液体及灰尘。设备运行产生的高温有可能会与可燃性气 体、液体及空气中的粉尘发生反应从而引发火灾。 儿童及未经培训的人员请勿单独操作设备。 用电操作安全 请务必将设备接地,切勿改装设备的插头。未接地/未正确接地/改装插头必然会增加漏电 风险。 请勿将设备暴露在潮湿或暴晒的环境中:潮湿的环境会增加漏电的风险,暴晒会加速设备 的塑件老化。 请勿滥用电源线,务必使用闪铸集团提供的电源线。 切勿在雷雨天气使用设备。 如长时间不使用设备,请关闭设备并拔下电源线插头。 个人操作安全 在设备运行时,请勿触碰喷头、平台等位置! 在打印完成时,请勿触碰喷头、平台,以免高温烫伤或机械损伤! 在操作设备时,请勿穿戴围巾、口罩、手套、珠宝装饰等容易卷入设备的物件! 请勿在饮酒、服药之后操作设备! 设备使用提示 保持设备内部整洁,切勿将金属物体掉入打印平台底部的滑槽内。 请及时清理丝料碎屑,建议在设备外进行操作。 自行对该设备进行任何改装将自动失去保修保障。 请在设备进丝操作时,喷头和平台的距离至少保持50mm的距离。距离过近可能会造成喷头 堵塞。 请在通风的环境下操作设备。 请勿利用该设备进行违法犯罪的活动。 请勿利用该设备制作食物储存类产品。 请勿将打印模型放入口腔。... - Page 40 设备运行环境要求 室内温度在15-30℃为宜;湿度在20%-70%为宜。 设备放置要求 设备需要被放置于干燥通风的环境中。设备前后左右四周必须预留至少20cm的空间距离。 存储温度在0-40℃为宜。 设备兼容耗材要求 在使用该设备时,建议使用闪铸提供或指定的耗材。如使用非闪铸提供耗材,材料特性有所 差异,打印参数可能需要调整。 耗材存储要求 耗材拆封后请保持储存环境干燥,无尘,建议配套干燥盒存储。 法律申明 用户无权对此使用手册进行任何修改。 客户若自行拆装或改造设备造成任何安全事故,闪铸集团概不负责。未经闪铸集团允许, 任何人不得对该手册进行修改或翻译。本手册受版权保护,闪铸集团对本手册保留最终 解释权。 第一版(2023年9月) @Copyright 2023浙江闪铸集团有限公司版权所有...
-
Page 41: 部件介绍
第一章 设备简介 1.1 部件介绍 1. 喷头 2. 显示屏 3. 打印平台 4. USB接口 5. 料盘支架安装孔位 6. 丝料检测传感器 7. 网线接口 8. 电源开关 9. 电源接口... -
Page 42: 设备参数
363 x 376 x 413mm [不含显示屏、料盘支架] 363 x 402 x 448mm [含显示屏、不含料盘支架] 净 重 10.8kg 打印连接方式 USB接口/Wi-Fi/以太网 工作温度 15-30℃ 兼容的操作系统 Windows 7/8/10/11; Linux支持Ubuntu 20.04 及以上版本; Mac OS支持10.9及以上版本 切片软件 Orca-Flashforge 平台最高温度 110℃ 调平方式 一键自动调平 断丝提醒 √ 断电续打 √ 智能触控液晶屏 4.3英寸 打印平台... -
Page 43: 开 箱
第二章 设备开箱操作 2.1 开 箱 安全提示:请勿在打印机安装完成之前通电。 1. 打开纸箱。 2. 取出上方固定泡棉以及快启售后服务卡。 3. 取出机器放置水平桌面,去除包装袋和 4. 取出腔体保护棉内的耗材、电源线、屏幕、 固定胶带。 配件盒和喷头内侧保护棉。... - Page 44 5. 按照箭头方向移动腔体泡棉。 6. 取出泡棉,完成开箱。...
-
Page 45: 装箱清单
2.2 装箱清单 电源线 售后服务卡 3D打印机 耗材 快速启动指南 显示屏 料盘支架 润滑脂 [含两颗螺丝] 通针 水洗胶 斜口钳 十字螺丝刀 内六角扳手... -
Page 46: 安装耗材支架和导丝管
2.3 安装耗材支架和导丝管 1. 取出配件盒中的两颗螺丝和料盘架。 2. 用两颗螺丝将料盘架固定在如图背板位置 (注意:请用2.0mm内六角扳手拧紧固定)。... - Page 47 3. 将导丝管前端插入到喷头导管中。 4. 将导丝管后端插入丝料传感器的卡扣中。...
-
Page 48: 安装屏幕
2.4 安装屏幕 注意事项 安装前需取下屏幕排线固定胶带。请轻撕,以免拉扯到排线。 1. 如图所示,将屏幕排线插入屏幕连接口。 a. 将屏幕上的排线插座上的卡扣按箭头方向抬至图示位置(图示1);然后将屏幕排线插入排线插座 连接口。注意: 排线需插接到位,检查指示线与插座齐平。 b. 将排线插座上的卡扣按箭头方向下压至图示位置(图示2)。 图示1 图示2... -
Page 49: 解锁平台
2. 将屏幕背面的卡扣插入打印机的槽内,并按箭头方向推动屏幕将其锁紧。 2.5 解锁平台 注意事项 请确认打印平台无异物! 用2.0mm内六角扳手取下图示中的4颗螺丝(可参照机器上箭头标识),解锁打印平台。... -
Page 50: 首次打印
2.6 首次打印 * 固件不定期更新,UI界面请以实际为准。 1. 连通电源,打开电源开关,点亮屏幕。 电源开关 2. 根据屏幕上的开机指引完成界面语言选择。 3. 根据引导打开WiFi开关连接网络,连接成功后会出现提示弹窗。... - Page 51 4. 根据引导绑定打印机。(注:此步骤若跳过, 后续仍可在设备上操作绑定,详见P52。) a.点击【确定】后出现打印机二维码页面。 QR Code b. 扫码(右图)或通过手机应用商城下载 Flash Maker手机应用,注册您的闪铸账号并登录。 c.用Flash Maker手机应用扫描打印机屏幕上的 二维码,将打印机与您的账号绑定。(注:设备 出厂时默认设备名称与位置;开机指南完成后, 可在设备 中自定义设备名称与位置) 5. 点击[下一步],机器进行首次校准。校准过程中出现震动和噪音属于正常现象。 (注:请将机器放置于稳定的平台面,且校准过程中请勿移 动机器。)...
- Page 52 6. 根据屏幕开机指引完成耗材安装进丝操作: a. 剪去耗材头部弯折部分。 b. 将耗材挂在耗材架上,穿过丝料传感器,直至从导丝管一端看到丝料,将丝料推送到送丝轮处, 直到无法再推入(*首次开机请使用PLA耗材进行第一次打印)。 C1. 点击进丝,首次选择默认[PLA]。 C2. 等待喷头加热。...
- Page 53 C3. 加热后将开始进丝,直至丝料从喷嘴吐出,说明进丝成功,最后确认导丝管也已完好的插入进丝口。 注意事项 若一直未见丝料吐出,请用手握住丝料,插入进丝口,点击[返回]重新进行进丝操作。用手感受 是否有丝料输送,直到丝料吐出。 7. 清理喷嘴残料以及平台上残余耗材,在打 印平台上涂一层胶水,请全幅面涂抹均匀。 注:涂抹胶水有利于改善模型粘附。 8. 点击[打印],机器开始首次打印内置文件 (该文件的配置参数使用的材料为PLA)。...
- Page 54 第三章 软件简介及安装 APP应用-Flash Maker 1. 扫码(下图)或通过手机应用商城下载 2. 点击打印机主页【 】-【 】打 Flash Maker手机应用,注册您的闪 开WiFi开关连接网络。 铸账号并登录。 3. 点击主页【 】进入设备信息页, 4. 用Flash Maker手机应用扫描打印机屏幕上 点击【我的账号】打开打印机二维码。 的二维码,将打印机与您的账号绑定。 QR Code 特别提示: 1. 设备出厂时默认设备名称为Adventurer 5M,位置默认为Group A; 您可以根据实际使用情况在打印机【设备信息】界面修改设备名称和位置。 2. 只有安装摄像头并打开该功能才能看到实时监控画面。 3. APP不支持仅局域网模式下连接。...
- Page 55 冒险家5M系列配套切片软件简要说明 注意事项 阅读软件简要说明前,请确认已查看快速启动指南,并已经完成第一次开机打印。 三维模型文件打印前需要先进行对应机器的切片预设才能进行打印。 推荐使用切片软件: Orca-Flashforge / OrcaSlicer。 打印前置步骤为: 将切片文件通过 使用切片软件将 U盘导入或网络 获得3维文件 下载安装 文件转化为机器 传输到设备中 ( STEP/STL/OBJ ) 切片软件 可识别的文件 进行打印 Orca-Flashforge * 图中仅用一种机型示意使用步骤讲解 Orca-Flashforge是基于Orca开发,并针对Adventurer 5M系列开发自定义功能的一款切片软件。 下载地址 1. 从官方网站 https://www.sz3dp.com/download-center 下载最新的切片软件。 2. 在U盘中找到Orca-Flashforge软件安装包,选择对应的系统版本进行安装。...
- Page 56 1.打开安装好的Orca-Flashforge软件。 2. 配置向导。 首次使用软件根据配置向导提示选择您所在的登 录地区以及对应机型及使用材料。(注:您可以 勾选列表中全部机型及材料类型,以便后续在切 片中选择。) 3. 账号登录/注册。 4. 新建或打开一个项目并进行切片,您可以在打印 使用您的闪铸账号登录Orca-Flashforge,如 机、耗材丝、工艺的配置栏里选择显示对应机型、 果没有账户,请进行手机注册。(注:Flash 材料及推荐参数。 Maker和Orca-Flashforge使用同一账号。) 5. 完成切片后,选择打印机并发送打印。 6. 在“设备”界面,对您的打印进程进行远程监控, 并可在需要时暂停/停止打印。(注:只有安装 并打开摄像头,才可以看到实时监控画面。)...
- Page 57 OrcaSlicer下载地址: 1.从官方网站 https://github.com/SoftFever/OrcaSlicer/releases 下载最新的切片软件。 2. 从闪铸官网【下载中心】(https://www.sz3dp.com/ download-center)下载。 注:请下载1.8.0版本以上的切片软件。 提 示 更多软件相关的详细信息和使用教程请访问闪铸官方WiKi查阅。 (https://wiki.flashforge.com/en/home)...
-
Page 58: 装载及更换打印耗材
第四章 打印 4.1 装载及更换打印耗材 4.1.1 安装打印耗材 点击 进入进丝页面,根据屏幕提示完成进丝操作。 4.1.2 更换打印耗材 1. 点击 进入进丝页面,根据屏幕提示完成换丝操作。... - Page 59 2. 按照图示拔出导丝管,剪断丝料。 3. 抽出已剪断的丝料,将新的丝料插入导丝管。如材料类型更换,点击[PLA]按钮选择相应的耗材类型。...
- Page 60 4. 点击[开始],等待喷头加热并开始进丝。当看到旧丝料挤出后,将新丝料插入进丝口,观察新丝料 输送以及喷嘴挤出情况。若新丝料从喷嘴顺利吐出,则说明换丝成功;若未见新丝料吐出,请用手 握住丝料,插入进丝口,点击[再次进丝]重新进行进丝操作。用手感受是否有丝料输送,直到丝料 吐出。进丝成功后,请将导丝管完好插入进丝口。 1. 若前一卷丝料完全用完,此时导丝管里也无丝料时,可以直接按进丝操作执行。 注意事项 2. 换丝时尽量使用新丝料将旧丝料清洗干净。 3. 可点击 查看屏幕中的喷嘴使用指南。...
-
Page 61: 网络连接
4.2 网络连接 点击 进入网络连接界面。 4.2.1 无线网络连接 打开Wi-Fi开关,点击连接对应无线网络,连接成功后相应网络会被标记,并在屏幕右上角 出现 图标。 4.2.2 有线网络连接 1. 选择以太网,根据屏幕提示将网线插入设备背部的网线接口。 2. 连接成功后有线网络会显示已连接,屏幕右上角出现 图标。... -
Page 62: 打印方式
4.3 打印方式 4.3.1 U盘打印 设备可通过U盘打印。将切片好的文件保存至U盘,将U盘插入设备,选择对应文件即可打印。 4.3.2 Wi-Fi传输打印 打印机连接网络成功后,打开Orca-Flashforge,切片完成后,点击菜单中的打印按钮,选择已连接 设备冒险家5M 发送打印。 注意事项 打印机连接的网络和电脑连接的网络必须在同 一网段中,否则无法连接成功。打印机连接有 2种模式:外网模式与局域网模式。... -
Page 63: 云打印
a. 外网模式下打印机连接前需要先登陆/注册闪铸账号;在设备页面点击【+】打开搜索列表, 选择连接的机器。 b. 局域网模式下连接打印机需打开打印机 【网络模式】-【局域网模式】,切片软 件在设备页点击【+】找到对应打印机。 选择相应打印机并输入打印机上的设备 局域网模式 ID完成连接。 4.3.3 云打印 闪铸云打印 1. 点击 ,打开FlashCloud(闪铸云) 连接开关并查看注册码。 2. 打开闪铸云网站,注册账号,经过邮箱激活后即可登录使用。 闪铸云:https://cloud.sz3dp.com/ 3. 点击[我的打印机] - [添加打印机]。 在添加打印机页面填写注册号(云注册码),为打印机起个名字, 点击确定后,这些信息会出现在打印机的闪铸云界面。... - Page 64 首页 当前打印机为空,请添加打印机 我的打印机 添加打印机 注册号 类型 我的打印机 打印机名称 我的模型 我的任务 模型库 打开Polar云网站注册账号。 Polar云:https://polar3d.com。 Polar云打印 注:Polar 云可能除美国以外,服务不可用。 登录后,点击右上角头像图标,点击[Settings],点击菜单中的PIN Code 查询PIN 码。 冒险家5M连接网络后打开Polar 云开关, 输入账号与PIN码即可。...
-
Page 65: 第五章 打印辅助功能使用介绍
4.4 打印后模型移除 注意事项 打印完成时,喷嘴和打印平台可能仍处于高温状态,建议冷却后再进行取模型操作! 打印完成后直接取出平台柔性钢板,弯折平台即可取下模型。二次打印时,请确保平台无残余丝料。 模型移除建议: 1. 请将平台板拿到设备外部再进行移除,否则模型碎屑容易留在设备腔体内,建议保持腔体清洁。 2. 建议使用刮刀取下TPU或其他柔性材料打印的模型,使用刮刀进行此操作将确保您可以从面板上剥离 柔性模型,而不会对模型造成损坏。 第五章 打印辅助功能使用介绍 因固件会不定期升级,界面请以实际显示页面为准。 注意事项 5.1 调平校准 首次开机引导会执行一次设备校准。后续使用过程中根据情况选择调平或振动补偿。 关于何时需执行调平的说明: 若是持续只打印PLA 材料时,可以只执行一次自动调平,无需进行每次打印前调平,做一次调平有利于 提升打印成功率。 若涉及打印材料类型的切换,例如从PLA 材料切换到ABS 材料打印,需要执行每次打印前调平。 若平台与喷嘴距离过远(粘附不住)或者过紧(丝料不吐出)时请执行自动调平。 更换新的打印平台板或者打印喷嘴后,需执行自动调平。 关于何时需执行振动补偿的说明: 打印模型振纹明显。 调节同步带松紧后。 设备长时间未使用,重新启用。... -
Page 66: 其他功能设置
操作说明: 点击 进入调平校准页面,选择[调平]或[振动补偿],点击[开始]按钮,设备将自动进行相应校 准操作。(注意事项:校准开始前,请确保平台以及喷嘴尖部无异物残留。) 关于何时执行PID校准的说明:更换新喷嘴或发现喷嘴温度异常时可执行该校准。 5.2 其他功能设置 在设备信息界面中可开启或关闭声音、丝料检测 功能以及进行固件升级。 丝料检测功能开启时,设备将会在打印中途丝料 用完时停止打印。 在无线网络连接时,点击固件升级可查看当前版 本以及检测是否有新固件版本,并进行在线固件 升级。 打印机名称和设备位置:用户可自定义修改设备 名称和位置。... -
Page 67: 打印平台板使用建议
第六章 维护 6.1 打印平台板使用建议 1. PEI 粉末喷涂板需要配合胶水使用,适合打印PLA/PETG/PLA-CF/PETG-CF/ABS/ASA; TPU 打印时无需 涂抹胶水。该板子为设备标配。 2. PEI 膜贴板适合打印PLA/TPU可以不使用胶水,打印PETG 建议配合胶水使用。该板子可额外购买。 3. PC 贴纸平台板适合打印PC/ABS/ASA。该板子可额外购买。 4. 平台板涂胶水后可使用水清洗。 5. 平台板若沾染油污,可使用洗洁精清洗。 6. 平台板若长期使用后有较大形变,建议更换新的平台板。 6.2 喷嘴的使用建议 1. 建议一个喷嘴组件对应同类材料使用。尤其是纤维增强材料与PETG, 不可与其他材料混用,若混用材料 容易引起堵头,降低喷头使用寿命。 2. 使用同个喷嘴打印不同耗材,更换的耗材打印温度低于当前喷头内耗材的打印温度,需要使用更高温的 设置来进行吐丝,进行内部丝料的清洗。 3. 需要更换的耗材打印温度高于当前喷头内耗材的打印温度,直接用新耗材进丝即可。 4. 清洗喷嘴内残余丝料,可多次进丝,或手动通针疏通挤出残留丝料。 5. 更换新的喷嘴组件后,请重新进行调平操作。 6.3 设备一般维护 1. - Page 68 第七章 Q&A Q1. 喷嘴堵头怎么办? 方案1:点击进丝按钮,将喷嘴温度加热至所用耗材的打印温度,待加温完成,拔出导丝管,查看丝料 是否弯折,丝料头部是否平整。若不是,剪平整后将导丝管与丝料装入喷头,再点击进丝查看。 方案2:方案1无改善,则使用通针通丝。 方案3:若使用通针通丝仍无法解决堵头问题,请更换喷嘴。 Q2. 如何更换喷嘴? 注意事项 更换喷嘴前请先关机断电,请勿带电操作 ! 1. 拔出导丝管,剪断丝料。 2. 按压住左右扣,同时拔出喷嘴,沿喷嘴顶部剪平丝料。 3. 将新喷嘴插入喷头中,可听到“咔”卡扣位置变换声,确保喷嘴卡槽位与喷头下部齐平,完成喷嘴更换。 注:如始终无法准确对齐喷嘴位置,可在安装时按压卡扣或取下喷头前罩(用手抓住喷头前罩下方外拉 并向上轻抬即可取下)查看位置。...
- Page 69 喷头装配是否到位的判断如下: 1. 安装必须用力将喷嘴按压到底; 2. 检查是否安装到位: a. 检查左右红色卡扣位置。 √ b. 检查喷嘴卡槽位与喷头下部是否齐平(如视线 有遮挡,可取下喷头前罩观察)。 4. 重新通电,点击[ ]进入进丝页面,根据屏幕提示完成进丝操作(见4.1.1),丝料顺利吐出,即喷嘴 更换成功。 Q3. 更换喷嘴后需要调平校准吗? 需要执行自动调平。喷头安装可能会产生微小误差,为保证打印质量,建议进行调平校准。设备每次 打印前默认勾选调平操作。 Q4. 点击打印模型,喷头运动,但打印一开始就没有出丝怎么办? 1. 观察导丝管,确认丝料是否已进入喷头,若无,请再点击进丝按钮,直至丝料从喷头中吐出。 2. 查看喷头是否堵头,若是,解决方案请查看Q1。...
- Page 70 Q5. 打印时发现喷嘴与平台相对位置过高(远离平台)或过低(顶到平台) 怎么办?如何调平? 请先确认打印平台是否安装到位以及喷嘴上是否有过多残料,若存在以上问题请先处理上述问题,然后 进入设置页面,选择调平选项,执行自动调平或开启打印前自动调平。 Q6. 可以使用其他品牌的丝料吗? 可以使用其他品牌丝料,但由于不同材料参数温度略有区别,需要经过参数调整配置。 Q7. 打印ABS材料安全吗? ABS在加热过程中会释放有毒气体。如条件允许,建议将设备置放在开阔环境下打印。儿童活动场所 建议打印PLA无毒材料。 Q8. 打印模型发生翘边或粘不牢现象怎么办? 方案1:增加平台温度可有效缓解此问题,高温可增加平台与模型的粘附力。 方案2:模型切片时选择添加帽檐(birm)可有效缓解此问题。 方案3:涂抹胶水。 方案4:清洗平台板,去除油污。 方案5:确认平台是否放平。可使用调平校准功能。 Q9. 插入U盘后找不到打印文件,屏幕显示全为文件夹怎么办? U盘格式不正确,设备支持FAT32格式的文件系统,请将U盘格式化成FAT32格式。 Q10. Wi-Fi连接不上怎么办? 1. 请检查Wi-Fi名称是否含有特殊字符,如果有,请修改之后再次尝试。 2. 请检查密码是否含有特殊字符,如果有,请修改之后再次尝试。 Q11. 更新固件注意事项。 请不要在下载或更新固件时断电断网,防止更新失败。 Q12. 为什么开机屏幕白屏? 如果听到开机声音,请更换屏幕或者排线;否则请联系售后人员。...
- Page 71 第八章 帮助与支持 闪铸专业的售后服务人员及业务员随时为您待命,非常乐意为您解决在您使用过程中遇到的任何 问题。如果您无法从用户手册中找到答案,您可以进入我们的官方网站来搜索问题的解决方案, 或者 通过电话联系我们。 在我们的官网中可以找到一些常见问题的说明和解决方法。您的许多问题都可以在闪铸集团中文 官方网站www.sz3dp.com得到解决。 您可以在周一到周六上午8:00到下午5:00通过电话来联系闪铸售后团队,为您解决问题。如果您 在下班时间联系我们,闪铸将在下个工作日的第一时间给您反馈。若造成不便,我们万分抱歉。 由于更换不同的丝料,会有少量杂质残留在喷头中造成喷头堵塞,疏通后即可,不属于 提 示 质量问题。若用户使用时存在该问题,请联系售后,并在售后的指导下完成疏通工作。 售后服务热线:400-886-6023 邮箱:support@flashforge.com 公司地址:广东省东莞市塘厦镇大坪大兴南街8号 2号楼三楼 提示:联系售后时,请提供产品序列号,即打印机背部的条形码 S/N: FFAD******...
- Page 72 Address:3rd Floor, Building 2, No. 8 South Daxing Street, Tangxia Town, Dongguan City, Guangdong Province After-sales: support@flashforge.com Suggestions and Complaints: mtk2@flashforge.com...
Need help?
Do you have a question about the Adventurer 5M and is the answer not in the manual?
Questions and answers