Flashforge ADVENTURER 3 Quick Start Manual
Hide thumbs
Also See for ADVENTURER 3:
- User manual (33 pages) ,
- Quick start manual (24 pages) ,
- User manual (52 pages)
Advertisement
Quick Links
All manuals and user guides at all-guides.com
ADVENTURER 3 / 冒险家 3
SZ16-ZN/EN-A06
Quick Start Guide
快速启动指南
中文P10
1. Hot! Avoid touching the heating nozzle and heating build plate in operation.
2. Moving parts in printer may cause injury. Do not wear gloves or other
sources of entanglement in operation.
Download
Please refer to FlashForge official website www.flashforge.com to download
the newest User's Guide, Software and Instruction Videos.
(Support-Support Center-Select a Product)
1. 高温危险!打印机喷嘴和打印平台在工作时会被加热,请避免接触!
2. 可动部件可能造成卷入挤压和切割伤害。操作机器时请不要佩戴手套或缠绕物。
资料下载
前往闪铸科技官方网站 www.sz3dp.com ,可以在[ 技术支持 ] 页面下载用户使
用手册、切片软件等资料,或查看相关操作视频。
This guide is only applicable to FLASHFORGE Adventurer3 3D printer
本手册仅适用于闪铸科技 Adventurer3 3D打印机
Advertisement

Related Manuals for Flashforge ADVENTURER 3


Summary of Contents for Flashforge ADVENTURER 3
- Page 1 Please refer to FlashForge official website www.flashforge.com to download the newest User's Guide, Software and Instruction Videos. (Support-Support Center-Select a Product) 1. 高温危险!打印机喷嘴和打印平台在工作时会被加热,请避免接触! 2. 可动部件可能造成卷入挤压和切割伤害。操作机器时请不要佩戴手套或缠绕物。 资料下载 前往闪铸科技官方网站 www.sz3dp.com ,可以在[ 技术支持 ] 页面下载用户使 用手册、切片软件等资料,或查看相关操作视频。 This guide is only applicable to FLASHFORGE Adventurer3 3D printer 本手册仅适用于闪铸科技 Adventurer3 3D打印机...
-
Page 2: Kit Contents
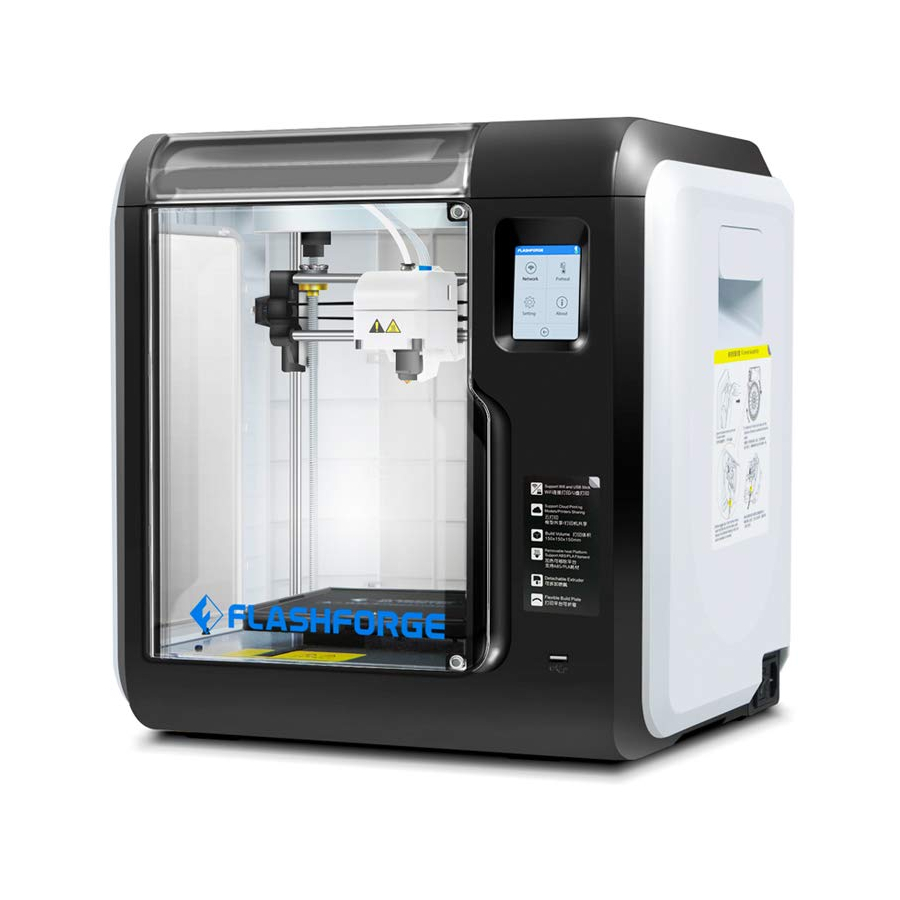
Please refer to FlashForge official website www.flashforge.com to download the newest User Guide and Quick Start Guide. (SUPPORT-Support Center - Select a Product) 本手册仅适用于闪铸科技 Adventurer3 3D打印机 This guide is only applicable to FLASHFORGE Adventurer3 3D printer Quick Start Guide Screwdriver Unclogging Pin Tool... - Page 3 All manuals and user guides at all-guides.com Getting to know your Adventurer 3 1. Filament guide tube 2. Filament guide tube joint 3. Extruder base 4.Cooling Fan 5. Removable nozzle 6. Extruder cables 7. Clip 8. Led light 9. Wind guide nose 10.
- Page 4 All manuals and user guides at all-guides.com Unpacking The People's The People's Insuranc e Company Insuranc e Company of China of China KEEP DRY KEEP DRY HANDL E HANDLE WITH CARE FRAGIL E WITH CARE FRAGIL E FR AG HA ND CA RE WI TH DR Y...
- Page 5 All manuals and user guides at all-guides.com 5. Plug the power cable into the input on the back and turn on the power switch, the touch screen is turned on. Power Switch X: 20.00 Y: 45.00 Z: 36.00 Language Move Camera Status Calibration...
-
Page 6: First Print
All manuals and user guides at all-guides.com First Print Plug the power cable into the input on the back and turn on the power switch, the touch screen is turned on. Power Switch Load Filament 1. Open the filament cover, insert the filament into the filament intake, push filament into the feeding wheel until some resistance is sensed. - Page 7 All manuals and user guides at all-guides.com /235℃ Build Load Heating extruder... Tools Change Filament Cancel 2. Tap [Filament]--Tap [Load]--After Load completed--Tap [OK] /235℃ /235℃ Preheat completed, Press ok when new color appears Begin loading... 3. Load completed when you see filament come out of extruder, Tap [OK]. Put the spool of filament on the spool holder, close the filament cover.
- Page 8 All manuals and user guides at all-guides.com Model Print 6.67GB Build Not Available Tools No job Filament 1. Tap [Build], choose the file path: Print from local memory card. 20mm_Box- PLA.gx < < 2. Locate the model file in the model list, Tap on its right to start printing;...
- Page 9 All manuals and user guides at all-guides.com Model Remove As showed in picture, press down dotted line area and draw out the removable build plate. Notices When printing completed, extruder and build plate may still hot, please start operating after cooling down! 2 .
-
Page 10: Change Filament
All manuals and user guides at all-guides.com Change Filament /235℃ Load Heating extruder... Change Cancel 1 . Tap [Filament]--Tap [Change], extruder will start preheating. 2 . Pull out the filament as the picture 3 . Insert new filament into the filament intake showed above. - Page 11 Download Please refer to FlashForge official website www.flashforge.com to download the newest User's Guide, Software and Instruction Videos. (Support-Support Center-Select a Product) 本手册仅适用于闪铸科技 Adventurer3 3D打印机 This guide is only applicable to FLASHFORGE Adventurer3 3D printer 快速启动指南 十字螺丝刀 通针 内六角扳手 润滑脂...
- Page 12 All manuals and user guides at all-guides.com 部件介绍 1. 导丝管 2. 导丝管接头 3. 喷头座 4. 风扇 5. 可拆卸喷嘴 6. 喷头排线 7. 夹扣 8. Led灯 9. 导风嘴 10. 前门 11. Y轴滑槽 12. 平台座 13. 可移除平台板 14. 触控屏 15 USB 16. 电源开关 17.
- Page 13 All manuals and user guides at all-guides.com 开 箱 The People's The People's Insuranc e Company Insuranc e Company of China of China KEEP DRY KEEP DRY HANDLE HANDL E WITH CARE WITH CARE FRAGIL E FRAGIL E FR AG HA ND CA RE WI TH...
- Page 14 All manuals and user guides at all-guides.com 5. 通过电源线连接电源与打印机; 开启开关,屏幕点亮。 X: 20.00 Y: 45.00 Z: 36.00 状态 语言 移动 相机 校准 回零 丝料检测 喷头灯 < < < < 1/ 3 2 / 3 6. 在屏幕上依次点击[工具] - [设置]进入如上页面,翻至第二页,点击[移动]。在移动界面点 击向上的箭头,将喷头升起,方便取下下方的纸塑盒。 7. 喷头升起后,打开前门取出内部的纸塑盒, 开箱完成。...
- Page 15 All manuals and user guides at all-guides.com 初次打印 通过电源线连接电源与打印机; 开启开关,屏幕点亮。 安装丝料 1 . 打开料盘盖,将丝料插入进丝口,推入 送丝轮内,感受到一定阻力时即可。 注:请务必确认丝料已推入送丝轮!...
- Page 16 All manuals and user guides at all-guides.com /235℃ 打印 进丝 喷头加热中... 工具 换丝 换丝 取消 2. 点击屏幕中的换丝按钮-选择进丝-进丝完成后-点击确定。 /235℃ /235℃ 加热完成,开始进丝... 待喷头出丝时,表明换丝完成 取消 确认 3 . 喷嘴出丝,确认进丝完成,将料盘置于料盘架上,封闭料盘盖。 请务必注意丝盘的出丝方向,确保 按图中所示方向(顺时针)出丝。...
- Page 17 All manuals and user guides at all-guides.com 模型打印 6.67GB 打印 U盘未插入 工具 无任务 换丝 1 . 选择打印 - 内存打印; 20mm_Box- PLA.gx < < 2 . 在模型列表中选择 模型,点击 开始打印;或点击模型图片或文件名进入 模型 详情页,然后点击 开始打印。 20mm_Box-P... 0 h 10 min 0.70M 7.49 打印完成! 20mm_Box-PLA.gx 确认...
- Page 18 All manuals and user guides at all-guides.com 模型移除 1 . 如上图所示,在虚线区域向下按压,同时向外抽出打印平台。 注意事项 打印完成时,喷嘴和打印平台可能仍处于高温状态,建议冷却后再进行操作! 2 . 弯折平台板,平台板会有一定形变与模型底部脱离(模型较小或较大时 建议使用铲刀辅助)。...
- Page 19 All manuals and user guides at all-guides.com 更换丝料 /235℃ 进丝 喷头加热中... 换丝 取消 1 . 点击丝料-换丝, 喷头将启动加温。 2 . 根据屏幕提示拔出丝料。 3 . 将新丝料插入进丝口,推入送丝轮内, 感受到一定阻力时即可。 /235℃ /235℃ 退丝完成,将丝料拔出后, 待喷头出丝时,表明换丝完成。 请插入新的丝料,点击确定。 确认 确认 4 . 新丝料从喷头出丝后,说明换丝完成,点击确认。...
- Page 20 All manuals and user guides at all-guides.com 售后专线:support@flashforge.com After-Sales Service: support@flashforge.com...
Need help?
Do you have a question about the ADVENTURER 3 and is the answer not in the manual?
Questions and answers