Flashforge Adventurer 5M Quick Start Manual
Hide thumbs
Also See for Adventurer 5M:
- User manual ,
- Installation manual (36 pages) ,
- Quick start manual (28 pages)
Advertisement
Quick Links
EN/CN - A03
Quick Start Guide
快速启动指南
Safety Notice
安全提示
1. Please refer to this Guide for initial printer setup.
2. Hot! Avoid touching the heating nozzle in operation.
3. Moving parts in the printer may cause injuries. Do not wear
gloves or other sources of entanglement in operation.
1. 请参照本指南完成打印机的初始准备。
2. 高温危险!打印机喷嘴在工作时会被加热,操作时请避免接触!
3. 可动部件可能会造成卷入挤压和切割伤害。操作机器时请不要
佩戴手套或缠绕物。
Do not power on the printer until installation is completed.
请勿在打印机安装完成之前通电。
Adventurer 5M / 冒险家5M
中文P13
Advertisement

Subscribe to Our Youtube Channel
Related Manuals for Flashforge Adventurer 5M


Summary of Contents for Flashforge Adventurer 5M
- Page 1 EN/CN - A03 Adventurer 5M / 冒险家5M Quick Start Guide 快速启动指南 中文P13 1. Please refer to this Guide for initial printer setup. 2. Hot! Avoid touching the heating nozzle in operation. 3. Moving parts in the printer may cause injuries. Do not wear gloves or other sources of entanglement in operation.
- Page 2 For more information, you can visit the Flashforge official website. www.flashforge.com - [Support] 更多产品相关资料您可以登陆闪铸官网查看。 www.sz3dp.com - [技术支持]...
-
Page 3: Unboxing Instructions
Unboxing Instructions 1. Open the box. 2. Remove the upper foam packaging, Quick Start Guide and After-sales Service Card. 3. Take out the machine, place it on a level 4. Remove the filament, power cable, screen, workspace and remove the packaging and accessory box from the chamber bags and tapes. - Page 4 5. Move the chamber foam according to the arrow direction. 6. Remove the foam.
-
Page 5: Packing List
Packing List Power Cable After-sales 3D Printer Filament Service Card Touch Screen Quick Start Guide Spool Holder Grease (with 2 screws) Glue Diagonal Pliers Unclogging Pin Tool Screwdriver Allen Wrench... -
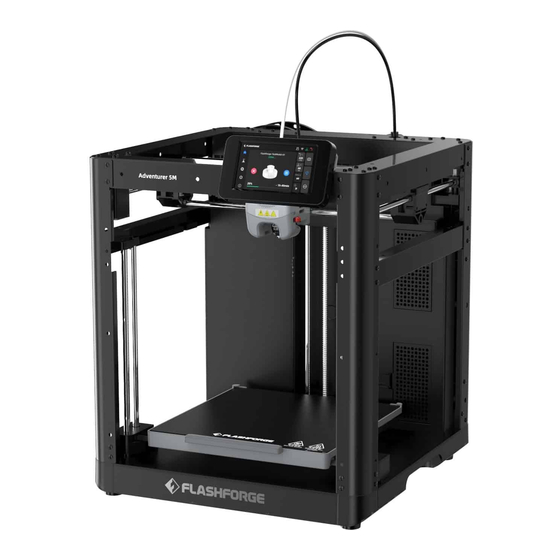
Page 6: Printer Components
Printer Components 1. Extruder 2. Touch Screen 3. Build Plate 4. USB Port 5. Screw Holes for Spool Holder 6. Filament Detection Sensor 7. Ethernet Input 8. Power Switch 9. Power Socket... - Page 7 Install the Spool Holder and Filament Guide Tube 1. Take out the two screws and spool holder from the accessory box. 2. Install the spool holder at the position shown in the figure with the two screws. (Note: Please tighten them using a 2.0mm Allen wrench.)
- Page 8 3. Insert the filament guide tube to the extruder. 4. Insert the other end of the filament guide tube into the filament detection sensor.
-
Page 9: Install The Screen
Install the Screen Before installation, please remove the tape of the screen cable. Tear it off gently to Note avoid damaging the cable. 1. As shown in the picture, insert the screen cable into the screen connector. a. Lift the buckle on the screen's cable socket to the indicated position (Fig. ①), then insert the screen cable into the socket connector. - Page 10 2. Insert the buckle on the back of the screen into the printer's slot, and push the screen according to the arrow direction to lock it in place. Unlock the Build Plate Note Please ensure the platform has been cleared up. Please use a 2.0mm Allen wrench to remove four screws which lock the build plate (as indicated by the arrow).
-
Page 11: First Print
First Print * The interface layout may change whenever there is an upgrade of firmware. 1. Power on the printer, turn on the power switch, and wait for the screen to respond. Power Switch 2. Following the guide on the screen, select the language. - Page 12 4. Load filament following the on-screen startup boot: a. Cut off the bent part of the filament end. b. Hang the filament on the spool holder. Pass it through the filament sensor until it's seen from the other end of the filament guide tube. Push it forward to the feed roller, until it can not go further.
- Page 13 C3. Feeding will begin after heating. Successful filament extrusion from the nozzle indicates successful loading. Lastly, confirm the filament guide tube is properly inserted. Note If no filament is extruded, manually insert the filament into the inlet and click [Back] to retry. Feel for filament movement until it is extruded.
- Page 14 Parameters Machine Name Adventurer 5M Extruder Quantity Printing Precision ±0.2mm [testing based on 100mm cubes] Positioning Accuracy X/Y-axis:0.0125mm, Z-axis:0.0025mm Layer Thickness 0.1-0.4mm Build Volume 220 x 220 x 220mm Nozzle Diameter 0.4mm default [0.6/0.8/0.25mm optional] Printing Speed 10-300mm/s Max Acceleration 20000mm/s²...
- Page 15 产品开箱 1. 打开纸箱。 2. 取出上方固定泡棉以及快启售后服务卡。 3. 取出机器放置水平桌面,去除包装袋和 4. 取出腔体保护棉内的耗材、电源线、屏幕、 固定胶带。 配件盒和喷头内侧保护棉。...
- Page 16 5. 按照箭头方向移动腔体泡棉。 6. 取出泡棉,完成开箱。...
- Page 17 装箱清单 电源线 售后服务卡 3D打印机 耗材 快速启动指南 料盘支架 润滑脂 显示屏 [含两颗螺丝] 水洗胶 斜口钳 通针 十字螺丝刀 内六角扳手...
- Page 18 部件介绍 1. 喷头 2. 显示屏 3. 打印平台 4. USB接口 5. 料盘支架安装孔位 6. 丝料检测传感器 7. 网线接口 8. 电源开关 9. 电源接口...
- Page 19 安装耗材架和导丝管 1. 取出配件盒中的两颗螺丝和料盘架。 2. 用两颗螺丝将料盘架固定在如图背板位置 (注意:请用2.0mm内六角扳手拧紧固定)。...
- Page 20 3. 将导丝管前端插入到喷头导管中。 4. 将导丝管后端插入丝料传感器的卡扣中。...
- Page 21 安装屏幕 注意事项 安装前需取下屏幕排线固定胶带。请轻撕,以免拉扯到排线。 1. 如图所示,将屏幕排线插入屏幕连接口。 a. 将屏幕上的排线插座上的卡扣按箭头方向抬至图示位置(图示1);然后将屏幕排线插入排线插座 连接口。注意: 排线需插接到位,检查指示线与插座齐平。 b. 将排线插座上的卡扣按箭头方向下压至图示位置(图示2)。 图示1 图示2...
- Page 22 2. 将屏幕背面的卡扣插入打印机的槽内,并按箭头方向推动屏幕将其锁紧。 解锁平台 注意事项 请确认打印平台无异物! 用2.0mm内六角扳手取下图示中的4颗螺丝(可参照机器上箭头标识),解锁打印平台。...
- Page 23 首次打印 * 固件不定期更新,UI界面请以实际为准。 1. 连通电源,打开电源开关点亮屏幕。 电源开关 2. 根据屏幕上的开机指引完成界面语言选择。 3. 点击[下一步],机器进行首次校准。校准过程中出现震动和噪音属于正常现象。(注:请将机器 放置于稳定的平台面,且校准过程中请勿移动机器。)...
- Page 24 4. 根据屏幕开机指引完成耗材安装进丝操作: a. 剪去耗材头部弯折部分。 b. 将耗材挂在耗材架上,穿过丝料传感器,直至从导丝管一端看到丝料,将丝料推送到送丝轮处, 直到无法再推入(*首次开机请使用PLA耗材进行第一次打印)。 C1. 点击进丝,首次选择默认[PLA]。 C2. 等待喷头加热。...
- Page 25 C3. 加热后将开始进丝,直至丝料从喷嘴吐出,说明进丝成功,最后确认导丝管也已完好的插入进丝口。 注意事项 若一直未见丝料吐出,请用手握住丝料,插入进丝口,点击[返回]重新进行进丝操作。用手感受 是否有丝料输送,直到丝料吐出。 5. 清理喷嘴残料以及平台上残余耗材,在打 印平台上涂一层胶水,请全幅面涂抹均匀。 注:涂抹胶水有利于改善模型粘附。 6. 点击[打印],机器开始首次打印内置文件 (该文件的配置参数使用的材料为PLA)。...
- Page 26 技术参数 设备名称 冒险家5M 喷头数量 打印精度 ±0.2mm [以100mm方块为测试基准] 定位精度 X/Y轴:0.0125mm, Z轴:0.0025mm 层厚度 0.1-0.4mm 打印尺寸 220 x 220 x 220mm 喷嘴口径 0.4mm默认[0.6/0.8/0.25mm可选] 打印速度 10-300mm/s 最大加速度 20000mm/s² 最大移动速度 600mm/s 最高喷头温度 280℃ 支持耗材类型 *PLA/*PETG [0.4mm口径] *TPU/PLA-CF/PETG-CF [0.6/0.8mm口径] * 为推荐打印材料 电 源 输入:AC 100~120V/200~240V,50/60Hz,350W 设备尺寸 363 x 376 x 413mm [不含显示屏、料盘支架] 363 x 402 x 448mm [含显示屏、不含料盘支架] 净...
Need help?
Do you have a question about the Adventurer 5M and is the answer not in the manual?
Questions and answers