Table of Contents
Advertisement
Quick Links
Advertisement
Table of Contents

Related Manuals for Kogan KASDA512AJA


Summary of Contents for Kogan KASDA512AJA
- Page 1 5.1 CHANNEL 235W DOLBY ATMOS SOUNDBAR WITH SUBWOOFER & REAR SPEAKERS KASDA512AJA...
-
Page 2: Table Of Contents
Safety & Warnings Components Overview Before First Use Operation Connectivity Specifications Troubleshooting Notes... -
Page 3: Safety & Warnings
• To reduce the risk of electric shock, do not dismantle the product and do not expose it to rain or moisture. • Servicing or repair should only be conducted by a qualified professional. If this product is damaged, contact help.Kogan.com for support. • Always ensure the power plug is easily accessible. Notice •... - Page 4 • Do not use this product outdoors. • Unplug this product during lightning storms or when unused for long periods of time. • If the power cord is damaged, cease use immediately and contact help.Kogan.com for support. • Operate this product only as instructed in this user guide.
-
Page 5: Components
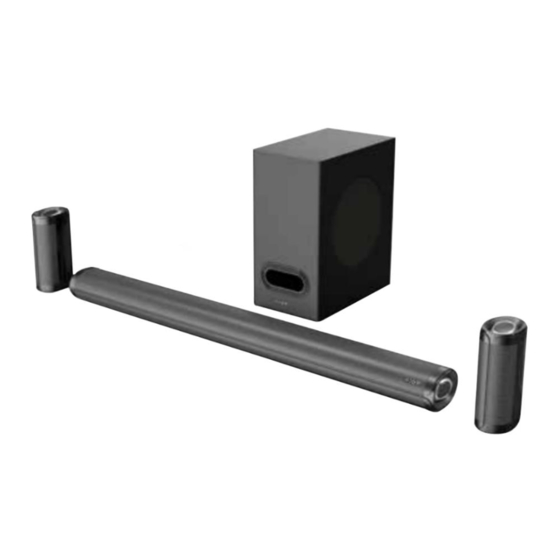
COMPONENTS Soundbar Subwoofer Rear Speaker (x1 Passive, Remote Control x1 Active) Remote Control Battery Power Adaptor (for the Rear Speaker Wall Rear Active Speaker) Mounting Kit Soundbar Wall Mounting Kit Line In to RCA Cable Power Cord (for the User Guide Soundbar) -
Page 6: Overview
OVERVIEW Soundbar 2 3 4 6 7 8 Display Digital display screen. Auxiliary audio input from MP3/phone/set-top box devices. Connect a USB flash drive to the USB port on the soundbar. HDMI In (eARC) Connect to HDMI eARC. AC IN Connect to power. - Page 7 Power Power on/off. - Volume Decrease the volume. Input Select an input source for the soundbar. + Volume Increase the volume.
- Page 8 Rear Speakers SL or SR Out Connect the passive speaker to the active speaker. SL Indicator Illuminates when the channel is set to SL (surround left) Indicates the pairing between soundbar and wireless Pairing Indicator surround speaker For software upgrade only. DC IN Connect to power.
- Page 9 • • Press and hold to pair the rear speakers with the SL/SR Switch soundbar. Subwoofer...
- Page 10 Remote Control Power Power on/off. + Volume Increase master volume. Previous Previous track (in USB & BT modes only). • Press to play/pause (in USB & BT modes only). • Press to mute (in Aux, Optical & HDMI eARC modes Play/Pause/Mute only).
- Page 11 • Press to toggle between Music, Movie, News and Sport mode. • Press and hold to return to factory default settings. Select an input source: AUX, USB, HDMI eARC, Optical, Input Bluetooth. • In Bluetooth mode, press and hold for more than 2 seconds for Bluetooth device pairing or to reconnect the last paired Bluetooth device.
-
Page 12: Before First Use
BEFORE FIRST USE Unpacking • Remove the soundbar from the box and remove all packing material from the soundbar. Save the packing material, if possible, in case the soundbar ever needs to be serviced or transported. The original box and packing material are the only safe way to pack your soundbar to protect it from damage in transit. - Page 13 Recommended Order of Operations: This order of operations ensures that the mounting process is integrated into the setup, considering the need for accessibility to the rear speakers' pairing button. Unboxing and inspection. Identify a suitable location for the soundbar, subwoofer and rear speakers. If wall- mounting, consider the optimal positions for brackets.
-
Page 14: Operation
OPERATION Positioning the Soundbar Place on a flat surface: Place the soundbar horizontally on a flat surface such as a shelf and align it centrally with soundbar inside a cabinet or a walled shelf. Follow this guidance for best sound output and good airflow around the soundbar. - Page 15 Drill 2 holes in the wall the same distance apart as the wall bracket on the soundbar. Place the wall anchors into the holes and secure with the screws. Do not tighten the screws all the way; ensure some space is remaining. Attach the 2 EVA pads onto the bracket.
- Page 16 Once the screws are securely fastened, hang the soundbar by inserting the screws into the wall bracket. Mount the Rear Speakers Note: Pair and configure the rear speakers before wall mounting. Drill 2 holes in the wall the same distance apart as the two rear speakers. Then, drill another hole under each hole the same distance apart as the bracket holes.
- Page 17 Place the wall anchors into the bracket holes and secure with screws to ensure the brackets do not shake. Attach the 2 EVA pads to the brackets. Align the bracket hole with the hole in the speaker and place the speakers on the EVA pads and. EVA Pads Insert the screws into the bracket holes and through the holes in the speaker and tighten.
- Page 18 Basic Operation Press the Power button on either the remote control or the soundbar to turn on the soundbar. The default input mode will appear on the display. Switch on the connected device (such as TV, playback device, game console etc). Press the Input button on either the remote control or the soundbar to select your desired input source.
- Page 19 Pair the Soundbar with the Rear Speakers Press the Power button to turn on the soundbar. Then, press the Input button on the soundbar to switch to Bluetooth (BT) mode. Power on the rear speakers. The Pairing indicator on the rear speaker will slowly flash blue to indicate it is in pairing mode.
- Page 20 Turn on the soundbar and then press the Input button on soundbar or remote control to switch to BT mode. The display will illuminate and Enter the Bluetooth settings on your device and select Kogan 5.1 Soundbar . When successfully paired, will illuminate solidly on the display.
-
Page 21: Connectivity
CONNECTIVITY Input Cable, satellite or network set-top box or BD/DVD Check the player. Remove the Mobile direction of the cap. device plug. Output Optical PC/MAC Input Wireless signal... - Page 22 Audio (Aux) Connection Connect the soundbar to your PC, laptop, smart-phone, TV or other audio device using the provided AUX cord. Ensure the device has both an AUX IN and an AUX OUT port. Then press the Input button on remote control or soundbar to switch the soundbar to Aux mode.
- Page 23 e-ARC (Enhanced Audio Return Channel): This soundbar supports HDMI with enhanced Audio Return Channel (e-ARC). If your TV is HDMI e-ARC compliant, you can hear the TV audio through your soundbar by using a single HDMI cable. Connect one end of a high speed HDMI cable (not provided) to the HDMI IN eARC port on the soundbar and the other end to the HDMI (e-ARC) connector on your Press the Input button on the soundbar or the remote control to switch to HDMI IN eARC mode.
-
Page 24: Specifications
SPECIFICATIONS Output Power 30W x 5 + 85W = 235W Bluetooth Version Frequency Response 45Hz-20KHz Soundbar: 73H x 100D x 960L mm Dimensions Subwoofer: 190W x 367H x 306D mm Speakers: 73H x 100D x 190L mm... -
Page 25: Troubleshooting
TROUBLESHOOTING Problem Possible Cause Solution Another input source is Select an appropriate Input selected. source. The mute function is Cancel the mute function. activated. The volume of the Increase the volume level on the soundbar or connected soundbar or by remote control or device is too low. - Page 26 The automatic volume adjustment function is activated. To prevent The volume excessive loudness, the decreases when the Turn up the volume as required. soundbar automatically soundbar is turned on. controls its volume within a certain level when the soundbar is turned on. The soundbar is too close Move those devices away from Noise is heard.
- Page 27 The soundbar is too far Move the Bluetooth device away from the Bluetooth closer to the soundbar. device. A device emitting electromagnetic waves Do not use this product near (such as a microwave oven, devices that emit a wireless device, etc.) may electromagnetic waves.
- Page 28 A device emitting Do not use this soundbar near electromagnetic waves (such as a microwave oven, device that emit a wireless device, etc.) may electromagnetic waves. be placed nearby. • Connect the TV and soundbar using a 19-core HDMI cable. •...
- Page 29 • Turn off the soundbar and rear speakers by removing the power plug from the electrical outlet. The soundbar is Connection between the • Ensure the soundbar and disconnected from rear speakers and the rear speakers are connected the rear speakers. soundbar is not correct.
- Page 30 Dolby Atmos Manufactured under license from Dolby Laboratories. Dolby, Dolby Audio, Dolby Vision, Dolby Atmos and the double-D symbol are trademarks of Dolby Laboratories. What is DOLBY ATMOS®? Dolby Atmos® transports you from the ordinary into the extraordinary with breathtaking, moving audio that fills your room and flows above and around you.
-
Page 31: Notes
NOTES... - Page 32 Need more information?
Need help?
Do you have a question about the KASDA512AJA and is the answer not in the manual?
Questions and answers