
Related Manuals for Crestron CHV-TSTAT-FCU-PIR-10-W-T


Summary of Contents for Crestron CHV-TSTAT-FCU-PIR-10-W-T
- Page 1 CHV-TSTAT-FCU-PIR-10-W-T 0-10V Heating/Cooling Fan-Coil Thermostat, White Textured Product Manual Crestron Electronics, Inc.
- Page 2 Crestron disclaims any proprietary interest in the marks and names of others. Crestron is not responsible for errors in typography or photography.
-
Page 3: Table Of Contents
Connect the Device Wiring Diagrams Configuration Setup Mode Enter Setup Mode Exit Setup Mode Navigate Setup Mode Configure the Thermostat Operation Resources Crestron Support and Training Programmer and Developer Resources Product Certificates Product Manual — Doc. 7915F Contents • iii... - Page 4 iv • Contents Product Manual — Doc. 7915F...
-
Page 5: Overview
(PIR) sensor to ensure that energy is never wasted on a vacant room. Whether used as a standalone unit or as part of a complete Crestron® control system, theCHV-TSTAT-FCU-PIR-10-W-Tdelivers superior functionality in a stylish wall mount design. -
Page 6: Features
Built-in PIR sensor to detect room vacancy for energy efficiency Cresnet® wired communications Backlit LCD display Large, easy-to-use front panel buttons for heating, cooling, fan speed, temperature scale, and temperature adjustments Wall-mount installation 6 • CHV-TSTAT-FCU-PIR-10-W-T Product Manual — Doc. 7915F... -
Page 7: Specifications
Specifications Product specifications for the CHV-TSTAT-FCU-PIR-10-W-T. Product Specifications Measurement Range Temperature 0º to 110ºF (-18º to 43ºC) Temperature Tolerance Over Full Range: ±1ºF (±0.5ºC) At Room Temperatures: ±1ºF (+0.1/-0.4ºC) Setpoint Range Heat 38° to 89°F (3° to 32°C) Cool 59° to 99°F (15° to 37°C) - Page 8 Network (1) 4-position terminal block; Cresnet device port, connects to Cresnet control network Environmental Humidity 10% to 95% RH (noncondensing) Construction Plastic, surface-mountable to the front of a horizontally-oriented 1-gang electrical box 8 • CHV-TSTAT-FCU-PIR-10-W-T Product Manual — Doc. 7915F...
-
Page 9: Dimension Drawings
Dimensions Height 4.00 in. (102 mm) Width 5.00 in. (127 mm) Depth 1.13 in. (29 mm) Weight 5.80 oz (165 g) Dimension Drawings Product Manual — Doc. 7915F CHV-TSTAT-FCU-PIR-10-W-T • 9... -
Page 10: Installation
Installation This section provides the following information: • In the Box • Determine the Mounting Location • Equipment Required • Mounting • Connect the Device 10 • CHV-TSTAT-FCU-PIR-10-W-T Product Manual — Doc. 7915F... -
Page 11: In The Box
In the Box CHV-TSTAT-FCU-PIR-10, 0-10 V Heating/Cooling Fan-Coil Thermostat Additional Items Screw, 6-32 x 1 in., Pan Head, Phillips (2007251) Screw, M3 x 16 mm, Flat Head, Phillips (2013788) Product Manual — Doc. 7915F CHV-TSTAT-FCU-PIR-10-W-T • 11... -
Page 12: Determine The Mounting Location
Follow the mounting requirements below: Mount 60 in. (~1.6 m) above the finished floor; this is an HVAC industry standard. Do not mount on an exterior wall. 12 • CHV-TSTAT-FCU-PIR-10-W-T Product Manual — Doc. 7915F... -
Page 13: Equipment Required
Equipment Required The following tools and hardware are required for mounting the thermostat. 1-gang U.S. electrical box or 1-gang U.K. electrical box (not included) Mounting screws (included) Phillips screwdriver (not included) Product Manual — Doc. 7915F CHV-TSTAT-FCU-PIR-10-W-T • 13... -
Page 14: Mounting
CAUTION: Do not press on the LCD display during mounting, as this may cause the screen to crack. 7. Carefully remove the warning label from the LCD display on the front plate. 8. Turn the HVAC system power on. 14 • CHV-TSTAT-FCU-PIR-10-W-T Product Manual — Doc. 7915F... - Page 15 Installation in U.S. Electrical Box (top) and U.K. Square Electrical Box (bottom) Product Manual — Doc. 7915F CHV-TSTAT-FCU-PIR-10-W-T • 15...
-
Page 16: Connect The Device
HVAC system. Apply power after all connections have been made. If the system being connected does not match the system described below, contact Crestron Technical Support for assistance. 16 • CHV-TSTAT-FCU-PIR-10-W-T Product Manual — Doc. 7915F... -
Page 17: Wiring Diagrams
The thermostat does not provide power. Heat contacts require an in-line power source. Fan valve: The fan speed is not full modulating. It provides four adjustable discrete voltage levels for Off, Low, Medium, and High. Product Manual — Doc. 7915F CHV-TSTAT-FCU-PIR-10-W-T • 17... -
Page 18: Configuration
Configuration Before using the thermostat, ensure it is using the latest firmware. Check for the latest firmware at www.crestron.com/firmware. Load the firmware onto the thermostat using Crestron Toolbox™ software. This section provides the following information: • Setup Mode • Configure the Thermostat 18 •... -
Page 19: Setup Mode
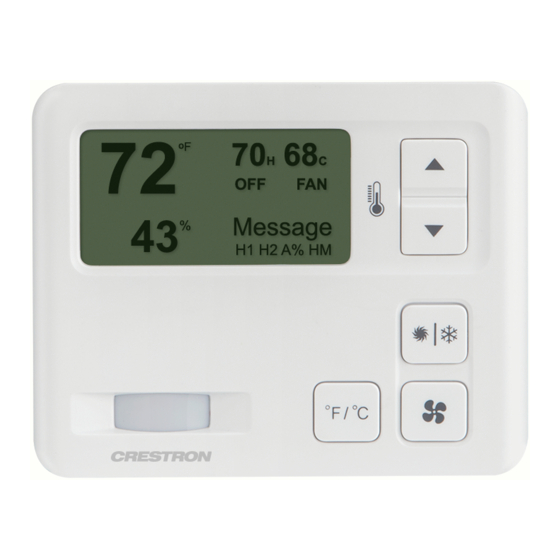
This section explains how to enter, exit, and navigate Setup mode on the thermostat. Enter Setup Mode CHV-TSTAT-FCU-PIR-10-W-T Front Panel Buttons To enter Setup mode, press and hold the Down button. While holding the Down button, simultaneously press and hold the Mode and Fan buttons until the SETUP: SYSTEM screen is displayed. -
Page 20: Configure The Thermostat
NOTE: When the 0-10V Heat Type is selected on the SETUP: SYSTEM screen, the Heat Anticipator cannot be set. Use the Fan Cool Down Time setting to control how long the fan will run after a heating call is finished. 20 • CHV-TSTAT-FCU-PIR-10-W-T Product Manual — Doc. 7915F... - Page 21 UNBOOKED TIMEOUT for a shorter period of time than BOOKED TIMEOUT so the room can enter the vacancy state quicker, which ensures that excess heating or cooling energy is not expended in a vacant room. Product Manual — Doc. 7915F CHV-TSTAT-FCU-PIR-10-W-T • 21...
- Page 22 Set Display Temp to N to display only the setpoint temperature on the device's home screen. SETUP: FAN VOLTAGE Screen Use the SETUP: FAN VOLTAGE screen to select the voltages corresponding to the high, medium, and low fan speeds. 22 • CHV-TSTAT-FCU-PIR-10-W-T Product Manual — Doc. 7915F...
-
Page 23: Operation
Operation To operate the CHV-TSTAT-FCU-PIR-10-W-T from the main user-facing UI, use the front panel buttons. CHV-TSTAT-FCU-PIR-10-W-T Front Panel Buttons Press the Up or Down buttons to raise or lower (respectively) the heat, cool, and auto setpoints. Press the Mode button to cycle through Heat, Cool, or Auto mode. -
Page 24: Resources
Resources The following resources are provided for the CHV-TSTAT-FCU-PIR-10-W-T. NOTE: You may need to provide your Crestron.com web account credentials when prompted to access some of the following resources. Crestron Support and Training Crestron True Blue Support Crestron Resource Library Crestron Online Help (OLH) Crestron Training Institute (CTI) Portal... - Page 25 Crestron Electronics, Inc. Product Manual — Doc. 7915F 15 Volvo Drive, Rockleigh, NJ 07647 10/25/23 Tel: 888.CRESTRON Specifications subject to Fax: 201.767.7656 change without notice. www.crestron.com...
Need help?
Do you have a question about the CHV-TSTAT-FCU-PIR-10-W-T and is the answer not in the manual?
Questions and answers