Advertisement
Quick Links
Technical Support and E-Warranty Certificate
www.vevor.com/support
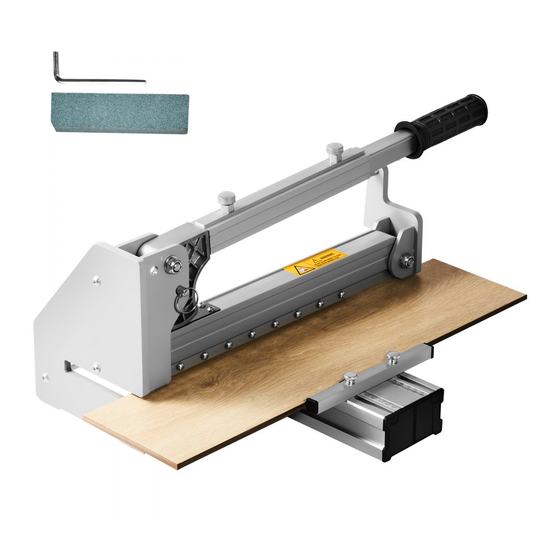
FLOOR CUTTER
MODEL: 8503-160
We continue to be committed to provide you tools with competitive price.
"Save Half", "Half Price" or any other similar expressions used by us only represents an
estimate of savings you might benefit from buying certain tools with us compared to the major
top brands and does not necessarily mean to cover all categories of tools offered by us. You
are kindly reminded to verify carefully when you are placing an order with us if you are
actually saving half in comparison with the top major brands.
Advertisement

Related Manuals for VEVOR 8503-160


Summary of Contents for VEVOR 8503-160
- Page 1 Technical Support and E-Warranty Certificate www.vevor.com/support FLOOR CUTTER MODEL: 8503-160 We continue to be committed to provide you tools with competitive price. "Save Half", "Half Price" or any other similar expressions used by us only represents an estimate of savings you might benefit from buying certain tools with us compared to the major top brands and does not necessarily mean to cover all categories of tools offered by us.
- Page 2 This is the original instruction, please read all manual instructions carefully before operating. VEVOR reserves a clear interpretation of our user manual. The appearance of the product shall be subject to the product you received. Please forgive us that we won't inform you again if there are any technology or software updates on our product.
-
Page 3: Technical Parameters
Warning-To reduce the risk of injury, user must read instructions manual carefully. TECHNICAL PARAMETERS Model 8503-160 maximum cutting thickness Length straight cut/oblique straight Cutting type cut/corner straight cut/width cut Product size (mm) 490*210*240 Net weight(kg) 14.5 - 2 -... -
Page 4: Safety Instructions
number name quantity picture framework subplate pressure bar square pipe Hand screw countersunk hex screw hexagon socket head cap screw millstone inner hexagon spanner SAFETY INSTRUCTIONS WARNING: FAILURE TO FOLLOW THESE RULES MAY RESULT IN SERIOUS INJURY! USING THIS MACHINE WITH RESPECT AND CAUTION WILL CONSIDERABLY LESSEN THE POSSIBILITY OF PERSONAL INJURY. - Page 5 SAFETY RULES FOR THE FLOORING CUTTER READ AND UNDERSTAND THIS INSTRUCTION MANUAL BEFORE OPERATING THE MULTI-FLOORING CUTTERS. 1.Stay alert. Do not operate under the influence of drugs, alcohol, or medication. 2.Always wear safety approved eye protection with side shields(ANSI Z87.1) 3.Keep the work area free of debris.
- Page 6 SET UP Installation of the support plate Connect the support plate to the cutter as show. Warning: Do not put your fingers against the sharp edge of the blade at any time. Installation of the handle Pull up the lock pin on the aluminum handle as shown and insert the handle base into the handle as shown.
- Page 7 CUTTING Straight Cutting Insert material between the cutting blade and the base, flush with the angle attachment as shown, and hold the material with your foot, then push the handle down to complete a cut. *Blade cutting maximum width: 300mm *Blade cutting maximum depth: 16mm Warning: Maintain control of the handle.
- Page 8 CUTTING “L” Cutting 1st cut Insert material between the cutting blade and the base at the end of the machine, flush with the angle attachment as shown, and then push the handle down to complete a cut. Insert material between the cutting blade base machine's front end, flush with the...
-
Page 9: Changing The Blade
CHANGING THE BLADE Warning: Do not put your fingers against the sharp edge of the blade at any time. Step 1: press the pressure rod down to the bottom, and replace the insurance plug pin from the top to the bottom; Step 2: Turn the screw to fix the blade counterclockwise;... - Page 10 Step 4: Put the new blade plane toward the connecting rod into the slot and tighten the fixing screw. Made In China - 9 -...
- Page 12 Technical Support and E-Warranty Certificate www.vevor.com/support...
Need help?
Do you have a question about the 8503-160 and is the answer not in the manual?
Questions and answers