Advertisement
Table of Contents
- 1 Table of Contents
- 2 Ⅰ.bacic Safety Rules
- 3 Ⅱ.matters Needing Attention
- 4 Ⅲ. Introduction for Main Parts
- 5 Ⅳ. Technical Parameters
- 6 Ⅴ.product Assembly Steps
- 7 Ⅵ. Software Installation
- 8 Ⅶ.software Function Description
- 9 Ⅷ.software Output Cutting
- 10 Ⅸ.APP Installation and Use
- 11 Ⅹ.frequently Asked Questions
- 12 FCC Information
- Download this manual
Technical Support and E-Warranty Certificate www.vevor.com/support
DESKTOP VINYL CUTTER
MODEL:SMART1
We continue to be committed to provide you tools with competitive price.
"Save Half", "Half Price" or any other similar expressions used by us only represents an
estimate of savings you might benefit from buying certain tools with us compared to the major
top brands and does not necessarily mean to cover all categories of tools offered by us. You
are kindly reminded to verify carefully when you are placing an order with us if you are
actually saving half in comparison with the top major brands.
Advertisement
Table of Contents

Related Manuals for VEVOR SMART1


Summary of Contents for VEVOR SMART1
- Page 1 Technical Support and E-Warranty Certificate www.vevor.com/support DESKTOP VINYL CUTTER MODEL:SMART1 We continue to be committed to provide you tools with competitive price. "Save Half", "Half Price" or any other similar expressions used by us only represents an estimate of savings you might benefit from buying certain tools with us compared to the major top brands and does not necessarily mean to cover all categories of tools offered by us.
- Page 2 This is the original instruction, please read all manual instructions carefully before operating. VEVOR reserves a clear interpretation of our user manual. The appearance of the product shall be subject to the product you received. Please forgive us that we won't inform you again if...
-
Page 3: Table Of Contents
Contents Ⅰ.Bacic Safety Rules………………………………....3-4 Ⅱ. Matters Needing Attention..........4-6 Ⅲ. Introduction for Main Parts………………..….......7 Ⅳ. Technical Parameters…............8 Ⅴ. Product Assembly Steps…..........8-10 Ⅵ. Software Installation....…........11-12 Ⅶ. Software Function Description…........13-14 Ⅷ.Software Output Cutting...........15-20 Ⅸ.APP Installation and Use...........20-25 Ⅹ.Frequently Asked Questions..........25-28 i. FCC Information..............28-29 Xi.Correct Disposal..............29... -
Page 4: Ⅰ.bacic Safety Rules
Ⅰ. Bacic Safety Rules WARNING:Read all safety warnings, instructions, illustrations and specifications provided with this appliance. Failure to follow all instructions listed below may result in electric shock, fire and/or serious injury. 1. Protective material must be removed before turning on the cutting plotter. 2. -
Page 5: Ⅱ.matters Needing Attention
17.If there is an abnormal sound after powering on the machine, please turn off the power immediately and contact the after-sales department for feedback. 18.This appliance can be used by children aged from 8 years and above and persons with reduced physical, sensory or mental capabilities or lack of experience and knowledge if they have been given supervision or instruction concerning use of the appliance in a safe way and understand the hazards involved. - Page 6 Symbol indicates that users need to pay close attention. The image on the left signifies "Beware of electric shock." Do not use a power supply that does not meet the rated voltage. Using an unqualified power supply can cause fire or electric shock. If the machine emits smoke, unusual odors, noise, or exhibits any other abnormal behavior, please power it off immediately and do not continue using it.
- Page 7 If the cutting plotter will not be used for a long time, please unplug the power cord from the socket. Otherwise it will cause a fire. When operating, do not put your hands on the reel. This may cause injury. The machine should be positioned on a stable surface.
-
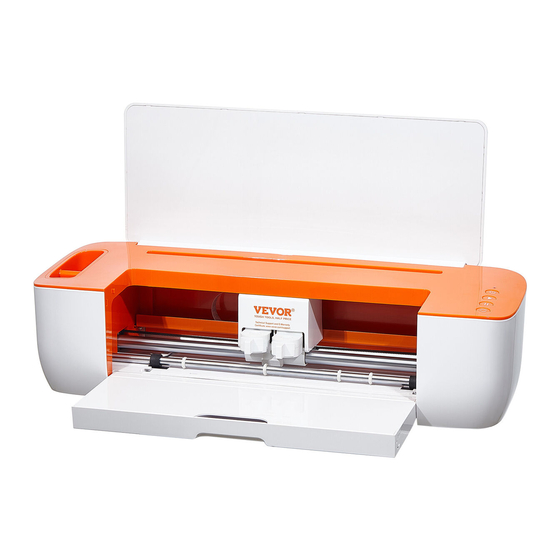
Page 8: Ⅲ. Introduction For Main Parts
Ⅲ. Introduction for Main Parts 1.Cover plate 2. Storge cup 3. Carriage 4.Button 5.Paper roller 6.Clamp R 7.Clamp L 8.Cutting platform 9.Storage box 10.U-DISK port 11.USB Type-B 12.DC 24V Light status description 13.Indicator light 14.Power button White:Normal 15.Start button 16.Pause button Blue:Bluetooth connected 17.Load/unload button Red:Machine fault... -
Page 9: Ⅳ. Technical Parameters
Ⅳ. Technical Parameters Mode Smart1 lItem Max. feeding width 13inch(330mm) Max. cutting width 12inch(305mm) Cutting thickness ≤1mm linear velocity 10-300mm/s Right tool pressure 10-500gf Left tool pressure 50-500gf Buffer Cutting precision ±0.1mm Interface U-DISK/USB /Bluetooth4.2ble Supporting systems Mac、Windows 、Android 5.1/iOS 11.0 above Adapter INPUT:AC100-240V,50-60Hz,48W;... - Page 10 Note: Never place the Blade and housing in Clamp L. Warning: Do not touch the blade tip with your fingers, as it can result in injury and blunting of the tip. b: The USB cable is used to connect c: Plug in the power supply. Smart1 to your computer.
- Page 11 d: Press the power-on button and wait f: Align the cutting surface of the for the machine to automatically reset. material to be cut upwards with the upper left corner of the cutting pad grid and paste it onto the cutting pad with a backing surface.
-
Page 12: Ⅵ. Software Installation
Ⅵ. Software Installation 1.Download the corresponding version of software installation through the link. https://get.exact-cut.com/ 2.Before installing the software, find the refrigerator sticker with the software PSN code in the accessory box. 3.Enter the given link in your browser to access the registration screen. 3.1 Click Register after entering your 3.2 Proceed to your email address to registration information... - Page 13 4.Double click the desktop installation package. 5.Install the program in order. 5.1 Agree and click "Next" 5.2 Click "Next" 5.4 Click "Finish" 5.3 Click "Install." 5.5 Enter your email address to log in to 5.6 After successful login, close this your account.
-
Page 14: Ⅶ.software Function Description
Ⅶ.Software Function Description 1. Main interface of the software 2. Module Description a:Menu bar(Includes features such as File, View, Edit, Arrange, License, and Help.) b:Common Options Toolbar (including File Create, Open and Save, File Import, Cut, Object Copy, Paste and Delete, Duplicate, Undo and Redo, Zoom In, Zoom Out and Zoom mode, and more.) - Page 15 e:Canvas interface editing area...
-
Page 16: Ⅷ.software Output Cutting
Ⅷ.Software Output Cutting 1.Normal Cutting Output 1.1 Plug in the cable that connects to 1.2 Check here if the machine is the machine. connected after opening the software. 1.4 Selected shapes can be edited. 1.3 Design graphics can be created from the software toolbar or imported from a file (SVG, PNG and JPG formats are supported for import). - Page 17 1.6 Select CLAMP L or CLAMP R 1.7 Click “Send to cut” according to the settings in the figure below, the default is CLAMP R, which is the cutting tool clamp 1.9 Move the graph in this screen to 1.8 Click “Send” adjust the cutting position.
- Page 18 1.11 Click here to send cuts 1.12 Place the material on the mat 1.13 Prompt to press the LOAD button. inside the grid, position the mat underneath the mat guides, and ensure that the top edge of the mat is gently secured by both rollers simultaneously.
- Page 19 1.17 When processing is 1.18 Press the 1.19 Cutting Completion. complete, the software will machine's prompt you to press the LOAD/UNLOAD button. LOAD button. 2.Contour Output Cutting 2.1 Design graphics can be created 2.2 Select the drawing and click on the from the software toolbar or imported right side to create an outline.
- Page 20 2.5 Click “Send” 2.4 Click “Send to Device” 2.6 Click on the graphic in the red box 2.7 Attach the printed graphic to the on the right and select a printer to print cutting mat placement machine. the designed graphic. 2.9 Follow the software instructions to 2.8 Click on the graphic in the red box locate this button on the machine.
- Page 21 2.10 First, place the pad with the 2.11 Press the LOAD 2.12 Prompt to adhered material on the edge of the button when the press the start press wheel according to the material is ready. button. diagram below. 2.16 Contour 2.15 Press the 2.14 When 2.13 Press the...
-
Page 22: Ⅸ.app Installation And Use
Ⅸ.APP Installation and Use To pair your machine with mobile devices featuring Bluetooth wireless technology, ensure that Smart1 is turned on and within a distance of no more than 15 feet. 1. Software Download You can download the APP software by following the link below. - Page 23 2.6 Click “Machine 2.5 Navigate to the home 2.4 Turn on system’s Setting” page and click “Profile" Bluetooth 2.7 Allow location 2.8 Click “Add” 2.9 Click on the Smart access when using. cutter icon.
- Page 24 2.12 Connection 2.11 Select the device 2.10 Click “Pair Devices” successful, click back. with the name for connection. 2.13 Click “Home” 2.14 Select a graphic 2.15 Click to create. from the gallery list.
- Page 25 2.18 Click to create. 2.17 Confirm editing and 2.16 Graphics can be tap Make. edited in the canvas. 2.19 Select the cutting 2.20 Select materials and 2.21 Move the graphic on mat and click next “Next”. click “Next”. this screen to adjust the cutting position.
- Page 26 2.23 First, place the pad with the adhered material on 2.22 Please press the the edge of the press wheel according to the diagram feed key. below. 2.24 Press the LOAD 2.25 Press the machine’s 2.26 Press the start button when the material start button.
-
Page 27: Ⅹ.frequently Asked Questions
2.29 Cutting Completion. 2.28 Press the machine’s 2.27 When processing LOAD/UNLOAD button. is complete, the software prompts you to press the eject button. Ⅹ.Frequently Asked Questions Q:What if the software shuts down during the cutting process and the software gets stuck? A:Click “Force Abort”... - Page 28 A:Follow the steps below to perform automatic calibration. Q:How do I switch the language of the software? A:Follow the instructions below to switch languages. Q:How to change the measuring units? A:Please follow the steps below to switch between units.
- Page 29 Q: How to cut in layers in APP? A:Please follow the steps below. Q:How to switch left and right knives in APP? A:Set up as follows. Q:What if I don't have the material I want to cut in the APP's material library? A: You can go to the Material Library page to add materials and set pressure.
-
Page 30: Fcc Information
Q: How do I adjust the pressure to increase or decrease? A: You can set it up in the following ways. Q: Why doesn't it recognize the USB flash disk? A: The format of your USB flash disk may not be supported. Support format : FAT and FAT32 Unsupported format: NTFS and exFAT FCC Information... - Page 31 2)This product must accept any interference received, including interference that may cause undesired operation. WARNING: Changes or modifications to this product not expressly approved by the party responsible for compliance could void the user's authority to operate the product. Note: This product has been tested and found to comply with the limits for a Class B digital device pursuant to Part 15 of the FCC Rules.
- Page 32 Technical Support and E-Warranty Certificate www.vevor.com/support...
Need help?
Do you have a question about the SMART1 and is the answer not in the manual?
Questions and answers
I bought a smart 1 but I can not get software now .
You can download the software for the VEVOR SMART1 by following the link provided in the manual:
http://api.cutterplotter.cn/index/d
After downloading, open the app, register for an account, and log in to use the software.
This answer is automatically generated
I have the Vevor Smart1 connected to my computer but it is not listed in the devices list. When I push the feed button for the mat to get going nothing happens.