Table of Contents
Advertisement
Quick Links
Advertisement
Table of Contents

Related Manuals for Messoa NCR376


Summary of Contents for Messoa NCR376
- Page 1 IR Bullet Network Camera NCR376 User Manual 201608 376 A2...
-
Page 2: Table Of Contents
Table of Contents Product Overview Physical Characteristics Installation Package Content Installation 2.2.1 Checking Appearance 2.2.2 Mounting & Wiring 2.2.3 Safety Wire Preparation 2.2.4 Adjusting the Camera Position 2.2.5 Adjusting the Protection Shield Hood Connection Network Topology System Requirements Connecting Process 3.3.1 Default IP address 3.3.2 Connecting from a computer &... - Page 3 WARNING ● This camera operates at DC 12V / PoE (IEEE 802.3af Class 3) only. ● Installation and service should be performed only by qualified and experienced technicians and comply with all local codes and rules to maintain your warranty. ●...
- Page 4 FCC Compliance Statement Information to the user: This unit has been tested and found to comply with the limits for a Class B digital device pursuant to Part 15 of the FCC Rules. Operation is subject to the following two conditions: (1) this device may not cause harmful interference, and (2) this device must accept any interference received, including interference that may cause undesired operation.
-
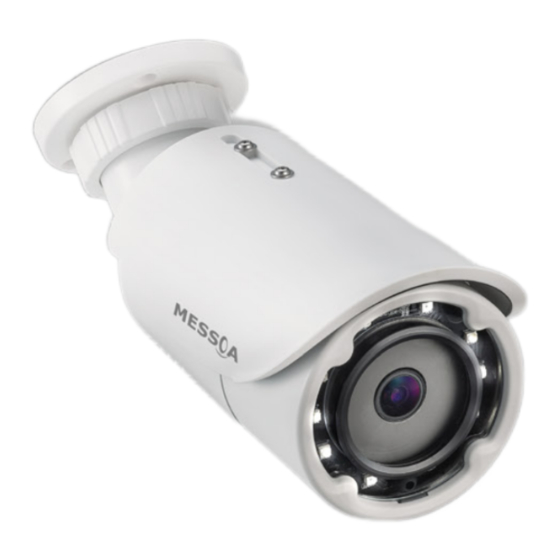
Page 5: Product Overview
Product Overview Physical Characteristics Unit: mm Figure 1 - 1: Physical Dimension & Pictorial Index... - Page 6 Table 1 - 1: Pictorial Index Definition Name Description Insert an Ethernet cable into the port for network connection as well as PoE (Power RJ-45 Ethernet / PoE Port over Ethernet) capability. To power on the camera via DC12V power source. Pay attention to the polarities DC 12V Port when connecting to DV12V power supply.
-
Page 7: Installation
Installation Package Content Check if everything in the packing box matches to the order form and the packing slip. All items listed below should be included in the packing box. • Network IR Bullet Camera * 1 • Printed Quick Guide * 1 •... -
Page 8: Mounting & Wiring
2.2.2 Mounting & Wiring Step 1. Mounting Preparation • Use the guide pattern to mark out and prepare a mounting area. Place the supplied guide pattern on a mounting surface. Drill 6 mm (0.25”) outer holes x 3 at the mounting surface corresponding to the 3 indicated positions for plastic anchors. - Page 9 Step 3. Wiring the Camera While mounting the camera, pass the PoE Port and DV12V Port cable, which penetrates from the mounting bracket, through the hole of mounting surface or place it by the side hole of the mounting bracket as the following figures shown depending on your different applications.
-
Page 10: Safety Wire Preparation
2.2.3 Safety Wire Preparation If you possess a safety wire (fall prevention wire, not supplied), connect the safety wire with one end to the mounting surface and the other end to the safety-cord screw of the camera. Safety wire Safety-cord screw of the camera Figure 2 - 5: Mounting the Camera Depending on the material of mounting surface, different screws and anchors than those supplied may be required. -
Page 11: Adjusting The Camera Position
2.2.4 Adjusting the Camera Position • Pan Adjustment (A) Rotate the A joint to adjust the camera horizontally for applying to a variety of applications. • Tilt Adjustment (B) Tilt the B joint to adjust the camera vertically for applying to varied applications. •... -
Page 12: Adjusting The Protection Shield Hood
2.2.5 Adjusting the Protection Shield Hood This camera is designed with capability to operate under rugged environments and thus will possibly be subject to influences from sunlight or rain. Protection shield hood is consequently coated on the camera to prevent from those outside effects. To adjust the protection shield hood, first loose the 2 cross screws above the hood followed by moving the protection shield hood forward or backward till a desired position based on your need of different applications. -
Page 13: Connection
Connection Network Topology The camera, which is equipped with Ethernet RJ-45 network interface, can deliver live view image in real time via both Internet and Intranet manners. Please refer to the skeleton drawings shown below for understanding. Figure 3 - 1: Network Topology System Requirements Below table lists the minimum requirement to implement and operate the camera. -
Page 14: Connecting Process
Connecting Process 3.3.1 Default IP address Since this is a network-based unit, an IP address must be assigned at the very first. The unit’s default IP address is 192.168.1.30 and sub mask is 255.255.255.0. However, if you have a DHCP server in your network, the unit would obtain an IP address automatically from the DHCP server so that you don’t need to change the camera’s IP address. - Page 15 Viewing Preparation Images of the unit can be viewed through Microsoft Internet Explorer 8 or above. Before viewing, follow these steps to enable the display. Enable Cookies as instructions below In Internet Explorer, click Internet Options on the Tools menu. ...
- Page 16 Scroll down to the ActiveX controls and plug-ins radio buttons and set as follows: 【 Download signed ActiveX controls 】 Prompt (recommended) 【 Download unsigned ActiveX controls 】 Prompt 【 Initialize and script ActiveX not marked as safe for scripting 】 Prompt Figure 3 - 4: Security Settings 2/4 【...
- Page 17 【 Run ActiveX controls and plug-ins 】 Enable 【 Script ActiveX controls marked safe for scripting* 】 Enable Figure 3 - 6: Security Settings 4/4 Press OK to save the settings. Close all Microsoft Internet Explorer Windows and restart a new window. This will allow the new settings taking effect. ...
-
Page 18: Ip Finder
IP Finder works only in Microsoft Windows XP, Microsoft Windows Vista, and Microsoft Windows 7 or above. Steps to get the utility program running are listed below. Download IP Finder from MESSOA Website to the computer. Double click on IPFinder.exe in the IP Finder folder, and the IP Finder window should pop out. -
Page 19: Administration And Configuration
Administration and Configuration Live View Figure 4 - 1: First Login Page After accessing and login to the IP address of camera, the screen will be shown as the screenshot above. There’re 2 main options on the upper left side: “Live View” and “Configuration”. The upper right corner, on the other hand, indicates the current user level and the “Logout”... - Page 20 After clicking “Live View”, user will be led to a real-time live view image. The “Stream1, 2, 3” are available for user to switch among each stream configuration for better adaptation in varied applications, for which you may refer to the latter chapter “3.2.1 Encode”...
-
Page 21: Configuration
Configuration After clicking the “Configuration”, the screen will be shown as below with several menu options for users to configure on the left side. We will thoroughly introduce them one by one in the following chapters. Figure 4 - 3: Configuration 4.2.1 Encode Figure 4 - 4: Encode By default, there are up to 3 profiles to be selected from and each profile contains 3 streams individually for further... - Page 22 Table 4 - 2: Edit Profile & Stream Item Option Description In certain of the vertical oriented shape applications, e.g., sideway, aisle, corridor, because of the attribute that requires more details in vertical areas, the prevailed 16:9 aspect ratio is not that appropriate and large portion of bandwidth are wasted in landscape field of view.
- Page 23 Table 4 - 3: Correlations of Resolution/Streams/FPS/Codecs – NTSC/PAL Stream 1 (H.264/MJPEG) Stream 2 (H.264/MJPEG) Stream 3 (H.264/MJPEG) 800x600@30/25fps 800x600@30/25fps 2048x1536@30/25fps 640x480@30/25fps 640x480@30/25fps 1920x1080@30/25fps 640x360@30/25fps 640x360@30/25fps 1280x960@30/25fps 320x240@30/25fps 320x240@30/25fps 1280x720@30/25fps 320x176@30/25fps 320x176@30/25fps 800x600@30/25fps 800x600@30/25fps 640x480@30/25fps 640x480@30/25fps 640x360@30/25fps 640x360@30/25fps 800x600@30/25fps 320x240@30/25fps 320x240@30/25fps 320x176@30/25fps 320x176@30/25fps...
-
Page 24: Image
4.2.2 Image Exposure This section mainly allows user to control the settings pertaining to exposure mode and day night modes. Figure 4 - 5: Exposure Settings Basic Settings ● Exposure Mode There are 4 modes to select from as follows: •... - Page 25 ● DC Iris Control DC Iris Control, driven by electric currents, is one of the auto iris modes that help surveillance cameras amend its iris opening automatically to adapt into the environments with constant changes in light levels. There are 2 options below for selection: •...
- Page 26 Day Night Settings Figure 4 - 7: Day Night Switch Control Settings ● Day Night Switch Control – Mode Set Day Night mode from 3 options, Auto, Color and B/W. When Color mode is selected, the camera is forced to stay in Color mode permanently.
- Page 27 White Balance This section allows user to set the white balance values to meet ambient conditions for best color rendition. Figure 4 - 9: White Balance Settings ● Mode • Auto: it automatically controls color temperature ranging from 2500°K to 10000°K •...
- Page 28 Basic Setting Figure 4 - 10: Basic Settings ● Sharpness Increasing the sharpness value will sharpen the edges and small feature of viewing images. If the edges appear too smooth or blurred, increase the sharpness; otherwise, decrease the sharpness. Sharpness value can be set from 0 to 100. The 100 offers the sharpest image.
-
Page 29: Video
4.2.3 Video Privacy Zone Privacy Zone enables user to black out a specific portion of the screen for privacy concern. There are up to 8 sets of privacy zones for users to define. After setting up a privacy zone, the live view image will appear a frame, whose color, size and position can be customized by user’s preference. - Page 30 First, turn one of the Zone or both on and click and drag left button on the right-side preview image to outline a desired zone. Also, user can select a wanted level for each Zone. Press “Save” to make settings take effect. If you want to delete settings, click “Clean”...
-
Page 31: Network
4.2.4 Network General This section is for users to set detailed settings related to wired network condition for the camera. Figure 4 - 14: General Settings ● Basic Settings • Device Name: Input your preferred name for the camera. • HTTP Port: This protocol allows for TCP protocol quality without having to open specific ports for streaming. - Page 32 • IPv4 Default Gateway: Leave blank as default setting. No Default Gateway address required if not used. Ask your network administrator for further information. • Primary DNS: Same as the above. • Secondary DNS: Same as the above. • IPv6 Enable: Check the box to enable IPv6 protocol. •...
- Page 33 FTP Server FTP (File Transfer Protocol), transferring files via TCP-based network, e.g. Internet, is a generally standard protocol that is adopted to transmit computer files from one host to another. Figure 4 - 15: FTP Settings ● Enable Simply select “ON” from the dropdown menu and input a value ranging from 1025 – 65535 or 21 by default into the Port field to activate the FTP server function.
- Page 34 RTSP RTSP is a standard protocol for connecting a client to establish and control streaming data over the web. If you want to allow third-party devices or software to access video/audio streams from the IP camera over the network, you must configure the RTSP ports.
- Page 35 ● Multicast URL Differing from URL, Multicast URL can transmit data from one host to a single host or to all hosts, thus consuming less network bandwidth with more flexibility. However, it is required to make sure if the peripherals connected with the camera are all compatible with Multicast in advance.
- Page 36 SNMP SNMP (Simple Network Management Protocol) is an Internet standard protocol on top of application layer that restructures the exchange of management information among network-attached nodes, which helps administrators to remotely manage network devices and master network problems with ease. Figure 4 - 18: SNMP Settings ●...
- Page 37 802.1X 802.1X is an IEEE Standard for Port-based Network Access Control and defines the encapsulation of the Extensible Authentication Protocol (EAP) over IEEE 802 which is known as EAP over LAN. Simply select a desired EAP protocol type from the dropdown menu and further input its required subfields to complete setup. Figure 4 - 19: 802.1X Settings ●...
- Page 38 Firewall Under this menu, users can manually define several IP addresses to be allowed or denied to access camera. Figure 4 - 20: Firewall Settings ● Allow: Select this option to make inputted IP addresses allowed to access IP camera. ●...
- Page 39 DDNS Dynamic Domain Name Server (DDNS) is the system which can automatically update DSN records without further manual editing in a real time manner, therefore resulting in web address directing faster and smoother. Figure 4 - 21: DDNS Settings ● Basic Settings •...
- Page 40 Secure Sockets Layer (SSL), the standard security technology for establishing encryption, allows sensitive information such as login credentials to be transmitted securely. Figure 4 - 22: SSL Settings ● Self Signed Self-signed certificate is a private own key that has no connection with person or organization that perform authorized certificate signing procedure.
- Page 41 GB28181 This page relates to the standard protocol that conforms to the regulations of IP security surveillance data transmitting, transferring and monitoring within the PRC (People Republic of China) areas. Figure 4 - 25: GB28181 Settings ● Basic Settings • Enable: Check the box to enable the function.
- Page 42 RTMP RTMP (Real Time Messaging Protocol), which is developed and owned by Macromedia, is a specific protocol for streaming video, audio and data via internet for general use. Figure 4 - 26: RTMP Settings ● Basic Settings • Enable: Check the box to enable the function •...
-
Page 43: System
4.2.5 System Date & Time Figure 4 - 28: Date & Time Settings ● Current Server Time The current date/time is displayed here. ● Synchronization Mode There’re 3 modes for users to set date/time. • Sync With Manual: Manually set date and time individually. •... - Page 44 Firmware The information about the camera are explicitly written under this page. Also, users can manually update System Firmware if available. All motions of camera will be stopped during the firmware update. Please close any other screens before firmware update. Never disconnect power or LAN cable during the updating process. It takes approximately 3 minutes for the unit to reboot after firmware update process.
- Page 45 This section allows user to enable OSD (On Screen Display) settings. In addition, it extends the OSD function to accord with the occurrence of events. Figure 4 - 31: OSD Settings ● Basic Settings There are up to 2 sets of OSD settings can be enabled concurrently as the following details: •...
- Page 46 Event Search As an intelligent apparatus, the IP camera is capable of automatically detecting scores of events, motion, tamper, alarm detections, etc., and can provide user with offhand occurrences when happening. Consequently, the Event Search section is brought about to assist administrator to have detailed yet systematic analysis on each individual event with its type, counts and time.
-
Page 47: Account
4.2.6 Account Account Settings Figure 4 - 33: Account Management ● User Levels • Admin: The highest privileged control for the camera is “Admin” level, which can handle both live view and all the configuration settings. The default username and password for Admin are “admin” and “1234” respectively. •... - Page 48 ● Modify & Delete Users: Figure 4 - 35: Modify & Delete Admin/Operator/User • Delete: Choose one of the users from the list and then click “Delete” to remove it instantaneously. (The default Admin is not available to be deleted.) •...
- Page 49 LDAP For accessing and maintaining distributed directory information services over an Internet Protocol network, the Lightweight Directory Access Protocol (LDAP), an open, vendor-neutral, industry standard application protocol, have a major role in both intranet and internet applications to facilitate information sharing between devices. Figure 4 - 36: LDAP Settings ●...
-
Page 50: Event Source
4.2.7 Event Source Defocus This function is designed to establish related actions when the camera is subject to the event of defocus. Figure 4 - 37: Defocus Settings ● Basic Setting • Enable: Check the box to enable the function. ●... - Page 51 ● Arming Schedule Setting Under this section, user can freely set up an ideal combination to record defocus events. The following table includes 7 days a week from the upper Monday to the lower Sunday with the hour group from the left 00 to the right 24. Click the “Edit” button at the upper-left corner to enter the setting page.
- Page 52 Motion This function is designed to establish related actions when the camera detects motion issues. A maximum of 4 sets of motion detection areas can be customized by users. Figure 4 - 40: Motion Detection Settings ● Motion Zone Area Setting •...
- Page 53 ● Arming Schedule Setting Under this section, user can freely set up an ideal combination to record motion events. The following table includes 7 days a week from the upper Monday to the lower Sunday with the hour group from the left 00 to the right 24. Click the “Edit” button at the upper-left corner to enter the setting page.
- Page 54 Network This function is designed to establish related actions when the camera is subject to network conflict or network lost events. Figure 4 - 43: Network Event Settings ● Wire Network Issues • Network Lost: Check the box to enable the detection of network lost. When the camera loses internet access, the network lost event will be detected and recorded.
- Page 55 Schedule This function is designed to establish related actions for schedule recording. Figure 4 - 44: Schedule Recoding Settings ● Basic Setting • Enable: Check the box to enable schedule recording function. • Mode: » Regular: It stands for schedule will be proceeded with, when enabled, regularly based on the trigger interval settings.
- Page 56 ● Arming Schedule Setting Under this section, user can freely set up an ideal combination for schedule recording. The following table includes 7 days a week from the upper Monday to the lower Sunday with the hour group from the left 00 to the right 24. Click the “Edit” button at the upper-left corner to enter the setting page.
- Page 57 Tamper This function is designed to establish related actions when the camera is subject to tamper events. Figure 4 - 47: Tamper Detection Settings ● Basic Setting • Enable: Check the box to enable the tamper detection. • Sensitivity: Set the sensitivity for tamper detection. High stands for that camera is prone to be triggered with slight tamper issue, while Low means that camera is triggered with only major tamper issue.
- Page 58 ● Arming Schedule Setting Under this section, user can freely set up an ideal combination to record tamper events. The following table includes 7 days a week from the upper Monday to the lower Sunday with the hour group from the left 00 to the right 24. Click the “Edit” button at the upper-left corner to enter the setting page.
- Page 59 mSD Healthness This function is designed to establish related actions when the inserted micro SD card is suffering from unexpected failed events or running out of sufficient storage space. Figure 4 - 50: Msd Healthness Settings ● Micro SD Card Events •...
-
Page 60: Video Analytics
4.2.8 Video Analytics VA (Video Analytics) comprises the proprietary algorithm to perform intelligent video analysis, e.g., to detect intrusion or loitering within defined zone from suspicious objects, or to count people and traffic flow by designated line deployment. It is especially practical to monitor certain alert areas or key zones that helps administrator not need to keep staying in front of the monitor by recording only critical scenes where events happen to facilitate interoperability and largely reduce required recording storage for surveillance camera. - Page 61 Line Counting This function is designed to count the moving objects that passed through the designated line defined by users. The ideal applications for this function, for instance, can be an entrance of a shopping mall or exit of a department store. Also, it can be applied to count the traffic flow of an intersection.
- Page 62 Border Line This function is designed to establish borderlines to guard certain alerted zones within the camera coverage. For example, administrator can assign multiple lines bordering the area where a critical coffer is located to efficiently monitor any suspect person crossing the borderlines deployed. Figure 4 - 54: Borderline Settings ●...
- Page 63 Figure 4 - 55: Border Line Performance On Live View ● Performance Switch to the Live View page and select “Border Line” from the dropdown menu on the lower left. When there’s a moving object crossing the designated line as the above image, both the crossed borderline and the rectangular frame enclosing the moving object are highlighted with red color for distinctive identification.
- Page 64 Figure 4 - 57: Arming Schedule Setting Page Note Please click “Save” button to save your settings.
- Page 65 Loitering This function is designed to intelligently keep an eye on suspect objects that enter and linger for a certain period within the alerted area defined by administrator. It is practical to monitor key zone without paying extra human resources to keep vigil in front of monitor 24/7.
- Page 66 Figure 4 - 59: Loitering Performance On Live View ● Performance Switch to the Live View page and select “Loitering” from the dropdown menu on the lower left. When there’s a moving object traveling into and lingering within the designated zone over a certain period of time defined by administrator as the above image, the rectangular frame enclosing the suspect object is highlighted with red color for distinctive identification.
- Page 67 Figure 4 - 61: Arming Schedule Setting Page Note Please click “Save” button to save your settings.
- Page 68 Intrusion Different from Border Line in partial ways, Intrusion is a function where administrator can assign an irregular shape (octagonal form at the maximum) to fence off any suspicious object from entering. In certain scenarios, administrator can effortlessly have a well command of critical zone and receive prompt warning once any object trespasses the defined critical zone in a real-time manner.
- Page 69 Figure 4 - 63: Intrusion Performance On Live View ● Performance Switch to the Live View page and select “Intrusion” from the dropdown menu on the lower left. When there’s a moving object trespassing into the designated critical zone defined by administrator as the above image, both the rectangular frame enclosing the suspect object and the defined zone are highlighted with red color for distinctive identification.
- Page 70 Figure 4 - 65: Arming Schedule Setting Page Note Please click “Save” button to save your settings.
-
Page 71: Event Setting
4.2.9 Event Setting Email This section is designed to set up detailed settings for email notification when events occur. Make sure you have enabled email sending function in each event section in advance. Figure 4 - 66: Email Record Setting ●... - Page 72 Figure 4 - 67: Email Address List • Check “Enable” to send email to the selected address. • Email Address: Input an email address to which events will be sent. There’re maximum 10 email addresses can be defined here. Note Please click “Save”...
- Page 73 This section is designed to set up detailed settings for FTP image storing when events occur. Make sure you have enabled FTP function in each event section in advance. Figure 4 - 68: FTP Settings ● Basic Setting • Server Address: Input a FTP server address. •...
- Page 74 Record Setting This section is designed to set up detailed settings for video recording. Make sure you have enabled recording function in each event section in advance. Figure 4 - 69: Record Setting ● Basic Setting • Record Type: Choose which record type to be adopted: »...
- Page 75 SD Card This section is designed to set up detailed settings for Edge Recording when events occur. Make sure you have enabled Edge Record function in each event section to activate this function. Figure 4 - 70: SD Card Setting ●...
- Page 76 Snapshot This section is designed to set up detailed settings for snapshot capture when events occur. Make sure you have enabled Snapshot function in each event section in advance. Figure 4 - 71: Snapshot Setting ● Basic Setting • Pre Event Capture Count: Set a number of snapshots to be captured prior to an event. •...
-
Page 77: Appendix: Specifications Of Ir Bullet Network Camera
Appendix: Specifications of IR Bullet Network Camera Video Sensor Type 1/2.8" image sensor optimized for low-light performance Active Pixels 2065 x 1553 (HxV) Compression H.264 / Motion JPEG Streaming Triple simultaneous streams Resolution 3MP(2048x1536), Full HD 1080P, 1.3MP(1280x960), HD 720P to 320x176 Max. - Page 78 140°F) Storage Temperature Regulatory CE, FCC, RoHS Approvals Order Information NTSC: NCR376-N1-MES; Model No. PAL: NCR376-P1-MES Cable Mangement Wall Mount: SAB023 Accessory 1. Memory card not included. 2. No memory card slot & local storage function for Argentina and Ecuador.
Need help?
Do you have a question about the NCR376 and is the answer not in the manual?
Questions and answers