Advertisement
QUICK START GUIDE
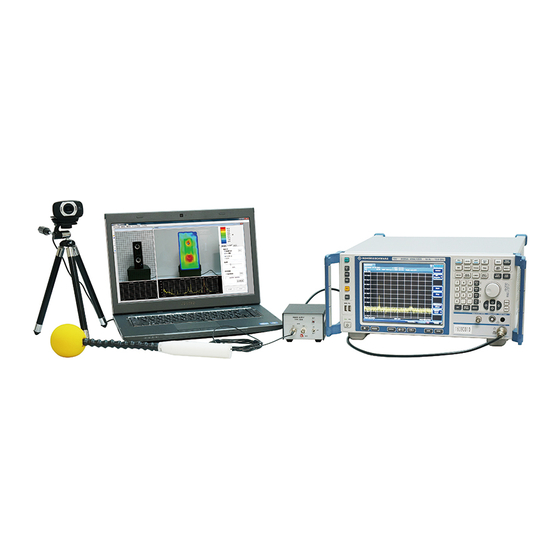
Sound Source Visualization System
EPS-02Sv2
NOISE LABORATORY CO., LTD.
Edition 2.00
AEA00098-00E-1
Contents
1. INTRODUCTION
2. INCLUDED ITEMS
3. SYSTEM REQUIREMENTS
4. SETUP MEDIA CONTENTS
5. SETUP PROCEDURE
NOTICE
•
The content of this guide is subject to change without prior notice.
•
The reproduction or transfer of this guide in any form whatsoever is
prohibited without the prior written permission of the Noise Laboratory
Co., Ltd. (NoiseKen).
•
Please contact NoiseKen if you find any unclear points, errors,
omissions, or other inconsistencies.
•
NoiseKen will not be liable for any damages that occur due to improper
usage of this product by the customer, failure to follow the information
in this product manual, or repair or modifications performed by a third
party other than NoiseKen or a party designated by NoiseKen.
The trademarks and company names appearing in this guide are
•
trademarks or registered trademarks of their respective companies. In
this guide, the trademark symbol (TM) and registered symbol (R) are
omitted.
1. INTRODUCTION
1
Thank
you
for
purchasing
the
EPS-02Sv2
1
Visualization System. The setup procedure is described below.
2
Also, please read this guide together with the instruction manual in
2
the setup media.
3
4
2. INCLUDED ITEMS
Before starting use, check that the parts and accessories below are
included with the product.
A
B
D
E
G
H
J
K
M
N
A: Sound pressure sensor (Microphone)
・
Main Part · · · · · · · · · · · · · · · · · · · · · · · · · · · · · · · · · · · · · · · · · · · · · · · · 1
・
Sensor cover (yellow/red/blue) · · · · · · · · · · · · · · · · · · · · · each 1
1
・
Data sheet · · · · · · · · · · · · · · · · · · · · · · · · · · · · · · · · · · · · · · · · · · · · · · · 1
B: Microphone power supply
・
Main Part · · · · · · · · · · · · · · · · · · · · · · · · · · · · · · · · · · · · · · · · · · · · · · · · 1
・
AC adapter · · · · · · · · · · · · · · · · · · · · · · · · · · · · · · · · · · · · · · · · · · · · · · 1
・
Manual · · · · · · · · · · · · · · · · · · · · · · · · · · · · · · · · · · · · · · · · · · · · · · · · · · · 1 set
・
Battery · · · · · · · · · · · · · · · · · · · · · · · · · · · · · · · · · · · · · · · · · · · · · · · · · · · 2
C: Web camera
・
Main Part · · · · · · · · · · · · · · · · · · · · · · · · · · · · · · · · · · · · · · · · · · · · · · · · 1
・
Warranty · · · · · · · · · · · · · · · · · · · · · · · · · · · · · · · · · · · · · · · · · · · · · · · · · 1
D: USB protect key · · · · · · · · · · · · · · · · · · · · · · · · · · · · · · · · · · · · · · · · · · · 1
E: BNC coaxial cable (3 m) · · · · · · · · · · · · · · · · · · · · · · · · · · · · · · · · 1
F: BNC-N coaxial cable (1.5 m) · · · · · · · · · · · · · · · · · · · · · · · · · · · 1
G: LAN cable (2 m) · · · · · · · · · · · · · · · · · · · · · · · · · · · · · · · · · · · · · · · · · · · 1
H: USB extension cable (2 m) · · · · · · · · · · · · · · · · · · · · · · · · · · · · · 1
I: Camera tripod
・
Main Part · · · · · · · · · · · · · · · · · · · · · · · · · · · · · · · · · · · · · · · · · · · · · · · · 1
Sound
Source
・
Storage bag · · · · · · · · · · · · · · · · · · · · · · · · · · · · · · · · · · · · · · · · · · · · · 1
・
Manual · · · · · · · · · · · · · · · · · · · · · · · · · · · · · · · · · · · · · · · · · · · · · · · · · · · 1
J: Setup media (EPS-02Sv2) · · · · · · · · · · · · · · · · · · · · · · · · · · · · · · 1
K: Japanese Quick Start Guide · · · · · · · · · · · · · · · · · · · · · · · · · · 1
L: English Quick Start Guide (This guide) · · · · · · · · · · · · · 1
M: Storage case · · · · · · · · · · · · · · · · · · · · · · · · · · · · · · · · · · · · · · · · · · · · · 1
* The key of C, J, K and L are included in the upgrade version.
* The key of D, J, K and L are included in the secondary license
C
version.
3. SYSTEM REQUIREMENTS
Check the following system requirements before setup.
F
OS
Microsoft Windows 10 (Japanese / English version)
Microsoft Windows 11 (Japanese / English version)
CPU
Dual Core 2.4 GHz or faster recommended
Memory
8 GB or more recommended
Storage
5 GB or more
Display
1366 × 768 dots or more
I
1920 × 1080 dots recommended
・
Other
Operation cannot be guaranteed when using
online storage or software that uses cloud
services.
・
2 empty USB ports
L
* A DVD drive is required for installation.
* If software with high CPU utilization is running, the operation may
become unstable.
* Refer to the manufacturer's website for the latest operation warranty
of each device such as camera.
4. SETUP MEDIA CONTENTS
The contents of the setup media are as follows.
(1)
EPS-02Sv2 folder
The EPS-02Sv2 installers are stored.
(2)
JSP USB folder
The USB protect key drivers are stored.
(3)
MANUAL folder
The PDF files of the instruction manual for this product are stored.
(4)
NI-VISA folder
The NI-VISA installer is stored.
Log on to Windows with an ID that has administrator privileges and
follow the steps below to setup.
<In the case of upgrade version>
Follow steps (1) and (4) to upgrade. It is not necessary to uninstall the
EPS-02S software beforehand. When the EPS-02S software is not
needed, uninstall it using "Uninstall or change a program" in "Control
Panel".
(1)
Network Address Setting (when connecting with a LAN cable)
①
Set the IP address of the PC. From the "Control Panel",
select "Network and Sharing Center", and click "Change
adapter settings" from the list on the left side.
②
The adapters that can be connected to the network are
displayed. Double-click the adapter (local area connection)
that is connected to the spectrum analyzer to display its
properties. Select "Internet Protocol Version 4" and click
"Properties".
③
Set the IP address to "192.168.99.3" and the subnet mask
to "255.255.255.0", and click OK. This completes the IP
address setting of the PC.
④
Set the IP address of the spectrum analyzer. For details on
the spectrum analyzer settings, refer to the instruction
manual of the spectrum analyzer. Set the IP address to
"192.168.99.100" and the subnet mask to "255.255.255.0".
(2)
Installation of NI-VISA
①
Insert the setup media into the DVD drive and open the
[NI-VISA] folder. Execute [Install.exe].
②
The installation program will start. Follow the instructions on the
screen to install. When installing, make sure that the
installation items include NI-VISA.
(3)
Installation of the EPS-02Sv2 software
①
Insert the setup media into the DVD drive and execute
[EPS-02Sv2_En.msi] in the [EPS-02Sv2]-[English] folder.
②
The installation program will start. Follow the instructions on the
screen to install.
* If a previous version of EPS-02Sv2 software is already installed,
uninstall it before performing the installation.
(4)
Installation of the USB protect key driver
①
Insert the USB protect key into the USB port of the PC.
②
Select "unknown devices" or "HardKey" of "other devices" in
Device Manager and install the driver. The driver file is located
in the [JSP USB] folder of the setup media.
2
5. SETUP PROCEDURE
3
Advertisement
Table of Contents

Related Manuals for NoiseKen EPS-02Sv2


Summary of Contents for NoiseKen EPS-02Sv2
- Page 1 4. SETUP MEDIA CONTENTS J: Setup media (EPS-02Sv2) · · · · · · · · · · · · · · · · · · · · · · · · · · · · · · 1 the setup media.
- Page 2 Noise Laboratory or your nearest sales agent of Noise Laboratory. NOISE LABORATORY CO., LTD. 1-4-4, Chiyoda, Chuo-ku, Sagamihara City, Kanagawa Pref., 252-0237, Japan TEL: +81-(0)42-712-2051 FAX: +81-(0)42-712-2050 URL: http://www.noiseken.co.jp Printed in Japan...
Need help?
Do you have a question about the EPS-02Sv2 and is the answer not in the manual?
Questions and answers