
Related Manuals for Heinner HDW-BI6093TE++


Summary of Contents for Heinner HDW-BI6093TE++
- Page 1 DISHWASHER HEINNER HDW-BI6093TE++ Model: HG-150SS • Dishwasher • Number of place settings: 15 • Number of programs: 9 • Energy class: E...
- Page 2 Thank you for purchasing this product! INTRODUCTION Before using the appliance, please read carefully this instruction manual and keep it for future reference. This instruction manual is designed to provide you with all required instructions related to the installation, use and maintenance of the appliance.
-
Page 3: Safety Instructions
III. SAFETY INSTRUCTIONS Safety Information When you take delivery of your machine • Check for any damage to your machine or to its packaging. Never start a machine damaged in any way, make sure to contact an authorised service. - Page 4 • This appliance is not intended for use by persons (including - children) with reduced physical, sensory or mental capabilities, or lack of experience and knowledge, unless they have been given supervision or instruction concerning use of the appliance by a person responsible for their safety.
-
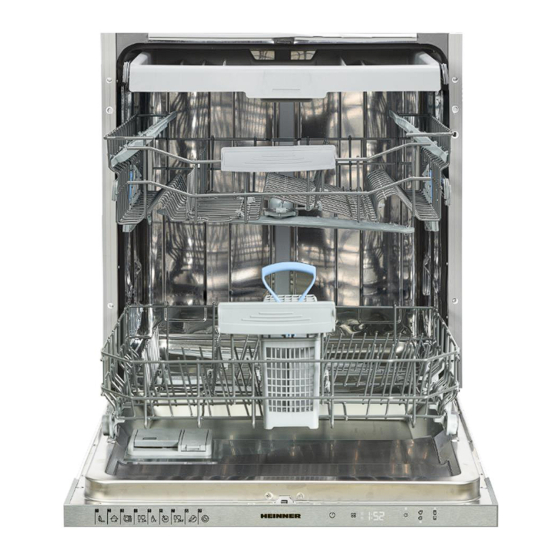
Page 5: Product Description
IV. PRODUCT DESCRIPTION 1. Upper basket with racks 2. Upper spray arm 3. Lower basket 4. Lower spray arm 5. Filters 6. Rating plate 7. Control panel 8. Detergent and rinse-aid dispenser 9. Cutlery basket 10. Salt dispenser 11. Upper cuttlery basket 12. - Page 6 Technical specifications Capacity 15 place settings Height 820 mm Width 598 mm Depth 550 mm Net Weight 42.7kg Electricity input 220-240 V, 50 Hz Total Power 1900 W Heating Power 1800 W Pump Power 100 W Drain Pump Power...
-
Page 7: Installation
INSTALLATION Machine positioning When positioning the machine, place it in an area where dishes can be easily loaded and unloaded. Do not put the machine in an area where the ambient temperature falls below 0°C. Read all warnings located on the packaging before removing the packaging and positioning the machine. - Page 8 Drain hose Connect the water drain hose directly to water drain hole or to the sink outlet spigot. This connection should be minimum 50 cm and maximum 110 cm from flor plane. IMPORTANT: Items will not wash properly if a drain hose longer than 4 m is used.
-
Page 9: Before Using The Appliance
VI. BEFORE USING THE APPLIANCE Preparing your Dishwasher for first use • Check whether the electricity and supply water specifications match the values indicated in the installation instructions for the machine. • Remove all packaging materials inside the machine. - Page 10 Testing strip (it’s not provided in product package) The washing effectiveness of your machine depends on the softness of the tap water. For this reason, your machine is equipped with a system that reduces the hardness in mains water supply.
- Page 11 Keep your detergents in cool, dry places out of reach of children. You can find powder, gel, and tablet detergents in the market that have been designed for household dishwashers. Detergent should be put into the compartment prior to starting the machine. Keep your detergents in cool, dry places out of reach of your children.
- Page 12 Recommended usage: If you want to obtain better results while using combined detergents, add salt and rinse aid into your machine and adjust the water hardness setting and the rinse aid setting to the lowest position. Solubility of the tablet detergents produced by different companies can vary depending on the temperature and time.
-
Page 13: Loading Your Dishwasher
VII. LOADING YOUR DISHWASHER For best results, follow these loading guidelines. Loading the household dishwasher up to the capacity indicated by the manufacturer will contribute to energy and water savings.. Manual pre-rinsing of tableware items leads to increased water and energy consumption and is not recommended. - Page 14 Height adjustment he upper basket includes a mechanism which enables the height of the basket to be adjusted up (1) or down (2) without having to remove the basket. Hold the basket on both sides and pull it up or push it down, ensuring both sides of the upper basket arein the same position.
- Page 15 Alternative Basket Loads Lower Basket Top Basket Incorrect Loads Incorrect Loads Incorrect loading can cause poor washing and drying performance. Please follow the manufacturer's recommendations for a good performance result.
-
Page 16: Programme Table
VIII. PROGRAMME TABLE Program Smart 60°C - 70°C Smart 50°C - 60°C Smart 30°C - 50°C Hygiene 70°C Name: Standard program Auto program for Auto program for Auto program for Suitable for for normally soiled heavily soiled normally soiled... - Page 17 Program Name: Super 50’ Delicate 40°C Quick 30’ Mini 14’ Suitable for normally Fastest program for Suitable for lightly soiled Suitable for lightly soiled soiled daily dishes with lightly soiled and delicate dishes. dishes and quick wash. Type of Soil: faster program.
-
Page 18: Control Panel
IX. CONTROL PANEL On/Off touch button Programme touch button Display Delay touch button Extra Rinse touch button Half Load touch button Extra Dry touch button Salt lack warning indicator Rinse Aid lack warning indicator On/Off Touch Button Turn the machine on by pressing On/Off button. When machine is on, "--" will be shown on the Display (3). - Page 19 Extra Rinse touch button If Extra Rinse option is selected, washing- rinsing steps will be added into the selected program, so you can ensure that your dishes will be extracted cleaner and glosser. Half Load Touch Button Press the Half Load button to select the area of the dishwasher that contains the dishes to be washed.
- Page 20 NOTE: When the door is opened after the selected wash programme is complete, a buzzer will sound and ‘0’ will be shown on the Display (3). Switching the Machine Off When the selected wash programme is complete, a buzzer will sound 5 times. You can then turn your machine off by using the On/Off touch button (1).
-
Page 21: Cleaning And Maintenance
X. CLEANING AND MAINTENANCE Cleaning the machine in regular intervals prolongs the machine’s service life. Make sure that the water softening setting (If available) is done correctly and correct amount of detergent is used to prevent limescale accumulation. Refill the salt compartment when the salt sensor light comes on. - Page 22 Spray arms Make sure that the spray holes are not clogged and that no food waste is stuck to the spray arms. If there is any clogging, remove the spray arms and clean them under water. To remove the upper spray arm undo the nut holding it in position by turning it clockwise and pulling it downwards.
-
Page 23: Troubleshooting
XI. TROUBLESHOOTING FAULT POSSIBLE CAUSE TROUBLESHOOTING Your Dishwasher is not plugged in. Plug your Dishwasher in. Switch your Dishwasher on by pressing the On/Off Your Dishwasher is not switched on. button. Fuse blown. Check your indoor fuses. The programme does not start. - Page 24 FAULT POSSIBLE CAUSE TROUBLESHOOTING Use the correct amount of detergent, as instructed in the programme Not enough detergent used. table. Rinse aid dosage and/or Increase rinse aid and/or water softener level. Whitish stains remains on dishes. water softener setting set too low.
- Page 25 AUTOMATIC FAULT WARNINGS AND WHAT TO DO TROUBLE CODE POSSIBLE FAULT WHAT TO DO Make sure the water inlet tap is open and water is flowing. Separate the inlet hose from the tap and clean the filter of the hose.
- Page 26 If one of program monitor lights is on and start/Pause light is on and off Your machine’s door is open, shut the door. If the programme won’t start ➢ Check if the plug is connected. ➢ Check your indoor fuses.
-
Page 27: Practical Information
XII. PRACTICAL INFORMATION 1. When the machine isn’t in operation: • Disconnect the plug and close the tap. • Leave the door slightly open to prevent odour formation. 2. Select the dry option to remove water droplets. 3. Place dishes in the machine properly to achieve the best energy consumption, washing and drying performance. - Page 28 CUSTOMER CARE AND SERVICE Always use original spare parts. When contacting our Authorised Service Centre, ensure that you have the following data available: Model and Serial Number. The information can be found on the rating plate. Subject to change without notice.
- Page 29 Environment friendly disposal You can help protect the environment! Please remember to respect the local regulations: hand in the non-working electrical equipment’s to an appropriate waste disposal center. HEINNER is a registered trademark of Network One Distribution SRL. Other brands and product names are trademarks or registered trademarks of their respective holders.
Need help?
Do you have a question about the HDW-BI6093TE++ and is the answer not in the manual?
Questions and answers