Table of Contents
Advertisement
Quick Links
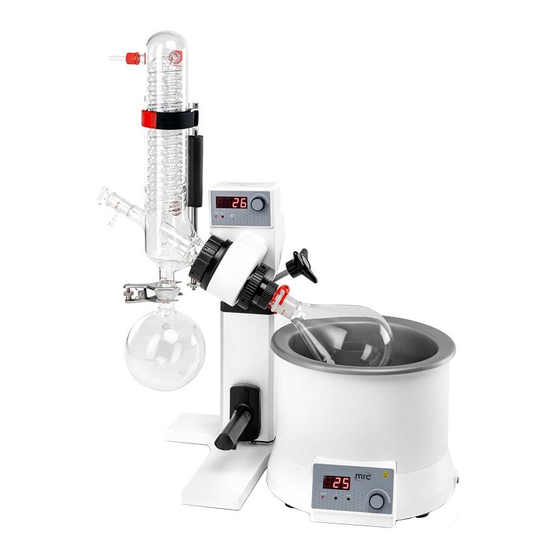
LED Digital Rotary Evaporator
Operation Instructions
ROVA-100S LED Digital Rotary Evaporator
Please carefully read the Instructions, and use
the product safely under the direction of the
Instructions.
If any information of shapes and performance
indicators changes, we will not notify this
otherwise.
MRC. 1.23
Advertisement
Table of Contents

Related Manuals for MRC ROVA-100S


Summary of Contents for MRC ROVA-100S
- Page 1 LED Digital Rotary Evaporator Operation Instructions ROVA-100S LED Digital Rotary Evaporator Please carefully read the Instructions, and use the product safely under the direction of the Instructions. If any information of shapes and performance indicators changes, we will not notify this otherwise.
- Page 2 Disclaimer The intellectual property right on the manual belongs to MRC Laboratory • Instruments Limited (hereinafter referred to as “the Company”), i.e. relevant copyright belongs to the company. Products of the company are under the patent protection countries and •...
- Page 3 If any information of the manual changes, we will not notify this otherwise. • The manual and any content of it must not be copied, abstracted or modified • in any form without the company’s written approval in advance.
-
Page 4: Table Of Contents
Contents Introduction ......................1 How to acquire help ....................1 Warranty ....................... 1 1.Safety notes ....................... 2 2.Scope of application ..................8 3.Inspection ......................9 3.1 Open-package inspection ................9 3.2 Package list ..................... 10 4.Control and display ..................11 4.1 Control ..................... -
Page 5: Introduction
Introduction Welcome to use the Operating Instructions of Rotary Evaporator. Users are advised to read carefully this manual before using this instrument, operate the instrument according to the instructions contained herein and be aware of all precautions. How to acquire help If you encounter any problems or need help while installing or using this instrument, please immediately contact the After-sales Service Department of the manufacturer / supplier. -
Page 6: Safety Notes
warranty does not cover any performance degradation of or damage to the instrument due to incorrect installation or operation, unauthorized disassembly or repair or any other violations of the operating instructions contained herein. If any related problem described in the terms of warranty occurs, please contact the manufacturer / supplier. - Page 7 - Splatter of liquids - Fly-out of parts - Contamination of human body, hair or clothes by splattered substances Warning! Inhale of contact with toxic liquids, gases, spatters, vapor, dust, • biological or microbiological medium might cause damage to the operator. Place the instrument on a stable, clean, antiskid, dry &...
- Page 8 Note the danger caused by the following circumstances: • - Flammable substance - Flammable low-boiling-point medium - Breakage of glass component Warning! Never distill or heat any substance whose ignition point is lower than • the temperature set for the safety of the heating bath. The heating bath’s safety temperature shall at least 25 °C lower than the •...
- Page 9 Only use of the accessories in the list of “optional accessories” can guarantee • the operational safety. Please refer to the operating instructions for heating kettle. • Please refer to the operating instructions for optional accessories. • Please use this instrument in a closed fume hood or other suitable protective •...
- Page 10 The glass assembly’ design pressure tolerance is 10mbar. The venting valve • (see the part of “Testing”) must be opened before heating and once again after cooling. When performing vacuum distillation, the steam must be condensed before release or released safely. If the residue after distillation is likely to be decomposed when exposed to oxygen, please add only gas for stress release into it.
- Page 11 cool down. Note: be careful to avoid boiling delay! When the instrument is not started up • and rotated, never heat the evaporating flask! Sudden appearance of foams or gases indicates that the medium inside the evaporating flask begins decomposing. Please immediately shut down the heating bath and lift the evaporating flask above the heating bath, keep the surrounding danger area well ventilated and inform surrounding personnel.
-
Page 12: Scope Of Application
be started up. The power supply to the instrument will be disconnected only when the • instrument is turned off or the power plug is pulled off. The power socket must be easy to operate. • The actual supply voltage must be consistent with the voltage specified on the •... -
Page 13: Inspection
manufacturer, which may be used for: Rapid softening of distilled liquid • Distillation of solutions or suspensions • Crystallization, synthesis or cleaning of chemicals • Drying of powder or particulate substances • Recovery of solvents • This instrument is intended for use in the following environment: Altitude: ≤2,000m ASL;... -
Page 14: Package List
supplier or manufacturer. Caution: 1. If you find any visible damage on the product, please don’t connect the product to power supply. 3.2 Package list Name Qty. Main unit Heating bath Power cable Vertical glass assembly Operating manual Table 1... -
Page 15: Control And Display
4.Control and display 4.1 Control Fig. 1 Fig. 2... - Page 16 Fig. 3 Adjustment display knob Forward and reverse rotation Forward interval setting button Reverse indicator indicator Fig. 4...
- Page 17 Temperature adjustment knob Heating Water mode indicator indicator Oil mode indicator Fig. 5 Name Description LED display Indicates the current working status and parameter setting. Forward indicator The indicator is on when the instrument is in the state of forward rotation only Reverse indicator The indicator is on when the instrument is rotating forwardly and reversely in turn...
- Page 18 Adjustment knob Turn the knob clockwise to increase the parameter and counterclockwise to decrease the parameter Press this key to start / stop the instrument Water mode The indictor is on when the heating bath is in the water bath indicator mode Oil mode indicator...
-
Page 19: Display
4.2 Display After the main unit is turned on, the interface is on and indicates the real-time speed: Fig. 6 This interface indicates the real-time speed. Turn the adjustment knob to set the speed and press the adjustment knob to start the instrument. The rotation speed can be changed by turning the adjustment knob while the instrument is in operation. - Page 20 display. When the heating bath is turned on, water mode is the default mode, the water mode indicator is on and the interface is on, indicating the real-time temperature: Fig. 8 Turn the temperature adjustment knob to set the target temperature of the heating bath.
-
Page 21: Installation And Testing
Fig. 10 5.Installation and testing 5.1 Installation Fig. 11 Place the main unit on a flat tabletop and squeeze the handle switch (a) to lift • it to the highest position. - Page 22 Fig. 12 Tighten the screw (b) by hand, adjust the angle of the motor head and tighten • the rotating head locking nut (c) to prevent accidental rotation. Fig. 13 Rotate the locking device (d) (Fig. 13) by 60° counterclockwise to mount the •...
- Page 23 Mount the seal ring (Fig. 14 and Fig. 15) • Fig. 14 Fig. 15 Mount the condenser (f) (Fig. 16 and Fig. 17) • Slide the locking nut (g) and pressure spring (h) onto the condenser. Screw down the locking nut (g) by hand...
- Page 24 Fig.16 Fig.17 Mount the fixing device for the vertical condensation glass assembly (Fig. 18) • Fig. 18 Piping connection (Fig. 19) •...
-
Page 25: Testing
Fig. 19 Note: To ensure good sealing performance, each glass ground joint may be coated with a layer of sealing grease. 5.2 Testing Check that whether working voltage specified on the nameplate matches with • power network voltage Power socket should be grounded properly •... - Page 26 and reverse rotation interval time. If set to “0”, the instrument only rotates forward. Press the temperature adjustment knob for several seconds to switch between • the water and oil bath modes. Turn the temperature adjustment knob to set the target temperature (up to 90℃ •...
-
Page 27: Fault Diagnosis
6.Fault diagnosis The instrument’s digital tube is not on when the power switch is turned on • Check that whether the connection of power line is firm. Check that whether power fuse is damaged or loose. ERR 001, indicating driving motor overcurrent. •... -
Page 28: Maintenance And Cleaning
7.Maintenance and cleaning Operate and maintain the product properly, so that it is in a good working state, which can extend the service life of the product. In routine service, keep the product dry and clean, remove the spilled liquid quickly, clean the outer surface with a non- grinding cleaner, and do not connect the power supply until all surfaces are dry. - Page 29 the manufacturer / supplier that the method will not damage the instrument. When cleaning the product, please wear suitable protective gloves. Cautions: The electronic device cannot be cleaned with detergent. • The instrument to be repaired must be cleaned while the •...
-
Page 30: Relevant Standards
8.Relevant standards The product structure conforms to the following safety standard: EN 61010-1 UL 3101-1 CAN/CSA C22.2(1010-1) EN 61010-2-10 The product structure conforms to the following EMC standard: EN 61326-1 Conforming to the following EU standards: EMC standard: 89/336/EWG Mechanical design standard: 73/023/EWG... -
Page 31: Technical Parameters
9.Technical parameters Item Main unit Heating bath Voltage [VAC] 100-240 200-240/100-120 Frequency [Hz] 50/60 50/60 Power [W] 1010 Motor DC brushless Speed range [rpm] 20-200 Display Temperature range [℃] Room temperature - Temperature control accuracy [℃] ±1(oil ±3) Lifting method Manual Lifting travel [mm] Forward... - Page 32 Allowable RH DIN EN60529 protection class IP20...
Need help?
Do you have a question about the ROVA-100S and is the answer not in the manual?
Questions and answers