Advertisement
Quick Links
Advertisement

Subscribe to Our Youtube Channel
Related Manuals for MRC PGI-550H


Summary of Contents for MRC PGI-550H
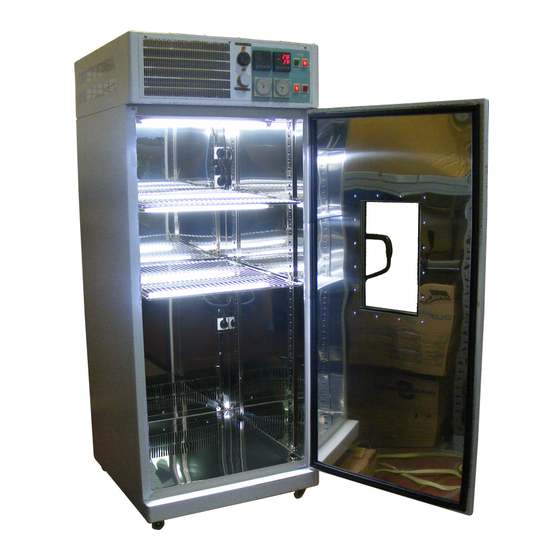
- Page 1 Growth Chamber USER'S MANUAL PGI-550H/RH/V - 1 -...
- Page 2 CONTENTS 1.Name Plate Power ……………………4 2.Instruction Manual …………………5 2.1 POWER …………………………5 2.2Temp. Control Operation …………………6 …………………7 3.2-1 Temp. Setting ……………………8 3.2-2 2.3 Timer Control Operation …………………9 3.3-1 Temp Timer Setting 3.3-2 Lamp Timer Setting 2.4 Over heat/low warning lamp …………9 3.Trouble shooting for temperature controller …10 4.Maintenace &...
- Page 3 1. Panel Key Description 1.1 Main Power Switch: Turn on/off main power Cooling switch :Turn on to start compressor Temp Timer Switch:Turn on/off Temperature Timer Lamp Timer Switch: Turn on/off the lamp Timer Day/Night Temp. Control :Display setting and actual temperature for day or night 1.6 Humidity : Display setting and actual humidity 1.7Humidity Power: Turn on/off Humidity 1.8 Over heat alarm lamp and knob...
-
Page 4: Humidity Control
1.9 Over low alarm lamp and knob 2.Operation Manual POWER 1.1 Check the working voltage is □110V/60Hz or □220/50Hz After confirming the working voltage is correct, insert the power cord to socket Turn on the power, the present temperature will display on the temperature control; PV is the actual temperature of inner box;... - Page 5 Controller board for Tem. & Humidity: Micro-Computer 1. PV: Instruction Temp. Light for inside chamber. 2. SV: Temperature setting. 3. OUT: Output controller signal light. 4. AT: Micro-auto calculate function light 5. SET: Change setting parameter. 6. SHIFT: Change column for setting Temp. or RH. (Hundred digit, Ten digit, units digit and decimal point) 7.
- Page 6 □ TEMP. □HUMIDITY CONTROL OPERATION 1. Turn on POWER switch (110V or 220V 50/60Hz): Operation: 1. Press SET button and SV light will be flashed 2. Shift (Use up▲ or down▼ to set temp.) 3. Press SET button when temp. setting complete 4.
- Page 7 3. AT: automatic perform pre-setting data. (You may use this function when the temp. is unstable or with big temp. difference) Operation: 1. Press SET after 5 seconds and show AL1 or AL2. 2. Press SET again and show ∩ ∪...
- Page 8 Actually temp. 37℃, display on 36.9℃, pb value deduct 0.1 Notice: Please do not change any parameter value to avoid affected the machine function. 4.NIGHT TEMPERATURE CONTROL If you want to use this function of “DAY NIGHT TEMPERATURE TIMER” at the same time, please turn on the function of “TEMP.TIME SWITCH”...
-
Page 9: Lamp Timer
different temperatures), you can chose the “AUTO” timing position, dialing out the red area of the required nighttime and dialing inward the daytime, then complete the setting 8.LAMP TIMER The “LIGHT TIMER” could be set for 24 house day and night lighting time according to the required time. - Page 10 - 10 -...
- Page 11 - 11 -...
-
Page 12: Troubleshooting
3.Troubleshooting Temp. Control System troubleshooting Conditions Cause Solutions Switch on power, indication light a. no current input a. check power supply system doesn’t light b. loose socket b. plug firmly or replace socket c. unstable voltage input c. check power, stop using d. - Page 13 Temperature tolerance is large a. Temperature is unstable a. suspend for 30 minus b. P、I、D value is not set or not b. Re-calculating AT correct automatically c. Temperature is setting is too close to room temperature c. Add cooling system or dropping d.
- Page 14 (electric AL1) d. over humidity setting, lock (electric type) d. reset e. no water, float water lever insufficient e. fill water f. water bath not deep f. clean & maintenance Humidity going up a. humidity control, output signal break a. ask for repair & maintenance out of control b.
-
Page 15: Installation
maintenance e. The ambient temperature is too high to e. Improve the environment, spread the heat badly, or it is under move to the cool place, closed room / direct sunlight well-ventilated environment with ambient temperature 30 ℃ f. While time-delay starting, the TIMER f. - Page 16 2. ELECTRIC WIRE: Please do not use too thin diameter of extensive wire due to it will cause the voltage goes down. It must use the sole-wire or specification extensive wire to protect the machine works normal and last longer. 3.
Need help?
Do you have a question about the PGI-550H and is the answer not in the manual?
Questions and answers