Table of Contents
Advertisement
Quick Links
Advertisement
Table of Contents

Subscribe to Our Youtube Channel
Related Manuals for GVS T-OS14E


Summary of Contents for GVS T-OS14E
- Page 1 User Manual Outdoor Station 7” Touch Panel Outdoor Station T-OS14E...
-
Page 3: Table Of Contents
Contents Unit 1 Overview ......................1 1.1 Functions and Characteristics ...................1 1.2 Parameters ....................... 1 Unit 2 Appearance and Interface ................. 2 2.1 Appearance .......................2 2.2 Dimension ......................... 3 2.3 Interface Introduction ....................4 Unit 3 Installation ......................5 3.1 Installation Height ..................... 5 3.2 Installation Steps .......................6 3.3 System Wiring ......................7 Unit 4 Operation Instructions .................. - Page 4 7.3 Door Status Detection .....................22 7.4 Factory Testing ......................22 7.5 Configuration Password ..................24 7.6 Device Information ....................24...
-
Page 5: Unit 1 Overview
Unit 1 Overview This product is an outdoor station of 2 wire analog video door phone system. It is connected with indoor stations in the system by 2 core wire. And it supports access control with IC card. 1.1 Functions and Characteristics Support video intercom and unlocking ... -
Page 6: Unit 2 Appearance And Interface
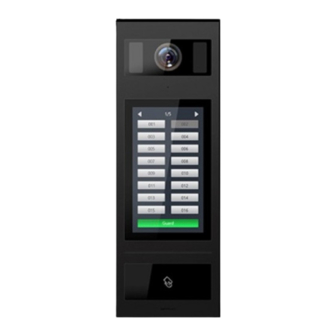
Unit 2 Appearance and Interface 2.1 Appearance Front View Rear View Aluminium Panel Camera Angle adjustment Fill-in Light Touch Display Zone Glass panel Wire Connecting Area Speaker Card Reading Area... -
Page 7: Dimension
2.2 Dimension... -
Page 8: Interface Introduction
2.3 Interface Introduction Network(update) Interface (1: TX+ , 2: TX-, 3: RX+, 4: RX-); ① Unlock time adjustment: please check “6.4 unlock time setting”; ② External camera; ③ Outdoor station address (ADD) setting, please check “6.5 ADD setting”; ④ BUS-A, BUS-B: 2-Wire BUS interface; ⑤... -
Page 9: Unit 3 Installation
Unit 3 Installation 3.1 Installation Height Ground Suggested height for installation: camera is 1.6m above the ground... -
Page 10: Installation Steps
3.2 Installation Steps embedded box preformed groove Step 1: put the embedded box into the preformed groove inside the wall, make the installation cables go through the wires outlet, and fix the embedded box with wall nails or wires outlet cement. -
Page 11: System Wiring
3.3 System Wiring Remarks: 1. The maximum quantity is: 1pc power supply+ 1pc outdoor station+4pcs distributor+16pcs indoor station; 2. Support multiple indoor monitors(maximum Qty is 4pcs) in one apartment, address of all indoor monitors in one apartment should be same. Attention:When there’s multiple monitors in one apartment, only one can be set as main indoor monitor, otherwise there will be an overcurrent. -
Page 12: Unit 4 Operation Instructions
6. Wiring distance A is the maximum length between outdoor station to power supply.Wiring distance B is the total length from power supply to the last indoor monitor. Wiring length of different kinds of wire is as below: Specification (A+B)length/m RVV 2*0.75mm²... - Page 13 If Indoor Monitor is online, it will begin the calling count down and start to play the ringback. Standby state of Keypad mode Remark: The device is using Push button mode as default, users can set DIP Switch as backside to be 0 and input the correct password to enter configuration setting for mode switching.
-
Page 14: Name List In Keypad Mode
4.3 Name list In Keypad mode In standby state of keypad mode, visitors can press to the show the name list(list needs to be imported by PC configuration tool in advanced ). Standby state of Keypad mode Name list Interface Name searching Interface Visitors can press the exact name in name list to make the call, or click the input box to search the resident’s name, when the searching is done, click... -
Page 15: Unlock
4.5 Unlock 1) By Swiping Card Swipe the registered card to the card reading area to unlock the door, and Outdoor Station will show “door opened”. 2) By Indoor Monitor Residents can unlock the door from Indoor Monitor when Outdoor Station is calling or being monitored by Indoor Monitor, and Outdoor Station will show “door opened”. -
Page 16: Unit 5 Settings
5) By User Password If User Password Unlock function is activated, residents can press and wait for 1S to enter public password interface. In User Password interface, input Apartment No. and related password, then press to unlock the door. Remark: User password needs to be imported by PC configuration tool, detailed setting refer to PC configuration tool instruction. -
Page 17: Main Setting Interface
5.2 Main Setting Interface After inputting the correct configuration password and , main setting interface is shown as below: Main Setting Interface Unit 6 System Settings System setting includes Time Setting(reserved), Ringtone Setting, Languages, PIN Setting, Card Management,Display Setting,User List Management and Set Outdoor Station Address. -
Page 18: Ringtone Setting
6.1 Ringtone Setting Ringtone setting interface is shown as below, users can press to adjust volume, press to turn on / off mute function. After setting is done, press to save and press to return last page. Ringtone setting Interface 6.2 Language Setting Language setting interface is shown as below, users can select the language and press to confirm, press... -
Page 19: Pin Setting
6.3 PIN Setting Password setting includes: User Password, Public Password and Public Password Modification. Users can press to turn on / off unlocked by user password or unlocked by public password. Press to confirm or press to return last page. PIN Setting Interface 6.4 Unlock Time Setting There is an adjustable potentiometer on the back side of the outdoor station(No.③),... -
Page 20: Card Management
6.6 Card Management Card management includes register, check(card information), delete, clear(delete all). Card Management Interface Swipe a card or input the card number to register, after registering finished, press to confirm, or press to return last page. While inputting card number, users can press to delete each number. -
Page 21: Display Settings
Card Information Interface If you choose , a message will pop-up to confirm the operation(delete all), press to confirm the operation, or press to return last page. 6.7 Display settings The display setting page is divided into four functions : Brightness adjustment, Enabling Screensaver, Entering Screensaver and Ending Screensaver time setting . -
Page 22: User List Management
Display settings interface 6.8 User list Management The user list management page is divided into four options: add , confirm , delete, and clear . User list management interface Register by entering the room number and user name in the add user interface , and click to confirm after registration, or click to return to the upper menu . - Page 23 User List Management - Confirmation Interface In the confirmation user interface, click to edit the name list, modify the room number and user name, and then click to confirm, or click to return to the upper menu . In the delete user interface, delete the list of names by clicking on it.
-
Page 24: Set Outdoor Station Address
6.9 Set Outdoor Station Address Switch to enable or disable the function of software setting outdoor station address. Click to set the outdoor station number, and the outdoor station number setting range is 1-9. -
Page 25: Unit 7 Configuration Setting
Unit 7 Configuration Setting Configuration setting includes Call Mode Setting, Alarm Setting, Factory Test, Configuration Setting, Company Info(reserved) and Device info. Users can press each icon to enter a particular setting. Configuration Setting Interface 7.1 Call Mode Setting Call Mode Setting interface is shown as below, users can choose each of the dialing method by pressing their icon, then press to confirm and the call mode is set. -
Page 26: Alarm Setting
7.2 Alarm Setting Alarm setting interface is shown as below, users can press to turn on/off anti demolition alarm. The alarm will ring when Outdoor Station is being disassembled by external force.Currently this model does not support tamper alarm function. The tamper alarm setting in the software is not workable. - Page 27 When choosing “Reset To Factory”, choose “confirm” on pop-up box to restore the system as factory setting, using push button mode, all settings (For example the device properties , volume etc.) will be restored as factory setting. Factory Test Interface Remark: 1.Resetting device within 60s after power on, all data will be erased (name list, card list, private unlock password);...
- Page 28 7.5 Configuration Password To change the configuration password: input the current password, move to new password box for entering new password. If entering the new password you input correctly twice,it will save the modification. Password number limitation: 6 digits. Configuration Password Interface 7.6 Device Information In device information interface you can find the version of software and MCU.
- Page 29 Device Information Interface...
Need help?
Do you have a question about the T-OS14E and is the answer not in the manual?
Questions and answers