GVS T Series User Manual
Two-wire indoor monitor
Hide thumbs
Also See for T Series:
- User manual (42 pages) ,
- User manual (25 pages) ,
- User manual (24 pages)

Related Manuals for GVS T Series


Summary of Contents for GVS T Series
- Page 1 User Manual INDOOR MONITOR T-SERIES TWO-WIRE INDOOR MONITOR USER MANUAL_V1.0 T-IS13...
-
Page 3: Table Of Contents
CONTENTS Chapter 1 Function Overview ..................2 1.1 Features ......................2 1.2 Specifications ....................2 Chapter 2 Product Introduction ................. 3 2.1 Appearance ......................3 2.2 Dimension ......................4 2.3 Interface Introduction ..................4 Chapter 3 Installation ....................5 3.1 Installation Height ..................... 5 3.2 Installation Steps .................... -
Page 4: Chapter 1 Function Overview
Chapter 1 Function Overview This product is a part of the two-wire analog video door phone system. The system being connected via 2 core wires, which enables visual intercom calls to be made with the Outdoor Station. 1.1 Features Support video intercom with HD, unlocking, remote call to Tuya APP, real-time video ... -
Page 5: Chapter 2 Product Introduction
Chapter 2 Product Introduction 2.1 Appearance... -
Page 6: Dimension
2.2 Dimension 2.3 Interface Introduction V +, GND: power interface BUS-A, BUS-B: Bus interface... -
Page 7: Chapter 3 Installation
Chapter 3 Installation 3.1 Installation Height Recommended installation height: 1.5m from ground at the bottom of the device... -
Page 8: Installation Steps
3.2 Installation Steps Step 2: After connecting the wires, align Step 1: Align the wall bracket with the screw holes on the back of the device with clips holes on 86 box (note the direction of wall on the wall bracket, pull the device bracket with the arrow pointing upwards) and downwards. -
Page 9: Chapter 4 Operating Instructions
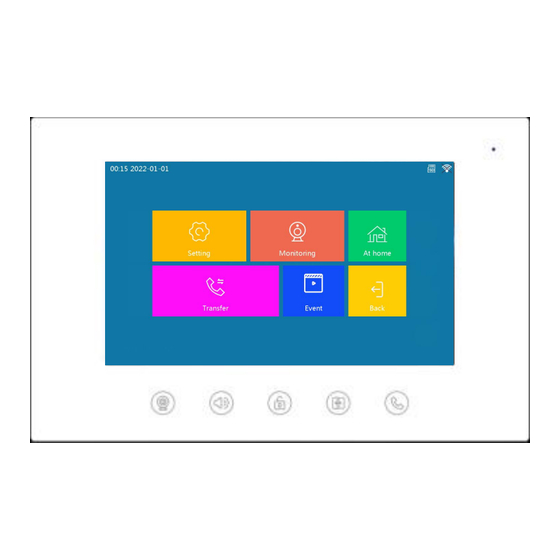
Chapter 4 Operating Instructions 4.1 Main & Standby Screen indicates that the device has an SD memory card inserted; indicates that the device is connected to Wi-Fi. Setting: Clicking on the Setting icon to enter Setting screen. Surveillance: Click on the Surveillance icon to enter the list. At Home: Click to switch between "At home", "Away from home"... -
Page 10: Incoming Call
Standby Interface: unread calls, unread messages, unread motion detection and unread camera records are available in the bottom right corner of the screen. 4.2 Incoming Call Click on the Incoming Call icon to enter call screen, showing 2.3.4.5.6. and the ALL button. Click on corresponding room number to call corresponding Indoor Monitor. -
Page 11: Surveillance
Click on : capture the Outdoor Station screen normally. Path to check the photo: 1) click Main Interface - Event - Call Record icon, 2) click Call Record in Standby Interface. Click on : Click on Video in surveillance interface to record. The default is to turn off video. -
Page 12: Call
the device is online; if it is red, the device is not online. Please check the network connection. 4.4 Call At Home: Default call mode. When Outdoor Station calls, Indoor Monitor rings, and then the Outdoor Station rings back. At the same time, the Indoor Monitor enters automatic recording mode. -
Page 13: Event
set to turn on the message switch, the message alert will be activated regardless of the mode. In either mode, Tuya App will be called at the same time. 4.5 Event Note: This function is only available when SD card is installed in the device Click on the Event icon to enter Call Record, Message Record, Motion Detection, Camera Record Interface. -
Page 14: System Setting
5.1 System Setting 5.1.1 Language Setting: Languages of Chinese, Russian, English, German, French and Italian can be selected here. Press Back icon after selecting, to complete the setting. When a language is selected but current interface is kept, and when the system countdown is over, current language is selected by default. -
Page 15: Outdoor Station Setting
connected to WIFI, system will automatically adjust current time, no need to set it separately. 5.1.6 Factory Setting: Click on Setting icon on the right side and a pop-up will show whether or not to restore to factory setting. In general, it’s not recommended to make this setting. 5.1.7 Software Upgrade: Click on Setting icon on the right side and a pop-up will show whether to do a software upgrade, which should be stored in the SD. -
Page 16: Camera Setting
5.2.3 Message: You can choose to turn off and turn on message for 30 seconds, 60 seconds or 120 seconds. Note: When a message is opened, a message notification will be played in either mode. 5.2.4 Human Detection: Human detection can be switched on optionally and its activation threshold can be selected as low, medium or high. -
Page 17: Network Setting
③ Enter Username: admin; Password: 123456”. Click the Enter button and it will connect successfully. 5.4 Network Setting ① Click on "Connect to WIFI"; ②Select the WIFI you need to join, then enter WIFI password and finally connect to it. 4.1.4.2 Use Tuya APP to scan the QR code in the picture, connect to your mobile phone and complete the cloud service connection. - Page 18 5.5.1 Add a Card Register a new card by swiping it at the swipe area of Outdoor Station, in the meantime a card number appears in the blank box on Indoor Monitor. Then a new card is successfully registered. Repeat the operation to complete registration of multiple cards. 12 cards can be added maximum.
-
Page 19: Tuya App Setting
Enter the card number in dialog box and click tick to complete deletion of that card number. 5.5.3 Delete All Cards Click on "Delete All Cards" button on the screen to delete all registered cards. 5.6 Tuya APP Setting 5.6.1 Download and install Tuya App Search for "Tuya Smart"... - Page 20 family", fill in the information and save. The person who sets up the device will become the family owner and can set up administrators and ordinary members. Once the family owner or administrator has added a device, family members will automatically add the device. "Tuya Smart"...
Need help?
Do you have a question about the T Series and is the answer not in the manual?
Questions and answers