Table of Contents
Advertisement
Quick Links
Advertisement
Table of Contents

Related Manuals for DFI EC51 CS Series


Summary of Contents for DFI EC51 CS Series
- Page 1 EC51x-CS Box PC User’s Manual...
- Page 2 Copyright FCC and DOC Statement on Class B This publication contains information that is protected by copyright. No part of it may be repro- This equipment has been tested and found to comply with the limits for a Class B digital de- duced in any form or by any means or used to make any transformation/adaptation without the vice, pursuant to Part 15 of the FCC rules.
-
Page 3: Table Of Contents
Table of Contents Chapter 1 - Introduction........................ 6 Panel Overview ........................9 Chapter 2 - Hardware Installation ....................10 System Memory ........................10 Installing the SO-DIMM Module ...................11 Chapter 3 - BIOS Settings ......................12 Overview ..........................12 Main ............................13 Advanced ..........................13 RC ACPI Configuration ....................14 CPU Configuration ......................14 Power &... - Page 4 About this Manual This manual can be downloaded from the website. The manual is subject to change and up- date without notice, and may be based on editions that do not resemble your actual products. Please visit our website or contact our sales representatives for the latest editions. Warranty 1.
- Page 5 other objects to make sure of proper air ventilation to protect the system from over- Static Electricity Precautions heating. It is quite easy to inadvertently damage your PC, system board, components or devices even • Dress the cables, especially the power cord, so they will not be stepped on, in contact before installing them in your system unit.
-
Page 6: Chapter 1 - Introduction
Chapter 1 INTRODUCTION Chapter 1 - Introduction SPECIFICATION SYSTEM Processor 8th/9th Generation Intel ® Core™ Processors, LGA 1151 Intel Core™ i7-9700TE , Octa Cores, 12M Cache, up to 3.8 GHz, 35W ® Intel Core™ i5-9500TE , Hexa Cores, 9M Cache, up to 3.6 GHz), 35W ®... - Page 7 2 x GbE (RJ-45) -EC51x-CS6G86E-Q/EC51x-CS6G86-Q 2 x RS232 -EC51x-CS98A1-H 3 x RS232/422/485 2 x RS232 -EC51x-CS6G86E-Q/EC51x-CS6G86-Q 4 x USB 3.1(Gen.2) www.dfi.com 2 x USB2.0 -EC51x-CS98A1-H 4 x USB 3.1(Gen.2) 4 x USB 3.1(Gen.1) User's Manual | EC51x-CS -EC51x-CS6G86E-Q/EC51x-CS6G86-Q 16 bits DIO...
- Page 8 Chapter 1 INTRODUCTION SPECIFICATION REAR I/O Ethernet/PoE -EC51x-CS6G86E-Q 2 x GbE (RJ-45) 4 x PoE (RJ-45) -EC51x-CS6G86-Q 6 x GbE (RJ-45) -EC51x-CS98A1-H 2 x GbE (RJ-45) -EC51x-CS6G86E-Q/EC51x-CS6G86-Q 2 x RS232 -EC51x-CS98A1-H 3 x RS232/422/485 2 x RS232 -EC51x-CS6G86E-Q/EC51x-CS6G86-Q 4 x USB 3.1(Gen.2) 2 x USB2.0 -EC51x-CS98A1-H 4 x USB 3.1(Gen.2)
-
Page 9: Panel Overview
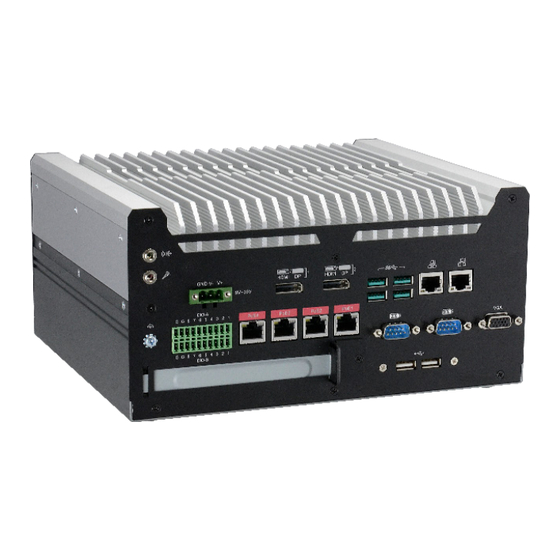
Chapter 1 INTRODUCTION ► Panel Overview I/O Ports Power Button with LED (Green) Front View Press to power on or power off the system. USB 3.1 RJ45 Reset Button Power HDMI/DP HDMI/DP Press to reset the system. HDD LED (Red) Indicates the status of disk drives. -
Page 10: Chapter 2 - Hardware Installation
Chapter 2 HARDWARE INSTALLATION Chapter 2 - Hardware Installation ► System Memory The system board supports the following memory interface. Single Channel (SC) Data will be accessed in chunks of 64 bits from the memory channels. Dual Channel (DC) Data will be accessed in chunks of 128 bits from the memory channels. Dual channel provides better system performance because it doubles the data transfer rate. -
Page 11: Installing The So-Dimm Module
Retention Clip Chapter 2 HARDWARE INSTALLATION Socket Top View ► System Memory Installing the SO-DIMM Module Please follow the steps below to install the memory card into the socket. Before installing the memory module, please make sure that the following safety cautions are well-attended. -
Page 12: Chapter 3 - Bios Settings
Chapter 3 BIOS SETTINGS Chapter 3 - BIOS Settings Legends ► Overview The BIOS is a program that takes care of the basic level of communication between the CPU Keys Function and peripherals. It contains codes for various advanced features found in this system board. Right / Left arrow Move the highlight left or right to select a menu The BIOS allows you to configure the system and save the configuration in a battery-backed... -
Page 13: Main
Chapter 3 BIOS SETTINGS ► Main ► Advanced The Main menu is the first screen that you will see when you enter the BIOS Setup Utility. The Advanced menu allows you to configure your system for basic operation. Some entries are defaults required by the system board, while others, if enabled, will improve the performance of your system or let you set some features according to your preference. -
Page 14: Rc Acpi Configuration
Chapter 3 BIOS SETTINGS ► Advanced ► Advanced RC ACPI Configuration CPU Configuration Aptio Setup Utility - Copyright (C) 2019 American Megatrends, Inc. Aptio Setup Utility - Copyright (C) 2019 American Megatrends, Inc. Advanced Advanced CPU Configuration When enabled, a VMM can RC ACPI Configuration Enable or disable System utilize the additional hard-... -
Page 15: Power & Performance
Chapter 3 BIOS SETTINGS ► Advanced ► Advanced Power & Performance PCH-FW Configuration Aptio Setup Utility - Copyright (C) 2019 American Megatrends, Inc. Aptio Setup Utility - Copyright (C) 2019 American Megatrends, Inc. Advanced Advanced ME State [Enabled] When Disabled ME will be Power &... - Page 16 Chapter 3 BIOS SETTINGS ► Advanced ► PCH-FW Configuration ► Advanced ► PCH-FW Configuration ► AMT Configuration ► AMT Configuration ► Secure Erase Configuration Aptio Setup Utility - Copyright (C) 2019 American Megatrends, Inc. Aptio Setup Utility - Copyright (C) 2019 American Megatrends, Inc. Advanced Advanced USB Provisioning of AMT...
- Page 17 Chapter 3 BIOS SETTINGS ► Advanced ► PCH-FW Configuration ► Advanced ► PCH-FW Configuration ► AMT Configuration ► OEM Flags Settings ► Firmware Update Configuration Aptio Setup Utility - Copyright (C) 2019 American Megatrends, Inc. Aptio Setup Utility - Copyright (C) 2019 American Megatrends, Inc. Advanced Advanced Me FW Image Re-Flash...
-
Page 18: Trusted Computing
Chapter 3 BIOS SETTINGS ► Advanced ► Advanced Trusted Computing NCT6116D Super IO Configuration Aptio Setup Utility - Copyright (C) 2019 American Megatrends, Inc. Aptio Setup Utility - Copyright (C) 2019 American Megatrends, Inc. Advanced Advanced TPM20 Device Found Enables or Disables BIOS NCT6116D Super IO Configuration WatchDog Timer Unit Se- Firmware Version... -
Page 19: Nct6116D Hw Monitor
Chapter 3 BIOS SETTINGS ► Advanced ► NCT6116D Super IO Configuration ► Advanced ► Serial Port 1/2/3/4/5/6 Configuration NCT6116D HW Monitor Aptio Setup Utility - Copyright (C) 2019 American Megatrends, Inc. Aptio Setup Utility - Copyright (C) 2019 American Megatrends, Inc. Advanced Advanced Serial Port 1 Configuration... -
Page 20: Serial Port Console Redirection
Chapter 3 BIOS SETTINGS ► Advanced ► NCT6116D HW Monitor ► Advanced ► Smart Fan Function Serial Port Console Redirection Aptio Setup Utility - Copyright (C) 2019 American Megatrends, Inc. Aptio Setup Utility - Copyright (C) 2019 American Megatrends, Inc. Advanced Advanced Enable CPU SmartFan... -
Page 21: Usb Configuration
Chapter 3 BIOS SETTINGS ► Advanced ► Serial Port Console Redirection ► Advanced ► Console Redirection Settings USB Configuration Aptio Setup Utility - Copyright (C) 2019 American Megatrends, Inc. Aptio Setup Utility - Copyright (C) 2019 American Megatrends, Inc. Advanced Advanced Enable CPU SmartFan Enables Legacy USB sup-... -
Page 22: Csm Configuration
Chapter 3 BIOS SETTINGS ► Advanced ► Advanced CSM Configuration USB Power Control Aptio Setup Utility - Copyright (C) 2019 American Megatrends, Inc. Aptio Setup Utility - Copyright (C) 2019 American Megatrends, Inc. Advanced Advanced Enable/Disable CSM Sup- Enable/Disable UEFI Net- Compatibility Support Module Configuration USB2_1/2 USB3_1/2 [5V_Dual]... -
Page 23: Network Stack Configuration
Chapter 3 BIOS SETTINGS ► Advanced Network Stack Configuration Aptio Setup Utility - Copyright (C) 2019 American Megatrends, Inc. Advanced Enable/Disable UEFI Net- Network Stack [Enabled] work Stack Ipv4 PXE Support [Disabled] Ipv6 PXE Support [Disabled] PXE boot wait time Media detect count →←: Select Screen ↑↓: Select Item... -
Page 24: Chipset
Chapter 3 BIOS SETTINGS ► Chipset ► Chipset Graphics Configuration Aptio Setup Utility - Copyright (C) 2019 American Megatrends, Inc. Aptio Setup Utility - Copyright (C) 2019 American Megatrends, Inc. Main Advanced Chipset Security Boot Save & Exit Chipset ► Graphics Configuration Initial priority : Graphics Configuration Graphics Configuration... -
Page 25: Peg Port Configuration
Chapter 3 BIOS SETTINGS ► Chipset PEG Port Configuration ► PEG Port Feature Configuration Aptio Setup Utility - Copyright (C) 2019 American Megatrends, Inc. Aptio Setup Utility - Copyright (C) 2019 American Megatrends, Inc. Chipset Chipset Enable or Disable the Root Detect Non-Compliance PCI PEG Port Configuration PEG Port Feature Configuration... -
Page 26: Pch-Io Configuration
Chapter 3 BIOS SETTINGS ► Chipset ► Chipset ► PCH-IO Configuration PCH-IO Configuration PCI Express Configuration Aptio Setup Utility - Copyright (C) 2019 American Megatrends, Inc. Aptio Setup Utility - Copyright (C) 2019 American Megatrends, Inc. Chipset Chipset PCI Express Configuration PCI Express Root Port Set- PCH-IO Configuration PCI Express Configuration... -
Page 27: Sata And Rst Configuration
Chapter 3 BIOS SETTINGS ► Chipset ► PCH-IO Configuration ► Chipset ► PCH-IO Configuration SATA And RST Configuration HD Audio Configuration Aptio Setup Utility - Copyright (C) 2019 American Megatrends, Inc. Aptio Setup Utility - Copyright (C) 2019 American Megatrends, Inc. Chipset Chipset SATA And RST Configuration... -
Page 28: Security
Chapter 3 BIOS SETTINGS ► Security ► Security Secure Boot Aptio Setup Utility - Copyright (C) 2019 American Megatrends, Inc. Aptio Setup Utility - Copyright (C) 2019 American Megatrends, Inc. Main Advanced Chipset Security Boot Save & Exit Security Password Description S e t A d m i n i s t r a t o r P a s s - System Mode Setup... -
Page 29: Boot
Chapter 3 BIOS SETTINGS ► Boot ► Save & Exit Aptio Setup Utility - Copyright (C) 2019 American Megatrends, Inc. Aptio Setup Utility - Copyright (C) 2019 American Megatrends, Inc. Main Advanced Chipset Security Boot Save & Exit Main Advanced Chipset Security Boot... -
Page 30: Updating The Bios
BIOS with the flash utility. For updating AMI BIOS in UEFI mode, you may refer to the how-to video at https://www.dfi.com/Knowledge/Video/5. ► Notice: BIOS SPI ROM 1. -
Page 31: Chapter 4 - Intel Amt Settings
Chapter 3 BIOS SETTINGS Chapter 4 - Intel AMT Settings ► Enable Intel AMT in the AMI BIOS ® 1. Power-on the system then press <Del> to enter the main menu of the AMI BIOS. ► Overview 2. In the Advanced menu, select PCH-FW Configuration. Intel Active Management Technology (Intel AMT) combines hardware and software solution to ®... -
Page 32: Entering Management Engine Bios Extension (Mebx)
Chapter 3 BIOS SETTINGS ► Enable Intel AMT in the AMI BIOS ► Entering Management Engine BIOS Extension (MEBX) ® 4. Press F4, or go to the Save & Exit menu, select Save Changes and Reset and then press <Enter>. A dialog box will appear. Select Yes and press Enter to reset the system after saving all changes made. -
Page 33: Mebx
Chapter 3 BIOS SETTINGS ► MEBX Intel(R) ME General Settings Main Menu Select MEBx Login under Main Menu and press Enter. A prompt that requires password input Select Intel(R) ME General Settings under Main Menu and then press Enter. will show up. Enter the default password “admin”. - Page 34 Chapter 3 BIOS SETTINGS ► MEBX ► Intel(R) ME General Settings ► MEBX ► Intel(R) ME General Settings Change ME Password Local FW Update If you want to change ME password, select Change ME Password and then press Enter. A Select Local FW Update then press Enter.
-
Page 35: Intel(R) Amt Configuration
Chapter 3 BIOS SETTINGS ► MEBX Intel(R) AMT Configuration > SOL/Storage Redirection/KVM Select Intel(R) AMT Configuration under Main Menu and then press Enter. Intel(R) Management Engine BIOS Extension v12.0.0.0010/Intel(R) ME v12.0.55.1521 Intel(R) Management Engine BIOS Extension v12.0.0.0010/Intel(R) ME v12.0.55.1521 Copyright(C) 2003-17 Intel Corporation. All Rights Reserved Copyright(C) 2003-17 Intel Corporation. - Page 36 Chapter 3 BIOS SETTINGS ► MEBX ► Intel(R) AMT Configuration ► MEBX ► Intel(R) AMT Configuration > SOL/Storage Redirection/KVM > User Consent Intel(R) Management Engine BIOS Extension v12.0.0.0010/Intel(R) ME v12.0.55.1521 Intel(R) Management Engine BIOS Extension v12.0.0.0010/Intel(R) ME v12.0.55.1521 Copyright(C) 2003-17 Intel Corporation. All Rights Reserved Copyright(C) 2003-17 Intel Corporation.
- Page 37 Chapter 3 BIOS SETTINGS ► MEBX ► Intel(R) AMT Configuration ► MEBX ► Intel(R) AMT Configuration > User Consent Password Policy Intel(R) Management Engine BIOS Extension v12.0.0.0010/Intel(R) ME v12.0.55.1521 Intel(R) Management Engine BIOS Extension v12.0.0.0010/Intel(R) ME v12.0.55.1521 Copyright(C) 2003-17 Intel Corporation. All Rights Reserved Copyright(C) 2003-17 Intel Corporation.
- Page 38 Chapter 3 BIOS SETTINGS ► MEBX ► Intel(R) AMT Configuration > Network Setup Move the cursor to select a field and press Enter to display options. Under the Intel(R) AMT Configuration menu, select Network Setup and then press Enter. Intel(R) Management Engine BIOS Extension v12.0.0.0010/Intel(R) ME v12.0.55.1521 Intel(R) Management Engine BIOS Extension v12.0.0.0010/Intel(R) ME v12.0.55.1521 Copyright(C) 2003-17 Intel Corporation.
- Page 39 Chapter 3 BIOS SETTINGS ► MEBX ► Intel(R) AMT Configuration ► Network Setup ► Intel(R) ME Network Name Settings ► MEBX ► Intel(R) AMT Configuration ► Network Setup Dynamic DNS Update > TCP/IP Settings Select Enabled or Disabled then press Enter. When Dynamic DNS Update is Enabled, the follow- Under the Intel(R) ME Network Setup menu, select TCP/IP Settings and then press Enter.
- Page 40 Chapter 3 BIOS SETTINGS ► MEBX ► Intel(R) AMT Configuration ► Network Setup ► TCP/IP Settings DHCP Mode IPv4 Address Select Enabled or Disabled then press Enter. Please make sure there is a DHCP server in the Assign a valid and available IP address to the system. Insert a value from 0.0.0.0 to network when this field is enabled.
- Page 41 Chapter 3 BIOS SETTINGS ► MEBX ► Intel(R) AMT Configuration ► MEBX ► Intel(R) AMT Configuration Activate Network Access Unconfigure Network Access Under the Intel(R) AMT Configuration menu, select Activate Network Access and press Enter, Under the Intel(R) AMT Configuration menu, select Undconfigure Network Access and press and then press Y to activate the ME network connection with the settings configured previ- Enter, and then press Enter to fully deactivate the ME network connection and reset configura- ously, or press N to abort.
- Page 42 Chapter 3 BIOS SETTINGS ► MEBX ► Intel(R) AMT Configuration > Remote Setup And Configuration Under the Intel(R) AMT Configuration menu, select Remote Setup And Configuration then Current Provisioning Mode press Enter. The current mode — Public Key Infrastructure (PKI) — is displayed. Intel(R) Management Engine BIOS Extension v12.0.0.0010/Intel(R) ME v12.0.55.1521 Copyright(C) 2003-17 Intel Corporation.
- Page 43 Chapter 3 BIOS SETTINGS ► MEBX ► Intel(R) AMT Configuration ► Remote Setup And Configuration ► MEBX ► Intel(R) AMT Configuration ► Remote Setup And Configuration > RCFG > TLS PKI Press Enter, select Start Configuration, and then press Enter to activate Remote Configuration The system adopts PKI for encryption and authentication, and the TLS protocol for communica- (RCFG).
- Page 44 Chapter 3 BIOS SETTINGS ► MEBX ► Intel(R) AMT Configuration ► Remote Setup And Configuration ► TLS PKI ► MEBX ► Intel(R) AMT Configuration > Power Control Under the Intel(R) AMT Configuration menu, select Power Control then press Enter. > Manage Hashes Intel(R) Management Engine BIOS Extension v12.0.0.0010/Intel(R) ME v12.0.55.1521 Select a hash name and then press the following keys to execute a function.
- Page 45 Chapter 3 BIOS SETTINGS ► MEBX MEBx Exit Under the Main Menu, select MEBx Exit and then press Enter. Press Y to confirm or N to abort. Intel(R) Management Engine BIOS Extension v12.0.0.0010/Intel(R) ME v12.0.55.1521 Copyright(C) 2003-17 Intel Corporation. All Rights Reserved MAIN MENU >...
-
Page 46: Chapter 5 - Raid
Chapter 3 BIOS SETTINGS Chapter 5 - RAID ► Setup Procedure The system board allows configuring RAID on Serial ATA drives. It supports RAID 0, RAID 1. To enable the RAID function, the following settings are required. ► RAID Levels Explanation 1. - Page 47 Chapter 3 BIOS SETTINGS Step 3: Create a RAID Volume Step 4: Install the Intel Rapid Storage Technology Utility 1. Go to the “Advanced” menu of the AMI BIOS and select “Intel(R) Rapid Storage Technol- The Intel Rapid Storage Technology Utility can be installed from within Windows. It allows RAID ogy”.
Need help?
Do you have a question about the EC51 CS Series and is the answer not in the manual?
Questions and answers