Table of Contents
Advertisement
Quick Links
Advertisement
Table of Contents

Related Manuals for DFI EC310 Series


Summary of Contents for DFI EC310 Series
- Page 1 EC300/310/ 320/321/322 Series User’s Manual A-221-M-2008...
-
Page 2: Copyright
Copyright This publication contains information that is protected by copyright. No part of it may be reproduced in any form or by any means or used to make any transfor- mation/adaptation without the prior written permission from the copyright hold- ers. -
Page 3: Fcc And Doc Statement On Class B
FCC and DOC Statement on Class B This equipment has been tested and found to comply with the limits for a Class B digital device, pursuant to Part 15 of the FCC rules. These limits are designed to provide reasonable protection against harmful interference when the equipment is operated in a residential installation. -
Page 4: Table Of Contents
Introduction Table of Contents ................... 2 Copyright ..................2 Trademarks FCC and DOC Statement on Class B ..........3 ................7 About this Manual ..................7 Warranty Static Electricity Precautions ............. 8 ................. 8 Safety Measures ................9 Safety Precautions About the Package ................ - Page 5 Introduction ..........51 Connecting Cables to Terminal Blocks Chapter 4 - Jumper Settings ............53 ............. 53 Jumper Settings - System Board Clear CMOS Data ..............53 PS/2 Power Select ..............54 USB Power Select ..............55 COM1 and COM2 RS232/422/485 Select ........56 COM1 and COM2 RS232/Power Select ........
- Page 6 Introduction Front Panel Connector ............112 Battery ................. 113 CompactFlash Socket .............. 114 Chapter 6 - Mounting Options ............. 115 ................115 Wall Mounting ..............118 Chapter 7 - BIOS Setup .................. 118 Overview .............. 120 AMI BIOS Setup Utility ..................
-
Page 7: About This Manual
Introduction About this Manual An electronic file of this manual can be obtained from the DFI website at www.dfi.com. To download the user’s manual from our website, please go to “Support” > “Download Center.” On the Download Center page, select your product or type the model name and click “Search”... -
Page 8: Static Electricity Precautions
Introduction Static Electricity Precautions It is quite easy to inadvertently damage your PC, system board, components or devices even before installing them in your system unit. Static electrical dis- charge can damage computer components without causing any signs of physical damage. -
Page 9: Safety Precautions
Introduction Safety Precautions • Use the correct DC input voltage range. • Unplug the power cord before removing the system chassis cover for installa- tion or servicing. After installation or servicing, cover the system chassis be- fore plugging the power cord. •... -
Page 10: About The Package
Introduction About the Package The system package contains the following items. If any of these items are missing or damaged, please contact your dealer or sales representative for as- sistance. 1 System unit 1 SATA data/power cable 1 120W power adapter (-CR6G60/-CRA060/-CR6881/-CR4G65) ... -
Page 11: Chapter 1 - Introduction
Introduction Chapter 1 - Introduction Overview EC300 Series EC300-CR6881 EC300-CR6G60 EC300-CRA060 EC300-CR4G65 EC300-CR4866... - Page 12 Introduction EC310 Series EC310-CR6881 EC310-CR6G60 EC310-CRA060 EC310-CR4866...
- Page 13 Introduction EC320/321/322 Series EC320/321/322-CR6881 EC320/321/322-CR6G60 EC320/321/322-CRA060...
- Page 14 Introduction EC321/322-CR4G65 EC320/321/322-CR4866...
-
Page 15: Key Features
• Expansion - EC300 Series: 1 XCT0-3G, 1 Mini PCIe - EC310 Series: 1 XCT0-3G,1 Mini PCIe, 1 PCI - EC320 Series: 1 XCT0-3G,1 Mini PCIe, 2 PCI - EC321 Series: 1 XCT0-3G,1 Mini PCIe, 1 PCI, 1 PCIe x16... -
Page 16: Specifications
Introduction Specifications PROCESSOR SYSTEM • 3rd Generation Intel Core processors (22nm process technology) ® - Intel Core™ i7-3610QE (6M Cache, up to 3.3 GHz); 45W ® - Intel Core™ i5-3610ME (3M Cache, up to 3.3 GHz); 35W ® - Intel Core™... - Page 17 DIMENSIONS • EC300 Series: 340.5mm x 88mm x 223mm (W x H x D) • EC310 Series: 340.5mm x 120.5mm x 223mm (W x H x D) • EC320/321/322 Series: 340.5mm x 140.5mm x 223mm (W x H x D) WEIGHT •...
-
Page 18: Getting To Know The Ec300/310/320/321/322 Series
Introduction Getting to Know the EC300/310/320/321/322 Series EC300 Series Front Panel Alert LED Reset Power USB 2.0 HDD LED Wi-Fi Module Wi-Fi Module Antenna Hole Antenna Hole Wi-Fi Module Antenna Hole Used to connect to a Wi-Fi antenna. USB Ports Used to connect USB 2.0/1.1 devices. - Page 19 Introduction EC300 Series Rear Panel Speaker-out USB 3.0 COM1 Alert Reset COM2 DC-In Power USB 2.0 COM6 COM3 GPIO USB 2.0 COM4 COM5 EC300-CR6881 Speaker-out COM1 Alert Reset COM2 DC-In USB 3.0 Power COM6 COM4 GPIO COM5 COM3 GPIO EC300-CR6G60 Speaker-out COM1 Alert...
- Page 20 Introduction USB 3.0 Speaker-out COM1 Alert Reset DC-In COM2 Power COM4 GPIO PoE Gigabit LAN COM3 EC300-CR4866 Power LED Indicates the power status of the system. HDD LED Indicates the status of the hard drive. Alert LED Indicates the status when the CPU is over temperature. DC-in Used to plug a power adapter.
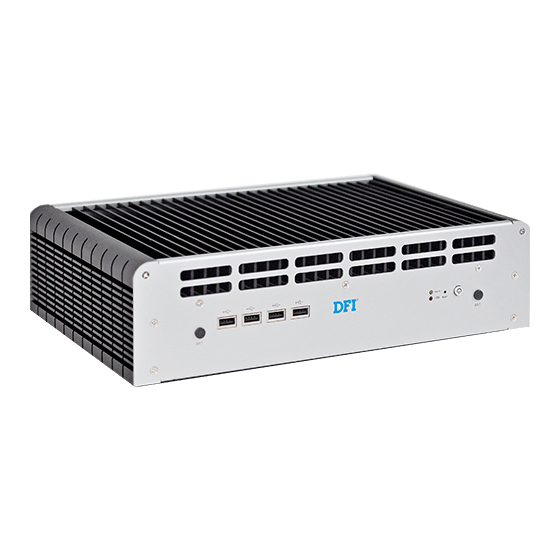
- Page 21 Introduction EC310 Series Front Panel Alert LED Reset Power Wi-Fi Module HDD LED Antenna Hole Wi-Fi Module USB 2.0 Antenna Hole Wi-Fi Module Antenna Hole Used to connect to a Wi-Fi antenna. USB Ports Used to connect USB 2.0/1.1 devices.
- Page 22 Introduction EC310 Series Rear Panel Speaker-out USB 3.0 Reset COM1 Alert COM2 DC-In Power PCI slot USB 2.0 COM6 COM3 GPIO USB 2.0 COM4 COM5 EC310-CR6881 USB 3.0 Speaker-out COM1 Alert Reset COM2 DC-In Power PCI slot COM6 COM4 GPIO...
- Page 23 Introduction USB 3.0 Speaker-out COM1 Alert COM2 Reset DC-In COM4 GPIO PoE Gigabit LAN COM3 Power EC310-CR4866 Power LED Indicates the power status of the system. HDD LED Indicates the status of the hard drive. Alert LED Indicates the status when the CPU is over temperature. DC-In Used to plug a power adapter.
- Page 24 Introduction EC320/321/322 Series Front Panel Alert LED Power Wi-Fi Module Antenna Hole Reset USB 2.0 HDD LED Wi-Fi Module Antenna Hole Wi-Fi Module Antenna Hole Used to connect to a Wi-Fi antenna. USB Ports Used to connect USB 2.0/1.1 devices. HDD LED Indicates the status of the hard drive.
- Page 25 Introduction EC320/321/322 Series Rear Panel Speaker-out USB 3.0 COM1 Alert Reset COM2 DC-In Power PCI/PCIe x16 slot COM6 COM3 GPIO USB 2.0 COM5 COM4 USB 2.0 EC320/321/322-CR6881 USB 3.0 Speaker-out COM1 Alert Reset COM2 DC-In COM4 COM6 GPIO PCI/PCIe x16 slots Power GPIO COM3...
- Page 26 Introduction USB 3.0 Speaker-out COM1 Alert Reset COM2 DC-In Power PCI/PCIe x16 slots COM9 COM7 COM5 COM3 COM10 COM8 COM6 COM4 EC320/321/322-CRA060 Speaker-out USB 3.0 COM1 Alert Reset COM2 DC-In Power COM4 GPIO PCI/PCIe x16 slot GPIO COM3 EC321/322-CR4G65 Speaker-out USB 3.0 COM1 Alert...
- Page 27 Introduction Power LED Indicates the power status of the system. HDD LED Indicates the status of the hard drive. Alert LED Indicates the status when the CPU is over temperature. DC-In Used to plug a power adapter. COM Ports Used to connect serial devices. DVI Port Used to connect a DVI device.
-
Page 28: Mechanical Dimensions
Introduction Mechanical Dimensions EC300 Series Left View Right View 340.50 368.10 340.50 Front View... - Page 29 Introduction EC310 Series Left View Right View 340.50 368.10 340.50 Front View...
- Page 30 Introduction EC320/321/322 Series Left View Right View 340.50 368.10 340.50 Front View...
-
Page 31: Chapter 2 - Getting Started
Getting Started Chapter 2 - Getting Started Preparing the System Before you start using the system, you need the following items: • Memory module • SATA hard drive • DC power adapter • USB keyboard • USB mouse • CD-ROM drive (for installing software/drivers) •... -
Page 32: Installing The Drivers
Getting Started Installing the Drivers The system requires you to install drivers for some devices to operate properly. Refer to the Supported Software chapter for instructions on installing the drivers. -
Page 33: Chapter 3 - Installing Devices
Installing Devices Chapter 3 - Installing Devices Removing the Chassis Cover 1. Make sure the system and all other peripheral devices connected to it has been powered-off. 2. Disconnect all power cords and cables. 3. The 6 mounting screws on the front and rear of the system are used to se- cure the cover to the chassis. - Page 34 Installing Devices 5. The SODIMM socket, SATA drive bay, CompactFlash socket and Mini PCIe slot are readily accessible after removing the chassis cover. CompactFlash socket SODIMM socket Mini PCIe Slot Cover SATA drive bay...
-
Page 35: Installing A Sodimm
Installing Devices Installing a SODIMM 1. Locate the SODIMM socket on the system board. 2. The 5 mounting screws on the protective plate is used to secure the plate. Remove these screws and then put them in a safe place for later use. Heat-dissipating plate SODIMM socket... - Page 36 Installing Devices 3. Note the key on the socket. The key ensures the module can be plugged into the socket in only one direction. 4. Grasping the module by its edges, align the module into the socket at an ap- proximately 30 degrees angle.
- Page 37 Installing Devices 5. Push the module down until the clips at each end of the socket lock into position. You will hear a distinctive “click”, indicating the module is correctly locked into position. Clip Clip...
-
Page 38: Installing A Sata Drive
Installing Devices Installing a SATA Drive 1. Locate the SATA drive bay on the cover. Cover SATA drive bay 2. Remove the 4 mounting screws that secure the HDD brackets to the drive bay. Mounting screw... - Page 39 Installing Devices 3. Align the mounting holes of the SATA drive with the mounting holes on the HDD bracket and then use the provided mounting screws to secure the drive in place. SATA drive HDD bracket Mounting screws Mounting screw 4.
- Page 40 Installing Devices Mounting hole Mounting screw 5. Connect A to the SATA power/data connector on the SATA drive, B and C to the SATA power connector and SATA data connector respectively on the sys- tem board. SATA power connector (B) SATA power/data connector (A) SATA data...
- Page 41 Installing Devices SATA power/data connector SATA data connector SATA power connector...
-
Page 42: Installing A Compactflash Card
Installing Devices Installing a CompactFlash Card 1. Locate the CompactFlash socket. With the label facing up, insert the Com- pactFlash card until it is completely seated in the socket. CompactFlash socket CompactFlash card... -
Page 43: Installing A Mini Pcie And/Or Msata Card
Installing Devices Installing a Mini PCIe and/or mSATA Card Latch 1. The latch is used to lock the Mini PCIe / mSATA card into position. Insert the latch into the mounting holes and then push the latch down until the clips at each end of the latch lock into position. - Page 44 Installing Devices 2. The system board is equipped with a Mini PCIe slot. The Mini PCIe slot sup- ports full length or half length Mini PCIe / mSATA card. Note the key on the slot. The key ensures the Mini PCIe / mSATA card can be plugged into the slot in only one direction.
- Page 45 Installing Devices Installing the Mini PCIe Card 1. Grasping the Mini PCIe card by its edges, align the card into the slot at an approximately 30 degrees angle. Apply firm even pressure to each end of the card until it slips down into the slot. The contact fingers on the edge of the card will almost completely disappear inside the slot.
- Page 46 Installing Devices Installing the mSATA Card 1. Insert the latch into the mounting holes in accordance with the length of the mSATA card. Push the latch down until the clips at each end of the latch lock into position. You will hear a distinctive "click", indicating the latch is correctly locked into position.
- Page 47 Installing Devices 3. Push the mSATA card down until the clips at each end of the latch lock into position. You will hear a distinctive “click”, indicating the card is correctly locked into position. Clip Clip...
-
Page 48: Installing The Pci And Pcie Expansion Cards
Installing Devices Installing the PCI and PCIe Expansion Cards Important: When inserting the riser card, please select a card within 175mm (as shown on the next picture) in or- der to fit in the slot. 1. The PCI and PCIe x16 slots on the riser card are used to install the expan- sion cards. - Page 49 Installing Devices 2. To remove the mounting screws and the brackets, you need to remove the hole plugs and insert the screwdriver through the hole to access the mount- ing screws. Bracket Mounting screw Hole plug 3. Remove these mounting screws and brackets, and then put them in a safe place for later use.
- Page 50 Installing Devices 4. Insert the Expansion card with a bracket into the PCI slot that is on the riser card. Replace the screw you removed in step 3 to secure the bracket in place. Expansion card Bracket Mounting screw Rear view Note: The Expansion cards used in the above illustrations may not resemble the actual cards.
-
Page 51: Connecting Cables To Terminal Blocks
Installing Devices Connecting Cables to Terminal Blocks 1. Insert one end of the power adaptor and the cable into the holes on the power jack, and use the screwdriver to fasten the cables. 2. Connect the power jack to the connector on the system, and use the screw- driver to secure the power jack in place. - Page 52 Installing Devices 3. Insert one end of the cables into the holes on the terminal block, and use the screwdriver to fasten the cables. 4. Connect the terminal block to the connector on the system, and use the screwdriver to secure the terminal block in place.
-
Page 53: Chapter 4 - Jumper Settings
Jumper Settings Chapter 4 - Jumper Settings Jumper Settings - System Board Clear CMOS Data 2-3 On: Clear CMOS Data 1-2 On: Normal (default) If you encounter the following, a) CMOS data becomes corrupted. b) You forgot the supervisor or user password. you can reconfi... -
Page 54: Ps/2 Power Select
Jumper Settings PS/2 Power Select 1-2 On: +5V (default) 2-3 On: +5V_standby JP1 is used to select the power of the PS/2 keyboard/mouse port. Selecting +5V_standby will allow you to use the PS/2 keyboard or PS/2 mouse to wake up the system. -
Page 55: Usb Power Select
Jumper Settings USB Power Select 1-2 On: +5V (default) 2-3 On: +5V_standby JP2 (for USB 6-7), JP3 (for USB 4-5) and JP8 (for USB 0-1) are used to select the power of the USB ports. Selecting +5V_standby will allow you to use a USB device to wake up the system. -
Page 56: Com1 And Com2 Rs232/422/485 Select
Jumper Settings COM1 and COM2 RS232/422/485 Select JP11 JP13 JP11 (COM1) and JP13 (COM2) are used to confi gure COM1 and COM2 to RS232, RS422 (Full Duplex) or RS485 respectively. JP11 (COM1) / JP13 (COM2) 1-2 On: RS232 3-4 On: RS422 5-6 On: RS485 (default) Full Duplex... -
Page 57: Com1 And Com2 Rs232/Power Select
Jumper Settings COM1 and COM2 RS232/Power Select JP12 JP14 JP12 (COM1) and JP14 (COM2) are used to confi gure COM1 and COM2 to pure RS232 or RS232 with power. The pin function of COM1 and COM2 will vary according to JP12’s and JP14’s set- ting respectively. -
Page 58: Power-On Select
Jumper Settings Power-on Select 2-3 On: Power-on via AC power 1-2 On: Power-on via power button (default) JP5 is used to select the method of powering on the system. If you want the system to power-on whenever AC power comes in, set JP6 pins 2 and 3 to On. If you want to use the power button, set pins 1 and 2 to On. -
Page 59: Mini Pcie/Msata Power Select
Jumper Settings Mini PCIe/ mSATA Power Select 2-3 On: +3VDU 1-2 On: +3V3 (default) JP4 is used to select the power supplied to the Mini PCIe and mSATA card that is on the motherboard. Selecting +3V3 will be the default setting. -
Page 60: Mini Pcie/Msata Select
Jumper Settings Mini PCIe/ mSATA Select 2-3, 5-6, 8-9, 11-12 On: mSATA 1-2, 4-5, 7-8, 10-11 On: Mini PCIe (default) JP6 is used to select Mini PCIe or mSATA. Mini PCIe is set as default. -
Page 61: Reset/Power On Select
Jumper Settings Reset/ Power on Select 1-2 On: Function as reset (default) JP10 2-3 On: Function as power on button The Reset/ Power on Select is used to select the function of the reset bottom. -
Page 62: Factory Testing
Jumper Settings Factory Testing 1-2 On: Impedance 75Ω (default) JP15 2-3 On: Impedance... -
Page 63: Jumper Settings - Io Board
Jumper Settings Jumper Settings - IO Board EC300/310/320/321/322-CRA060 COM 3 to COM 10 RS232/RS422/RS485 Select COM 4 COM 5 COM 10 COM 3 COM 6 COM 9 COM 7 COM 8 (JP2) (JP3) (JP8) (JP1) (JP4) (JP5) (JP6) (JP7) JP1 (for COM 3) to JP8 (for COM 10) are used to confi gure the COM ports to RS232, RS422 (Full Duplex) or RS485. - Page 64 Jumper Settings COM 6 and COM 7 RS232/Power Select JP10 COM 6 COM 7 (JP9) (JP10) JP9 and JP10 are used to confi gure COM 6 and COM 7 to pure RS232 or RS232 with power. The pin function of COM 6 and COM 7 will vary according to JP9’s and JP10’s set- ting respectively.
- Page 65 Jumper Settings EC300/310/320/321/322-CR6881 COM 3 to COM 6 RS232/RS422/RS485 Select COM 4 COM 3 COM 5 COM 6 (JP2) (JP1) (JP5) (JP8) JP1 (for COM 3), JP2 (for COM 4), JP5 (for COM 5) and JP8 (for COM 6) are used to confi...
- Page 66 Jumper Settings COM 3 to COM 6 RS232/Power Select COM 6 COM 3 COM 4 COM 5 (JP7) (JP3) (JP6) (JP4) JP3, JP4, JP6 and JP7 are used to confi gure COM 3 to COM 6 to pure RS232 or RS232 with power.
- Page 67 Jumper Settings Digital I/O Signal Voltage Select JP9 is used to confi gure DIO to signal voltage select. The pin function of DIO port will vary according to the jumper’s setting respec- tively. 1-2 On: 2-3 On: +3.3V (default)
- Page 68 Jumper Settings USB Power Select JP10 USB0 USB1 JP10 (for USB 0-1) is used to select the power of the USB ports. Selecting +5V_ standby will allow you to use a USB device to wake up the system. BIOS Setting “USB Device Wakeup From S3/S4”...
- Page 69 Jumper Settings EC300/310/320/321/322-CR6G60 COM 3 to COM 6 RS232/RS422/RS485 Select COM 4 COM 3 COM 5 COM 6 (JP2) (JP1) (JP5) (JP8) JP1 (for COM 3), JP2 (for COM 4), JP5 (for COM 5) and JP8 (for COM 6) are used to confi...
- Page 70 Jumper Settings COM 3 to COM 6 RS232/Power Select COM 4 COM 3 COM 5 COM 6 (JP6) (JP3) (JP4) (JP87) JP3, JP4, JP6 and JP7 are used to confi gure COM 3 to COM 6 to to pure RS232 or RS232 with power.
- Page 71 Jumper Settings Digital I/O Signal Voltage Select DIO1 DIO2 JP9 is used to confi gure DIO to signal voltage select. The pin function of DIO port will vary according to the jumper’s setting respec- tively. 1-2 On: 2-3 On: +3.3V (default) DIO1 / DIO2...
- Page 72 Jumper Settings EC300/320/321/322-CR4G65 COM 3 and COM 4 RS232/RS422/RS485 Select COM 3 COM 4 (JP1) (JP3) JP1 (for COM 3) and JP3 (for COM 4) are used to confi gure the COM ports to RS232, RS422 (Full Duplex) or RS485. The pin function of the COM ports will vary according to these jumpers’...
- Page 73 Jumper Settings COM 3 and COM 4 RS232/Power Select COM 3 COM 4 (JP2) (JP4) JP2 and JP4 are used to confi gure COM 3 and COM 4 to pure RS232 or RS232 with power. The pin function of COM 3 and COM 4 will vary according to JP2’s and JP4’s set- ting respectively.
- Page 74 Jumper Settings Digital I/O Signal Voltage Select DIO1 DIO2 JP9 is used to confi gure DIO to signal voltage select. The pin function of DIO port will vary according to the jumper’s setting respec- tively. 1-2 On: 2-3 On: +3.3V (default) DIO1 / DIO2...
- Page 75 Jumper Settings EC300/310/320/321/322-CR4866 Digital I/O Signal Voltage Select JP9 is used to confi gure DIO to signal voltage select. The pin function of DIO port will vary according to the jumper’s setting respec- tively. 2-3 On: 1-2 On: +3.3V (default) DIO1 / DIO2...
-
Page 76: Chapter 5 - Ports And Connectors
Ports and Connectors Chapter 5 - Ports and Connectors Front Panel I/O Ports For EC300/310/320/321/322 Alert LED Reset Power USB 2.0 HDD LED Wi-Fi Module Wi-Fi Module Antenna Hole Antenna Hole The front panel I/O ports consist of the following: •... -
Page 77: Usb Ports
Ports and Connectors USB Ports USB 7 USB 6 USB 5 USB 2.0 USB 4 USB allows data exchange between your computer and a wide range of simulta- neously accessible external Plug and Play peripherals. The system board is equipped with 4 USB 2.0/1.1 ports at the front panel I/O ports. - Page 78 Ports and Connectors Wake-On-USB Keyboard/Mouse The Wake-On-USB Keyboard/Mouse function allows you to use a USB keyboard or USB mouse to wake up a system from the S3/S4 (STR - Suspend To RAM) state. To use this function: • Jumper Setting It must be set to “2-3 On: +5V_standby”.
-
Page 79: Rear Panel I/O Ports
Ports and Connectors Rear Panel I/O Ports For EC300 Speaker-out USB 3.0 COM1 Alert Reset COM2 DC-In Power USB 2.0 COM6 COM3 GPIO USB 2.0 COM4 COM5 EC300-CR6881 Speaker-out COM1 Alert Reset COM2 DC-In USB 3.0 COM4 COM6 GPIO COM5 COM3 GPIO Power... - Page 80 Ports and Connectors USB 3.0 Speaker-out COM1 Alert Reset DC-In COM2 Power COM4 GPIO GPIO COM3 EC300-CR4G65 USB 3.0 Speaker-out Alert COM1 Reset DC-In COM2 Power COM4 GPIO PoE Gigabit LAN COM3 EC300-CR4866 The rear panel I/O ports consist of the following: EC300 - CR6881 •...
- Page 81 Ports and Connectors EC300 - CR6G60 • 1 DC-in power jack: 3-pole Phoenix terminal block • 1 Speaker-out: 2W 3.5mm audio jack • 1 VGA: DB-15 D-sub • 2 Gigabit LAN: RJ45 with LEDs • 6 COM: DB-9 D-sub (RS232/422/485) •...
- Page 82 Ports and Connectors For EC310 Speaker-out USB 3.0 Reset COM1 Alert COM2 DC-In Power PCI slot USB 2.0 COM6 COM3 GPIO USB 2.0 COM4 COM5 EC310-CR6881 USB 3.0 Speaker-out COM1 Alert Reset COM2 DC-In PCI slot COM6 COM4 GPIO GPIO COM5 COM3 Power...
- Page 83 Ports and Connectors USB 3.0 Speaker-out COM1 Alert COM2 Reset DC-In COM4 GPIO PoE Gigabit LAN COM3 Power EC310-CR4866 The rear panel I/O ports consist of the following: EC310 - CR6881 • 1 DC-in power jack: 3-pole Phoenix terminal block •...
- Page 84 Ports and Connectors EC310 - CRA060 • 1 DC-in power jack: 3-pole Phoenix terminal block • 1 Speaker-out: 2W 3.5mm audio jack • 1 VGA: DB-15 D-sub • 2 Gigabit LAN: RJ45 with LEDs • 4 COM: DB-9 D-sub (RS232/422/485) •...
- Page 85 Ports and Connectors For EC320/321/322 Speaker-out USB 3.0 COM1 Alert Reset COM2 DC-In Power PCI/PCIe x16 slot COM6 COM3 GPIO USB 2.0 COM5 COM4 USB 2.0 EC320/321/322-CR6881 USB 3.0 Speaker-out COM1 Alert Reset COM2 DC-in Power COM4 PCI/PCIe x16 slots COM6 GPIO GPIO...
- Page 86 Ports and Connectors USB 3.0 Speaker-out COM1 Alert Reset COM2 DC-In Power PCI/PCIe x16 slots COM9 COM7 COM5 COM3 COM10 COM8 COM6 COM4 EC320/321/322-CRA060 Speaker-out USB 3.0 COM1 Alert Reset COM2 DC-In Power COM4 GPIO PCI/PCIe x16 slot GPIO COM3 EC321/322-CR4G65...
- Page 87 Ports and Connectors Speaker-out USB 3.0 COM1 Alert Reset COM2 DC-In Power GPIO PCI/PCIe x16 slot COM4 PoE Gigabit LAN COM3 EC320/321/322-CR4866 The rear panel I/O ports consist of the following: EC320/321/322 - CR6881 • 1 DC-in power jack: 3-pole Phoenix terminal block •...
- Page 88 Ports and Connectors EC320/321/322 - CRA060 • 1 DC-in power jack: 3-pole Phoenix terminal block • 1 Speaker-out: 2W 3.5mm audio jack • 1 VGA: DB-15 D-sub • 2 Gigabit LAN: RJ45 with LEDs • 4 COM: DB-9 D-sub (RS232/422/485) •...
-
Page 89: Lan Ports
Ports and Connectors LAN Ports LAN 2 LAN 1 LAN 1 LAN 2 The LAN ports allow the system board to connect to a local area network by means of a network hub. BIOS Setting Confi gure “Wake on LAN” in the Advanced menu (“SuperIO Confi guration” sub- menu) of the BIOS. -
Page 90: Usb Ports
Ports and Connectors USB Ports USB 1 USB 0-1 USB 0 USB 3.0 USB allows data exchange between your computer and a wide range of simulta- neously accessible external Plug and Play peripherals. The system board is equipped with 2 USB 3.0 port at the rear panel I/O ports. -
Page 91: Dvi Port
Ports and Connectors DVI Port The DVI-I port is used to connect an LCD monitor. Connect the display device’s cable connector to the DVI-I port. After you plug the cable connector into the port, gently tighten the cable screws to hold the connec- tor in place. -
Page 92: Vga Port
Ports and Connectors VGA Port The VGA port is used for connecting a VGA monitor. Connect the monitor’s 15-pin D-shell cable connector to the VGA port. After you plug the monitor’s cable con- nector into the VGA port, gently tighten the cable screws to hold the connector in place. -
Page 93: Speaker-Out
Ports and Connectors Speaker-out Speaker out This jack is used to connect a headphone or external speakers. -
Page 94: Digital Input/Output
Ports and Connectors Digital Input/Output The Digital I/O connector provides powering-on function to an external device that is connected to this connector. Digital Output/ Input Pin Assignment DIO1 DIO2 DIO3 DIO4 DIO5 DIO6 DIO7 DIO8... -
Page 95: Com Ports
Ports and Connectors COM Ports COM 1 COM 2 COM 1/COM 2: RS232/422/485 The pin functions of COM port 1 and COM port 2 will vary according to JP11’s and JP13’s setting. The jumpers allow you to confi gure the Serial COM ports to RS232, RS422 (Full Duplex) or RS485. -
Page 96: Com 3 To Com 10 Rs232/422/485 Select (-Cra060)
Ports and Connectors COM 3 to COM 10 RS232/RS422/RS485 Select EC300/310/320/321/322-CRA060 COM 4 COM 5 COM 10 COM 3 COM 6 COM 9 COM 7 COM 8 (JP2) (JP3) (JP8) (JP1) (JP4) (JP5) (JP6) (JP7) JP1 (for COM 3) to JP8 (for COM 10) are used to confi gure the COM ports to RS232, RS422 (Full Duplex) or RS485. -
Page 97: Com 6 And Com 7 Rs232/Power Select
Ports and Connectors COM 6 and COM 7 RS232/Power Select JP10 COM 6 COM 7 (JP9) (JP10) JP9 and JP10 are used to confi gure COM 6 and COM 7 to pure RS232 or RS232 with power. The pin function of COM 6 and COM 7 will vary according to JP9’s and JP10’s set- ting respectively. -
Page 98: Com 3 To Com 6 Rs232/422/485 Select (-Cr6881)
Ports and Connectors COM 3 to COM 6 RS232/RS422/RS485 Select EC300/310/320/321/322-CR6881 COM 4 COM 3 COM 5 COM 6 (JP2) (JP1) (JP5) (JP8) JP1 (for COM 3), JP2 (for COM 4), JP5 (for COM 5) and JP8 (for COM 6) are used to confi... -
Page 99: Com 3 To Com 6 Rs232/Power Select
Ports and Connectors COM 3 to COM 6 RS232/Power Select COM 4 COM 3 COM 5 COM 6 (JP6) (JP3) (JP4) (JP7) JP3, JP4, JP6 and JP7 are used to confi gure COM 3 to COM 6 to pure RS232 or RS232 with power. -
Page 100: Com 3 To Com 6 Rs232/422/485 Select (-Cr6G60)
Ports and Connectors COM 3 to COM 6 RS232/RS422/RS485 Select EC300/310/320/321/322-CR6G60 COM 4 COM 3 COM 5 COM 6 (JP2) (JP1) (JP5) (JP8) JP1 (for COM 3), JP2 (for COM 4), JP5 (for COM 5) and JP8 (for COM 6) are used to confi... -
Page 101: Com 3 To Com 6 Rs232/Power Select
Ports and Connectors COM 3 to COM 6 RS232/Power Select COM 4 COM 3 COM 5 COM 6 (JP6) (JP3) (JP4) (JP87) JP3, JP4, JP6 and JP7 are used to confi gure COM 3 to COM 6 to to pure RS232 or RS232 with power. -
Page 102: Com 3 And Com 4 Rs232/422/485 Select (-Cr4G65)
Ports and Connectors COM 3 and COM 4 RS232/RS422/RS485 Select EC300/320/321/322-CR4G65 COM 3 COM 4 (JP1) (JP3) JP1 (for COM 3) and JP3 (for COM 4) are used to confi gure the COM ports to RS232, RS422 (Full Duplex) or RS485. The pin function of the COM ports will vary according to the jumper’s setting. -
Page 103: Com 3 And Com 4 Rs232/Power Select
Ports and Connectors COM 3 and COM 4 RS232/Power Select COM 3 COM 4 (JP2) (JP4) JP2 and JP4 are used to confi gure COM 3 and COM 4 to pure RS232 or RS232 with power. The pin function of COM 3 and COM 4 will vary according to JP2’s and JP4’s set- ting respectively. -
Page 104: Dc-In
Ports and Connectors DC-in DC-in This jack is considered a low power solution. Connect a DC power cord to this jack. -
Page 105: Poe Lan Ports
Ports and Connectors PoE LAN Ports The PoE (Power over Ethernet) LAN port allows the system board to connect to a local area network and provide electrical power by means of a network hub. The port is fully IEEE std 802.3af-2003 compliant. Per PoE port power outputs 48V DC 15.4 watts. -
Page 106: I/O Connectors Chassis Intrusion Connector
Ports and Connectors I/O Connectors Chassis Instrusion Connector Chassis signal Ground The board supports the chassis intrusion detection function. Connect the chas- sis intrusion sensor cable from the chassis to this connector. When the system’s power is on and a chassis intrusion occurred, an alarm will sound. When the system’s power is off and a chassis intrusion occurred, the alarm will sound only when the system restarts. -
Page 107: Sata (Serial Ata) Connectors
Ports and Connectors SATA (Serial ATA) Connectors SATA 1 SATA 0 The Serial ATA connectors are used to connect Serial ATA devices. Connect one end of the Serial ATA cable to a SATA connector and the other end to your Serial ATA device. -
Page 108: Hdd Power Connectors
Ports and Connectors HDD Power Connectors +12V Ground Ground HDD Power The HDD power connectors supply power to SATA drives. Connect one end of the provided power cable to the HDD power connector and the other end to your storage device. -
Page 109: Mini Pcie Slot
Ports and Connectors Mini PCIe Slot Mini PCIe Slot Install Mini PCI Express cards such as network cards or other cards that comply to the Mini PCI Express specifi cations into the Mini PCI Express slot. -
Page 110: Cooling Fan Connectors
Ports and Connectors Cooling Fan Connectors Ground Sensor CPU Fan Ground Sensor System Fan The fan connectors are used to connect the cooling fan. The cooling fans will pro- vide adequate airfl ow throughout the chassis to prevent overheating the system board components. -
Page 111: Ps/2 Keyboard/Mouse Connector
Ports and Connectors PS/2 Keyboard/Mouse Connector 10 9 +5V_STB +5V_STB CHASSIS GND MS DATA KB DATA MS CLK KB CLK The PS/2 Keyboard/Mouse connector is used to connect PS/2 keyboard and PS/2 mouse by means of a PS/2 cable. Wake-On-PS/2 Keyboard/Mouse The Wake-On-PS/2 Keyboard/Mouse function allows you to use the PS/2 key- board or PS/2 mouse to power-on the system. -
Page 112: Front Panel Connector
Ports and Connectors Front Panel Connector 12 11 PWR-BTN RESET-SW HDD-LED PWR-LED HDD-LED - HDD LED This LED will light when the hard drive is being accessed. RESET SW - Reset Switch This switch allows you to reboot without having to power off the system. PWR-BTN - Power Switch This switch is used to power on or off the system. -
Page 113: Battery
Ports and Connectors Battery Battery The lithium ion battery powers the real-time clock and CMOS memory. It is an auxiliary source of power when the main power is shut off. Safety Measures • Danger of explosion if battery incorrectly replaced. •... -
Page 114: Compactflash Socket
Ports and Connectors CompactFlash Socket CompactFlash socket The CompactFlash socket is used for inserting a CompactFlash card. Compact- Flash card is a small removable mass storage device designed with fl ash tech- nology - a non-volatile storage solution that does not require a battery to retain data indefi... -
Page 115: Chapter 6 - Mounting Options
Mounting Options Chapter 6 - Mounting Options Wall Mounting The Wall Mounting kit includes the following: • 2 Wallmount brackets • Bracket screws 1. If rubber feet has been previously attached at the bottom of the system, please remove them first. Rubber feet... - Page 116 Mounting Options 2. At the bottom side of the system, use the provided mounting screws to se- cure the wallmount brackets on each side of the system. Mounting screw Wallmount bracket...
- Page 117 Mounting Options 357.10 R2.00 R2.50 Ø8.50 16.00...
-
Page 118: Chapter 7 - Bios Setup
BIOS Setup Chapter 7 - BIOS Setup Overview The BIOS is a program that takes care of the basic level of communication be- tween the CPU and peripherals. It contains codes for various advanced features found in this system board. The BIOS allows you to confi gure the system and save the confi... - Page 119 BIOS Setup Legends Keys Function Right and Left arrows Moves the highlight left or right to select a menu. Up and Down arrows Moves the highlight up or down between submenus or fi elds. <Esc> Exits to the BIOS Setup Utility. + (plus key) Scrolls forward through the values or options of the highlighted fi...
-
Page 120: Ami Bios Setup Utility
BIOS Setup AMI BIOS Setup Utility Main The Main menu is the fi rst screen that you will see when you enter the BIOS Setup Utility. Aptio Setup Utility - Copyright (C) 2011 American Megatrends, Inc. Main Advanced Chipset Boot Security Save &... -
Page 121: Advanced
BIOS Setup Advanced The Advanced menu allows you to confi gure your system for basic operation. Some entries are defaults required by the system board, while others, if enabled, will improve the performance of your system or let you set some features ac- cording to your preference. - Page 122 BIOS Setup ACPI Power Management Confi guration This section is used to confi gure the ACPI Power Management. Aptio Setup Utility - Copyright (C) 2011 American Megatrends, Inc. Advanced ACPI Power Management Confi guration Enables or Disables BIOS ACPI Auto Confi guration. [Disable] Enable ACPI Auto Confi...
- Page 123 BIOS Setup Trusted Computing This section confi gures settings relevant to Trusted Computing innovations. Aptio Setup Utility - Copyright (C) 2011 American Megatrends, Inc. Advanced Confi guration Enables or Disables Security Device Support [Disabled] BIOS support for security device. O.S. will not show Current Status Information Security Device.
- Page 124 BIOS Setup PC Health Status This section displays the SIO hardware health monitor. Aptio Setup Utility - Copyright (C) 2011 American Megatrends, Inc. Advanced Smart Fan Function Smart Fan Function Case Open Beep [Disabled] CPU Temperature : +66 C System Temperature : +39 C : N/A...
- Page 125 BIOS Setup Boundary 1 to Boundary 4 The range is from 0-127. Speed Count 1 to Speed Count 5 The range is from 1-100. Case Open Beep Set this fi eld to Enabled to allow the system to alert you of a chassis intru- sion event.
- Page 126 BIOS Setup CPU Confi guration This section is used to confi gure the CPU. It will also display the detected CPU information. Aptio Setup Utility - Copyright (C) 2011 American Megatrends, Inc. Advanced CPU Confi guration Enabled for Windows XP and Linux (OS optimized Intel (R) Core (TM) i7-2710QE CPU @ 2.10GHz for Hyper-Threading...
- Page 127 BIOS Setup SATA Confi guration This section is used to confi gure SATA functions. Aptio Setup Utility - Copyright (C) 2011 American Megatrends, Inc. Advanced Enable or disable SATA SATA Controller(s) [Enabled] SATA Mode Selection [IDE] Device. SATA Test Mode [Disabled] Serial ATA Port 0 Empty...
- Page 128 BIOS Setup If AHCI or RAID is selected in the SATA Mode Selection, it will display the following information: Aptio Setup Utility - Copyright (C) 2011 American Megatrends, Inc. Advanced Determines how SATA SATA Controller(s) [Enabled] controller(s) operate. SATA Mode Selection [AHCI] SATA Test Mode [Disabled]...
- Page 129 BIOS Setup Software Feature Mask Confi guration Aptio Setup Utility - Copyright (C) 2011 American Megatrends, Inc. Advanced Enable or disable SATA Software Feature Mask Confi guration device. Empty Serial ATA Port 0 Unknown Software Preserve [Enabled] Port 0 [Disabled] Hot Plug [Disabled]...
- Page 130 BIOS Setup Intel TXT (LT) Confi guration This section is used to confi gure the Intel Trusted Execution technology. Aptio Setup Utility - Copyright (C) 2011 American Megatrends, Inc. Advanced Intel Trusted Execution Technology Confi guration Intel TXT support only can be enabled/disabled if SMX is enabled.
- Page 131 BIOS Setup Intel Anti-Theft Confi guration This section is used to disable the PC at the hardware level in the event of loss or theft. Aptio Setup Utility - Copyright (C) 2011 American Megatrends, Inc. Advanced Enable/Disable Intel AT in Intel Anti-Theft Technology Confi...
- Page 132 BIOS Setup Intel AMT Confi guration Aptio Setup Utility - Copyright (C) 2011 American Megatrends, Inc. Advanced Intel AMT [Enabled] Enable/ Disable Intel (R) Active Management Un-Confi gure ME [Disabled] Technology BIOS Extension. Note: iAMT H/W is always enabled. This option just controls the BIOS extension execution.
- Page 133 BIOS Setup USB Confi guration This section is used to confi gure USB. Aptio Setup Utility - Copyright (C) 2011 American Megatrends, Inc. Advanced Enables Legacy USB USB Confi guration support. AUTO option disables legacy support if USB Devices: no USB devices are 1 Keyboard, 1 mouse, 2 Hubs connected.
- Page 134 BIOS Setup Device power-up delay Maximum time the device will take before it properly reports itself to the Host Controller. “Auto” uses default value: for a Root port it is 100 ms, for a Hub port the delay is taken from Hub descriptor.
- Page 135 BIOS Setup F81217 Second Super IO Confi guration This section is used to confi gure the serial port functions. Aptio Setup Utility - Copyright (C) 2011 American Megatrends, Inc. Advanced F81217 Second Super IO Confi guration Set Parameters of Serial Port 4 (COMB) F81217 Second Super IO Chip F81217 Second IO...
- Page 136 BIOS Setup F71879 Super IO Confi guration This section is used to confi gure the I/O functions supported by the onboard Super I/O chip. Aptio Setup Utility - Copyright (C) 2011 American Megatrends, Inc. Advanced Restore AC Power Loss F71879 Super IO Confi guration help.
- Page 137 BIOS Setup Serial Port 1 Confi guration to Serial Port 2 Confi guration Aptio Setup Utility - Copyright (C) 2011 American Megatrends, Inc. Advanced Serial Port 1 Confi guration Enable or Disable Serial Port (COM) [Enabled] Serial Port IO=3F8h; IRQ=4; Device Settings [Auto] Change Settings...
- Page 138 BIOS Setup Onboard ATA Controller Confi guration This section is used to enable or disable the onboard ATA controller. Aptio Setup Utility - Copyright (C) 2011 American Megatrends, Inc. Advanced Select an operative mode PATA Primary Master Not Present for ATA controller. [IDE Mode] ...
- Page 139 BIOS Setup Serial Port Console Redirection This section is used to enable or disable the console redirection. Aptio Setup Utility - Copyright (C) 2011 American Megatrends, Inc. Advanced Console Redirection En- COM0 (Disabled) Port is Disabled able or Disable. Console Redirection COM1 (Pci Bus0, Dev0, Func0) (Disabled) Console Redirection Port is Disabled...
- Page 140 BIOS Setup CPU PPM Confi guration Aptio Setup Utility - Copyright (C) 2011 American Megatrends, Inc. Advanced CPU PPM Confi guration Enable/Disable Intel SpeedStep EIST [Enabled] Turbo Mode [Enabled] CPU C3 Report [Enabled] CPU C6 Report [Enabled] CPU C7 Report [Enabled] Confi...
-
Page 141: Chipset
BIOS Setup Chipset Confi gures relevant chipset functions. Aptio Setup Utility - Copyright (C) 2011 American Megatrends, Inc. Main Advanced Chipset Boot Security Save & Exit PCH Parameters PCH-IO Confi guration System Agent (SA) Confi guration Select Screen ... - Page 142 BIOS Setup PCH-IO Confi guration Aptio Setup Utility - Copyright (C) 2011 American Megatrends, Inc. Chipset Intel PCH RC Version 1.1.0.0 PCI Express Coniguration Intel PCH SKU Name QM77 settings. Intel PCH Rev ID 04/C1 PCI Express Confi guration ...
- Page 143 BIOS Setup PCI Express Confi guration Aptio Setup Utility - Copyright (C) 2011 American Megatrends, Inc. Chipset Enable or disable PCI PCI Express Confi guration [Enabled] PCI Express Clock Gating Express Clock Gating for each root port. PCIE Port 1 is assigned to LAN ...
- Page 144 BIOS Setup xHCI Pre-Boot Driver Enables or disables xHCI Pre-Boot Driver support. xHCI Mode Mode of operation of xHCI controller. Options are Smart Auto, Auto, Enabled, Disabled. EHCI1 and EHCI2 These fi elds are used to enable or disable USB 2.0. PCH Azalia Confi...
- Page 145 BIOS Setup System Agent (SA) Confi guration Aptio Setup Utility - Copyright (C) 2011 American Megatrends, Inc. Chipset System Agent Bridge Name SandyBridge Confi g Graphics Settings. System Agent RC Version 1.1.0.0 VT-d Capability Supported Graphics Confi guration NB PCIe Confi...
- Page 146 BIOS Setup DVMT Total Gfx Mem This fi eld is used to select the graphics memory size used by DVMT mode. LCD Control Aptio Setup Utility - Copyright (C) 2011 American Megatrends, Inc. Chipset LCD Control Select the Video Device which will be activated [VBIOS Default] during POST.
- Page 147 BIOS Setup NB PCIe Confi guration Aptio Setup Utility - Copyright (C) 2011 American Megatrends, Inc. Chipset NB PCIe Confi guration To enable or disable the PEG0 Not Present PEG. Enable PEG [Auto] Select Screen Select Item Enter: Select +/ -: Change Opt.
- Page 148 BIOS Setup Memory Confi guration Aptio Setup Utility - Copyright (C) 2011 American Megatrends, Inc. Chipset Memory Information 1.2.2.0 Memory RC Version Memory Frequency 1060 Mhz Total Memory 8192 MB (DDR3) 4096 MB (DDR3) DIMM#1 DIMM#2 4096 MB (DDR3) CAS Latency (tCL) Minimum delay time CAS to RAS (tRCDmin) Row Precharge (tRPmin)
-
Page 149: Boot
BIOS Setup Boot Aptio Setup Utility - Copyright (C) 2011 American Megatrends, Inc. Main Advanced Chipset Boot Security Save & Exit Boot Confi guration Number of seconds to Setup Prompt Timeout wait for setup activation Bootup NumLock State [On] key. 65535(0xFFFF) means Quiet Boot [Disabled]... - Page 150 BIOS Setup Option ROM Messages Set display mode for option ROM. INT19 TRAP Response When enabled, it allows the optional ROM to trap Int 19. CSM Parameters Aptio Setup Utility - Copyright (C) 2011 American Megatrends, Inc. Main Advanced Chipset Boot Security Save &...
-
Page 151: Security
BIOS Setup Security Aptio Setup Utility - Copyright (C) 2011 American Megatrends, Inc. Main Advanced Chipset Boot Security Save & Exit Password Description Set Administrator Password. If ONLY the Administrator’s password is set, then this only limits access to Setup and is only asked for when entering Setup. - Page 152 BIOS Setup Secure Boot Policy Aptio Setup Utility - Copyright (C) 2011 American Megatrends, Inc. Main Advanced Chipset Boot Security Save & Exit Internal FV [Always Execute] Image Execution Policy Option ROM [Deny Execute] on Security Violation. Removable Media [Deny Execute] Image load device path.
- Page 153 BIOS Setup Key Management Aptio Setup Utility - Copyright (C) 2011 American Megatrends, Inc. Main Advanced Chipset Boot Security Save & Exit System Mode Setup Launches the fi le browser Secure Boot Mode Disabled to set the platform key from fi le. Platform Key (PK) NOT INSTALLED ...
- Page 154 BIOS Setup Set DB from fi le Launches the fi le browser to set the authorized signature database from fi le. Get DB to File Stores the existing authorized signature database to fi le name DB in selected fi le system’s root. Delete the DB Deletes the authorized signature database.
-
Page 155: Save And Exit
BIOS Setup Save & Exit Aptio Setup Utility - Copyright (C) 2011 American Megatrends, Inc. Main Advanced Chipset Boot Security Save & Exit Save Changes and Reset Reset the system after Discard Changes and Reset saving the changes. Restore Defaults Save as User Defaults Restore User Defaults Boot Override... -
Page 156: Updating The Bios
BIOS Setup Updating the BIOS To update the BIOS, you will need the new BIOS fi le and a fl ash utility, AFUDOS. EXE. Please contact technical support or your sales representative for the fi les. To execute the utility, type: A:>... -
Page 157: Chapter 8 - Supported Software
CD and double-click “Setup”. If your product package does not include a CD/DVD, you can download the latest drivers from the DFI Download Center: http://www.dfi.com/DownloadCenter Once you are in the Download Center page, select your product or type the model name and click "Search"... - Page 158 Supported Software Microsoft .NET Framework 3.5 (for Windows XP only) Note: Before installing Microsoft .NET Framework 3.5, make sure you have up- dated your Windows XP operating system to Service Pack 3. To install the driver, click “Microsoft .NET Framework 3.5” on the main menu. 1.
- Page 159 Supported Software 3. Click Exit.
- Page 160 Supported Software Intel Chipset Software Installation Utility The Intel Chipset Software Installation Utility is used for updating Windows fi les so that the Intel chipset can be recognized and confi gured properly in the system. To install the utility, click “Intel Chipset Software Installation Utility” on the main menu.
- Page 161 Supported Software 3. Go through the readme document for more installa- tion tips then click Next. 4. Click Finish to exit setup.
- Page 162 Supported Software Intel Graphics Drivers To install the driver, click “Intel Graphics Drivers” on the main menu. 1. Setup is now ready to in- stall the graphics driver. Click Next. By default, the “Automatically run WinSAT and enable the Windows Aero desktop theme”...
- Page 163 Supported Software 3. Go through the readme document for system re- quirements and installation tips then click Next. 4. Setup is now installing the driver. Click Next to con- tinue. 5. Click “Yes, I want to restart this computer now” then click Finish.
- Page 164 Supported Software Intel Management Engine Drivers To install the driver, click “Intel Management Engine Driver” on the main menu. 1. Setup is ready to install the driver. Click Next. 2. Read the license agreement then click Yes.
- Page 165 Supported Software 3. Setup is currently installing the driver. After installation has completed, click Next. 4. After completing installa- tion, click Finish.
- Page 166 Supported Software Intel Rapid Storage Drivers To install the driver, click “Intel Rapid Storage Drivers” on the main menu. Note: Windows Vista is not supported. 1. Setup is ready to install the driver. Click Next. 2. Read the license agreement then click Yes.
- Page 167 Supported Software 3. Go through the readme document for more installa- tion tips then click Next. 4. Setup is currently installing the driver. After installation has completed, click Next. 5. Click “Yes, I want to restart this computer now.” then click Finish.
- Page 168 Supported Software Intel Turbo Boost Monitor To install the driver, click “Intel Turbo Boost” on the main menu. 1. Setup is now ready to in- stall the utility. Click Next. 2. Read the license agreement and then click “I accept the terms in the license agree- ment”.
- Page 169 Supported Software 4. Click Finish.
- Page 170 Supported Software Intel LAN Drivers To install the driver, click “Intel LAN Drivers” on the main menu. 1. Setup is ready to install the driver. Click Next. 2. Click “I accept the terms in the license agreement” then click “Next”. 3.
- Page 171 Supported Software 4. Click Install to begin the installation. 5. After completing installa- tion, click Finish.
- Page 172 Supported Software Audio Drivers To install the driver, click “Audio Drivers” on the main menu. 1. Setup is ready to install the driver. Click Next. 2. Click “Yes, I want to restart my computer now” then click Finish. Restarting the system will allow the new software in- stallation to take effect.
- Page 173 Supported Software Intel USB 3.0 To install the driver, click “Intel USB 3.0” on the main menu. 1. Setup is ready to install the graphics driver. Click Next. 2. Read the license agreement then click Yes. 3. Go through the readme document for more installa- tion tips then click Next.
- Page 174 Supported Software 4. Setup is currently installing the driver. After installation has completed, click Next. 5. After completing installa- tion, click Finish.
- Page 175 Supported Software Infineon TPM Driver and Tool (optional) To install the driver, click “Infi neon TPM driver and tool (option)” on the main menu. 1. TPM requires installing the Microsoft Visual C++ pack- age prior to installing the driver. Click Install. 2.
- Page 176 Supported Software 4. Click “I accept the terms in the license agreement” and then click “Next”. 5. Enter the necessary infor- mation and then click Next. 6. Select a setup type and then click Next.
- Page 177 Supported Software 7. Click Install. 8. The setup program is cur- rently installing the driver. 9. Click Finish.
- Page 178 Supported Software Click Yes to restart the system. Restarting the system will allow the new software installation to take effect.
- Page 179 Supported Software DFI Utility DFI Utility provides information about the board, Watchdog, DIO, and Backlight. To access the utility, click “DFI Utility” on the main menu. Note: If you are using Windows 7, you need to access the operating system as an administrator to be able to install the utility.
- Page 180 Supported Software 3. Enter “User name” and “Organization” information then click “Next”. 4. Click “Install” to begin the installation. 5. After completing installa tion, click “Finish”.
- Page 181 Supported Software MyGuard Hardware Monitor To install the driver, click “MyGuard Hardware Monitor” on the main menu. 1. Setup is ready to install the utility. Click Next. 2. Click Install to begin instal- lation. 3. Setup is currently installing the utility.
- Page 182 Supported Software 4. After completing instal- lation, click Finish to exit setup.
- Page 183 Supported Software F6 Floppy This is used to create a fl oppy driver diskette needed when you install Windows ® XP using the F6 installation method. This will allow you to install the operating system onto a hard drive when in AHCI mode. 1.
- Page 184 Supported Software Microsoft DirectX 9.0C (for Windows XP only) To install the driver, click “Microsoft DirectX 9.0C” on the main menu. 1. Click “I accept the agree- ment” then click Next. 2. To start installation, click Next. 3. Click Finish. Reboot the system for DirectX to take effect.
- Page 185 Supported Software Adobe Acrobat Reader 9.3 To install the reader, click “Adobe Acrobat Reader 9.3” on the main menu. 1. Click Next to install or click Change Destination Folder to select another folder. 2. Click Install to begin instal- lation. 3.
- Page 186 Supported Software UART Drivers 1. Locate for PCI Serial Port in Computer Manager. 2. Right-click on “PCI Serial Port”. 3. Select “Update Driver Soft- ware”. 4. Double-click Setup. 5. Click “Browse my computer for driver software”. 6. Click “Browse” to select the folder where the driver is located.
- Page 187 Supported Software 8. Click “Install this driver software anyway”. 9. Setup is now installing the driver. 10. After completing installa- tion, click “Close”.
- Page 188 Supported Software 11. After completing installing the driver, the serial ports on the system board are distributed among the COM ports in Computer Manager.
-
Page 189: Appendix A - Nlite And Ahci Installation Guide
NLITE and AHCI Installation Guide Appendix A - NLITE and AHCI Installation Guide nLite nLite is an application program that allows you to customize your XP installation disc by integrating the RAID/AHCI drivers into the disc. By using nLite, the F6 function key usually required during installation is no longer needed. - Page 190 NLITE and AHCI Installation Guide 4. Insert the XP installation disc into an optical drive. 5. Launch nLite. The Welcome screen will appear. Click Next. 6. Click Next to temporarily save the Windows installa- tion fi les to the designated default folder.
- Page 191 NLITE and AHCI Installation Guide 7. Click Next. 8. In the Task Selection dia- log box, click Drivers and Bootable ISO. Click Next.
- Page 192 NLITE and AHCI Installation Guide 9. Click Insert and then se- lect Multiple driver folder to select the drivers you will integrate. Click Next. Select only the drivers appropriate for the Win- dows version that you are using and then click OK. Integrating 64-bit driv- ers into 32-bit Windows or vice versa will cause...
- Page 193 NLITE and AHCI Installation Guide If you are uncertain of the southbridge chip used on your motherboard, select all RAID/AHCI con- trollers and then click Click Next.
- Page 194 NLITE and AHCI Installation Guide The program is currently integrating the drivers and applying changes to the installation. When the program is fi n- ished applying the chang- es, click Next.
- Page 195 NLITE and AHCI Installation Guide To create an image, se- lect the Create Image mode under the General section and then click Next. Or you can choose to burn it directly to a disc by selecting the Direct Burn mode under the General section.
- Page 196 NLITE and AHCI Installation Guide You have finished cus- tomizing the Windows XP installation disc. Click Finish. Enter the BIOS utility to confi gure the SATA con- troller to RAID/AHCI. You can now install Windows...
- Page 197 NLITE and AHCI Installation Guide AHCI The installation steps below will guide you in confi guring your SATA drive to AHCI mode. 1. Enter the BIOS utility and confi gure the SATA controller to IDE mode. 2. Install Windows XP but do not press F6. 3.
- Page 198 NLITE and AHCI Installation Guide 5. In the Hardware Update Wizard dialog box, select “No, not this time” then click Next. 6. Select “Install from a list or specifi c location (Ad- vanced)” and then click Next. 7. Select “Don’t search. I will choose the driver to install”...
- Page 199 NLITE and AHCI Installation Guide 8. Click “Have Disk”. 9. Select C:\AHCI\iaAHCI.inf and then click Open. Select the appropriate AHCI Controller of your hardware device and then click Next.
- Page 200 NLITE and AHCI Installation Guide A warning message ap- peared because the se- lected SATA controller did not match your hardware device. Ignore the warning and click Yes to proceed. Click Finish. The system’s settings have been changed. Win- dows XP requires that you restart the computer.
-
Page 201: Appendix B - Watchdog Timer
Watchdog Timer Appendix B - Watchdog Timer Watchdog Timer The following parameters are references for setting the time interval of the Watchdog Timer function. The system will regularly be “cleared” according to the set time interval. If the system hangs or fails to function, it will also reset ac- cording to the time interval so that your system will continue to operate. - Page 202 Watchdog Timer NEWIODELAY dx, SuperIo_DAT_Port al, dx NEWIODELAY endM mSuperio_LDN_Select Macro mSuperio_Set_Reg 07h, LDN endM mSuperio_Set_Reg Macro RegIndex, SetValue dx, SuperIo_CFG_Port al, RegIndex dx, al NEWIODELAY dx, SuperIo_DAT_Port al, SetValue dx, al NEWIODELAY endM NEWIODELAY Macro 0EBh, al ;Dummy I/O output for delay endM .code start:...
- Page 203 Watchdog Timer ; PLED mode register, WDTO time unit as second, Keyboard reset when WDTO time out mSuperio_GetSet_Reg 0F5h, 11110111b, 00000100b ; , Disable MS/KB interrupt reset WDTO counting, IRQ2 for WDTO mSuperio_GetSet_Reg 0F7h, 11111111b, 11000010b ; , WDTO Time out Value mSuperio_Set_Reg 0F6h, WDT_Counter mSuperio_Exit_Confi...
-
Page 204: Appendix C - System Error Message
System Error Message Appendix C - System Error Message When the BIOS encounters an error that requires the user to correct something, either a beep code will sound or a message will be displayed in a box in the mid- dle of the screen and the message, PRESS F1 TO CONTINUE, CTRL-ALT-ESC or DEL TO ENTER SETUP, will be shown in the information box at the bottom. - Page 205 System Error Message Hard Disk(s) fail (20) HDD initialization error. Hard Disk(s) fail (10) Unable to recalibrate fi xed disk. Hard Disk(s) fail (08) Sector Verify failed. Keyboard is locked out - Unlock the key The BIOS detects that the keyboard is locked. Keyboard controller is pulled low. Keyboard error or no keyboard present Cannot initialize the keyboard.
-
Page 206: Appendix D - Troubleshooting
Troubleshooting Appendix D - Troubleshooting Troubleshooting Checklist This chapter of the manual is designed to help you with problems that you may encounter with your personal computer. To effi ciently troubleshoot your system, treat each problem individually. This is to ensure an accurate diagnosis of the problem in case a problem has multiple causes. - Page 207 Troubleshooting The picture seems to be constantly moving. 1. The monitor has lost its vertical sync. Adjust the monitor’s vertical sync. 2. Move away any objects, such as another monitor or fan, that may be creating a magnetic fi eld around the display. 3.
- Page 208 Troubleshooting Serial Port The serial device (modem, printer) doesn’t output anything or is out- putting garbled characters. 1. Make sure that the serial device’s power is turned on and that the device is on-line. 2. Verify that the device is plugged into the correct serial port on the rear of the computer.
Need help?
Do you have a question about the EC310 Series and is the answer not in the manual?
Questions and answers