Advertisement
Quick Links
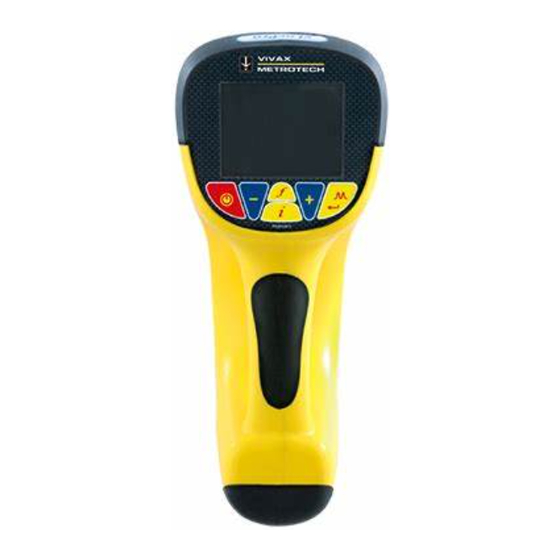
vLocCam Receiver Display
1
Digital display of signal response
2
Loudspeaker Status
3
Alkaline & Rechargeable Battery Status
4
Peak Signal Indication
5
Frequency
6
Location Mode Select
7
Gain Control (increase gain)
8
Information Depth/Current Measurement
9
Gain Control (reduce gain)
10
On/Off Control
11
Frequency Select
12
Compass Line Direction Indicator
13
Left vs Right Indication
14
db Gain Setting
15
Analogue display of signal response
16
Continuous Depth
Location Mode
17
(Peak, Null, Sonde, Broad, Peak Arrows)
Disclaimer: All product availability or product accessory information is subject to change without notice.
vLocCam Quick Start Guide (V3.0)
Locating the camera head
Switch on the transmitting Sonde using the controls on
the front of the vCam control module.
Switch on by depressing "13". Pressing "14" together
with "13" toggles the frequency through 512Hz, 640Hz
and 33kHz.
See the vCam user manual for full functions of the
control module.
Select 33kHz unless detecting a camera head that is
within a cast iron pipe. In this case, use 512Hz if in a
60Hz environment such as the USA, or 640Hz if in a
50Hz environment such as Europe and much of the rest
of the world.
Note: Only a very weak or no signal will be detected
through steel pipes.
Check the distance reading on the counter of the vCam
and start the search for a signal approximately 10m
before the suspected position of the camera head.
Switch on the vLocCam and use the "f" button to select
the frequency matching the transmitter.
vCamDigital Control Panel
Advertisement

Related Manuals for Vivax Metrotech vLocCam


Summary of Contents for Vivax Metrotech vLocCam
- Page 1 10m before the suspected position of the camera head. Switch on the vLocCam and use the “f” button to select the frequency matching the transmitter. Disclaimer: All product availability or product accessory information is subject to change without notice.
- Page 2 50% on the display. Sweep the area using a sweep pattern as shown below. When the vLocCam passes a cable that is radiating a Finally rotate the vLocCam receiver signal, the signal strength will increase. It may be to detect the biggest signal again.
- Page 3 Quick Start Guide (V3.0) When a signal is detected sweep the locator backwards AA Battery Pack (Removable) and forwards to detect the largest signal. Impact Protection Care should be taken when charging batteries – NEVER repeatedly recharge batteries (or turn power off &...
- Page 4 Quick Start Guide (V3.0) Using the Compass Feature to locate Sonde Switch on the vLocCam. Select the frequency to match the Sonde frequency. Use the mode button to select Sonde. Stand in the approximate vicinity of the Sonde. Press the “+”...
Need help?
Do you have a question about the vLocCam and is the answer not in the manual?
Questions and answers