Advertisement
Introduction
Thank you for choosing Creality. For your convenience, please read through this User Manual before you start and follow the instructions provided carefully. Creality is always ready to provide you with high-quality services. If you encounter any issues or have any questions when using our products, please use the contact information at the end of this manual to contact us. To further improve your user experience, you can find more about our devices via the following methods:
User manual: You can find instructions and videos in the memory card provided with the printer.
You can also visit our official website (https://www.creality.com) to find information regarding software, hardware, contact information, device instructions, device warranty information, and more.
Firmware Upgrade
- To upgrade the WiFi firmware, you can upgrade the firmware via the Creality Cloud OTA;
- To upgrade the equipment firmware, you can visit https://www.creality.com, click on Service Center → Firmware/ Software Download → Download the required firmware, install and use it.
Videos showing the operation of the products and after-sales service
- Please visit Creality Cloud: https://www.crealitycloud.com/product, click on "Products" and select the right model, and then click on "Related" to view the tutorials on after-sales service;
- Or contact our after-sales service center at +86 755 3396 5666, or send e-mail to cs@creality.com.
Instructions for Use
- Do not use this printer by methods or operations that are not described in this manual, otherwise it may result in accidental injury or property damage;
- Do not place this printer near flammable materials, explosive materials or high heat sources. Please place this printer in a ventilated, cool and low-dust environment;
- Do not place this printer in a vibrating or any other unstable environment, as the printing quality will be compromised when the printer shakes;
- Please use the filament recommended by the manufacturer, otherwise the nozzle may be clogged or the printer may be damaged;
- Please use the power cord provided with the printer and do not use the power cord of other products. The power plug must be plugged into a three-hole socket with a ground wire;
- Do not touch the nozzle or hotbed while the printer is in operation, otherwise you may get burned;
- Do not wear gloves or accessories while operating the printer, otherwise the moving parts may cause accidental injury including cuts and lacerations;
- After the printing process is complete, please use tools to clean up the filament on the nozzle while the nozzle is still hot. Do not touch the nozzle with your hands when cleaning, otherwise your hands may get burned;
- Please regularly clean the printer body with a dry cloth while the power is off, and wipe off dust, sticky printing materials, and foreign objects on the guide rails;
- Children under the age of 10 must not use this printer without adult supervision in order to avoid accidental injury;
- This printer has a safety protection mechanism. Please do not manually move the nozzle or printing platform quickly while the printer is on, otherwise the printer will automatically power off for protection;
- Users should abide by the laws and regulations of the corresponding country and region where the equipment is located (place of use), abide by professional ethics, and pay attention to safety obligations. The use of our products or equipment for any illegal purpose is strictly prohibited. Our comp any is not responsible for the relevant legal responsibilities of any violators.
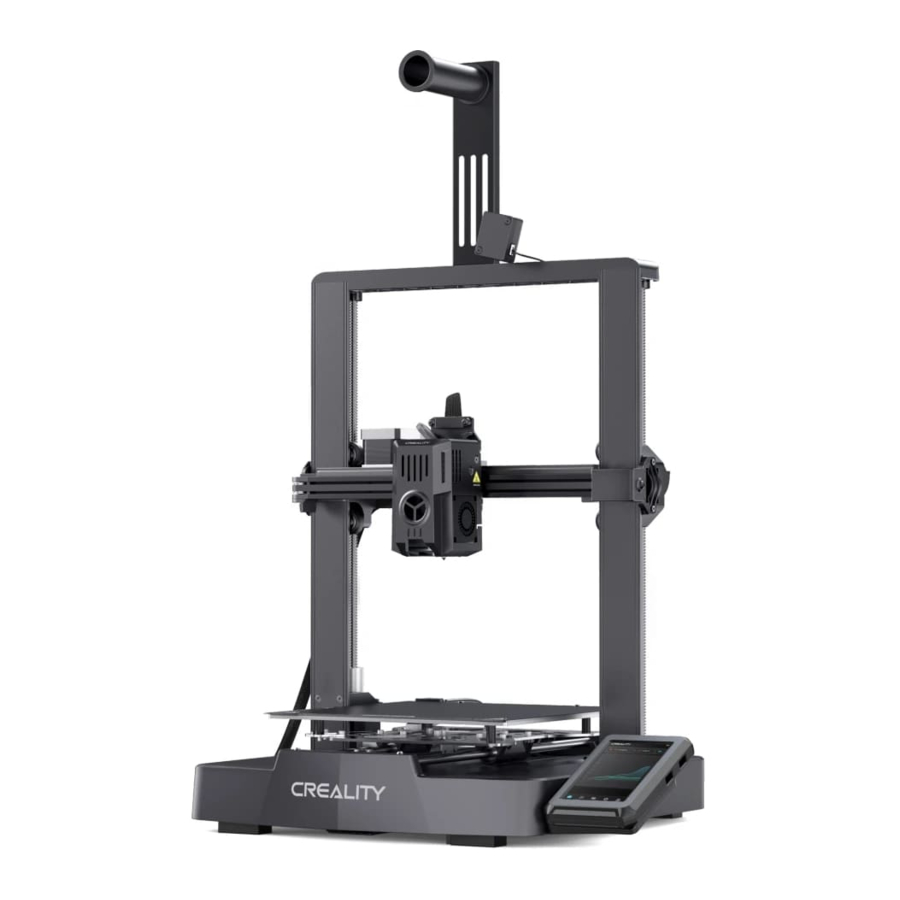
About the Printer

- Print platform
- X-axis kit
- Extruder kit
- Material rack and filament detection assemblies
- X-axis tensioner
- Display screen
- USB port 1
- USB port 2
- Power outlet
- Voltage regulation gear
- Y-axis tensioner
- Z-axis motor
- X-axis support
- X-axis motor
- Coupler
- Power switch
Assembly Procedure
Gantry frame

- The gantry is placed in the base card slot, and the broken material detection port is passed through the bottom shell pair interface, and it is fixed with M3*14 screws;
- Dock the filament detection line port.
- Secure the bottom shell with M3*14 screws.
- Secure the bottom shell and gantry frame with M3*8 screws.
Display screen
Put the display screen on the right side of the bottom assembly, align the screw holes and secure with M4*10 screws, then connect the display wiring.

Material rack and filament detection assemblies

- Install the material rack and material barrel according to the diagram;
- Secure the material rack and filament detection assembly onto the gantry frame, align the screw holes and lock it with M5*8 screws;
- Connect the filament detection switch.
Equipment Wiring

- First insert the nozzle wire into the nozzle adapter plate, then install the FFC fixing clip assembly, and use M3*8 screws to fix and lock it;
- Following the wire label instructions, first insert the extruder line into the cable fixing clip, and then connect the X-axis motor;
- Connect the Z-axis motor.
- Switch on the power

- Please ensure the correct position for the power supply switch and mains before supply connection, in order to avoid damage to the device.
- If the mains between 100V and 120V, please select the 115V for the power supply switch.
- If the mains between 200V and 240V, please select the 230V for the power supply switch(default is 230V).
 Tips: Please ensure proper wiring according to the provided diagram and avoid overturning or folding the extruder cable, as it may cause printing abnormalities.
Printer Auto Guidance
Auto Guidance


Note: The current interface is for reference only. As the functions are constantly upgraded, please refer to the latest firmware UI on the official website.
Auto Detection


Note: The current interface is for reference only. As the functions are constantly upgraded, please refer to the latest firmware UI on the official website.
About the User Interface

Note: The current interface is for reference only. As the functions are constantly upgraded, please refer to the latest firmware UI on the official website.

Long press on the model to select multiple options and copy locally
*Up to a maximum of 3 models can be copied

Click on the model file to access its details
*Checking "Print Calibration" can improve print quality

Note: The current interface is for reference only. As the functions are constantly upgraded, please refer to the latest firmware UI on the official website.
First Printing
Filament Loading
Load filaments

- Perform nozzle warm-up;
- Before first printing, cut the front of the filament at 45° and break it off straight;
- Thread the straightened filaments through the filament detection switch;
- Gently press the extrusion clamp and push the filaments that have passed through the filament detection switch through the hole to the bottom of the heat break, until there is some excess filaments protruding at the nozzle.
How to Replace the Filament?
Withdraw the filaments quickly and feed the new filaments after the nozzle is preheated and filaments are pushed a little forward.
Auto feed

LAN printing
※ Install Creality Print slicing software by opening the random data on the USB flash drive.
※ Log in to the official website to download for installation:https://www.crealitycloud.com/software-firmware/software?type=7


- Select "Language" and "Server"
- Add the printer
- Confirm the nozzle diameter
- Import model files


- Set filament type
- Adjust parameter configuration and click on "Slice"
- After slicing is done, click on "LAN printing"
- Add equipment: can be added either by "scan to add" or "manually add".
Note: The current interface is for reference only. As the functions are constantly upgraded, please refer to the latest firmware UI on the official website.

- Add a device: a. Scan Add → Select device
Click "Settings" → "Network" to view the IP address of the connected network
Add a device: b. Add a device by manually entering the IP address - Device list
- Equipment printing information details
Note: The current interface is for reference only. As the functions are constantly upgraded, please refer to the latest firmware UI on the official website.
USB flash drive printing

- Insert the USB flash drive into any USB port
- Select the model from the USB flash drive
- Click on "Print"
- Printing...
Tips:
- For details on using the software, please refer to the slicing software user manual on the USB flash disk.
- Saved files must be placed in the root directory (not a subdirectory) of the USB flash disk.
- It is recommended that you name the files using Latin alphabet, numbers, and common characters.
- Do not insert or remove the USB flash disk during the printing process.
Equipment Maintenance
Platform plate removal and maintenance
1.
- When printing is finished, wait for the platform plate to cool before removing the printing platform with the model attached;
- Slightly bend the platform with both hands to separate the model from the platform.
![]()

- If there are residual filaments on the platform plate, scrape them off lightly with a blade and print again.
![]()
- If the first layer of the model is not properly glued, it is recommended to apply solid adhesive evenly on the surface of the platform plate.
![]()


Tips:
- The printing platform is not easy to bend too large in daily use, and it is impossible to prevent deformation from being unusable;
- The printing platform is a perishable part, and it is recommended to replace it regularly to ensure that the first layer of the model sticks properly.
Maintenance of screw rod, optical axis and guide rail
It is recommended to purchase lubricant and perform regular lubrication maintenance on the screw rods, optical shafts, and guide rail areas.
Screw rod area

Optic axis and guide rail area

Guide rail area

Optical axis area

Nozzle Replacement

- Remove the silicone protective cover
- Remove the old nozzle
- Mount a new nozzle
- Mount the silicone protective cover
 Warnings:
- To replace the nozzle, you need to preheat the nozzle first;
- Prevent scalding when replacing nozzles which are hot;
- Use a tool to hold the heating block in place when removing the nozzle to avoid damage to the components.
Equipment Parameters
| Model | Ender-3 V3 KE |
| Modeling Technolog | FDM |
| Modeling Dimensions | 220*220*240mm |
| Leveling Method | Auto-leveling with CR-Touch |
| Number of Nozzles | 1pcs |
| Extruder Diameter | 0.4 mm (standard) |
| Slice Thickness | 0.1-0.35mm |
| Precision | ±0.1mm |
| Typical Printing Speed | 300mm/s |
| Maximum Printing Speed | 500mm/s |
| Maximum Acceleration | 8000mm/s² |
| Nozzle Temperature | ≤300℃ |
| Hotbed Temperature Ambient Temperature | ≤100℃ 5℃~35℃ |
| Filaments | PLA/PETG/ABS/TPU(95A)/ASA |
| Rated Power | 350W |
| Input voltage | 100-120V~, 200-240V~, 50/60Hz |
| Power Loss Recovery | YES |
| Filament detection | YES |
| Printing Method | LAN printing/USB flash drive printing/APP printing |
| Slicing Software | STL/OBJ/3MF/AMF |
| File Format | Creality print/Cura 5 and later/Simplify3D |
| Operating Systems | Windows/Mac OS/Linux |
| Language | English/ Español/ Deutsche/ Français/ Pусский/ Português/ Italiano/ Türk/ 日本語/ 中文 |
Circuit Connecting

18th Floor, JinXiuHongDu Building, Meilong Road, Xinniu Community,
Minzhi Street, Longhua District, Shenzhen City, China.
Official Website: www.creality.com
Tel: +86 755-8523 4565
E-mail: cs@creality.com


Documents / Resources
References
![www.creality.com]() CREALITY - Official Website, Leading 3D Printer Supplier & Manufacturer
CREALITY - Official Website, Leading 3D Printer Supplier & Manufacturer![www.crealitycloud.com]() [Official] Creality Product Center - Compare different 3D printers
[Official] Creality Product Center - Compare different 3D printers![www.crealitycloud.com]() creality-print - 3D printing software of Creality Cloud
creality-print - 3D printing software of Creality Cloud![www.creality.com]() CREALITY - Official Website, Leading 3D Printer Supplier & Manufacturer
CREALITY - Official Website, Leading 3D Printer Supplier & Manufacturer
Download manual
Here you can download full pdf version of manual, it may contain additional safety instructions, warranty information, FCC rules, etc.
Advertisement


Need help?
Do you have a question about the Ender-3 V3 KE and is the answer not in the manual?
Questions and answers