Creality CR-10 Smart - 3D Printer Manual
- User manual (154 pages) ,
- User manual (36 pages) ,
- User manual (52 pages)
Advertisement
- 1 Introduction
- 2 Equipment parameters
- 3 Package Content
- 4 Install the Gantry Frame
- 5 Pull Rod Installation
- 6 Install the Rack
- 7 Install the touch screen
- 8 Cable Connection
- 9 Bed Leveling
- 10 Preheating Method
- 11 Load Filament
- 12 Pairing via Bluetooth
- 13 Creality Cloud print
- 14 Off-line print
- 15 Start Printing
- 16 Network reset
- 17 Printer maintenance
- 18 Circuit Wiring
- 19 Trouble-shooting
- 20 Documents / Resources
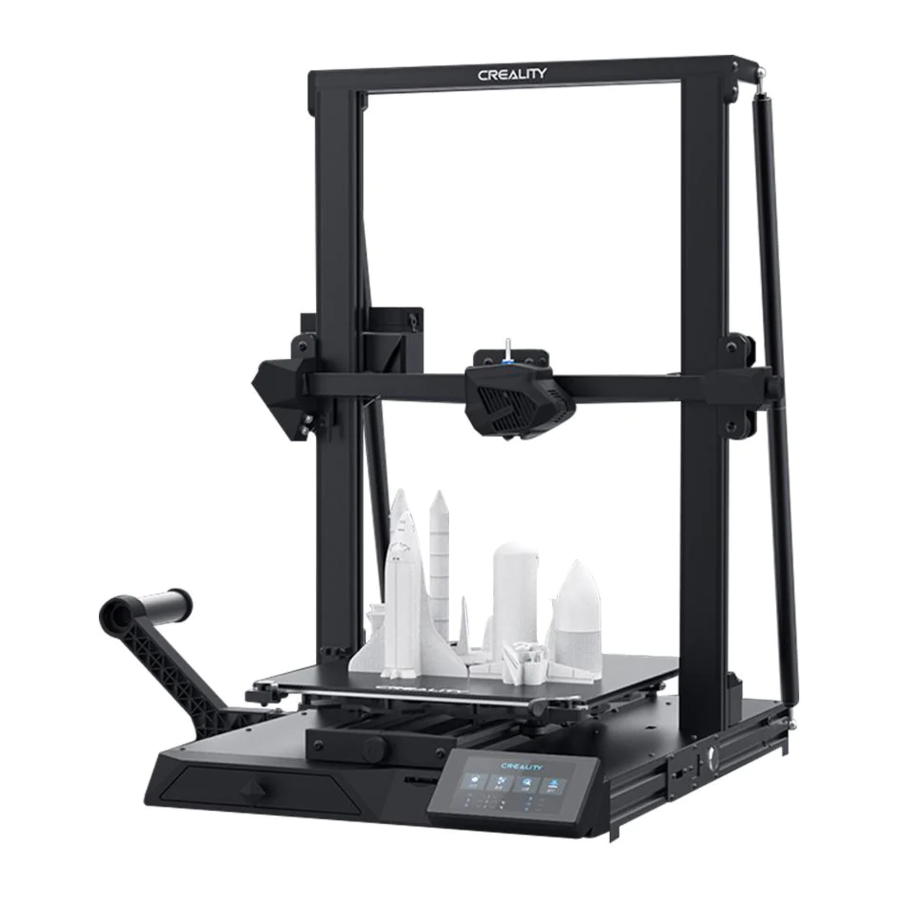
Introduction

- X Limit Switch
- Spotlight
- Nozzle Kit
- Feeding holder components
- Z-axis photoelectric switch
- Printing Platform
- Y-axis belt adjusting knob
- Tool Box
- Storage Card Slot
- Touch screen
- USB interface
- Network Interface
- Power-on button
- Power-on button X-axis belt adjusting knob
- Pull rod
- Screw rod
- Coupling
- Z-axis motor
- Power switch
- AC power supply
- Y-axis Motor
- X-axis Motor
- Filament Detector
- Extruder Motor
Equipment parameters
Basic Parameters
| Model | CR-10 Smart |
| Printing Size | 300*300*400mm |
| Molding Tech | FDM |
| Nozzle Number | 1 |
| Slice Thickness | 0.1mm-0.4mm |
| Nozzle Diameter | Standard 0.4mm |
| Precision | ±0.1mm |
| Filament | 1.75mm PLA/ABS/TPU/PETG/Wood |
| File Format | STL/OBJ/AMF |
| File Transfer | Wifi/Storage card |
| Slice Software | Creality Slicer/Cura/Repetier-Host/Simplify3D |
| Power Supply | Input: AC100-240V 50/60Hz Output: DC 24V |
| Total Power | 350W |
| Bed Temp | ≤100℃ |
| Nozzle Temp | ≤260℃ |
| Resume Printing | Yes |
| Filament Detector | Yes |
| Dual Z-axis | Yes |
| Auto Leveling | Yes |
| Language | English |
| Printing Speed | 80-100mm/s |
Package Content
 Tips: the above accessories are for reference only, please refer to the physical accessories!
Install the Gantry Frame

 Twist the coupling to raise the X axis to the position shown in Figure 16.
- Base Frame x 1
- Gantry Frame x 1
- M5x45 Sems Screw ×4
 Fix the lines on the nozzle kit with a black rolling belt as shown in the figure and re-fix it if any re-assembly before operation.

Two Z-axis profiles, installed on the inner step of the Y-axis bottom profile.

Pull Rod Installation
Adjust the proper length of assembled pull rod and install in the position shown in the figure

- M5×12 Hexagon flat round head screw x2
- M5x20 Hexagon flat round head screws x2 1
- M5 Large Flat gasket ×2
Install the Rack
Follow the installation diagram to assemble the rack on the left of the machine.

- Rack x 1
![]()
- Spool x 1
![]()


Install the touch screen

- Touch screen x 1
![]()

- Connect the FFC on the base with the touch screen.
- Fix the three screen locks on the touch screen to the studs of the base and press them into place.

Do not connect or disconnect the cables when the machine is powered on.
Cable Connection

- Connect the 15pin port to the nozzle adapter board as shown in the figure
- Connect Z-axis motor cable
- Connect the photoelectric switch wire
- Connect it to the power cord and turn on the power
- Long press the power button and wait the display screen to start
- Power Cord x 1
![]()

- Do not connect or disconnect the cables when the machine is powered on.
Bed Leveling

- Slelct"Level"to automatically level
- After the leveling is completed, adjust the Z-axis compensation value according to the adhesion of the printing consumables and the glass
 During the leveling process, please do not touch the Teflon tube and nozzle cable.
Preheating Method
Method 1

Notes:The interface of the manual of instruction is only for reference, and the actual interface shall be subject to the display of the machine.
Method 2

Notes: The print preheating standard is adjusted at the factory, PLA preheating standard: nozzle temperature 200 °, hot bed temperature 60 °, ABS preheating standard: nozzle temperature 240 °, hot bed temperature 70 °.If you need to adjust it due to printing materials or other reasons, you can adjust the parameters on the interface home page control → temperature → PLA / ABS preheat setting.
Load Filament
When you wait for the temperature to rise, hang the filament over the Filament Holder.

For loading filament smoothly, the end of the filament should be placed as shown above.
Installation method of threading fixture:

- Threading fixture x 1
- Clamp the threading fixture to the position shown in the figure as the figure shows.
- Thread the consumable through the consumable run-out detection box, then the threading fixture and finally into the extruder.
When it reaches the target temperature, insert the filament into the small hole of the Extruder until it reaches the nozzle through the filament cutting detection module. If the filament flows out from the nozzle, it presents that the filament is properly loaded.
The method of extrusion spring adjustment: turn right to loosen turn left to tighten (as shown in Fig. A)

Tips: How to replace the filament?
- Cutting filament near the Extruder and slowly feed new filament until they are fed into the new filament.
- Withdrawing the filament quickly and feeding the new faliment after nozzle preheated and filament pushed alittle forward.
Pairing via Bluetooth
- Download Creality Cloud

- Register

- Log in

- Scan QR Code

- Add equipment

- Connect to local WiFi

- Select model

- Select machine

- Printing

- Select device

- Start printing


Creality Cloud print
- Download Creality Cloud

- Register

- Log in


- Scan QR Code


- Network settings


- Connect machine WiFi


- Connect to local WiFi


- Select model


- Select machine


- Printing


- Select device


- Start printing


Off-line print
- Download the software from official website (www.cxsw3d.com) or find the software in storage card for installation.
![]()
- Double click to open the software.

- Select language→Next→Select your machine→Next→Finish.

- Open Creality 3D slicer → Load (Read file) → Select file.
![]()
- Generate G-code and save the gcode file to storage card.

- Insert the storage card
![]()


File names must be Latin letters or numbers, not Chinese characters or other special symbols
Notes: For details on the software instructions, please refer to the slicing software manual in the storage card!

Please don't insert or remove the storage card during printing.
Start Printing

Click print control

Select the file to be printed
Network reset

Note:
- In the first use or if you need to clear the owner information, you can click "Restore network" button on the screen, wait for 1-2 minutes and then try to scan the code again or connect the network via Bluetooth.
Printer maintenance

- Rotate the glass pick-and-place handleplate for platform replacement. (as shown in figure A)
- Then manually turn the knob to the appropriate tightness to avoid belt breakage. (as shown in figure B)
- Please use clean water to clean the dirt on the flat pallet.
- The machine will restart after power interruption and pop out the "resume printing" button. Please clear the redundant filament between the nozzle and model before resumption to avoid printing failure.
Circuit Wiring

Trouble-shooting


Scan To Learn More
SHENZHEN CREALITY 3D TECHNOLOGY CO., LTD.
Add: 18F,JinXiuHongDu Building, Meilong Blvd., Longhua Dist., Shenzhen, China 518131
Official Website: www.creality.com
Tel: +86 755-8523 4565
E-mail: info@creality.;com cs@creality.com

Documents / Resources
References
![www.cxsw3d.com]() 创想三维(CREALITY) - 3D打印机,教育/工业3D打印机领导品牌
创想三维(CREALITY) - 3D打印机,教育/工业3D打印机领导品牌![www.creality.com]() CREALITY - Official Website, Leading 3D Printer Supplier & Manufacturer
CREALITY - Official Website, Leading 3D Printer Supplier & Manufacturer
Download manual
Here you can download full pdf version of manual, it may contain additional safety instructions, warranty information, FCC rules, etc.
Advertisement


Need help?
Do you have a question about the CR-10 Smart and is the answer not in the manual?
Questions and answers