Advertisement
- 1 To Our Dear Users
- 2 Firmware Upgrade
- 3 NOTES
- 4 Equipment Introduction
- 5 Equipment Parameters
- 6 Parts List
- 7 Device Installation
- 8 Equipment Connecting
- 9 Adjusting Pulley Tightness
- 10 Auto Leveling
- 11 Filament Infill
- 12 Start Printing
- 13 Print Method
- 14 Routine Maintenance
- 15 Circuit Connecting
- 16 Documents / Resources
To Our Dear Users
To make using our products easier, please read this User Manual before you start and follow the instructions provided carefully.
Creality is always ready to provide you with high-quality services. If you encounter any issues or have any questions when using our products, please use the contact information at the end of this manual to contact us.
To further improve your user experience, you can find more about our devices via the following methods:
User manual: You can find instructions and videos in the SD card provided with the printer.
You can also visit our official website (https://www.creality.com) to find information regarding software, hardware, contact information, device instructions, device warranty information, and more.
Firmware Upgrade
Please visit our official website https://www.creality.com/download, switch to your language, then select your printer and model. Download the required firmware and install it to use it with your printer.
NOTES
- Do not use the printer any way other than described here in order to avoid personal injury or property damage.
- Do not place the printer near any heat source or flammable or explosive objects. We suggest placing it in a well-ventilated, low-dust environment.
- Do not expose the printer to violent vibration or any unstable environment, as this may cause poor print quality.
- Before using experimental or exotic filaments, we suggest using standard filaments such as ABS or PLA to calibrate and test the machine.
- Do not use any other power cable except the one supplied. Always use a grounded three-prong power outlet.
- Do not touch the nozzle, hotbed or motor while the printer is in operation, otherwise you may get burned.
- Do not wear gloves or loose clothing when operating the printer. Such cloths may become tangled in the printers moving parts leading to burns, possible bodily injury, or printer damage.
- When cleaning debris from the printer hotend, always use the provided tools. Do not touch the nozzle directly when heated. This can cause personal injury.
- Clean the printer frequently. Always turn the power off when cleaning, and wipe with a dry cloth to remove dust, adhered printing plastics or any other material off the frame, guide rails, or wheels. Use glass cleaner or isopropyl alcohol to clean the print surface.
- Children under 10 years old should not use the printer without supervision.
- This machine is equipped with a security protection mechanism. Do not manually move the nozzle or printing platform mechanism manually while booting up, otherwise the device will automatically power off for safety.
- Users should comply with the laws and regulations of the corresponding countries and regions where the equipment is located (used), abide by professional ethics, pay attention to safety obligations, and strictly prohibit the use of our products or equipment for any illegal purposes. Creality will not be responsible for any violators' legal liability under any circumstance.
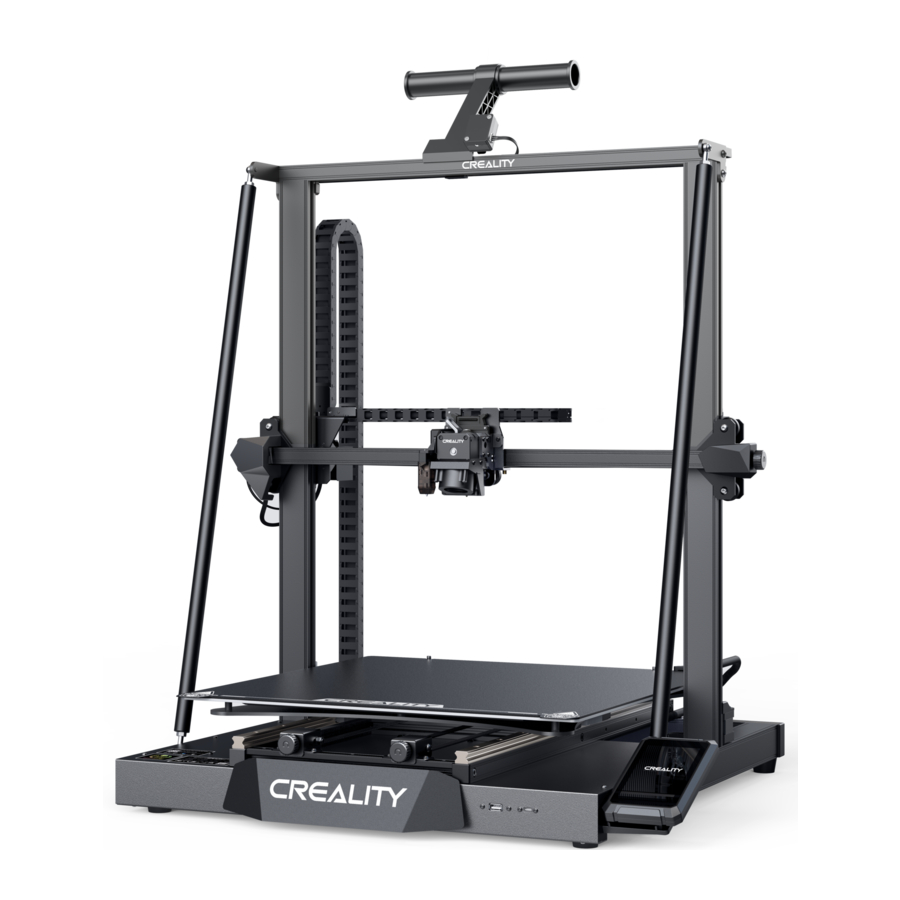
Equipment Introduction

- Z-axis Cable Drag Chain
- X-axis Limit Switch
- Extruder Extrusion Kit
- Printing Platform
- Y-axis Tensioner
- USB Flash Drive Port
- Material rack
- Filament Detection
- X-axis Cable Drag Chain
- X-axis Tensioner
- Camera Interface
- RJ45 Network Interface
- Display screen
- Type-c port
- Y-axis Limit Switch
- Y-axis Motor
- Pull Rod
- X-axis Motor
- Power Switch
- Z-axis Motor
Equipment Parameters

Parts List

Tips: the above accessories are for reference only. Please refer to the physical accessories!
Device Installation
Installation of X-axis Cable Drag Chain

- Insert the extruder adapter terminals into the appropriate interfaces.
- Fix the front end of the X-axis cable drag chain to the extruder back support plate with 3 M3*5 screws.
- Align the clips and then apply gentle pressure to assemble the drag chain at the rear end of the X-axis.
Gantry Frame Installation
Place the gantry frame on the base slot and pre-fix it first with 4 M5*45 screws aligned with the holes, then tighten to secure it.

Z-axis Cable Drag Chain Installation

- Insert the mainboard adapter cable into the appropriate interface and assemble the Z-axis cable drag chain at this end.
- Complete the assembly of the other end of the Z-axis cable drag chain.
Pull Rod Installation

- Fix one end of the pull rod to the top of the gantry frame with one M5*10 screw (just pre-tighten the screw).
- Fix the other end of the pull rod to the base with one M5*25 screw and one M5 flat gasket as shown, finally tighten the fixing screws on both ends of the pull rod; then complete the assembly of the pull rod on the other side using the same method.
Display screen Installation

- Assemble the display screen frame with three M4*20 screws.
- Insert the display screen cable into the appropriate interface and snap the cable into the buckle.
- Align the pins on the back of the display screen with the punched holes in the display screen frame and insert it, then slide it downwards to fasten it.
Material Rack Installation

- Fit the front slot of the material rack to the front slot of the top profile and press down on the end of the material rack to fix it.
- Screw the threaded ends of the two material barrels into the two ends of the material rack.
Equipment Connecting


- Follow the yellow label on the 6pin (4 wires) port to connect the Y-axis stepper motor;
- Follow the yellow label on the 6pin (4 wires) port to connect the Z-axis stepper motor;
- Connect the filament detection module by following the yellow label on the 3pin (3 wires) port;
- Connect the filament detection connector;
Adjusting Pulley Tightness
X/Z-axis Pulley Adjustment

Before switching on the machine, please check the tightness of the pulley by gently toggling it with your hand and check if it is idling or stuck (as shown in Figure A).
If yes, please use an open-end spanner to adjust the hexagonal eccentric isolation column to make it rotate smoothly.
Auto Leveling
- Click on "Prepare → Auto Leveling" in the main interface, and then click on "Start" after the machine has returned home, and wait for the machine to detect the platform to finish the auto leveling.

- Click on "Move " in the settings screen, observe the height value of the Z-axis, set the value to 0 and then click on "Move" to return.
Click on "Z-offset" and observe the gap between the nozzle and the platform by adjusting the Z-axis compensation value so that the distance between the nozzle and the platform are about the thickness of a piece of an A4 paper.

- Observe the print result after starting printing, and adjust the Z-axis compensation again if any exceptions occur.


 The above interface is for reference only.
Filament Infill
Preheating Method
- Preheating mode 1: Click "Prepare" and select "Manual " to input corresponding values in the column of nozzle temperature and hot bed temperature respectively.

- Preheating mode 2: Click "Prepare" to select "Manual", select "PLA Preheat" or "ABS Preheat" according to the type of consumables, and click "More Preheat" for other types of consumables.


Note: The printing preheating parameter standard has been adjusted at the factory. PLA preheating standard: nozzle temperature 200°, hot bed temperature 60°; ABS preheating standard: nozzle temperature 250°, hot bed temperature 100°. If adjustment is required due to printing materials or other reasons, you can select "Preheat PLA" or "Preheat ABS" in "Tune - ADV.SET" to adjust the corresponding temperature. Click "More preheat set" for the preheating temperature adjustment of other consumables.
Filament Infill

- When you wait for the temperature to rise, hang the filament over the material rack.
- Pass through the Filament Sensor, then press the extruder handle and insert the filament along the extruder hole to the nozzle position. If the filament flows out of the nozzle when the temperature reaches the target value, the filament is properly loaded.
Replacement of filaments:
- When the machine has just started printing, cut filaments near the extruder and slowly feed filaments until they are fed into the material barrel.
- When printing has finished and the machine has cooled down, heat the nozzle to 185℃+, then draw the filaments out and replace them by referring to step 1.
- To change the filaments during printing, adjust the printing speed to 10% and refer to step 2 for replacement.
Start Printing
Installation and use of the Creality Print slicing software
- Download at https://www.crealitycloud.com/software-firmware/software or find the software on a USB flash drive and install it;
![]()
- Choose a language;

- Choose a region;

- Choose a model;

- After the "Add Printer" is completed, adjust the basic parameters through the printer "Management": the screen size should be 480*800 and the preview image type should be jpg, otherwise the previews cannot be generated;
Note: Previews cannot be generated when using other slicing software;

- Click on "Import Model" and select the model file;

- Open the model and click on "Start Slicing";

- Click on "Export" when the slicing is finished and then save the finished file;

- Generate a g-code file → Save to USB flash drive.


The above interface is for reference only.
Print Method
Local printing from a USB flash drive
- Generate a g-code file using Creality Print slicing software and save it to a USB flash drive.

- Insert the USB flash drive and select the file you want to print.


For details on using the software, please refer to the slicing software user manual on the storage card.
 Do not plug or unplug the USB flash drive during the printing process.
 Tips: The file name must only contain Latin letters and digits. Chinese characters or special symbols must not be used.
Download and install Creality Cloud
- Search for "Creality Cloud" in the app shop, download and install it.
![www.apple.com]()
![play.google.com]()
![]()
- Sign up for an account.
![]()
- Log in.
![]()


The above interface is for reference only.
Creality Cloud networking mode 2: Printing by Wi-Fi matching
- Add a device;
![]()
- Reset the device;
![]()
- Scan the QR code on the device;
![]()
- Choose a networking method;
![]()
- Connect the device to Wi-Fi;
![]()
- Enter Wi-Fi password;
![]()
- Device connecting;
![]()
- Added successfully;
![]()
- Turn off device hotspot alerts.
![]()


The above interface is for reference only.
Routine Maintenance
Lubrication and maintenance
Tip: Please lubricate the guideways, sliders and screw rods in the blue area regularly (as shown in the figure). It is recommended to do it once every 500 hours of printing.

Use and maintenance of the magnetic adhesive sticker
Tips: This hotbed can be heated up to 100°C. It is strictly forbidden to remove the printing platform when the temperature of the hotbed is higher than 70°C. Since the printing platform is a wearing part, it is recommended to clean it regularly to ensure that the first layer of the model is adhered. Please replace it in time if it is damaged.
- Remove the printed model from the machine together with the platform and partially bend the platform slightly to separate the model from the platform.
![]()
- Filaments can be scraped off with a blade included in the tool box. Be cautious of safety when using the blade.
![]()
- When printing large models, it is recommended to apply solid glue evenly on the surface of the platform; if the platform is over-glued, it can be cleaned with tap water and wipe the surface dry afterwards.
![]()


Extruder kit maintenance
Tips:
Extruders are vulnerable parts. It is recommended to do the periodic inspection of extruder if it is used for more than three months to check whether the fan has foreign objects on it or whether it is damaged, which will affect the heat dissipation and cooling. If the extrusion is uneven, intermittent and the printed model has no extrusion or has false layer, it is recommended to do the heat break cleaning or replace the nozzle kit with a new one as a priority. Refer to the  nozzle kit.

Circuit Connecting

Since each model is different, the actual product may be different from the picture. Please refer to the actual product. The final interpretation right belongs to Shenzhen Creality 3D Technology Co., Ltd.

SHENZHEN CREALITY 3D TECHNOLOGY CO., LTD
Company Address: 18th Floor, JinXiuHongDu Building, Meilong Road, Xinniu Community Minzhi Street, Longhua District, Shenzhen City, China.
Official Website: www.creality.com
Business Tel: +86 755-8523 4565

Documents / Resources
References
![www.creality.com]() CREALITY - Official Website, Leading 3D Printer Supplier & Manufacturer
CREALITY - Official Website, Leading 3D Printer Supplier & Manufacturer![www.creality.com]() 3D Printer Slicer Software& Firmware Download - Creality 3D
3D Printer Slicer Software& Firmware Download - Creality 3D![www.crealitycloud.com]() batch-upload-models-tool - 3D printing software of Creality Cloud
batch-upload-models-tool - 3D printing software of Creality Cloud![www.apple.com]() App Store - Apple
App Store - Apple![play.google.com]() Google Play
Google Play![www.creality.com]() CREALITY - Official Website, Leading 3D Printer Supplier & Manufacturer
CREALITY - Official Website, Leading 3D Printer Supplier & Manufacturer
Download manual
Here you can download full pdf version of manual, it may contain additional safety instructions, warranty information, FCC rules, etc.
Advertisement


Need help?
Do you have a question about the CR-M4 and is the answer not in the manual?
Questions and answers