Advertisement
Notes
- Do not use the printer any way other than described herein in order to avoid personal injury or property damage.
- Do not place the printer near any heat source or flammable or explosive objects. We suggest placing it in a well-ventilated, low-dust environment.
- Do not expose the printer to violent vibration or any unstable environment, as this may cause poor print quality.
- Before using experimental or exotic filaments, we suggest using standard filaments such as ABS or PLA to calibrate and test the machine.
- Do not touch the nozzle or printing surface during operation as they may be hot. Keep hands away from machine while in use to avoid burns or personal injury.
- When cleaning debris from the printer hotend, always use the provided tools. Do not touch the nozzle directly when heated. This can cause personal injury.
- Clean the printer frequently. Always turn the power off when cleaning, and wipe with a dry cloth to remove dust, adhered printing plastics or any other material off the frame, guide rails, or wheels. Use glass cleaner or isopropyl alcohol to clean the print surface before every print for consistent results.
- This machine is equipped with a security protection mechanism. Do not manually move the nozzle and printing platform mechanism manually while booting up, otherwise the device will automatically power off for safety.
- Users should comply with the laws and regulations of the corresponding countries and regions where the equipment is located (used), abide by professional ethics, pay attention to safety obligations, and strictly prohibit the use of our products or equipment for any illegal purposes. Creality will not be responsible for any violators' legal liability under any circustance.
Parts List

Tool list

 Tips:
Tips:
the above accessories are for reference only, in kind prevail!
Interface Descriptions
Description of Mainboard interfaces and Connections

Description of nozzle interfaces 4.3 Description of Z-axis Adapter

Description of Z-axis Adapter

Product installation
Nozzle assembly and wire clamp installation
- Place the nozzle assembly on the mounting back panel of the extruder, pre-lock with four M3x6 hexagon socket head cap screw, and then tighten to fix it.

- Clip the wire clamp to the back panel of the X-axis motor.


Gantry frame installation
- Move the right profile of the bottom component out of the desktop about 35mm, and expose the installation holes.
- Place the gantry frame in the slot of the base, and pre-lock with two M5x45 hexagon socket head spring washer combination screws from the bottom to the top on the hole.
- Rotate the bottom assembly by 180° to ensure that the profiles on both sides are leveled up and down.
Pre-lock with two M5x45 hexagon socket head spring washer combination screws on the left hole, and then tighten to fix it. - Rotate the bottom assembly by 180°, and tighten the screw on the right side.
When tightening the screws, use the short side of the wrench.


Display installation
- Place the display bracket on the side of the right profile, and tighten it with three M4X18 hexagon flat round head screws.

- Align the pins on the back of the display with the large holes of the display bracket and insert them, and then slide down to tighten it.


Material rack installation
- Find the material pipe accessories, and fix the threaded end on the right end of the material rack.

- Fit the front slot of the installed material rack to the front slot of the profile, and then press down to clamp the bottom of the profile.


Equipment wiring
- Connect the nozzle to the 24pin port as shown in the figure.
- Connect the X and Z axis stepper motors according to the yellow label on 6pin (4 wires) port.
- Connect the X-axis limit switch as indicated by the yellow label on the 3pin (2 wires) port.
- Connect 3pin (3 wires) 2.0 port to the keysets, and 3pin (3 wires) 2.54 port to the filament detector.

 Note:
Note:
- Please ensure the correct position for the power supply switch and mains before supply connection, in order to avoid damage to the device.
- If the mains between 100V and 120V, please select the 115V for the power supply switch.
- If the mains between 200V and 240V, please select the 230V for the power supply switch (default is 230V).
Auto Leveling
(Please use CR-Touch auto-leveling first. If CR-Touch is damaged, please install Z-axis limit and manually level the bed. For details, please refer to the instructions stored in the SD card.)
- Turn on the equipment and select "Level".
Default operation: The printer first automatically returns to home for automatic calibration of 16 points, and then returns to home again to complete the leveling.

- Enter "prepare→Z-offset", adjust the Z-axis compensation value so that the height from the nozzle to the printing platform is about the thickness of a piece of A4 paper (0.08-0.1mm), click the knob to confirm, and complete the setting of Z-axis compensation value.


Auxiliary leveling
(When the inclination of the printing platform is larger than 2mm, CR-Touch leveling will fail. Please use the auxiliary leveling)
- Enter "Control → Reset configuration" to reset the printer parameters.

- Enter "Prepare→ Auto Home" and return to the starting position.

- Enter "Prepare → Move → Move Z", and clear the value.

- Enter "Prepare→Z-offset", adjust the Z-axis compensation value so that the height from the nozzle to the platform is almost the thickness of A4 paper (0.08-0.1mm), click the knob to confirm, and complete the center point leveling.

- Enter "Prepare → Disable stepper" to turn off all enabled motors.

- Adjust the knob at the bottom of the hot bed, move the nozzle to the four corners of the printing platform, so that the height of the nozzle to the printing platform is almost the thickness of A4 paper (0.08-0.1mm) to ensure that the four corners are leveled.


 |  | The nozzle is so far away from the platform that the filaments can't attach to the platform. | |
 |  | Extrude the filaments evenly to make them attach to the platform properly. | |
 |  | The nozzle is so close to the platform that the filaments are not extruded enough, or even scratch the platform. | |
Load Filaments
- In order to complete the loading smoothly, please trim the end of the filaments to an inclination of 45°.
- First pass the filament through the filament detector hole, then press the handle of the extruder, and insert the filament along the extruder hole until the nozzle position.
- Preheat the nozzle. When the temperature reaches the set value, you can see that there are filaments flowing out of the nozzle, and the loading is completed.
Replace filaments:
- In the case of no printing operation:
- Heat the nozzle to above 185℃ to soften the filaments in the nozzle. Then press the extrusion handle and pull out the filaments quickly to avoid getting stuck in the printer's pipe;
- Change the new filaments to the rack and install that according to step 8
- In the case of being printing:
- Pause printing first. When the printer stops working, press the extrusion handle and pull out the filaments quickly to avoid getting stuck in the printer's pipe;
- Replace the new filaments to the rack. Thread the filament through the filament sensor, press the extrusion handle through the filament sensor and insert the filaments from the feed hole of the extruder into the nozzle. Push the filaments to remove the residual filaments and resume printing after cleaning up.


First time Printing Instruction
- Log in to the official website to download (www.creality.com) or find the Creality software in the memory card and install it.
![]()
- Select Preferences in sequence → Configure Creality* Next → Select corresponding language → Next →Finish to complete the setting.


- Select Printer (Ender-3 S1)

- Enter the corresponding parameters → Close


- Open Creality Slicer
![]()
- Load File
![]()
- Select File


- Generate G code → Save to memory card

- Insert Memory Card User the screen knob to select the menu Select the desire print file.


It is important to note file name within the memory card must be in Latin letters or numbers. Chinese characters or any other
Reminder: Please refer to user manual within the provided special symbol cannot be displayed by the printer. memory card for software operation instructions.
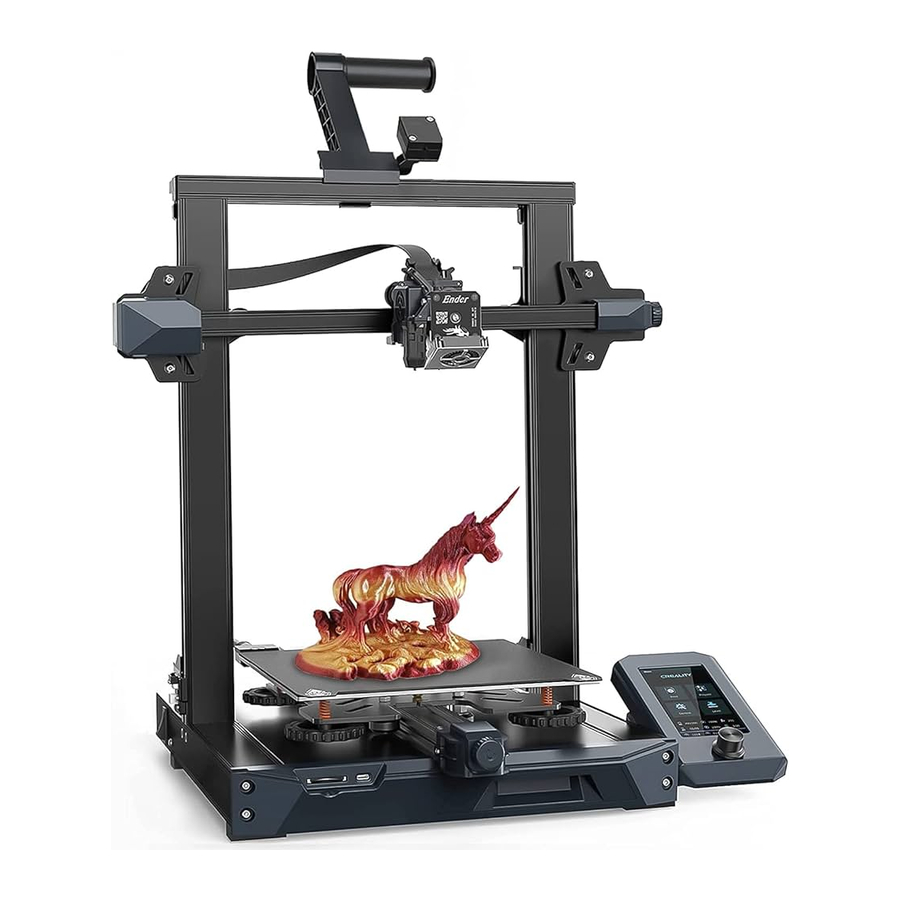
Equipment Introduction

- X-axis Limit Switch
- Nozzle Assembly
- Auto Leveling Assembly
- Printing Platform
- Memory Card Slot
- Type-C Connection
- Tool Box
- Spool Holder
- Filament Sensor
- X-axis Belt Tension Adjustment Knob
- Display
- Z-axis Motor Z2
- Y-Axis Limit Switch
- Voltage Toggle Switch
- Y-axis Motor
- X-axis Motor
- Y-axis Belt Tension Adjustment Knob
- Coupler
- Z-axis Motor Z1
- Power Switch
- Power Socket


The actual product may be different from the picture due to different models. Please refer to the actual product. Shenzhen Creality 3D Technology Co., Ltd. reserves the right of final interpretation.
SHENZHEN CREA LITY 3D TECHNOLOGY CO., L TD.
18F, JinXiuHongDu Building, Meilong Blvd., Longhua Dist., Shenzhen, China 518131
official Website: www.creality.com
Tel: +86 755-8523 4565
E-mail: info@creality.com cs@creality.com

Documents / Resources
References
Download manual
Here you can download full pdf version of manual, it may contain additional safety instructions, warranty information, FCC rules, etc.
Advertisement


Need help?
Do you have a question about the Ender-3 S1 and is the answer not in the manual?
Questions and answers