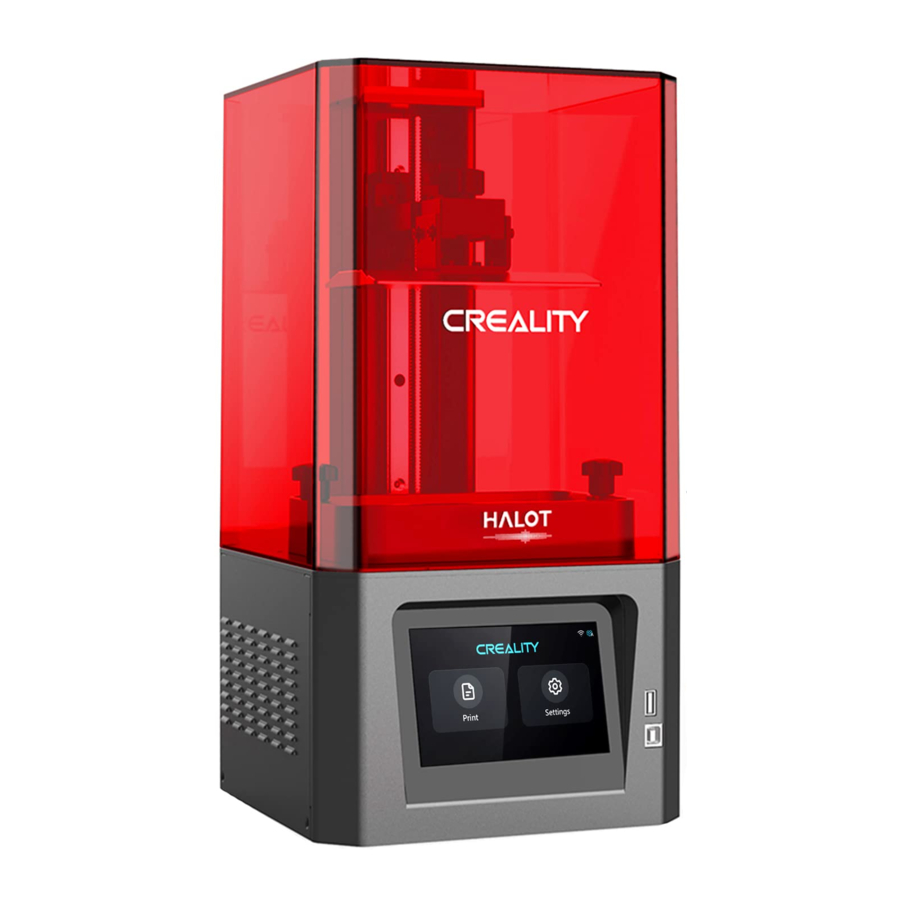
Creality HALOT-ONE - 3D Printer Manual
- User manual (28 pages) ,
- User manual (22 pages)
Advertisement
- 1 Introduction
- 2 Firmware Upgrade
- 3 Instructions for Use
- 4 About the Printer
- 5 Equipment parameters
- 6 List of Parts
- 7 Assemble the 3D Printer
- 8 Installing the 3D Printer
- 9 Interface Information
- 10 Leveling the Platform 1
- 11 Leveling the Platform 2
- 12 Loading the Filament
- 13 Replacing the Release Film
- 14 First Printing
- 15 Remote Controlled Printing
- 16 Circuit Wiring
- 17 Troubleshooting
- 18 Documents / Resources
Introduction
Thank you for choosing Creality. For your convenience, please read through this User Manual before you started and follow the instructions provided carefully. Creality is always ready to provide you with high-quality services. If you encounter any issues or have any questions when using our products, please use the contact information at the end of this manual. To further improve your user experience, you can find more about our devices via the following methods: User manual: You can find instructions and videos in the USB drive provided with the printer.
You can also visit our official website (https://www.creality.com) to find information regarding software, hardware, contact information, device instructions, device warranty information, and more.
Firmware Upgrade
Please visit our official website https://www.creality.com. Click on Homepage → Support→ Download. Download the required firmware and install it to use it with your printer.
Instructions for Use
- Do not use this printer by methods or operations that are not described in this manual, otherwise it may result in accidental injury or property damage.
- Do not place this printer near flammable materials, explosive materials or high heat sources. Please place this printer in a ventilated, cool and low-dust environment.
- Do not place this printer in a vibrating or any other unstable environment, as the printing quality will be compromised when the printer shakes.
- Please use the filament recommended by the manufacturer, otherwise the printer may be damaged.
- Please use the power cord provided with the printer and do not use the power cord of other products. The power plug must be plugged into a three-hole socket with a ground wire.
- Do not open the printer cover while the printer is in operation, otherwise the printing process may be interrupted.
- Do not wear cotton gloves while operating the printer, otherwise the moving parts may cause accidental injury including cuts and lacerations.
- After the printing is complete, please wear gloves and wait for a while before removing the printing platform. Use tools to remove the model from the platform, and do not touch the platform with your bare hands when cleaning it.
- Please regularly clean the printer body with a dry cloth while the power is off, and wipe off dust, sticky printing materials, and foreign objects on the guide rails.
- Children under the age of 10 must not use this printer without adult supervision in order to avoid accidental injury.
![]()
Do not plug or unplug the power cable while the printer is turned on.- Users should abide by the laws and regulations of the corresponding country and region where the equipment is located (place of use), abide by professional ethics, and pay attention to safety obligations. The use of our products or equipment for any illegal purpose is strictly prohibited. Our company is not responsible for the relevant legal responsibilities of any violators.
About the Printer

- Torx Head Screw
- Leveling Screw
- Platform
- Tray Fixing Screw
- Tray
- Touch Screen
- Limit Sensor
- Air Filter
- USB Port
- Type-B USB Port
- Power Switch
- Power Socket
Equipment parameters
| Basic Parameters | |
| Model Name | HALOT-ONE |
| Build Size | 127*80*160mm(length, width and height) |
| XY Axis Resolution | 1620*2560 |
| XY Axis Accuracy | 0.05mm |
| Print speed | 1-4S/layer |
| Layer Thickness | 0.01-0.2mm |
| Touch Screen | 5 inch touch screen |
| Light Source Type | Integral light source (wavelength 405nm) |
| Rated Voltage | 100-240V~, 50/60Hz |
| Rated Power | 100W |
| Machine Size | 221*221*404mm |
| Package size | 295*295*545mm |
| Net Weight | 7.1KG |
| Gross Weight | 8.8KG |
| Print Method | USB Disk, Creality Cloud |
| Machine Language | 中文(简/繁)/ English/ Español/ Deutsche/ Français/ Pусский/ Português/ Italiano/ Türk/Nederlands/Polskie/日本語/ |
| Slicing Software Operation System | Win7/Win8/Win10 64bit, Mac system(32-bit is not supported) |
| Compatible Resin | Common rigid photosensivie resin, Standard resin, Hight hardness, High toughness, Dental model resin. |
List of Parts
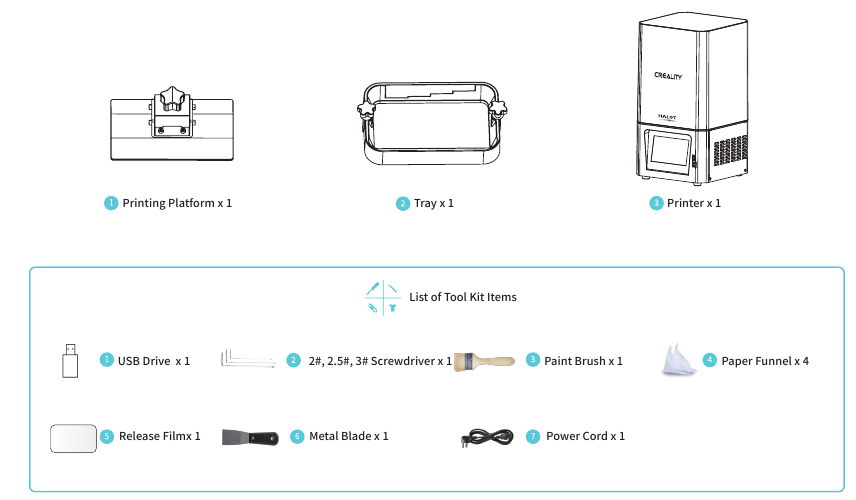
 Note: The components above are for reference only. The actual product may vary.
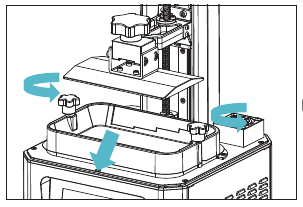
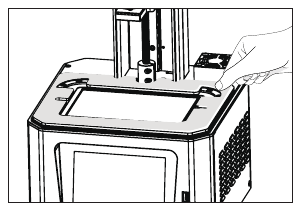
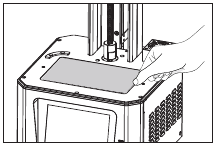
Assemble the 3D Printer
Remove the protective cotton above the printing screen as shown in the picture:
- Take out the machine
![]()
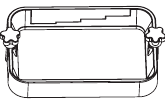
- Remove the resin vat
![]()
- Remove the foam above the screen
![]()
Installing the 3D Printer

Interface Information
Setting

Note: The current interface is for reference only, due to the continuous upgrading of functions, the actual to the official website of the latest firmware Ul as the standard.
Leveling the Platform 1
- To calibrate the printing platform, first raise the platform, loosen the plastic head screws on the left and right sides of the filament tray, and remove the tray.


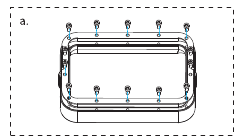
- loosen the four screws on the connection plate of the modeling platform board and press the A4 paper against the printing screen. Press Settings → Z-axis Movement → Leveling (refer to the 2-step operation for leveling the platform) to check whether the platform fits evenly with the paper.
![]()
- After confirming that the A4 paper fits evenly, tighten the four screws on the platform.
![]()
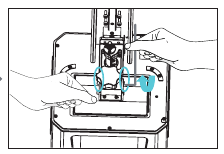
Note: The printing platform is already leveled at the factory. If you need to re-level it due to transportation or other reasons, please follow the above-mentioned steps. (The user needs to prepare a piece of flat A4 paper by themselves.)
Leveling the Platform 2

Note: The current interface is for reference only, due to the continuous upgrading of functions, the actual to the official website of the latest firmware Ul as the standard.
Loading the Filament
Pour the UV photosensitive resin for the 3D printer into the tray. Container capacity: 140 ml / 170 ml / 225 ml / 285 ml.

Q&A: How can I replace the filament?
Gently remove the tray and pour the remaining resin into the container. Clean the tray, pour in new resin, and then put the tray back into the printer.

Please wear gloves before loading the filament, as photosensitive resin is irritating to skin.
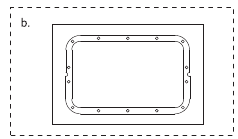
Replacing the Release Film
- Remove the 14 screws at the bottom of the filament tray to remove the worn-out release film.
![]()
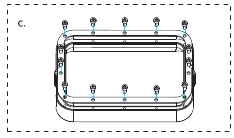
- Take. Remove the protective film on both sides of the release film and take a new release film, and then place the new release film between the two steel rings.
![]()
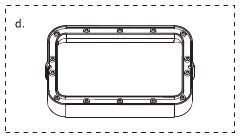
- Put the installed steel rings back into the filament tray and tighten the 14 screws.
![]()
- The installed release film is as shown in the images below.
![]()
![]()

First Printing
Slicer

- Open the slicer software of LCD 3D printer, click "open" on the left of the screen and add model file.


- If the model needs to add support, click the upper left icon to set corresponding parameters.


- Click icon ①→Setting slice printing parameters ②→ Click "Slice"

- Waiting for slice to be finished→save the slice

(You are welcome to find more details of slicing tutorial on the official website www.creality.com).


Note: The current interface is for reference only, due to the continuous upgrading of functions, the actual to the official website of the latest firmware Ul as the standard.
- Generate cxdlp file and save the file to U disk;


- Insert the USB drive → select the file → press the Start button.


Note: The current interface is for reference only, due to the continuous upgrading of functions, the actual to the official website of the latest firmware Ul as the standard.
The printer must not be shaken during the printing process, otherwise the printing quality may be compromised.
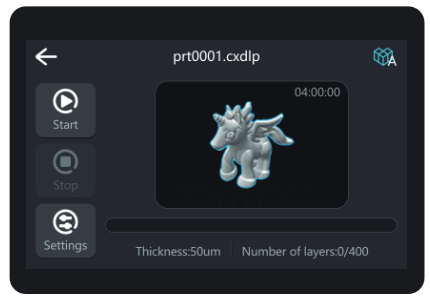
- Select files
![]()
- Select the file to be printed and press "Start"
![]()
- Printing....
![]()


Note: The current interface is for reference only, due to the continuous upgrading of functions, the actual to the official website of the latest firmware Ul as the standard.
Remote Controlled Printing
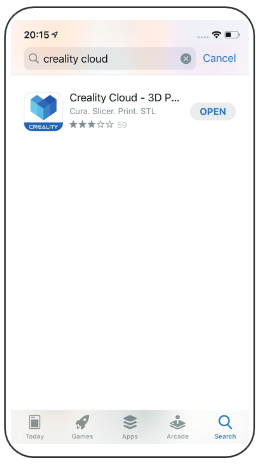
- Download the app.
![]()
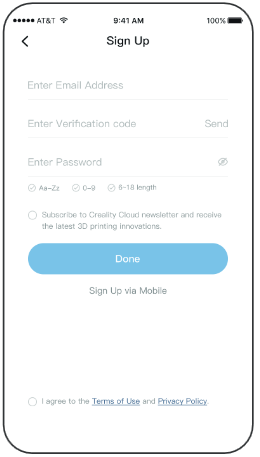
- Register an account.
![]()
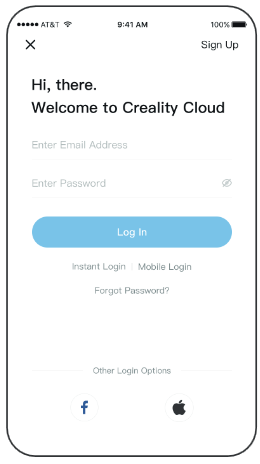
- Log in to your account.
![]()
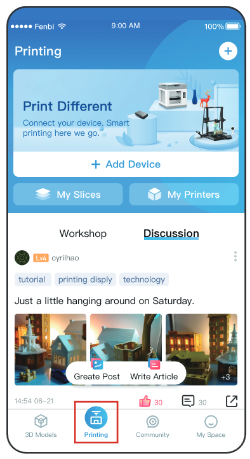
- Add new devices.
![]()
- Scan the QR code (Settings → Add Device → QR Code).
![]()
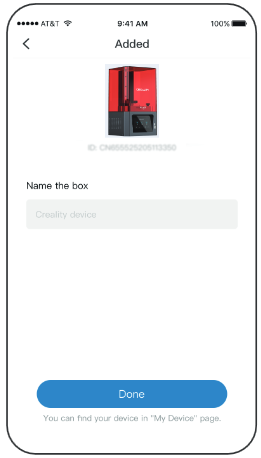
- Name your device.
![]()
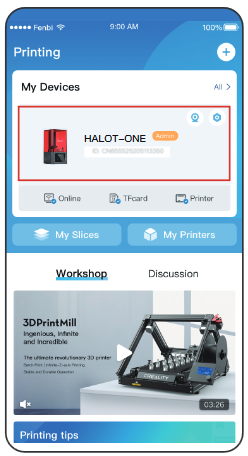
- Select your device.
![]()
- Check the printing status.
![]()
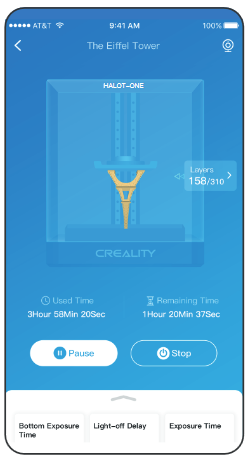
- Check the printing progress.
![]()


Note: The current interface is for reference only, due to the continuous upgrading of functions, the actual to the official website of the latest firmware Ul as the standard.
Circuit Wiring

Troubleshooting

Add: 18F, JinXiuHongDu Building, Meilong Blvd., Longhua Dist., Shenzhen, China 518131 Official Website: www.creality.com Tel: +86 755-8523 4565 E-mail: info@creality.com cs@creality.com


Documents / Resources
References
![www.creality.com]() CREALITY - Official Website, Leading 3D Printer Supplier & Manufacturer
CREALITY - Official Website, Leading 3D Printer Supplier & Manufacturer![www.creality.com]() CREALITY - Official Website, Leading 3D Printer Supplier & Manufacturer
CREALITY - Official Website, Leading 3D Printer Supplier & Manufacturer
Download manual
Here you can download full pdf version of manual, it may contain additional safety instructions, warranty information, FCC rules, etc.
Advertisement


Need help?
Do you have a question about the HALOT-ONE and is the answer not in the manual?
Questions and answers