Table of Contents
Advertisement
Available languages
Available languages
Quick Links
INSTALLATION INSTRUCTIONS
Pressure Balanced
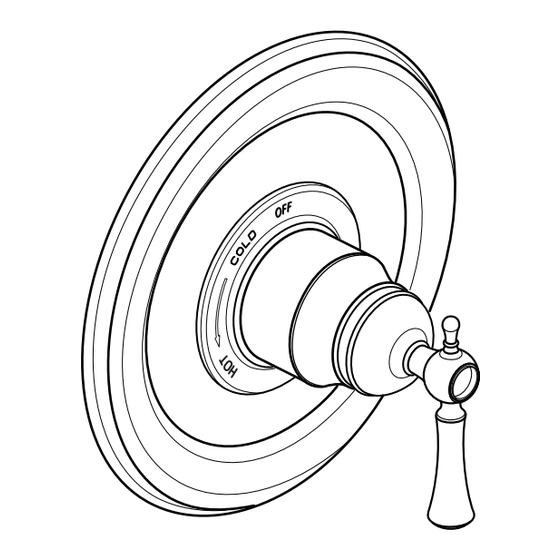
Randall
®
Shower Valve Trim Kit
Cross Handle
Model D35102540
Lever Handle
Model D35102500
To be used with D35000500.191
Pressure Balanced Shower Valve
Thank you for selecting DXV by American Standard.
To ensure that your installation proceeds smoothly,
please read these instructions carefully
before you begin.
RECOMMENDED TOOLS AND MATERIALS
Most of the procedures require the use of common tools and materials, which are available from hardware and plumbing,
supply stores. It is essential that the tools and materials be on hand before work is begun.
Tubing Cutter
Channel Locks
ROUGHING-IN DIMENSIONS:
• For reference
BOTTOM OF
SHOWER HEAD
74" FOR HEAD
CLEARANCE
(OPTIONAL)
(1880 mm)
48" TO 54"
OPTIONAL
(1219 TO1372 mm)
In the United States:
DXV by American Standard
One Centennial Avenue
Piscataway, New Jersey 08855
Attention: Director of Customer Care
For residents of the United States, warranty
information may also be obtained by calling
the following toll free number: (800) 227-2734
www.DXV.com
Product names listed herein are trademarks of AS America, Inc.
© AS America, Inc. 2015
Te on Tape
FINISHED WALL
LEVER
CROSS
HANDLE
HANDLE
BOTTOM OF
TUB
OR SHOWER
STALL
Adjustable Wrench
1-5/8" TO 3-1/4"
(41 mm TO 83 mm)
1/2" NPT
(13 mm)
OPTIONAL TO
FINISHED FLOOR
USUALLY
BETWEEN
72'' AND 84"
(1829 TO 2134 mm)
OUTLETS 1/2" NPT
SHW
7-7/8" D.
(200 mm)
TUB
In Canada:
DXV by American Standard
5900 Avebury Road
Mississauga, Ontario
L5R 3M3
Canada
Toll Free: 1-800-387-0369
Local: 905-306-1093
Fax: 1-800-395-1498
www.DXV.ca
- 1 -
Flat Blade Screwdriver
Phillips Screwdriver
Plumbers' Putty or Caulking
THREADED INLETS (STOPS)
INLETS 1/2" NPT
5-7/8"
(149 mm)
3-3/8"
(86 mm)
In Mexico:
DXV by American Standard
Via Morelos 330
Col. Santa Clara Coatitla
Ecatepec, Estado de México 55540
Toll Free: 01-800-8391200
www.DXV.mx
M965553 Rev. 1.6 (5/15)
Advertisement
Table of Contents

Subscribe to Our Youtube Channel
Related Manuals for DXV Randall D35102500


Summary of Contents for DXV Randall D35102500
- Page 1 Lever Handle Model D35102500 To be used with D35000500.191 Pressure Balanced Shower Valve Thank you for selecting DXV by American Standard. To ensure that your installation proceeds smoothly, please read these instructions carefully before you begin. RECOMMENDED TOOLS AND MATERIALS Most of the procedures require the use of common tools and materials, which are available from hardware and plumbing, supply stores.
-
Page 2: Install Trim
Rouging-in Turn off hot and cold water CAUTION supplies before beginning. NOTE: When soldering, remove PLASTER GUARD, CARTRIDGES and CHECK STOPS (IF PRESENT). When finished soldering, flush valve body, replace cartridges, check stops (if present) and plaster guard to continue installation. Use thread sealant or Teflon tape on threaded connections. •... -
Page 3: Back To Back Installation
ADJUST HOT LIMIT STOP (MUST BE DONE PRIOR TO TRIM INSTALLATION) By restricting HANDLE rotation and limiting the amount of hot water allowed to mix with the cold, the HOT LIMIT SAFETY STOP (1) reduces risk of accidental scalding. To set the maximum hot water temperature of your faucet, all you need to do is adjust the setting on the HOT LIMIT SAFETY STOP (1). -
Page 4: Model Numbers
Randall ® Pressure Balanced Shower Valve Trim Kit MODEL NUMBERS Cross Handle D35102540 Lever Handle D35102500 Replace the “YYY” with appropriate finish code POLISHED CHROME BRUSHED NICKEL PLATINUM NICKEL SATIN BRASS A3195.191 EXTENSION KIT (CARTRIDGE) A3196.191 EXTENSION KIT (DIVERTER) M964519-YYY0A CARTRIDGE COVER H961536.XXX CROSS HANDLE SET... -
Page 5: Installation Instructions
INSTALLATION INSTRUCTIONS Pressure Balanced Shower Valve with Check Stops Model D35000.500 Thank you for selecting DXV by American Standard. To ensure that your installation proceeds smoothly, please read these instructions carefully before you begin. RECOMMENDED TOOLS AND MATERIALS ROUGHING-IN DIMENSIONS:... - Page 6 CAUTION Turn off water at main supply. ROUGHING-IN PARA TENER ACCESO A LA VÁLVULA PARA DARLE SERVICIO NOTE When soldering, remove PLASTER GUARD, CARTRIDGES and CHECK STOPS (IF PRESENT). When finished soldering, flush valve body, replace Cierre el suministro de agua, ya sea cerrando el suministro principal de agua o cerrando los TOPES DE PASO de agua fría y cartridges, check stops (if present) and plaster guard to continue installation.
- Page 7 PRECAUCIÓN Cierre el agua en el suministro principal. TO GAIN ACCESS TO VALVE FOR SERVICING PRESENTACIÓN NOTA Al soldar, quite el PROTECTOR DE YESO, los CARTUCHOS y los TOPES DE PASO (SI ESTÁN PRESENTES). Al terminar de soldar, enjuague el cuerpo de la válvula, vuelva a colocar Shut off water supply by either closing off main water supply, or closing off the hot and cold CHECK STOPS on los cartuchos, los topes de paso (si están presentes) y el protector de yeso para continuar la instalación.
-
Page 8: Instrucciones De Instalación
INSTRUCCIONES DE INSTALACIÓN Válvula de ducha de presión equilibrada con topes de paso Modelo D35000.500 Gracias por elegir DXV by American Standard. Para asegurarse de que no haya problemas durante la instalación, lea atentamente estas instrucciones antes de comenzar. HERRAMIENTAS Y MATERIALES RECOMENDADOS DIMENSIONES GENERALES: "... -
Page 9: Instructions D'installation
INSTRUCTIONS D’INSTALLATION Robinet de douche à pression équilibrée avec clapets anti-retour Modèle D35000.500 Merci d’avoir choisi la marque DXV d’American Standard. Avant de commencer, veuillez lire ces instructions attentivement pour vous assurer que votre installation s’effectue sans problème. OUTILS ET MATÉRIAUX RECOMMANDÉS La majorité... - Page 10 ATTENTION Fermer l’entrée d’eau principale. AJUSTEMENT POUR ACCÉDER À LA VANNE À DES FINS D’ENTRETIEN REMARQUE Avant de souder, retirer le DISPOSITIF DE PROTECTION, les CARTOUCHES et les CLAPETS ANTI-RETOUR (le cas échéant). Lorsque la soudure Fermer l’alimentation en eau en fermant l’alimentation principale en eau ou en fermant les CLAPETS ANTI-RETOUR est terminée, rincer le robinet, remplacer les cartouches, les clapets anti-retour sur le robinet, le cas échéant.
Need help?
Do you have a question about the Randall D35102500 and is the answer not in the manual?
Questions and answers