Table of Contents
Advertisement
Quick Links
Advertisement
Table of Contents

Related Manuals for Sirius XM RAdio SXPL1H1


Summary of Contents for Sirius XM RAdio SXPL1H1
- Page 1 USER GUIDE Dock & Play Radio VEHICLE KIT INCLUDED...
-
Page 2: Table Of Contents
Table of Contents Onyx Plus User Guide Compatibility ............... . . 4 Introduction . - Page 3 Table of Contents Onyx Plus User Guide Factory Settings ................. .79 Demo Mode .
-
Page 4: Compatibility
Compatibility Onyx Plus User Guide The XDPIV2 Vehicle Dock included with your Onyx Plus is compatible with the AMPS dash and vent mounts included with your Onyx Plus, as well as the T-Slot dash and vent mounts (previously included with Onyx). The AMPS mounting accessories are not compatible with the previous version of the Vehicle Dock, XDPIV1. -
Page 5: Introduction
Introduction Onyx Plus User Guide Features Thank you for purchasing the SiriusXM Onyx Plus with Vehicle Kit! SiriusXM Onyx Plus has these exciting features to enhance your overall experience: • View program and channel information on a full color display featuring album art, channel logos and graphics • Store up to 20 of your favorite channels for one-touch access • Pause, rewind and replay live satellite radio plus all your Smart Favorite channels... -
Page 6: Safety And Care Information
Introduction Onyx Plus User Guide Safety and Care Information IMPORTANT! Self installation instructions and tips are provided for your convenience. It is your responsibility to determine if you have the knowledge, skills, and physical ability required to properly perform an installation. SiriusXM shall have no liability for damage or injury resulting from the installation or use of any SiriusXM or third party products. -
Page 7: What's In The Box
Introduction Onyx Plus User Guide What’s in the Box? menu alerts t-mix t-scn b / # Onyx Plus Radio PowerConnect™ Vehicle Dock Vent Mount and Dash Mount Extended Vent Clamps Aux In Cable Screws (4) Antenna & Dash Mount Alcohol PowerConnect Power Adapter Magnetic Mount Antenna Preparation Pads... -
Page 8: Onyx Plus Button Functions
Introduction Onyx Plus User Guide Onyx Plus Button Functions Up and Down Buttons Power/FM Button Left and Right Buttons Press to preview and tune to Press to search for Press to turn Radio on and off; channels through the channel channels by category. -
Page 9: Powerconnect Vehicle Dock
Introduction Onyx Plus User Guide PowerConnect Vehicle Dock Color-Coded Connections The color-coded PowerConnect Vehicle Dock makes it simple to connect. Just match the colors on the cable ends to the colors on the dock to see what goes where. Rear View AUDIO (Green) FM (Blue) Connection for Aux... -
Page 10: Installation
Installation Onyx Plus User Guide WARNING! DO NOT attempt to install Onyx Plus while driving. Park your vehicle in a safe location before beginning installation. Step 1: Choose a Location for Your Radio When installing Onyx Plus in your vehicle, choose a location where it will not block your vision, interfere with the controls, or obstruct the air bag. -
Page 11: Step 2: Install The Adhesive Or Vent Mount
Installation Onyx Plus User Guide Step 2: Install the Adhesive or Vent Mount Follow the instructions on the next several pages for the mounting method you have selected. Installing the Adhesive Mount: CAUTION! The adhesive used on the Adhesive Mount may be difficult to remove. Do not install this mount on leather surfaces (contact your automobile dealership if you are unsure about your dash surface), and make sure the air temperature is at least 60°F (15°C) during installation. - Page 12 Installation Onyx Plus User Guide Installing the Vent Mount: IMPORTANT! To make the cable connections easier, wait until after you have connected all the cables to the dock before you attach the Vent Mount to a vent. 1. Locate a vent with horizontal louvers sturdy enough to hold your Extended Vent Clamps PowerConnect Vehicle Dock and Onyx Plus Radio.
-
Page 13: Step 3: Mount The Magnetic Mount Antenna
Installation Onyx Plus User Guide Step 3: Mount the Magnetic Mount Antenna Mount the Magnetic Mount Antenna on the outside of your vehicle, on a horizontal surface that will always face the sky. The antenna contains a strong magnet which will stick to any metal part of your vehicle, but will not damage the vehicle. - Page 14 Installation Onyx Plus User Guide 3. Place the antenna in the location you selected. Follow the Tips and Cautions shown below. TIP! Mount the antenna on the roof (for most vehicles) or trunk (for convertibles) where it has a clear view of the sky in all directions CAUTION! Don’t mount the antenna inside the vehicle, for example, on...
-
Page 15: Step 4: Route The Antenna Cable
Installation Onyx Plus User Guide Step 4: Route the Antenna Cable Before you begin routing the antenna cable, read these general instructions for how to route and hide the antenna cable. Then route your antenna cable according to the step-by-step instructions which follow for your specific type of vehicle. - Page 16 Installation Onyx Plus User Guide Route cable out from under rear windshield moulding and tuck into weatherstripping around trunk opening Avoid sharp bends by running cable through Pull weatherstripping weatherstripping for several inches from trunk opening Tuck cable into weatherstripping. Route cable through weatherstripping several inches to avoid sharp bends Pull cable out of weatherstripping...
- Page 17 Installation Onyx Plus User Guide Use a blunt plastic putty knife or similar blunt tool to lift edge of interior trim and tuck cable Route cable under under trim. Continue trim or upholstery towards front of vehicle Continue routing cable under trim or carpet towards front of vehicle Route cable from trunk...
- Page 18 Installation Onyx Plus User Guide Sedan/Coupe With Antenna Placed at the Rear of the Roof: 1. Feed the antenna cable from the antenna underneath the rubber molding around the rear window. Use a blunt plastic putty knife or similar blunt tool to lift the rubber molding around the rear window and tuck the antenna cable underneath the molding.
- Page 19 Installation Onyx Plus User Guide Sport Utility Vehicle (SUV) 1. Feed the antenna cable underneath the rubber weather stripping of the rear tailgate window/ door and route the cable along the rear hatch. Lift the weather stripping from the opening and tuck the cable inside it, then replace the weather stripping.
-
Page 20: Step 5: Connect The Magnetic Mount Antenna And Powerconnect Power Adapter
Installation Onyx Plus User Guide 2. Continue tucking the cable underneath the windshield molding around the windshield to the lowest corner. 3. At the lowest corner of the windshield, route the cable out of the windshield molding and into the rubber weather stripping around the door opening. -
Page 21: Step 6: Connect The Audio
Installation Onyx Plus User Guide Step 6: Connect the Audio To play XM audio through your vehicle’s stereo or FM radio, decide on one of the following audio connection options: • Option 1: Best: Use the provided Aux In Cable if your vehicle’s stereo system has an auxiliary input connection or jack. - Page 22 Installation Onyx Plus User Guide Option 1: Aux In Cable Installation Instructions 1. Plug one end of the Aux In Cable into the green AUDIO connector on the dock. AUDIO 2. Plug the other end into the auxiliary input jack of your vehicle’s stereo system.
- Page 23 Installation Onyx Plus User Guide Option 2: Cassette Adapter Installation Instructions 1. Plug the Cassette Adapter into the green AUDIO connector on the dock. AUDIO 2. Insert the Cassette Adapter into the vehicle’s cassette deck. You may need to turn on your vehicle’s stereo system in order to do so. 3.
- Page 24 Installation Onyx Plus User Guide Option 3: PowerConnect Installation Instructions 1. If you are using the vent mounting method, attach the Vent Mount to the vehicle vent. 2. Insert your Onyx Plus into the dock. 3. Power on your Onyx Plus by pressing the Power button. 4.
- Page 25 Installation Onyx Plus User Guide 99. 3 menu alerts t-mix t-scn b / # MATCH FM CHANNELS iii. Press menu. iv. Press down to scroll to and highlight FM Settings and press the Select button. v. FM Channels will be highlighted. If it is not highlighted, press down to scroll to and highlight FM Channels.
-
Page 26: Subscribe
Subscribe Onyx Plus User Guide You can follow either the general activation and subscription process or use the on-board activation guide to activate your Onyx Plus and subscribe to the XM service. General activation and subscription process: Subscribe to the XM service by following these steps: 1. -
Page 27: Using Your Onyx Plus
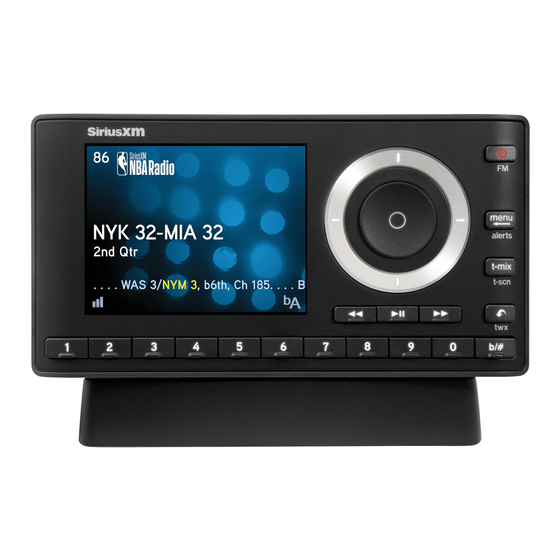
Using Your Onyx Plus Onyx Plus User Guide The Main Display When listening to a channel, information about the channel and what is currently playing is displayed. In addition, other information may also be displayed. Channel Name/Logo Album Art Channel Number Favorite Channel Indicator Artist Name Tom Petty... -
Page 28: Navigation Basics
Using Your Onyx Plus Onyx Plus User Guide Navigation Basics Power/FM Button Pressing Power/FM turns Onyx Plus On or Off. Pressing and holding Power/FM provides easy tuning of FM presets for optimized PowerConnect performance. It is not available when an Aux In Cable or Cassette Adapter is used for the audio connection. - Page 29 Using Your Onyx Plus Onyx Plus User Guide Banks/Direct Button b / # Pressing b / # changes the current favorite bank from bank A to bank B, or B to A. Pressing and holding b / # prompts for the entry of a channel number using the number buttons. Once the channel number is entered, the Radio directly tunes to the new channel.
-
Page 30: Tuning To A Channel
Using Your Onyx Plus Onyx Plus User Guide Tuning to a Channel Onyx Plus can be set to tune channels in numerical order, or to tune channels in category order, i.e., pop channels, then rock channels, etc., when channels are tuned using up and down . - Page 31 Using Your Onyx Plus Onyx Plus User Guide a. The Set Time Zone screen is displayed. Press up and down to highlight the time zone for your location and press the Select button. The time zone will be confirmed. b. Next select whether Daylight Savings Time (DST) should be on or off for your location. Press the Select button to toggle between on and off.
-
Page 32: Direct Tune
Using Your Onyx Plus Onyx Plus User Guide Direct Tune A channel can be tuned directly by entering the channel number using the number buttons. 1. To directly tune to a channel press b/#. 2. Use the number buttons 0-9 to enter the channel number and wait a moment until the channel is tuned, or press the Select button to immediately tune to the channel. -
Page 33: Jump And Traffic And Weather Now
Using Your Onyx Plus Onyx Plus User Guide Jump and Traffic and Weather Now Jump Pressing jump/twx ( ) will immediately tune to the previous channel to which you had been listening. Traffic and Weather Now Pressing and holding jump/twx will tune to a Traffic and Weather Now report for your city. -
Page 34: Favorite Channels
Using Your Onyx Plus Onyx Plus User Guide Favorite Channels You can set up to 20 of your favorite channels (10 in bank A and 10 in bank B) so you can easily access them. Each favorite channel can be assigned to a number button. An icon on the main display screen shows the currently selected bank . -
Page 35: Scanning Channels In A Category
Special Features Onyx Plus User Guide Scanning Channels in a Category You can scan a category and listen to each channel for 10 seconds before Onyx Plus automatically tunes to the next channel. If you want to stay tuned to the channel being played and stop the scan, just press the Select button. -
Page 36: Fm Presets
Special Features Onyx Plus User Guide FM Presets FM presets make it easy to quickly access stored FM channels and choose a new FM channel from them. Use FM presets when you use PowerConnect or the FMDA to listen to your Onyx Plus through your vehicle’s FM radio. -
Page 37: Album Art And Enhanced Album Art
Special Features Onyx Plus User Guide Album Art and Enhanced Album Art Onyx Plus can display album art for the currently playing song on qualified music channels. Album art is on by default, but you can choose not to have album art displayed. You can also select an Enhanced Album Art mode where after five seconds the album art is displayed in a larger format. -
Page 38: Parental Controls
Special Features Onyx Plus User Guide Parental Controls Onyx Plus has a parental control feature which allows you to lock access to individual channels, or lock access to an entire category. A 4-digit code controls access to the locked channel or locked category. - Page 39 Special Features Onyx Plus User Guide To lock (or unlock) channels or categories: 1. Press menu. 2. Press down to scroll to and highlight Parental Controls. Press the Select button. 3. You will be prompted to enter the 4-digit code. For each digit, press one of the 0-9 keys (or press down or up to select digits) and then press right...
- Page 40 Special Features Onyx Plus User Guide 8. The Code Confirmation screen will be displayed. For your records, write down the code you have selected. Press the Select button. 9. Press and hold menu to return to the main display screen. To listen to a locked channel: There are two ways to tune to a channel which has been locked.
-
Page 41: Tunemix
Special Features Onyx Plus User Guide TuneMix TuneMix plays songs in a unique mix from the music channels you have saved as smart favorites, allowing you to build a blended channel from as few as three to as many as 18 music channels. TuneMix can be configured to play all the music channels saved as smart favorites from favorite channel banks A and B (all channels mode, default), or configured to play only the music channels from the currently selected... - Page 42 Special Features Onyx Plus User Guide To configure TuneMix for Bank or All Channels: 1. Press menu/alerts. 2. Press down to scroll to and highlight Feature Settings. Press the Select button. 3. Press down to scroll to and highlight Tune Mix/Scan. 4.
-
Page 43: Tunescan
Special Features Onyx Plus User Guide TuneScan TuneScan plays the first 10 seconds of songs in a unique mix from the music channels you have saved as smart favorites, allowing you to build a virtual channel from as few as three to as many as 18 music channels. - Page 44 Special Features Onyx Plus User Guide playing, press the Select button. • If you want to return to the channel to which you were listening prior to TuneScan, press and hold the Select button. TuneScan will terminate if you tune to another channel, if you press menu/alerts, jump , or play/ pause , if you press t-mix/t-scn to enter TuneMix mode, or if you press banks/direct (b/#) when...
-
Page 45: Tunestart
Special Features Onyx Plus User Guide TuneStart TuneStart plays the current song from the beginning when you tune to a music channel which you have saved as a smart favorite channel. (Refer to “Favorite Channels” on page 34 for more information on smart favorite channels.) A TuneStart will also occur if you tune back to the channel that was tuned immediately prior to the currently tuned channel, either by pressing jump , or by... -
Page 46: Pause & Replay
Special Features Onyx Plus User Guide Pause & Replay Pause & Replay gives you the opportunity to “hear that again” by temporarily storing and then letting you access the stored content. For the currently tuned channel, you can pause and replay for as long as you have been tuned to the channel, up to a maximum of approximately 60 minutes. - Page 47 Special Features Onyx Plus User Guide To listen to live broadcast: 1. Pressing and holding while the Radio is in Pause & Replay mode exits Pause & Replay mode and resumes playing the live broadcast.
-
Page 48: Song/Artist Alerts
Special Features Onyx Plus User Guide Song/Artist Alerts You can set your Onyx Plus to alert you when the following events occur: • Song Alert: Alerts can be set for your favorite songs, so that whenever the song begins to play on any music channel, you will be alerted and given the opportunity to tune to the channel. - Page 49 Special Features Onyx Plus User Guide To edit Song and Artist Alerts: Individual Song and Artist alerts can be edited in the following ways: • Turn alerts on or off (on/off): An individual Song or Artist alert can be turned off so you no longer receive an alert, but it is still kept in the alert list so you can turn it back on.
- Page 50 Special Features Onyx Plus User Guide To turn the audible alert beep on or off: If you do not wish to hear an audible alert beep when a Song or Artist Alert occurs, you can turn it off. You will still continue to receive the visual alert. 1.
-
Page 51: Game/Score Alerts
Special Features Onyx Plus User Guide Game/Score Alerts If your subscription package includes the play-by-play sports channels for your desired sports leagues, and SiriusXM broadcasts the games, you can set your Onyx Plus to alert you when the following events occur: • Game Alert: Alerts can be set for your favorite sports teams so that whenever SiriusXM begins broadcasting a game in which your... - Page 52 Special Features Onyx Plus User Guide • For a given sport, during the season it is likely that SiriusXM will be broadcasting several games simultaneously. This will result in Game Alerts when each game begins, and Score Alerts throughout the games. For sports where scores are frequent, you may find constant Score Alerts to be disruptive.
- Page 53 Special Features Onyx Plus User Guide The Alert, Ticker, and Flash box for teams which are highlighted for selection, and have Alert Ticker been selected, are shown with a blue background and black letters. Flash 7. Press and hold down to scroll to and highlight the team for which you want to set an alert.
- Page 54 Special Features Onyx Plus User Guide 4. Press down to scroll to and highlight Manage Teams. Press the Select button. 5. Deselect All Teams is highlighted. Press the Select button. 6. Press and hold menu/alerts to return to the main display screen. To turn Game and Score Alerts on or off and setting the audible alert beep on or off: 1.
-
Page 55: Sports Ticker
Special Features Onyx Plus User Guide Sports Ticker Sports Ticker shows status of games in progress including current score, and the final score for games which have ended within the last 24 hours. For games in progress, it also shows the channel number if the game is being broadcast by SiriusXM. - Page 56 Special Features Onyx Plus User Guide (Refer to “Game/Score Alerts” on page 51 for more information about Game and Score Alerts, and “SportsFlash” on page 58 for more information about SportsFlash.) Pressing and releasing down or up navigates through each Alert, Ticker and Flash box, highlighting the Alert, Ticker, or Flash box in blue.
- Page 57 Special Features Onyx Plus User Guide 6. Press and hold menu/alerts to return to the main display screen. To quickly deselect all teams for Sports Ticker: All teams you had previously selected can be quickly deselected for Sports Ticker. Keep in mind that this will also deselect all teams for Game and Score alerts and SportsFlash alerts.
-
Page 58: Sportsflash
Special Features Onyx Plus User Guide SportsFlash A SportsFlash is a key play from your favorite teams when a game is being broadcast on SiriusXM. When an exciting play happens, a SportsFlash alert will be displayed and you will have the opportunity to tune to the SportsFlash and hear the play. - Page 59 Special Features Onyx Plus User Guide • SportsFlash alerts normally do not occur if you are already tuned to the channel which is broadcasting the game in which the selected team is playing. However, it’s possible that the same game may be broadcast on multiple SiriusXM channels simultaneously. If so, you will receive SportsFlash alerts for the other channels where the game is being broadcast.
- Page 60 Special Features Onyx Plus User Guide alerts will return you to the previous page if you wish to select teams in other leagues. After you have selected five teams for SportsFlash alerts, you will be unable to select any more. 9.
- Page 61 Special Features Onyx Plus User Guide Select button. 5. Deselect All Teams is highlighted. Press the Select button. 6. Press and hold menu/alerts to return to the main display screen. To turn Game and Score Alerts on or off and setting the audible alert beep on or off: 1.
-
Page 62: My Sports Zone
Special Features Onyx Plus User Guide My Sports Zone The My Sports Zone category displays sports games which are currently being broadcast on SiriusXM, showing the current score and game details. It is not displayed when there are no sports games being broadcast. - Page 63 Special Features Onyx Plus User Guide Tuning a game from My Sports Zone: 1. Press left or right until the My Sports Zone category is displayed. 2. Press down or up to scroll and highlight a sports game, and press the Select button. 3.
- Page 64 Special Features Onyx Plus User Guide highlight the sports game to be replaced and press the Select button. iii. A confirmation screen will be displayed, confirming that a temporary SportsFlash has been set for the duration of the sports game. iv.
-
Page 65: Electronic Program Guide
Special Features Onyx Plus User Guide Electronic Program Guide The Electronic Program Guide (EPG) provides a view of the current and upcoming shows airing on SiriusXM. You can select shows for Program Alerts, so when the show is about to begin, you will receive a notification and can easily tune to the show. - Page 66 Special Features Onyx Plus User Guide EPG Navigation Use the following buttons to navigate through the EPG: Rewind and Fast Forward buttons: Use these buttons to navigate through the 1/2 hour time segments. Note that you cannot navigate to a time segment previous to the current time. Down and up buttons: Use these buttons to navigate through the channels, and highlight a...
- Page 67 Special Features Onyx Plus User Guide 5. Highlight a show for which you’d like to set a Program Alert and press and hold the menu/alerts button. If there is more than one show in a time segment, you’ll be able to select the specific show for which you want to set a Program Alert in the next step.
- Page 68 Special Features Onyx Plus User Guide 2. Press down to scroll to and highlight Alerts. Press the Select button. 3. Press down to scroll to and highlight Manage My Program Alerts. Press the Select button. 4. At the Manage My Program Alerts screen, Program Alerts will be highlighted.
- Page 69 Special Features Onyx Plus User Guide 5. Press up and down to highlight the time zone for your location and press the Select button. The newly selected time zone will be displayed on the Manage My Program Alerts screen. 6. Press and hold menu/alerts to return to the main display screen. To turn Daylight Savings Time on/off: 1.
-
Page 70: Where Else Can You Use Your Onyx Plus
Where Else Can You Use Your Onyx Plus? Onyx Plus User Guide SiriusXM offers a variety of accessories that allow you to adapt your Onyx Plus to your lifestyle and enhance your listening experience. With these accessories, you can effortlessly take your Satellite Radio listening experience from your vehicle to your home or office or on the go —... -
Page 71: Configuring Your Onyx Plus
Configuring Your Onyx Plus Onyx Plus User Guide Radio ID Your Onyx Plus has an 8 character alphanumeric ID which uniquely identifies your Radio. This ID is used during the subscription process. To display the Radio ID: 1. Press menu/alerts. 2. -
Page 72: Fm Settings
Configuring Your Onyx Plus Onyx Plus User Guide FM Settings Find Available FM Channels in Your Area Before attempting any of the procedures below, you should park your vehicle in a safe location. Do not attempt to set up your FM channels or any Onyx Plus function while driving. PowerConnect allows you to listen to SiriusXM through your existing vehicle radio. - Page 73 Configuring Your Onyx Plus Onyx Plus User Guide TIP! It will be much more difficult to find available FM channels in large cities than in most suburban or rural locations. A direct audio connection using the Aux In Cable, Cassette Adapter, or professional installation is your best solution if you drive in or near large metropolitan areas.
- Page 74 Configuring Your Onyx Plus Onyx Plus User Guide 6 If you are editing the storage location that has the “current” FM preset, skip to step 7. Otherwise, Start Using will be highlighted. Press the Select button. NOTE! You can also set an FM preset without having to start using it right away.
-
Page 75: Brightness
Configuring Your Onyx Plus Onyx Plus User Guide Brightness The Brightness of the Onyx Plus display can be adjusted for optimal viewing. To change the brightness of the display screen: 1. Press menu/alerts. 2. Press down to scroll to and highlight Brightness and press the Select button. -
Page 76: Alerts
Configuring Your Onyx Plus Onyx Plus User Guide Alerts Refer to “Song/Artist Alerts” on page 48, “Game/Score Alerts” on page 51, “Sports Ticker” on page 55, “SportsFlash” on page 58, and “Electronic Program Guide” on page 65 for detailed information. Parental Controls Refer to “Parental Controls”... - Page 77 Configuring Your Onyx Plus Onyx Plus User Guide To configure the traffic/weather city: 1. Press menu/alerts. 2. Press down to scroll to and highlight Feature Settings and press the Select button. 3. Press down to scroll to and highlight Traffic/Weather and press the Select button.
-
Page 78: Parental Controls
Configuring Your Onyx Plus Onyx Plus User Guide Parental Controls Refer to “Parental Controls” on page 38 for detailed information. Signal Indicator For best reception, your Magnetic Mount Antenna should have an unobstructed view of the XM satellites. In large cities, there are terrestrial transmitters (ground repeaters) to help increase the signal coverage. -
Page 79: Factory Settings
Configuring Your Onyx Plus Onyx Plus User Guide Factory Settings The factory settings menu has two choices, AUX Detect and Restore Defaults. AUX Detect AUX Detect allows Onyx Plus to automatically detect a connection made to the AUDIO connector of the PowerConnect Vehicle Dock by an Aux In Cable or Cassette Adapter. -
Page 80: Demo Mode
Configuring Your Onyx Plus Onyx Plus User Guide Restore Defaults You can clear all of your personal settings, such as favorite channels, FM presets, etc., and return the Radio to its original out-of-the-box settings. To reset Onyx Plus to factory defaults: NOTE! Restoring defaults permanently removes all personal settings. -
Page 81: Using The Vehicle Dock From The Universal Xpress Car Kit
Configuring Your Onyx Plus Onyx Plus User Guide Using the Vehicle Dock From the Universal Xpress Car Kit If you have chosen to use the Vehicle Dock from the Universal Xpress Car Kit rather than the PowerConnect Vehicle Dock included with your Onyx Plus Radio, you will need to complete some additional installation steps. - Page 82 Configuring Your Onyx Plus Onyx Plus User Guide tune Onyx Plus and the FM radio in your vehicle to the same FM channel. TIP! Onyx Plus is programmed with FM channel 97.9 as the default setting. To turn the FM Transmitter Off: If you are using the older model Vehicle Dock from the Universal Xpress Car Kit, and plan to use the Aux In Cable or a Cassette Adapter as the audio connection option, you’ll have to turn the FM Transmitter under the FM Settings menu in Onyx Plus off, if it was previously turned on.
-
Page 83: Troubleshooting
Troubleshooting Onyx Plus User Guide Onyx Plus has been designed and built to be trouble-free but if you experience a problem, try this: • Check that all connections are firm and secure. • Make sure the vehicle power socket is clean and free of corrosion. • Make sure you have connected Onyx Plus as described in this User Guide. - Page 84 Troubleshooting Onyx Plus User Guide If this happens: Try this: No audio when using the Aux In • Check all cables between your Onyx Plus and your vehicle’s Cable or Cassette Adapter stereo system for a firm and secure connection. • Ensure you have selected the proper input source on your vehicle’s stereo system.
- Page 85 Troubleshooting Onyx Plus User Guide If this happens: Try this: Game Alerts or Score Alerts A subscription package which includes the play-by-play sports are not being shown, not channels for the desired league is required for Game or Score functioning as expected, or Alerts.
-
Page 86: Product Specifications
Product Specifications Onyx Plus User Guide System Power Requirements: ....... 9-16 V DC, 500 mA (max) Operating Temperature: . -
Page 87: Patent And Environmental Information
) except in compliance with applicable export laws, rules and regulations. The user of this or any other software contained in a Sirius XM Radio Inc is explicitly prohibited from attempting to copy, decompile, reverse engineer, hack, manipulate or disassemble the object code, or in any other way convert the object code into human-readable form. -
Page 88: Fcc Statement
FCC Statement Onyx Plus User Guide The user is cautioned that changes or modifications not expressly approved by Sirius XM Radio Inc. can void the user’s authority to operate this device. This device complies with Part 15 of the FCC Rules. Operation is subject to the following two conditions: 1. -
Page 89: Important Legal Information
1-866-635-2349. Fees and programming are subject to change. © 2016 Sirius XM Radio Inc. “Sirius”, “XM” and all related marks and logos are trademarks of Sirius XM Radio Inc. and its subsidiaries. All other marks and logos are the property of their respective owners. -
Page 90: Owners Record
Owners Record Onyx Plus User Guide The Radio model number is located below and the XM Radio ID is located on the label on the back of Onyx Plus. Record the XM Radio ID in the space provided below. Refer to these numbers whenever you call your dealer regarding this product. - Page 91 Sirius XM Radio Inc. 1221 Avenue of the Americas New York, NY 10020 1.866.635.2349 siriusxm.com © 2016 Sirius XM Radio Inc. SXPL1V1UG 160830a...
Need help?
Do you have a question about the SXPL1H1 and is the answer not in the manual?
Questions and answers