Sirius XM RAdio Onyx Plus User Manual
Dock & play radio
with vehicle kit
Hide thumbs
Also See for Onyx Plus:
- User manual (124 pages) ,
- Quick start manual (2 pages) ,
- User manual (100 pages)

Subscribe to Our Youtube Channel
Related Manuals for Sirius XM RAdio Onyx Plus


Summary of Contents for Sirius XM RAdio Onyx Plus
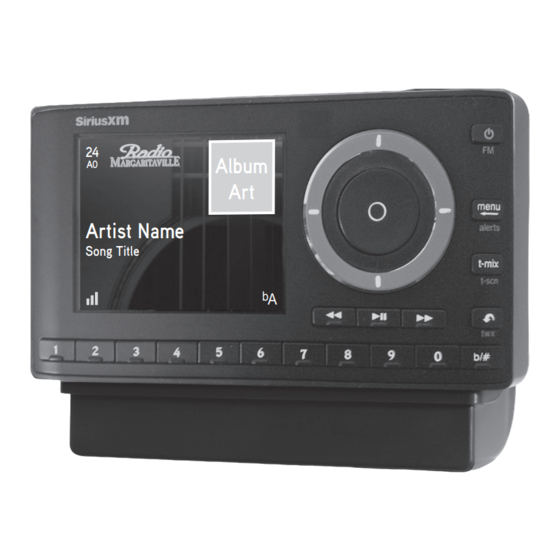
- Page 1 Plus USER GUIDE Dock & Play Radio with Vehicle Kit Album Artist Name Song Title...
-
Page 2: Table Of Contents
Vehicle Installation . . . . . . . . . . . . 12 Onyx Plus? . . . . . . . . . . . . . . . . . .83 Step 1: Choose a Location for Your Configuring Your Onyx Plus . - Page 3 Table of Contents FCC Statement . . . . . . . . . . . . . . .111 Copyrights and Trademarks . . . . 112 Owners Record .
-
Page 4: Compatibility
Compatibility The XDPIV2 Vehicle Dock included with your Onyx Plus is compatible with the AMPS dash and vent mounts included with your Onyx Plus, as well as the T-Slot dash and vent mounts (previously included with Onyx) . The AMPS mounting accessories are not compatible with the previous version of the Vehicle Dock, XDPIV1 . -
Page 5: Introduction
Introduction Features Thank you for purchasing the SiriusXM Onyx Plus with Vehicle Kit! SiriusXM Onyx Plus has these exciting features to enhance your overall experience: • Hear SiriusXM through your existing vehicle radio with easy, do-it- yourself installation . • Pause, rewind and replay up to 30 minutes of live satellite radio . -
Page 6: Safety And Care Information
Introduction Safety and Care Information IMPORTANT! Self installation instructions and tips are provided for your convenience . It is your responsibility to determine if you have the knowledge, skills, and physical ability required to properly perform an installation . SiriusXM shall have no liability for damage or injury resulting from the installation or use of any SiriusXM or third party products . - Page 7 Introduction Warning! • Opening the case may result in electric shock . • If the liquid crystal fluid comes in contact with your skin, wipe the skin area with a cloth and then wash the skin thoroughly with soap and running water .
-
Page 8: What's In The Box
Introduction What’s in the Box? menu alerts t-mix t-scn b / # Dash Mount PowerConnect™ Vehicle Dock Onyx Plus Radio Aux In Cable Vent Mount and Extended Vent Clamps Screws (4) Cable Routing Adapter PowerConnect Power Magnetic Mount Antenna & Dash Mount... -
Page 9: Onyx Plus Functions
Introduction Onyx Plus Functions Up and Down Buttons Left and Right Buttons Power/FM Button Press to preview and tune Press to search for Press to turn Radio on to channels through the channels by category . and off; Press and hold to channel lineup;... -
Page 10: Powerconnect Vehicle Dock
Introduction PowerConnect Vehicle Dock Color-Coded Connections The color-coded PowerConnect Vehicle Dock makes it simple to connect . Just match the colors on the cable ends to the colors on the dock to see what goes where . Rear View AUDIO ANT (Silver) PWR (Red) AUDIO (Green) - Page 11 Introduction Wire Guide The PowerConnect Vehicle Dock has a wire guide at the top rear that can help you to organize the cables and wires connected to the dock . If you need to bring a cable or wire from one side of the dock to the other, utilize the wire guide by looping the cable though the wire guide as shown .
-
Page 12: Vehicle Installation
. Several examples of Onyx Plus mounted in a vehicle are shown: A is the on dash method using the Adhesive Mount, and B is the vent clip method using the Vent Mount . - Page 13 Vehicle Installation Option 3 Option 4 Option 5 Option 6...
-
Page 14: Mount
1. Locate a flat surface for the Adhesive Mount . Make sure there is ample room for the PowerConnect Vehicle Dock and Onyx Plus Radio when installed . 2. Set the orientation of the Adhesive Mount before adhering it . Loosen the knob and adjust the adhesive foot for the location you selected in “Step 1: Choose a Location for Your Radio”... - Page 15 Vehicle Installation tighten the knob . Knob Adhesive Foot Dock Mounting Plate 4. Attach the Adhesive Mount to the PowerConnect Vehicle Dock using the 4 provided screws . 5. Before you attach the Adhesive Mount to the dash, skip ahead and finish the remainder of the vehicle installation so that the cables are attached to the dock .
- Page 16 1. Locate a vent with horizontal louvers sturdy Extended Vent Clamps enough to hold your PowerConnect Vehicle Dock and Onyx Plus Radio . 2. If the vent louvers in your vehicle are Short Vent recessed, you may need to use the longer Clamps vent clamps with the Vent Mount .
- Page 17 Vehicle Installation 3. Attach the Vent Mount to the PowerConnect Vehicle Dock using the 4 provided screws . 4. Before you attach the Vent Mount to the vent, skip ahead and finish the remainder of the vehicle installation so that the cables are attached to the dock .
- Page 18 Vehicle Installation Step 3: Mount the Magnetic Mount Antenna Mount the Magnetic Mount Antenna on the outside of your vehicle, on a horizontal surface that will always face the sky . The antenna contains a strong magnet which will stick to any metal part of your vehicle, but will not damage the vehicle .
- Page 19 Vehicle Installation SUV: We recommend mounting the antenna at the rear of the roof as shown . Convertible: We recommend mounting the antenna at the leading edge of the trunk as shown . Pickup Truck: We recommend mounting the antenna just above the front windshield as shown .
-
Page 20: Adapter
Vehicle Installation 3 If you are installing the antenna at the roof edge, or hood edge, install the Cable Routing Adapter to direct the antenna cable downward . Without Cable With Cable Routing Adapter Routing Adapter Installed Installed Cable Routing Adapter orientation Place the antenna Slide the Cable Routing...
Need help?
Do you have a question about the Onyx Plus and is the answer not in the manual?
Questions and answers