Table of Contents
Advertisement
Advertisement
Table of Contents

Related Manuals for transnorm TS 1600-105FH2


Summary of Contents for transnorm TS 1600-105FH2
- Page 1 TS 1600-105FH2 Curve belt conveyor Operating instructions...
- Page 2 Fax +49 (0) 5127 4400 info@transnorm.de http://www.transnorm.com Documentation Operating instructions - TRANSLATION - Version 5.3 ENG, 16.02.2017 Subject to technical alteration. All rights reserved by TRANSNORM SYSTEM GmbH. Reprint and duplications only with written approval. Revision V 3.0 Initial version V 3.1 EC declaration of conformity updated V 3.2...
-
Page 3: Table Of Contents
Contents Contents Applicable documents ........................ 7 EC Declaration of Incorporation ......................7 Introduction ............................ 9 Purpose of the document ........................9 Validity ............................9 Illustrations ............................. 9 Using the instructions ......................... 10 Safety instructions ..........................11 Copyright Protection ........................... 12 Service .............................. - Page 4 Transportation with industrial truck or crane ..................38 TS 1600-105FH2 up to 45° ......................38 TS 1600-105FH2 45° up to 90° ....................39 TS 1600-105FH2 more than 90° ....................40 Final assembly on site ........................41 ...
- Page 5 Contents Decommissioning and waste disposal ................111 Machine disposal ..........................111 Main components of the machine ..................... 112 Contact details ........................... 113 Head office ............................113 Subsidiaries, branch offices and sales partners worldwide .............. 114 Service branches - Germany ......................116 Suggestions and information ......................116...
- Page 6 Contents Operating instructions: Curve belt conveyor TS 1600-105FH2 Version 5.3 ENG, 16.02.2017...
-
Page 7: Applicable Documents
Applicable documents EC Declaration of Incorporation Applicable documents EC Declaration of Incorporation... - Page 8 Applicable documents EC Declaration of Incorporation Operating instructions: Curve belt conveyor TS 1600-105FH2 Version 5.3 ENG, 16.02.2017...
-
Page 9: Introduction
Introduction Purpose of the document Introduction Purpose of the document These operating instructions enable you to safely operate the delivered machine, defined as partly completed machinery by the EC Machinery Direc- tive, in accordance with its intended use. Read through these instructions carefully before commissioning the machine. -
Page 10: Using The Instructions
This is a measure to solve the problem. You have completed a series of actions. You have completed the entire activity. This is a notice. Notices provide additional information. Operating instructions: Curve belt conveyor TS 1600-105FH2 Version 5.3ENG, 16.02.2017... -
Page 11: Safety Instructions
Introduction Safety instructions Safety instructions Safety instructions warn of risks and remaining risks and offer information on how to prevent them. The signal words CAUTION, WARNING and DANGER indicate the level of severity of the risk. The following overview explains the safety instructions used in this docu- ment. -
Page 12: Copyright Protection
This publication must be treated as strictly confidential. It is intended only for internal use by an authorised group of persons. and must not be disclosed to third parties without the written approval of TRANSNORM SYSTEM GmbH. All documents are protected within the meaning of the Copyright Protection Act. -
Page 13: Warranty
We expressly point out that only original spare parts and accessories approved by TRANSNORM SYSTEM GmbH may be used. Unless otherwise stipulated in the contract, the warranty period begins on the day of delivery or with notification of readiness to deliver. - Page 14 Introduction Warranty Operating instructions: Curve belt conveyor TS 1600-105FH2 Version 5.3ENG, 16.02.2017...
-
Page 15: Safety
Safety Operating conditions Safety Operating conditions The conveyor, subsequently referred to as the machine, is an incomplete machine as defined by the EC Machinery Directive. The machine has been designed according to the state of the art. Nevertheless, there may be dangers arising from the machine under the following circumstances: ... -
Page 16: Impermissible Operating Conditions
Provide instructions for procedures and behaviour in the case of distur- bances. Clarify questions regarding occupational health and safety and protection of the environment. Operating instructions: Curve belt conveyor TS 1600-105FH2 Version 5.3 ENG, 16.02.2017... - Page 17 Safety Operating conditions Fault-free operation of the machine Implement the following measures to ensure trouble-free operation of the machine: Always keep the complete operating instructions legible, handy and close to the machine so that it is available to personnel at all times. ...
-
Page 18: Safety Equipment
For data regarding inspection intervals please see the maintenance plan. Overview of safety equipment Safety equipment on the TS 1600-105FH2 curve belt conveyor Item Description Finger guard... -
Page 19: Staff Qualifications
Safety Staff qualifications Safety equipment on side guides Safety equipment on the TS 1600-105FH2 curve belt conveyor Item Description finger guard, side guide finger guard, side guide Staff qualifications Assembly, maintenance and repair works as well as the commissioning demand special knowledge and qualifications of the staff involved. - Page 20 Electrical technician. Or: Instruction. The work may be carried components out under the supervision of an electrical technician in accord- ance with the rules and regulations for electrical engineering Operating instructions: Curve belt conveyor TS 1600-105FH2 Version 5.3 ENG, 16.02.2017...
-
Page 21: Remaining Risks Regarding The Machine
Safety Remaining risks regarding the machine Remaining risks regarding the machine The machine's protective devices offer protection against injury. However, for some special tasks it is unavoidable to enter the danger zone. Therefore, an element of risk always remains. Remaining risks for operating personnel The following table will enable the operating personnel to detect and avoid fundamental dangers and hazards. -
Page 22: Remaining Risks For Technical Personnel
Secure the machine and hoists to prevent slipping Read chapter "Transport and installation" and carefully observe the instructions For conveying systems ceiling suspension: Observe the assembly instructions of the suspensions Operating instructions: Curve belt conveyor TS 1600-105FH2 Version 5.3 ENG, 16.02.2017... - Page 23 Safety Remaining risks regarding the machine Measures for technical personnel to avert risk and prevent damage Danger Cause Measure Risk of Sharp-edged During maintenance / repair work: injury machine parts Be alert and proceed with caution Avoid hectic movements ...
- Page 24 Leaking operating During disposal: the environ- fluids Collect operating fluids in suitable ment containers. Dispose of waste oil, lubricating grease, cleaning agents containing solvents and similar products correctly Operating instructions: Curve belt conveyor TS 1600-105FH2 Version 5.3 ENG, 16.02.2017...
-
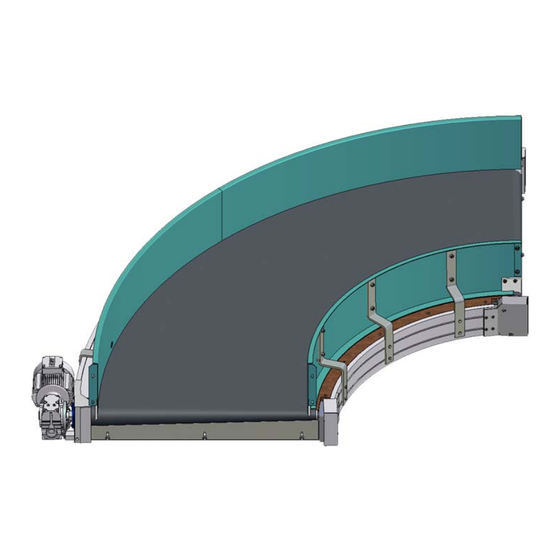
Page 25: Description
The TS 1600-105FH2 has been optimised especially for flight baggage conveyor systems. Being the key component of the innovative curve family TS 1600, the TS 1600-105FH2 with a load capacity of up to 120 kg offers a wide operating spectrum for the internal transportation of packed and unpacked unit loads. -
Page 26: Main Dimensions
Conveying angle / nominal angle Nominal radius / inside radius Nominal width Conveying height BFLI Nominal width Different supports or suspensions than shown may be mounted (check service specifications). Operating instructions: Curve belt conveyor TS 1600-105FH2 Version 5.3 ENG, 16.02.2017... -
Page 27: Technical Data
For the technical data regarding your specific machine, please refer to the service specifications of your order confirmation. The following refers to the general technical data of preference items. Mechanical Data TS 1600-105FH2 Curve belt conveyor Name Data Design versions... - Page 28 Other data Name Data Year of construction see production identification tag Noise emission Sound pressure level measured in accordance with DIN EN 13023:2003-03 below 77 dB(A). Operating instructions: Curve belt conveyor TS 1600-105FH2 Version 5.3 ENG, 16.02.2017...
-
Page 29: Machine Areas
Description Machine areas Machine areas The conveyor consists of the following areas: Curve belt conveyor TS 1600-105FH2 Design: bevel wheel gear motor, design M1, position outside left Picture illustration Name Tail pulley Support Conveyor track gear motor... -
Page 30: Machine Parts
Lower conveyor track cover Belt edge holder, top Covers, bearing block Belt edge holder, bottom Bearing block, outside Finger guard plate, drive side Conveyor belt Support Tail pulley Basic frame Operating instructions: Curve belt conveyor TS 1600-105FH2 Version 5.3 ENG, 16.02.2017... -
Page 31: Optional Machine Equipment
Description Optional machine equipment Optional machine equipment In the following you will find an example for both a baggage and a tube guid- ance. Side guides: left baggage guidance, right tube guidance... - Page 32 Description Optional machine equipment Operating instructions: Curve belt conveyor TS 1600-105FH2 Version 5.3 ENG, 16.02.2017...
-
Page 33: Transportation And Erection
Transportation and erection Delivery of the machine Transportation and erection Delivery of the machine Conveyors up to a length of approx. 3 m are completely assembled at the factory and are delivered with preadjustments. Longer conveyors are usually delivered in part elements. The individual parts are marked with labels on the section points. -
Page 34: Disposing Of Packaging Material
The machine is not explosion-protected. Do not operate the conveyor in potentially explosive atmospheres. DANGER The required space for operation and maintenance depends on the indi- vidual requirements. Operating instructions: Curve belt conveyor TS 1600-105FH2 Version 5.3 ENG, 16.02.2017... -
Page 35: Transport Within The Company
Transportation and erection Transport within the company The place of installation must fulfil the following conditions: normal atmosphere (not containing oil or gas, no corrosive components) Ambient air temperature +5 °C to +40 °C, temporarily to +50 °C (max. -
Page 36: Auxiliary Equipment
La max. = 4,000 mm La min. = 2,000 mm Lb max. = 2,000 mm Lb min. = 1,000 mm Round slings, safe working load 1,000 kg U min = 3 m Operating instructions: Curve belt conveyor TS 1600-105FH2 Version 5.3 ENG, 16.02.2017... - Page 37 Transportation and erection Transport within the company Required auxiliary equipment Hoisting chain 8x24 with shortening claw, safe working load 2,500 kg L min = 2 m Round sling hook, safe working load 1,000 kg L = 84 mm A = 24 mm D = 35 mm F = 17 mm G = 20 mm...
-
Page 38: Transportation With Industrial Truck Or Crane
Transportation with industrial truck or crane TS 1600-105FH2 up to 45° Required auxiliary equipment: 1x lift truck cross beam 3x round sling / hoisting chain 3x chain shackle 3x transportation plate (E2009698) Operating instructions: Curve belt conveyor TS 1600-105FH2 Version 5.3 ENG, 16.02.2017... -
Page 39: Ts 1600-105Fh2 45° Up To 90
Transportation and erection Transportation with industrial truck or crane TS 1600-105FH2 45° up to 90° Necessary auxiliary equipment: 1x adjustable cross beam or 4x lift truck hooks 4x round sling / hoisting chain 4x chain shackle 4x transportation plate (E2009698) -
Page 40: Ts 1600-105Fh2 More Than 90
TS 1600-105FH2 more than 90° Necessary auxiliary equipment: 1x cross beam, adjustable on two sides or 4x lift truck hooks 4x round sling / hoisting chain 4x chain shackle 4x transportation plate (E2009698) Operating instructions: Curve belt conveyor TS 1600-105FH2 Version 5.3 ENG, 16.02.2017... -
Page 41: Final Assembly On Site
Transportation and erection Final assembly on site Final assembly on site We recommend to have the assembly carried out by TRANSNORM SYSTEM GmbH. Alternatively, final installation could be carried out under the supervision of or after instruction by TRANSNORM SYSTEM GmbH. -
Page 42: Carrying Out Installation
Attach the supports or suspensions to the framework of the basic frame using the joining elements (1) provided. Loosen off the fixing screws (2) and adjust the angle of inclination. Operating instructions: Curve belt conveyor TS 1600-105FH2 Version 5.3 ENG, 16.02.2017... - Page 43 Curve belt conveyors are almost always delivered in one piece. Curve conveyors delivered in multipart require assembly works carried out by TRANSNORM SYSTEM GmbH. Do not mount these machines yourself. Is the conveyor on optimal setting? The standard curve belt conveyor is delivered with a drawn-in endless conveyor belt.
- Page 44 Manually check the transfer accuracy at the front and back of the machine. Use loads according to specifications to carry out this check. The machine has been aligned. The machine has been installed and aligned. Operating instructions: Curve belt conveyor TS 1600-105FH2 Version 5.3 ENG, 16.02.2017...
-
Page 45: Mount Side Guides
Transportation and erection Final assembly on site Mount side guides It depends on the scope of delivery whether your conveyor is delivered with side guides. See performance specifications for this information. Carry out the following procedures: Mount side guides. If necessary, mount photoelectric sensor supports in such a way that it becomes impossible to reach into the conveyed loads flow. -
Page 46: Electrical Connection
This is included in the motor delivery (see interior of the terminal box cover). If this wiring diagram is missing, the motor must not be connected. The machine has been connected. Operating instructions: Curve belt conveyor TS 1600-105FH2 Version 5.3 ENG, 16.02.2017... -
Page 47: Operation
Operation Commissioning Operation Commissioning Essentially the same procedure is carried out for commissioning and start-up after maintenance. The daily start-up process via the control unit of the overall conveyor system is described in the system documentation or in the control documentation. The machine is designed for the following electrical connection data: ... - Page 48 Ask a second person to supervise. Carry out the following procedures: Briefly switch on the machine. Check the correct direction of rotation. Switch off machine. Direction of rotation has been checked. Machine running. Operating instructions: Curve belt conveyor TS 1600-105FH2 Version 5.3 ENG, 16.02.2017...
- Page 49 Operation Commissioning and start-up after service and maintenance works Carry out test run Risk of injury - exposed machine parts! Parts of the body, hair and clothing can become caught in rotating machine parts and crushed. WARNING Wear close-fitting protective clothing. ...
-
Page 50: Normal Operation
Carry out the following procedures: Turn-off the main switch for the power supply according to the control unit documentation. Secure against accidental switch-on. The machine has been decommissioned. Operating instructions: Curve belt conveyor TS 1600-105FH2 Version 5.3 ENG, 16.02.2017... -
Page 51: Maintenance And Care
Upon your request we will provide an optimised maintenance contract based on your individual requirements. To guarantee safe operation of the machine, we recommend that you to make use of our TRANSNORM SYSTEM Service at least once a year. -
Page 52: Lubricants
Clean belt. Visual inspection: Are the belt edges or the surface damaged? If so, replace belt. Is the belt bulging up? If so, correct belt tension and adjustment. Operating instructions: Curve belt conveyor TS 1600-105FH2 Version 5.3 ENG, 16.02.2017... - Page 53 Maintenance and care Maintenance plan Maintenance schedule (cont'd.) Interval Assembly group Maintenance works / controls Depending Gear motor Gear: on the indi- Are there any oil marks under the gear? If Regard operating vidual case so, seal the leakage and optimise the oil instructions of manu- level.
-
Page 54: Cleaning And Care
Clean the machine regularly and appropriately for the degree of soiling. It may only be cleaned dry (with a brush, cloth, compressed air, etc.). Make sure the machine and especially the electrical components are protected from wetness. Operating instructions: Curve belt conveyor TS 1600-105FH2 Version 5.3 ENG, 16.02.2017... -
Page 55: Repairs
Spare part purchasing Repairs Spare part purchasing Only genuine TRANSNORM SYSTEM GmbH spare parts may be used. DIN- parts may be ordered from specialised trade. When making inquiries or placing orders, we recommend that you send a copy of the spare parts list to our customer service department, stating the type and amount of parts required. -
Page 56: Tightening Torques
Tightening torque Bush no. 1008 1310 1210 1610 2012 2517 1108 1315 1215 1615 2017 2525 Tightening torque [Nm] Check the tightening torques after 1 hour of operation. Operating instructions: Curve belt conveyor TS 1600-105FH2 Version 5.3 ENG, 16.02.2017... -
Page 57: Guards
TRANSNORM provides captive fasteners for protective devices if the oper- ating company needs to demount a safety device from a machine. This is necessary for maintenance and cleaning. -
Page 58: Replacing A Side Guide
Carry out the following procedures: Mark position of the supports (1) on the frame (2). Remove joining elements (3). Demount baggage guidance. Place baggage guidance on suitable underlay. Baggage guidance is demounted. Operating instructions: Curve belt conveyor TS 1600-105FH2 Version 5.3 ENG, 16.02.2017... - Page 59 Repairs Replacing a side guide Mount the baggage Carry out the following procedures: guidance Position baggage guidance on frame (2). Tighten joining elements (3) by hand. Position holder (1) on marking. Check the distance between side guide and bed ( 5 - 8 mm). Tighten joining elements (3).
- Page 60 Position tube guidance on frame (2). Tighten joining elements (3) by hand. Position holder (1) on marking. Tighten joining elements (3). Tube guidance is mounted. Side guide has been exchanged. Operating instructions: Curve belt conveyor TS 1600-105FH2 Version 5.3 ENG, 16.02.2017...
-
Page 61: Belt Exchange, Standard
Repairs Belt exchange, standard Belt exchange, standard The patented belt guidance, consisting of a belt edge worked into the outer edge and precision ball bearings at an angle to the edge, guarantees a very low noise level and a long service life. The divided belt edge holders guar- antee a very quick belt exchange. - Page 62 Demount the bed Carry out the following procedures: Remove joining elements (1) of bed. Remove bed (2) in the direction of the outside radius. Bed has been demounted. Operating instructions: Curve belt conveyor TS 1600-105FH2 Version 5.3 ENG, 16.02.2017...
- Page 63 Repairs Belt exchange, standard Demount the upper Carry out the following procedures: belt edge holder parts of lower run Turn locking lever to „open“. Remove upper parts of belt edge holders (1). Upper belt edge holder parts in the lower run are demounted. ...
- Page 64 Belt has been inserted. Mount the upper belt Carry out the following procedures: edge holder parts of lower run Insert upper parts of belt edge holders (1). Operating instructions: Curve belt conveyor TS 1600-105FH2 Version 5.3 ENG, 16.02.2017...
- Page 65 Repairs Belt exchange, standard Check belt edge nose for correct position between ball bearings inside the holders. Turn locking lever to „close“. Upper belt edge holder parts in the lower run are mounted. Fasten the drive- and Carry out the following procedures: tail pulley Slide pulley bearing (2) onto pulley journal.
- Page 66 Carry out the following procedures: edge holder parts of upper run Insert upper parts of belt edge holders (1). Check belt edge nose for correct position between ball bearings inside the holders. Operating instructions: Curve belt conveyor TS 1600-105FH2 Version 5.3 ENG, 16.02.2017...
- Page 67 Repairs Belt exchange, standard Turn locking lever to „close“. Upper belt edge holder parts in the upper run are mounted. Fasten the gear Carry out the following procedures: motor with drive outside Carry out procedures as described under „mount gear motor“. ...
- Page 68 Mount the side guide Carry out procedure as described under "Mount baggage guidance“ or "Mount tube guiding.“ Side guide is fitted. The conveyor belt is replaced. Operating instructions: Curve belt conveyor TS 1600-105FH2 Version 5.3 ENG, 16.02.2017...
-
Page 69: Belt Exchange, Alternative
Repairs Belt exchange, alternative Belt exchange, alternative In case of restricted work space, use suspension or multiple support. Precondition: Machine has been taken out of operation. Machine has been secured against accidental switch-on. Side guide is demounted. ... - Page 70 Demount the bed Carry out the following procedures: Remove joining elements (1) of bed. Remove bed (2) in the direction of the outside radius. Bed has been demounted. Operating instructions: Curve belt conveyor TS 1600-105FH2 Version 5.3 ENG, 16.02.2017...
- Page 71 Repairs Belt exchange, alternative Demount the upper Carry out the following procedures: belt edge holder parts of lower run Turn locking lever to „open“. Remove upper parts of belt edge holders (1). Upper belt edge holder parts in the lower run are demounted. ...
- Page 72 Loosen off grub screws of flange bearing (6). Pull the pulley bearing (7) off the shaft journal. Pull out the drive pulley (tail pulley) (8). Drive pulley has been removed. Operating instructions: Curve belt conveyor TS 1600-105FH2 Version 5.3 ENG, 16.02.2017...
- Page 73 Repairs Belt exchange, alternative Remove the belt Carry out the following procedures: Release grub screws of the pedestal bearing (1). Loosen off joining elements (3). Lift pulley bearing (2) and pull off from pulley journal. Lift drive pulley (drive pulley) and remove belt (4). ...
- Page 74 Check belt edge nose for correct position between ball bearings inside the holders. Turn locking lever to „close“. Upper belt edge holder parts in the lower run are mounted. Operating instructions: Curve belt conveyor TS 1600-105FH2 Version 5.3 ENG, 16.02.2017...
- Page 75 Repairs Belt exchange, alternative Fit the bed Carry out the following procedures: Insert beading (2). Fasten beading with joining elements (1). Bed has been fitted. Mount the upper belt Carry out the following procedures: edge holder parts of upper run Insert upper parts of belt edge holders (1).
- Page 76 Mount covers (6) and (4) with finger guard (5). Align finger guard (5) and fasten. Align and fasten finger plate (3), clearance <=5 mm. Mount angled finger guard (2). Operating instructions: Curve belt conveyor TS 1600-105FH2 Version 5.3 ENG, 16.02.2017...
-
Page 77: Tensioning/Adjusting Belt
Repairs Tensioning/adjusting belt Mount cover (1). Covers are mounted. Carry out the following procedures: Mount the side guide Carry out procedure as described under "Mount baggage guidance“ or "Mount tube guiding.“ Side guide is mounted. The conveyor belt is replaced. - Page 78 Parts of the body, hair and clothing can become caught in rotating machine parts and crushed. WARNING Wear close-fitting protective clothing. Wear a hairnet to cover long hair. Carry out the following procedures: Loosen joining elements (1), outside only. Operating instructions: Curve belt conveyor TS 1600-105FH2 Version 5.3 ENG, 16.02.2017...
- Page 79 Repairs Tensioning/adjusting belt Tension and adjust the belt by turning the tension screws on the side of turning unit. First on the outside, then on the inside. The belt will have a delayed response to the adjustment. Therefore, only adjust tension screws slightly.
- Page 80 Align and fasten finger plate (2), clearance <=5 mm. Mount covers (5) and (3) with finger guard (4). Align finger guard (4) and fasten. Covers are mounted. Belt has been tightened and adjusted. Operating instructions: Curve belt conveyor TS 1600-105FH2 Version 5.3 ENG, 16.02.2017...
-
Page 81: Replacing The Gear Motor
Repairs Replacing the gear motor Replacing the gear motor Shaft-mounted bevel wheel gear For some maintenance and repair works the gear motor must be demounted but not exchanged. When replacing the gear motor, obtain the new gear motor according to the spare parts list and prepare it according to the manu- facturer's specifications. - Page 82 Carry out the following procedures: Apply assembly paste to the pulley journal. Assembly to be carried out in reverse order. Gear motor has been mounted. Gear motor has been replaced. Operating instructions: Curve belt conveyor TS 1600-105FH2 Version 5.3 ENG, 16.02.2017...
-
Page 83: Shaft-Mounted Worm Gear
Repairs Replacing the gear motor Shaft-mounted worm gear For some maintenance and repair works the gear motor must be demounted but not exchanged. When replacing the gear motor, obtain the new gear motor according to the spare parts list and prepare it according to the manu- facturer's specifications. - Page 84 Carry out the following procedures: Apply assembly paste to the pulley journal. Assembly to be carried out in reverse order. Gear motor has been mounted. Gear motor has been replaced. Operating instructions: Curve belt conveyor TS 1600-105FH2 Version 5.3 ENG, 16.02.2017...
-
Page 85: Shaft-Mounted Bevel Wheel Gear
Repairs Replacing the gear motor Shaft-mounted bevel wheel gear For some maintenance and repair works the gear motor must be demounted but not exchanged. When replacing the gear motor, obtain the new gear motor according to the spare parts list and prepare it according to the manu- facturer's specifications. - Page 86 Carry out the following procedures: Apply assembly paste to the pulley journal. Assembly to be carried out in reverse order. Gear motor has been mounted. Gear motor has been replaced. Operating instructions: Curve belt conveyor TS 1600-105FH2 Version 5.3 ENG, 16.02.2017...
-
Page 87: In Case Of Chain Drive / Toothed Belt Drive
Repairs Replacing the gear motor In case of chain drive / toothed belt drive For some maintenance and repair works the gear motor must be demounted but not exchanged. When replacing the gear motor, obtain the new gear motor according to the spare parts list and prepare it according to the manu- facturer's specifications. - Page 88 Installation is carried out in reverse order. Align and tighten chain drive / toothed belt drive. Gear motor has been mounted. Gear motor has been replaced. Operating instructions: Curve belt conveyor TS 1600-105FH2 Version 5.3 ENG, 16.02.2017...
-
Page 89: Replace Chain Drive / Toothed Belt Drive
Repairs Replace chain drive / toothed belt drive Replace chain drive / toothed belt drive Precondition: Machine has been taken out of operation. Machine has been secured against accidental switch-on. Motor has cooled down. Demount the chain Carry out the following procedures: drive / toothed belt drive... -
Page 90: Replacement Of Flange/Pedestal Bearing
Gear motor is demounted. Demount the flange Carry out the following procedures: bearing, outside Move cover (1). loosen grub screw of flange bearing. Move off joining element (2). Operating instructions: Curve belt conveyor TS 1600-105FH2 Version 5.3 ENG, 16.02.2017... - Page 91 Repairs Replacement of flange/pedestal bearing Slip off flange bearing (3). Flange bearing outside is demounted. Mount the flange Carry out the following procedures: bearing, outside Slide on flange bearing (3) onto pulley journal. Align flange bearing and pulley. Fasten flange bearing with joining elements (2).
- Page 92 Pedestal bearing inside is mounted. Mount the gear Carry out the following procedures: motor where appli- cable Proceed as described under "Mounting the gear motor". Gear motor has been mounted. Operating instructions: Curve belt conveyor TS 1600-105FH2 Version 5.3 ENG, 16.02.2017...
-
Page 93: Replacing Drive Pulley
Repairs Replacing drive pulley Tighten / adjust the Carry out the following procedures: belt Proceed as described under "Tightening / adjusting the belt" Belt has been tightened and adjusted. Flange bearing has been replaced. Replacing drive pulley Precondition: ... - Page 94 Release the bed on Carry out the following procedures: the drive side Move off joining elements. If the beading is divided then only on driving side. Bed is released. Operating instructions: Curve belt conveyor TS 1600-105FH2 Version 5.3 ENG, 16.02.2017...
- Page 95 Repairs Replacing drive pulley Demount the pulley Carry out the following procedures: bearing inside loosen grub screws of pedestal bearing. Remove the fasteners (1). Lift pulley bearing (2), turn it and pull it off the pulley journal. Pulley bearing inside is demounted. ...
- Page 96 Slide pulley bearing (2) onto pulley journal. Align drive pulley and mount joining elements (1). Tighten grub screws of pedestal bearing. Pulley bearing inside is mounted. Operating instructions: Curve belt conveyor TS 1600-105FH2 Version 5.3 ENG, 16.02.2017...
- Page 97 Repairs Replacing drive pulley Attach the bed on Carry out the following procedures: the drive side Tighten joining elements. If the beading is divided then only on driving side. Beading is fastened. Mount the upper belt Carry out the following procedures: edge holder parts on the drive side.
- Page 98 Gear motor has been mounted. Tension the belt / Carry out the following procedures: adjust Proceed as described under "Tightening / adjusting the belt" Belt is tensioned and adjusted. Operating instructions: Curve belt conveyor TS 1600-105FH2 Version 5.3 ENG, 16.02.2017...
- Page 99 Repairs Replacing drive pulley Mount the covers Carry out the following procedures: Mount covers (6) and (4) with finger guard (5). Align finger guard (5) and fasten. Align and fasten finger plate (3), clearance <=5 mm. Mount angled finger guard (2). Mount cover (1).
-
Page 100: Replacing Tail Pulley
Loosen off finger guard plate (3) on tail pulley side. Remove cover (4) with finger guard (5) on tail pulley side. Remove cover (6) on tail pulley side. Covers have been demounted. Operating instructions: Curve belt conveyor TS 1600-105FH2 Version 5.3 ENG, 16.02.2017... - Page 101 Repairs Replacing tail pulley Demount the upper Carry out the following procedures: belt edge holder parts on tail pulley Turn locking lever to „open“. side Pull off the upper belt edge holder parts (1) in the area of the bed. ...
- Page 102 Use hoists to raise and lower the pulley. Carry out the following procedures: Move cover (1). Loosen grub screws (2). Slide out tail pulley (3). Tail pulley has been removed. Operating instructions: Curve belt conveyor TS 1600-105FH2 Version 5.3 ENG, 16.02.2017...
- Page 103 Repairs Replacing tail pulley Slide in the tail pulley Increased risk of accident! Pulley can tilt and crush body parts. Secure the pulley to prevent it falling. WARNING Use hoists to raise and lower the pulley. Carry out the following procedures: Slide new tail pulley (3) into belt loops and flange bearing.
- Page 104 Insert upper parts of belt edge holders (1). side. Check belt edge nose for correct position between ball bearings inside the holders. Operating instructions: Curve belt conveyor TS 1600-105FH2 Version 5.3 ENG, 16.02.2017...
- Page 105 Repairs Replacing tail pulley Turn locking lever to „close“. Upper belt edge holder parts are mounted. Tighten / adjust the Carry out the following procedures: belt Proceed as described under "Tightening / adjusting the belt" Belt has been tightened and adjusted. ...
-
Page 106: Replace Belt Edge Holders
Demount upper parts of belt edge holders (1). Remove joining elements (2). Take out lower parts of belt edge holders (3) from upper run and (4) lower run. Belt edge holders are demounted. Operating instructions: Curve belt conveyor TS 1600-105FH2 Version 5.3 ENG, 16.02.2017... - Page 107 Repairs Replace belt edge holders Mount the belt edge Carry out the following procedures: holders Align lower parts of belt edge holders (3) in upper run and (4) lower run. Tighten joining elements (2). Mount upper parts of belt edges later. ...
- Page 108 Repairs Replace belt edge holders Operating instructions: Curve belt conveyor TS 1600-105FH2 Version 5.3 ENG, 16.02.2017...
-
Page 109: Fault Clearance
Fault clearance What to do if... Fault clearance This section informs you what to do if a malfunction occurs. A disturbance can have various different causes. For instructions on the respective fault clearances that may be carried out by technical personnel as defined under "Personnel qualification", please refer to the section "Fault clearance". -
Page 110: Motor And Gear
Should the drive motor have a disturbance, please refer to the operating instructions of the motor for information on fault clearance. The operating instructions of the motor are part of the installation. Operating instructions: Curve belt conveyor TS 1600-105FH2 Version 5.3 ENG, 16.02.2017... -
Page 111: Decommissioning And Waste Disposal
Decommissioning and waste disposal Machine disposal Decommissioning and waste disposal Machine disposal Please comply with local regulations on waste disposal when disposing of the entire machine or parts of it. The regulations will tell you if the machine has to be dismantled for disposal, and to what extent, and how the individual components can be supplied for recycling. -
Page 112: Main Components Of The Machine
Drive belt, conveyor belt Polyurethane (PUR) Polyvinyl chloride (PVC) Conveyor roller Plastic Steel Gear motor Cast iron Copper Steel Base frame, support Aluminium Steel Pulley Steel Polyurethane (PUR) coated steel Operating instructions: Curve belt conveyor TS 1600-105FH2 Version 5.3ENG, 16.02.2017... -
Page 113: Contact Details
If this information does not solve your problem, please contact TRANS- NORM SYSTEM GmbH. Head office Germany TRANSNORM SYSTEM GmbH Förster Str. 2 D-31177 Harsum Tel.: +49 (0) 5127 4020 Fax: +49 (0) 5127 4400 E-mail: info@transnorm.de... -
Page 114: Subsidiaries, Branch Offices And Sales Partners Worldwide
China TRANSNORM SYSTEM (SHANGHAI) CO., Ltd. Shangcheng RD 738 Room 1004 2001120 Shanghai, China Tel.: +86 (021) 61 62 55 60 Fax: +86 (021) 61 62 55 63 E-mail: sales@transnorm.asia Operating instructions: Curve belt conveyor TS 1600-105FH2 Version 5.3ENG, 16.02.2017... - Page 115 Contact details Subsidiaries, branch offices and sales partners worldwide Branches Netherlands France TRANSNORM SYSTEM GmbH TRANSNORM SYSTEM GmbH Sales Unit Benelux Bureau France Bâtiment B - Paris Nord 2 Grachtweg 23B 69, Rue de la Belle Etoile 4301 KJ Zierikzee 95940 Roissy Charles de Gaulle Cedex Tel.: +31 (0) 1 11 41 00 90...
-
Page 116: Service Branches - Germany
Fax: 0 21 73 / 93 82 76 Fax: 0 71 43 / 96 58 51 Suggestions and information ...on this documentation or the machine should be sent to the first address listed above. Operating instructions: Curve belt conveyor TS 1600-105FH2 Version 5.3ENG, 16.02.2017...
Need help?
Do you have a question about the TS 1600-105FH2 and is the answer not in the manual?
Questions and answers